
The official launch of iOS 9 is on the horizon, which makes it a great time to ensure your Xamarin.iOS app is ready to take advantage of all of the upcoming features. One that I’m excited about is the new and improved multi-tasking experience on the iPad. With iOS 9, it’s possible to run two apps side-by-side in a split view on the iPad. This means that your app can’t assume that it’s going to have the device’s full resources, or, more importantly, the entire screen. If you already use Auto Layouts for your apps, then you’re all set to take advantage of split view on the iPad, but if your app is using the older layout option of Autoresizing, you’ll want to transition to Auto Layouts as soon as possible to make sure you’re ready for the change.

Getting Started with Auto Layouts
Auto Layout for iOS is an extremely powerful layout system that allows you to create complex relationships between controls and how they should respond to changes in screen size or orientation. Let’s take a look at how you can take an existing Autoresizing layout and convert it to Auto Layout. Below is my simple iPad layout, which uses Autoresizing.
 This is how we want our app to look when Auto Layouts is switched on. To turn Auto Layouts on, we’ll first need to click on the canvas behind our view controllers. This will allow access to the Storyboard Document Inspector, as you can see in the right hand side of the above screenshot.
Select ‘Use Auto Layouts’. When you do this you’ll notice two extra buttons appear in the toolbar. These are adding and removing constraints from our controls. Now that Auto Layouts is enabled, we can begin to define our layout relationships between controls. We’ll begin with configuring the layout for the title. The key to successfully mastering Auto Layouts is understanding that you’re providing rules for width, height, and X and Y positions. If you don’t provide these four pieces of information per control, your layout won’t work. When you double click the ‘My Amazing App!’ label, you’ll see controls that look similar to “Ts” appear on the edges. 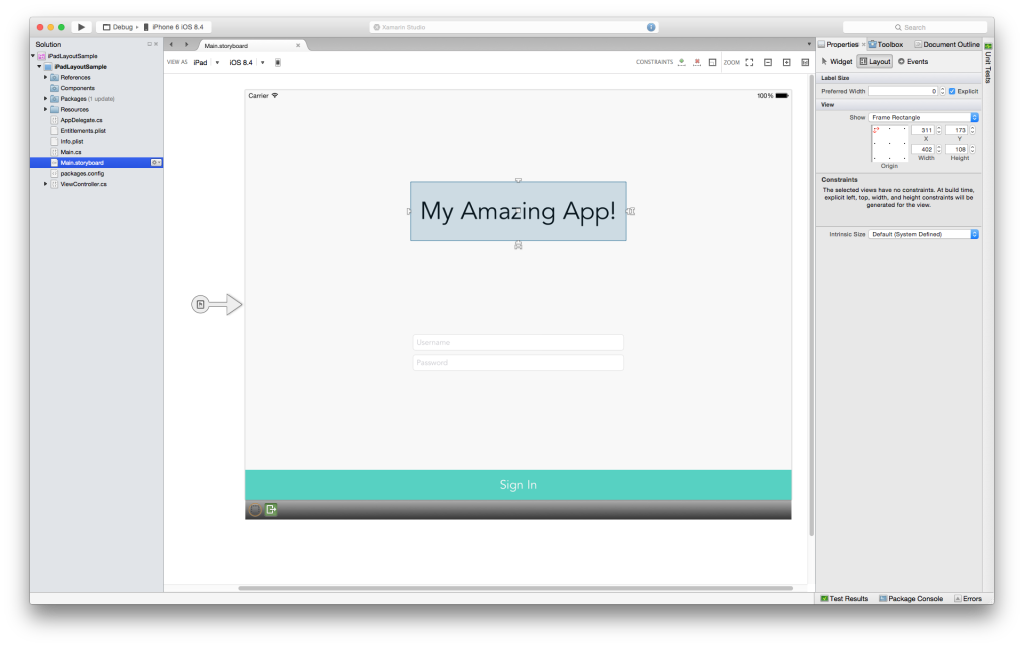
We can drag these controls to form connections. In the example below, I’m defining the Y-value of the control relationship to the top of the view controller.

Dragging the square in the center of the label allows us to set its X position as the middle of the view. I can click the control on the bottom and right of the Ts to fix the height and width of the label. If you’ve done this successfully, you’ll see the Auto Layout guides change from orange (to indicate an issue) to blue.

If you repeat the process for the bottom button by fixing the height and drawing lines to the left button and right edges, you should be able to rotate the UI and see both the label and the button resize correctly.

Finishing Up
Hopefully this post has demonstrated that using Auto Layouts is straight forward and not as complex as you might have initially thought. If you’re looking for advanced examples or more in-depth understanding of how to utilize Auto Layouts, make sure to check out our documentation.
Remember, its not long before iPad users will expect your app to work with Split View, so make sure you’re ready today!