
Creating mobile app prototypes is an important part of the design process. It’s extremely useful for developers and test users to be able to interact with a prototype in order to experience how the app will behave when it’s complete, but building prototypes can be daunting due to the large amount of time it takes. This is especially true when you’re asked to make prototypes for more than just one mobile platform, which happens more often than not. With Xamarin.Forms, though, it’s quick and easy to create user interfaces that are shared across Android, iOS, and Windows Phone.
Wireframes vs. Mockups vs. Prototypes
These terms often get used interchangeably in the mobile world. In order to understand why you might use Xamarin.Forms for prototyping, let’s go over the differences between these design terms.
Wireframes
Wireframes are a static, low-fidelity representation of design. They’re usually in black and white, with blue sometimes used to show links and/or buttons. Wireframes should be created before mockups or prototypes, since they’re the backbone of your mobile app’s design.
Bottom Line: Wireframes are quick to create and are typically used as documentation for your project.

Mockups
Mockups are a static, high-fidelity representation of designs. These full-color images should look almost exactly like the final product in terms of color, icons, buttons, etc. Mockups represent the structure of information and demonstrate the basic functionalities of your app in a static way.
Bottom Line: Mockups are quicker to create than prototypes and are great for gathering feedback on the design in its entirety.
Prototypes
Prototypes are a middle to high-fidelity representation of the final product that simulates user interaction. It’s more likely that your prototypes will be middle-fidelity, meaning they won’t have to be as accurate as mockups when it comes to the design of your app. Prototypes should allow testers to interact with the app in a way similar to the final product.
 Bottom Line: Prototypes are expensive to create but are good for allowing stakeholders to preview the mobile app in its entirety.
Xamarin.Forms for Prototyping
Prototyping can be expensive and time consuming, but Xamarin.Forms lets you create prototypes for all three platforms by writing code in XAML or C# just one time, greatly reducing this pain. Xamarin.Forms also allows you to put real apps onto real devices to show off your prototypes. It empowers you to rapidly create a prototype and then put your prototype onto iOS, Android, and Windows devices so that your client or stakeholder can experience the user interaction of your app. That’s a pretty powerful tool in the design and development process.
So… Let’s code!
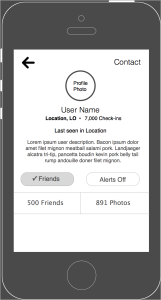
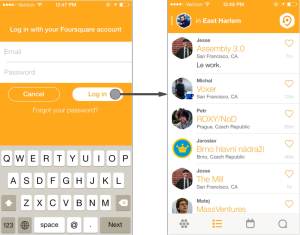
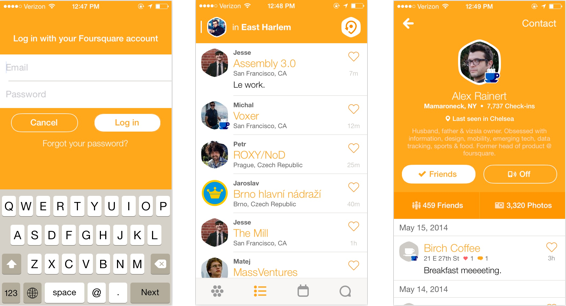
We are going to use the Swarm mobile app by Foursquare for our prototyping example. Here are a few screens that we should be able to easily create prototypes for:
Initial Setup
Create a new Xamarin.Forms app. I’m going to name mine “SwarmPrototype”. Now, add a new Forms ContentPage XAML file named “LoginPage”.
In your App.cs file, modify the existing App() method so that our LoginPage shows up as soon as the app starts. We will also wrap the LoginPage in a NavigationPage and change some navigation bar properties.
public App ()
{
   // The root page of your application
   MainPage = new NavigationPage(new LoginPage())
   {
      BarBackgroundColor = Color.Transparent,
      BarTextColor = Color.White
   };
}
This gives us a NavigationPage, which provides some simple navigation properties so we can easily move from screen to screen through our prototype. The navigation bar will have white text to represent the screenshots above.
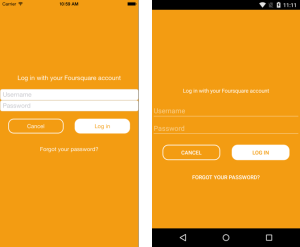
Login
Let’s head over to our LoginPage.xaml now. You can see it has automatically given us a content page in which we will need to add some content. First, add a StackLayout with 200 padding on top and an orange background.
<ContentPage.Content>
   <StackLayout
      Padding="0,200,0,0"
      BackgroundColor="#FFA733"
      VerticalOptions="FillAndExpand"
      Spacing="20">
   </StackLayout>
</ContentPage.Content>
Now, inside of our stacklayout, which is oriented vertically by default, we want to add a label, two entries, and three buttons. The label and the two entries will look like this:
<Label
   Text="Log in with your Foursquare account"
   TextColor="White"
   HorizontalOptions="Center"/>
<StackLayout
   HorizontalOptions="FillAndExpand"
   Spacing="0">
   <Entry
      Placeholder="Username"/>
   <Entry
      Placeholder="Password"/>
</StackLayout>
As you can see, we have a label and then two entries inside of another stacklayout. The reason I put those two entries inside of a new stacklayout is so that I could make sure the Spacing=”20″ in our main stacklayout didn’t apply to those elements. Here’s the rest of the XAML for the LoginPage:
<StackLayout
   Orientation="Horizontal"
   HorizontalOptions="CenterAndExpand"
   Spacing="30">
   <Button
      x:Name="buttonCancel"
      Text="Cancel"
      TextColor="White"
      BackgroundColor="#FFA733"
      BorderRadius="15"
      BorderColor="White"
      BorderWidth="2"
      HeightRequest="40"
      WidthRequest="150"/>
   <Button
      x:Name="buttonLogin"
      Text="Log in"
      TextColor="#FFA733"
      BackgroundColor="White"
      BorderRadius="15"
      HeightRequest="40"
      WidthRequest="150"/>
</StackLayout>
<Button
   x:Name="buttonForgot"
   Text="Forgot your password?"
   TextColor="White"
   BackgroundColor="Transparent"/>
One Last Thing
Now we have a static login page, which is a great start, but prototypes are meant to be interactive; we want the app to navigate when the user clicks the “Log in” button. In the LoginPage.xaml.cs file, we’re going to add an event handler for that button as well as a line of code to hide the navigation bar on the LoginPage.
public LoginPage ()
{
   InitializeComponent ();
   NavigationPage.SetHasNavigationBar (this, false);
   buttonLogin.Clicked += async (object sender, EventArgs e) => {
   await Navigation.PushAsync (new ActivityFeedPage ());
   };
}
In the event handler, we use the Navigation property (given to us by the NavigationPage we set up in our App.cs file) to Push a new ActivityFeedPage. You will have to add a new ContentPage XAML file named “ActivityFeedPage” for this to work.
Our login page is now good to go! If we run the app we can see that, even though we only wrote one XAML file, it looks and feels native on Android and iOS.
Keep on coding!
I urge you to take a look at the Xamarin.Forms guides and to try creating the next two pages on your own. If you’re having trouble, take a look at the completed project on my GitHub. I will also be doing a more extensive guest lecture on this topic through Xamarin University on September 24th. Get your free 30-day trial so you can join me for this awesome rapid prototyping session!