After I published my “Find the Monkey” project for an earlier post about iBeacons, several people asked me how to send messages between the devices after locating the iBeacon. A logical way to do this is to use the Multipeer Connectivity framework, which was introduced in iOS 7. Mutlipeer Connectivity allows iOS devices to establish network connections over various technologies including Bluetooth, infrastructure WiFi and peer to peer WiFi.
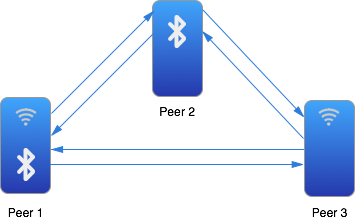
Multipeer Connectivity even enables devices using different technologies to leverage peers to establish connections that otherwise would not be possible. For example, consider the case of one device running just WiFi, with another running only Bluetooth. Normally these device could not communicate. However, if a third device running both WiFi and Bluetooth is present, the other devices can leverage it to communicate with each other seamlessly when using Multipeer Connectivity.
With Multipeer Connectivity there are advertisers and browsers. An advertiser makes a device discoverable to peers, whereas a browser searches for peers. iOS includes classes that make it easy to implement advertising and browsing. The MCAdvertiserAssistant class is used to advertise a peer, while the MCBrowserViewController handles browsing for peers. Additionally, these classes take care of the invitation workflow to join peers to a session. Once in a session, peers can transmit data back and forth to each other, including sending messages, resources and streaming.
Let’s extend the application from the iBeacon post to include Multipeer Connectivity. For this example, when the application running on the iPhone finds the iBeacon running on the iPad, the iPhone will send a message to the iPad as shown below:
In this case, the iPad will browse using the MCBrowserViewController. To create an MCBrowserViewController:
-
Create an MCPeerID to identify the peer.
-
Create an MCSession around the MCPeerID.
-
Create an MCBrowserViewController from the session and a service type.
void StartMultipeerBrowser ()
{
  peer = new MCPeerID ("Monkey");
  session = new MCSession (peer);
  session.Delegate = sessionDelegate;
  browser = new MCBrowserViewController (serviceType, session);
  browser.Delegate = browserDelegate;
  browser.ModalPresentationStyle = UIModalPresentationStyle.FormSheet;
  PresentViewController (browser, true, null);
}
The browser controller presents the UI shown below. When peers are found, they appear in a list. Tapping a peer causes an invitation to join a session to be sent to the peer. The browser also displays the connection status of any peers, such as when one connects after accepting an invitation:
The session delegate handles changes in connection state, such as when peers connect and disconnect to the session. It also handles receiving data sent from peers.
class MySessionDelegate : MCSessionDelegate
{
  public override void DidChangeState (MCSession session, MCPeerID peerID, MCSessionState state)
  {
    switch (state) {
    case MCSessionState.Connected:
      Console.WriteLine ("Connected: {0}", peerID.DisplayName);
      break;
    case MCSessionState.Connecting:
      Console.WriteLine ("Connecting: {0}", peerID.DisplayName);
      break;
    case MCSessionState.NotConnected:
      Console.WriteLine ("Not Connected: {0}", peerID.DisplayName);
      break;
    }
  }

  public override void DidReceiveData (MCSession session, NSData data, MCPeerID peerID)
  {
    InvokeOnMainThread (() => {
      var alert = new UIAlertView ("", data.ToString (), null, "OK");
      alert.Show ();
    });
  }
  ...
}
The browser delegate is where you handle dismissing the UI in response to the Done and Cancel buttons, which result in the DidFinish and WasCancelled calls respectively:
class MyBrowserDelegate : MCBrowserViewControllerDelegate
{
  public override void DidFinish (MCBrowserViewController browserViewController)
  {
    InvokeOnMainThread (() => {
      browserViewController.DismissViewController (true, null);
    });
  }

  public override void WasCancelled (MCBrowserViewController browserViewController)
  {
    InvokeOnMainThread (() => {
      browserViewController.DismissViewController (true, null);
    });
  }
}
On the advertiser side, setting up an MCAdvertiserAssistant is very similar to setting up the MCBrowserViewController.
-
Create and MCPeerId and MCSession as before.
-
Create an MCAdvertiserAssistant.
-
Call the MCAdvertiserAssistant’s Start method.
void StartMultipeerAdvertiser ()
{
  peer = new MCPeerID ("Player1");
  session = new MCSession (peer);
  session.Delegate = sessionDelegate;
  assistant = new MCAdvertiserAssistant (serviceType, dict, session);
  assistant.Start ();
}
When the invitation is received, the MCAdvertiserAssistant presents an alert for the user to accept or decline the invitation.
Once connected, we can send a message, resource, or stream data. For example, here’s how to send a message to the iPad indicating that it has been found in our Find the Monkey scenario:
void SendMessage ()
{
  var message = NSData.FromString (
    String.Format ("{0} found the monkey", peer.DisplayName));
  NSError error;
  session.SendData (message, session.ConnectedPeers,
  MCSessionSendDataMode.Reliable, out error);
}
The updated FindTheMonkey example is available here.

