 Rachel Reese is a long-time software engineer and math geek who recently relocated to Nashville, TN to work at Firefly Logic. Rachel is an ASPInsider and an F# MVP. You can catch her at Xamarin Evolve 2014, the largest conference for cross-platform mobile development.
This blog post is part of our continuing celebration of F# Week at Xamarin! Celebrate by getting your own F# t-shirt! Yesterday, Rachel gave us an “Introduction to F# with Xamarin”. Today, she takes us through building a task management app with F# and Xamarin.
Getting Started with iOS Development
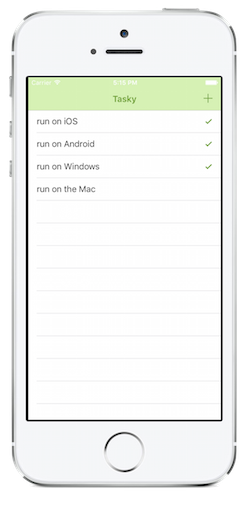
 Yesterday, we took a look at the benefits of F# by building much of the data layer for the F# version of the task-management app Tasky. Today, let’s complete that, add a couple of views, and we’ll be up and running with an F# version of Xamarin’s favorite task app!
In Xamarin Studio, create a new F# iOS Single View Application named “Tasky”. Xamarin Studio will create a solution for us, with two important files:
1. AppDelegate.fs
- – This is the heart of the application. The Main module defines an application’s entry point, while the AppDelegate type inherits from UIApplicationDelegate, which provides such application lifecycle events as ApplicationDidFinishLaunching and ApplicationWillTerminate. From AppDelegate, we’ll define which view controller should load first. In this case, because the application is named Tasky, the first view controller that’s called is TaskyViewController.fs.
2. TaskyViewController.fs
- – This is the project’s first view controller. This is inherited from UIViewController, and the main overridable methods here handle the view lifecycle. For example: ViewDidLoad, DidReceiveMemoryWarning, DidRotate, ViewWillDisappear, etc.
If we run the project at this point, before making any changes, it will load a blank, black screen. Let’s make it do a bit more. We will start by setting up navigation. Open AppDelegate.fs and update the RootViewController to the following:
[code langauge=”fsharp”] window.RootViewController <- new UINavigationController (new TaskyViewController ()) [/code]
Wrapping the TaskyViewController in a UINavigationController will allow a user to navigate back from the update task screen (once we create it). In other words, that screen will display a back button allowing return to the task list. That finishes off the changes we’ll need to make for Tasky in AppDelegate.fs.
Next, let’s work on the main view controller. Open TaskyViewController.fs, and we’ll add an event handler in ViewDidLoad, for adding a new task from a “+” button on the navigation bar.
[code langauge=”fsharp”] let addNewTask = new EventHandler (fun sender eventargs -> this.NavigationController.PushViewController (new AddTaskViewController (), true) ) this.NavigationItem.SetRightBarButtonItem (new UIBarButtonItem (UIBarButtonSystemIcon.Add, addNewTask), false) [/code]
At this point, we’ll also need to create a nearly empty AddTaskViewController.fs, inherited from UIViewController, like so:
[code langauge=”fsharp”] type AddTaskViewController () = inherit UIViewController () override this.ViewDidLoad () = base.ViewDidLoad () [/code]
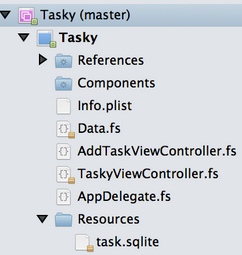
Our final project structure will look like this:
 Creating and Populating with Data
Now that the navigation is set up, let’s build the task list itself. First, create the UITableView:
let table <- new UITableView ()
Next, within the ViewDidLoad method, set the view’s frame to be the full screen, and add the table to the view.
table.Frame <- this.View.Bounds
this.View.Add table
Displaying the table was the easy part. Next, we’ll need to fill the table with data. To help do this, we need to create a UITableViewSource. In our case, we take in the list of tasks that are returned from the SQLite Type Provider, as well as our navigation controller. We will need to include the navigation controller as a parameter, so that we can navigate when the user clicks a row in the table. We also copy the task list locally, and set the cell identifier to a unique name for this cell type. It’s possible to load a mix of different cell types (with completely varied layouts) into an iOS table, and this identifies which one is being loaded.
type TaskDataSource(tasksource: task list, navigation: UINavigationController) =
    inherit UITableViewSource ()
    let tasks = new List<task> (taskSource)
    member x.cellIDentifier = "TaskCell"
Once we’ve defined those, there are two methods we absolutely must override in TaskDataSource: RowsInSection, and GetCell. RowsInSection returns the total number of rows that the table contains; GetCell dequeues or creates a new UITableViewCell, then populates that cell with the correct data for that row. [For more information on dequeuing, see the “Note on Cell Reuse” in the Xamarin docs, above.]
override x.RowsInSection (view, section) = tasks.Count

override x.GetCell (view, indexPath) =
    let t = tasks.[indexPath.Item]
    let cell =
        let newCell = view.DequeueReusableCell x.cellIdentifier
        match newCell with
            | null -> new UITableViewCell (UITableViewCellStyle.Default, x.cellIdentifier)
            | _ -> newCell
    cell.TextLabel.Text <- t.Description
    cell
With these added, let’s jump back to the TaskyViewController type. We need to override ViewWillAppear, to set the newly created TaskDataSource to be the UITableView source. We also must reload the data each time the view appears. Using the GetIncompleteTasks method we created in the type providers section, we should now be able to run Tasky and load the tasks.
override this.ViewWillAppear animated =
    base.ViewWillAppear animated

    table.Source <- new TaskDataSource (Data.GetIncompleteTasks (), this.NavigationController)
    table.ReloadData ()
This will give us the basic set up to load a table of tasks, but we aren’t yet able to navigate to a detail page upon selecting a row, nor are we able to delete with a swipe in from the right.
Swipe to Delete Adding the ability to swipe delete is only a matter of adding two more overrides into the TaskDataSource type.
- CanEditRow is, logically, whether or not that row can be edited.
- CommitEditingStyle handles the deletion. First, delete the task from the data source; second, remove the task from the tasks list; finally, delete that row from the view.
override x.CanEditRow (view, indexPath) = true
override x.CommitEditingStyle (view, editingStyle, indexPath) =
    match editingStyle with
        | UITableViewCellEditingStyle.Delete ->
          Data.DeleteTask tasks.[indexPath.Item].Description
          tasks.RemoveAt (indexPath.Item)
          view.DeleteRows ( [|indexPath|], UITableViewRowAnimation.Fade)
        | _ -> Console.WriteLine "CommitEditingStyle:None called"
Selection and Navigating The final step in the TaskyViewController functionality is to handle navigation. To select a row and navigate to a detail page for that row, we only need to override the RowSelected method. In this case, we first want to deselect the row (so that when we return to the view, the row doesn’t remain selected), and then push the new view controller. We’re using the AddTaskViewController, which handles both adding and updating tasks.
override x>RowSelected (tableView, indexPath) =
    tableView.DeselectRow (indexPath, false)
    navigation.PushViewController (new AddTaskViewController (tasks.[indexPath.Item], false), true)
The above code modifies the constructor of the AddTaskViewController (created previously) to accept a current task, as well as a Boolean determining whether or not that task is a new task. We’ll update this in the next section.
Creating a Non-Table View We’re almost done now; we just need to add a quick form to handle adding and updating a task. Let’s start by updating the constructor to accept a task and a Boolean, as just mentioned. To do this, we need to modify the AddTaskViewController type to take in the new parameters. We’ll also add a second, parameterless constructor, which creates an instance of the controller with some defaults – specifically: Description should be empty, Complete should be false, and the isNew Boolean should be true, exactly as one would expect with a brand new task.
type AddTaskViewController (task:task, isNew:bool) =
    inherit UIViewController ()
    new () = new AddTaskViewController ({Description=""; Complete=false}, true)
    override this.ViewDidLoad () =
        base.ViewDidLoad ()
Now, let’s move into the ViewDidLoad method. Create a new subview to which we will add our fields, and set the background color to white.
let addView = new UIView (this.View.Bounds)
addView.BackgroundColor <- UIColor.White
From here, we simply add and position our form elements. We’ll start with a UITextField for the Description, and a UISwitch with corresponding UILabel for our Complete field. We also add an event handler to handle setting Complete on our task when the switch is toggled.
let description = new UITextField (new RectangleF (20.f, 64.f, 280.f, 50.f))
description.Text <- task.Description
description.Placeholder <- "task description"
addView.Add description

let completeLabel = new UILabel (new RectangleF (20.f, 114.f, 100.f, 30.f))
completeLabel.Text <- Complete
addView.Add completeLabel

let completeCheck = new UISwitch (new RectnagleF (120.f, 114.f, 200.f, 30.f))
completeCheck.SetState (task.Complete, false)
let changeCompleteStatus =
    new EventHandler (fun sender eventargs ->
        task.Complete <- completeCheck.On
    )

completeCheck.TouchDragInside.AddHandler changeCompleteStatus
addView.Add completeCheck
Now that the input part is complete, we need to be able to save new tasks, along with a corresponding label to indicate the operation has completed. Depending on whether or not the task is new, we call the appropriate Add or Update function in our Data file, and then print “Added” or “Updated”.
let addedLabel = new UILabel (new RectangleF (20.f, 214.f, 280.f, 50.f))
addView.Add addedLabel

let addUpdateButton = UIButton.FromType (UIButtonType.RoundedRect)
addUpdateButton.Frame <- new RectangleF (20.f, 164.f, 280.f, 50.f)

let addUpdateHandler =
    new EventHandler (fun sender eventargs ->
        match isNew with
            | true ->
                Data.AddTask description.Text
                addedLabel.Text <- "Added!"
            | false ->
                Data.UpdateTask description.Text completeCheck.On
                addedLabel.Text <- "Updated!"
        description.Text <- ""
    )

addUpdateButton.TouchUpInside.AddHandler addUpdateHandler
addUpdateButton.SetTItle ("Save", UIControlState.Normal)
addView.Add addUpdateButton
Since the label was added to indicate that saving is complete, we need to clear the text when we want to add a new task, to minimize confusion, and make it obvious that the new task has also been added. To that end, we add a clear label function that is called when the user clicks back into the Description field.
let clearLabel =
    new EventHandler (fun sender eventargs ->
        addedLabel.Text <- ""
    )
description.TouchDown.AddHandler clearLabel
Finally, we simply need to add the subview that we’ve been populating to the main view, and we’re done!
[code langauge=”fsharp”] this.View.Add addView [/code]
We have just built an F# version of Tasky, Xamarin’s favorite task-management app! You can get the bits on GitHub and follow me on Twitter @RachelReese.

0 comments