
Many enterprise organizations are making the move to the cloud and building mobile apps for internal use. It’s increasingly common to see enterprises with entire suites of internal apps to help make employees more productive, from expense reporting to leave management, even carpooling. Rather than rolling a brand new infrastructure for these apps, organizations can take advantage of Active Directory (AD) and consume existing APIs that provide data such as contacts, email, calendar, org trees, and more. Thanks to brand new and improved libraries for authenticating users and consuming the Microsoft Graph, building such applications has become much easier.
In this blog post, we’ll be building a sample application for managing leave (sick time, parental leave, etc.) using the Microsoft Authentication Library (MSAL) and Microsoft Graph APIs.
Step 1: Register the Application
You can register the application by visiting https://apps.dev.microsoft.com and clicking on the Add an app button. Once you enter the app details, be sure to note the Application Id generated. Under the Add Platforms section, you can now register an application to multiple platforms. This makes life simpler by having one application ID for various implementations of the same app across mobile and web.

Click Native Application. This will allow mobile applications to access the organization’s AD and Graph API.
Once supported platforms are added, we can add permissions on the same screen. In this case, I’ve given the permissions "User.Read", "User.ReadBasic.All", and"Mail.Send". These are required to get a user’s information and send an email to his or her manager to let them know the user will be out for the day.

Save the changes, and your app is now registered with the organization’s Active Directory!
Step 2: Building the Mobile Apps
Create a blank Xamarin.Forms app with the Portable Class Library (PCL) option to share code across platforms. For this library, ensure the profile is set to Profile7. Add the Microsoft.Client.Identity and Microsoft.Graph NuGet packages to all projects. If you don’t see them in the NuGet Package Manager, check Include Prerelease.
First, we need to authenticate the user. This is done with the Microsoft Authentication Library (MSAL) PublicClientApplication class. Inside of App.xaml.cs, add the following code:
public static PublicClientApplication IdentityClientApp = null;
public static UIParent UiParent = null;

// AD application identifier and requested permissions, or scopes.
public static string ClientID = "7214e6cd-85ad-4433-9d13-f2631e1d4142"; // TODO: Replace this with the Application ID from Step #1.
public static string[] Scopes = { "User.Read", "User.ReadBasic.All ", "Mail.Send" };

public App()
{
   InitializeComponent();
   IdentityClientApp = new PublicClientApplication(ClientID);
   MainPage = new Leaver.MainPage();
}
Next, we need to build out a login page. Create a GraphServiceClient in MainPage.xaml.cs, which will be responsible for calling all future Graph APIs. You can see a sample implementation in the code below:
private async Task CreateGraphClientAsync()
{
   try {
     Client = new GraphServiceClient("https://graph.microsoft.com/v1.0",
           new DelegateAuthenticationProvider(async (requestMessage) =>
           {
              var tokenRequest = await App.IdentityClientApp.AcquireTokenAsync(App.Scopes, App.UiParent).ConfigureAwait(false);
              requestMessage.Headers.Authorization = new AuthenticationHeaderValue("bearer", tokenRequest.AccessToken);
           }));
           Me = await Client.Me.Request().GetAsync();
           Username.Text = $"Welcome {((User)Me).DisplayName}";
           return true;
        }
        catch (MsalException ex)
        {
           await DisplayAlert("Error", ex.Message, "OK", "Cancel");
           return false;
        }
}
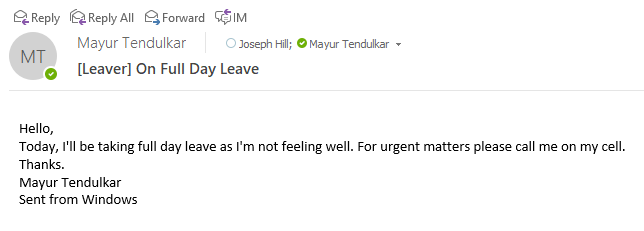
Now that we’ve initialized our GraphServiceClient, we can use the Graph API to send an email:
private async void SendEmail(Message message)
{
   if (!UserExists)
      await CreateGraphClientAsync();
   var req = Client.Me.SendMail(message);
   await req.Request().PostAsync();
   Status.Text = $"Email sent to your manager { ((User)Manager).DisplayName }, CC: you";
}
Step 3: Platform-Specific Modifications
Login functionality with MSAL was previously implemented in Xamarin.Forms by using custom renderers. With this new, production-ready preview of MSAL, this functionality is implemented using a URL scheme to make our lives easier. This automatically initiates the authentication flow and completes the login flow.
iOS
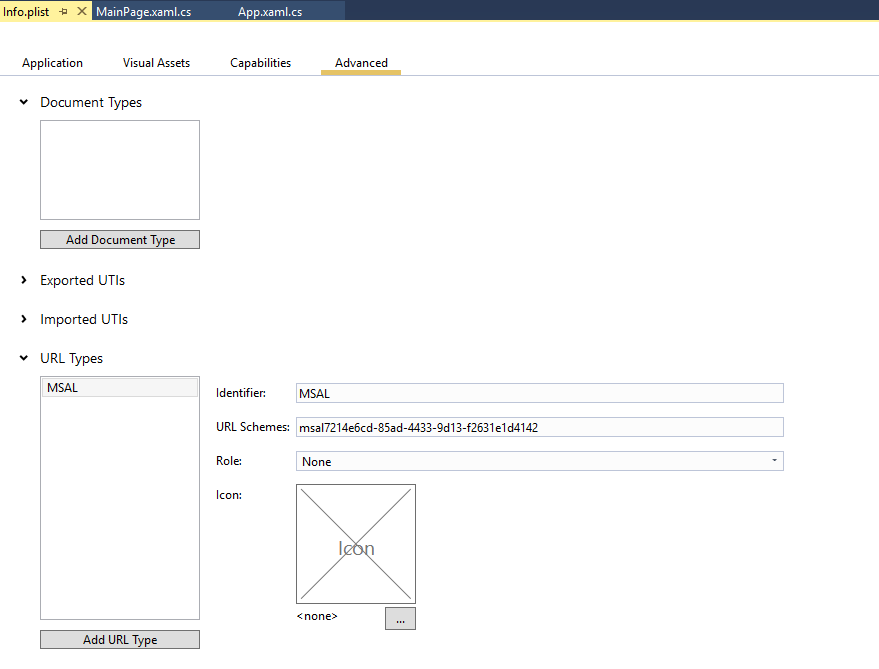
In Visual Studio 2017 Preview 3, we’ve added a UI editor for Info.plist where you can register your custom URL scheme:
The completed authentication process can be handled in AppDelegate:
public override bool FinishedLaunching(UIApplication app, NSDictionary options)
{
   global::Xamarin.Forms.Forms.Init();
   LoadApplication(new App());
   App.IdentityClientApp.RedirectUri = "msal7214e6cd-85ad-4433-9d13-f2631e1d4142://auth";
   return base.FinishedLaunching(app, options);
}

public override bool OpenUrl(UIApplication app, NSUrl url, NSDictionary options)
{
   AuthenticationContinuationHelper.SetAuthenticationContinuationEventArgs(url);
   return true;
}
Android
Open AndroidManifest.xml and add the BrowserTabActivity with intent-filter to register the URL scheme:
The completed authentication process can be handled in our app’s MainActivity:
protected override void OnCreate(Bundle bundle)
{
   TabLayoutResource = Resource.Layout.Tabbar;
   ToolbarResource = Resource.Layout.Toolbar;
   base.OnCreate(bundle);
   global::Xamarin.Forms.Forms.Init(this, bundle);
   LoadApplication(new App());
   App.IdentityClientApp.RedirectUri = "msal7214e6cd-85ad-4433-9d13-f2631e1d4142://auth";
   App.UiParent = new UIParent(Xamarin.Forms.Forms.Context as Activity);
}
protected override void OnActivityResult(int requestCode, Result resultCode, Intent data)
{
   base.OnActivityResult(requestCode, resultCode, data);
   AuthenticationContinuationHelper.SetAuthenticationContinuationEventArgs(requestCode, resultCode, data);
}
Windows
The Microsoft Authentication Library doesn’t require any specific platform modifications to handle the login process for Universal Windows Platform (UWP) apps.
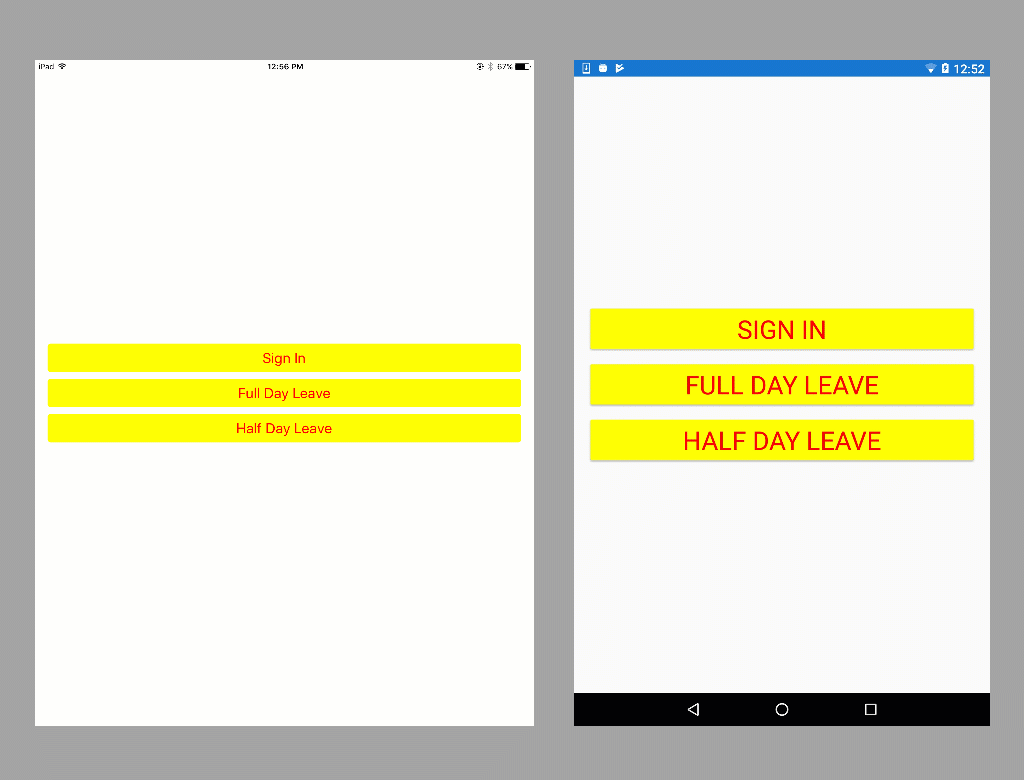
Step 4: Run the App
Once the steps are complete, run the app to see our completed leave scheduling application for iOS, Android, and Windows using Xamarin.Forms, the Microsoft Authentication Library, and the Microsoft Graph APIs.
Conclusion
Microsoft Authentication Library (MSAL) makes it easy to integrate apps with existing Active Directories (AD) and add authentication in just a few lines of code. The Microsoft Graph API enables access various services available to our users, such as mail, calendar, people, and SharePoint, all from a single API. To try out the mobile app built in this blog post, download the sample from my GitHub.