Android Oreo Notification Channels
One of the most important features introduced in Android 8.0 Oreo is notification channels. Notification channels make it possible for you to group notifications so that all notifications posted to a channel exhibit the same behavior. For example, you might have a notification channel that is intended for notifications that require immediate attention and a separate “quieter” channel that is used for informational messages.
Using Notification Channels
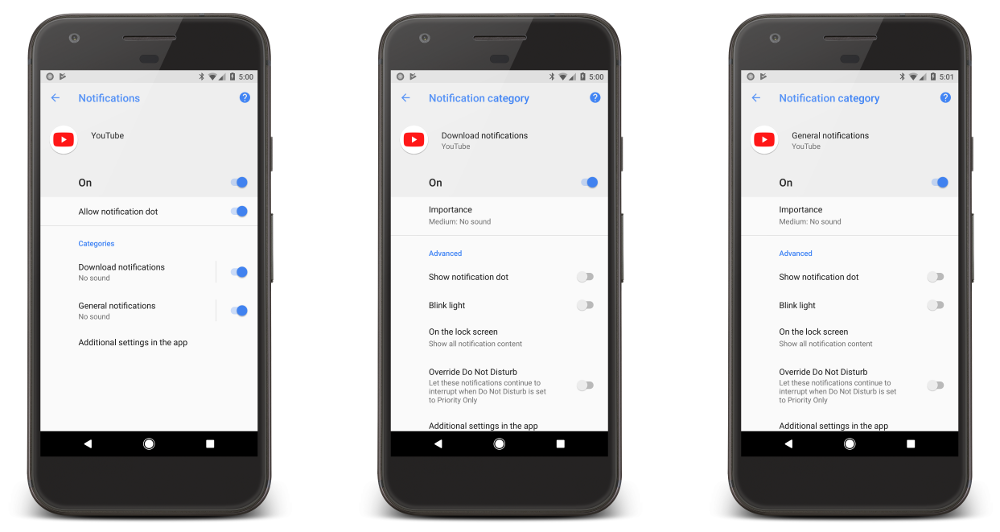
For example, have a look at the YouTube app that is installed with Android Oreo (tap Settings > Apps & Notifications > Notifications > Notifications and select YouTube from the list). The first screen (on the left) lists two notification categories: Download notifications and General notifications:

Each of these categories is a notification channel: the YouTube app implements a Download notifications channel and a General Notifications channel. Tap Download notifications in the first screen, which displays the settings screen for the app’s download notifications channel (see second screen above). Notice that you don’t have absolute control over how your notification channels interact with the user; s/he can modify the settings for any notification channel on the device as seen in the screenshots above (however, you can configure default values, as I’ll describe below). In this screen, the user can modify the behavior of the Download notifications channel by doing the following:
- Set the Importance level to Urgent, High, Medium, or Low, which configures the level of sound and visual interruption.
- Turn the notification dot on or off.
- Turn the blinking light on or off.
- Show or hide notifications on the lock screen.
- Override the Do Not Disturb setting.
The General Notifications channel (third screen) has similar settings. As these examples illustrate, the new notification channels feature makes it possible for you to give users fine-grained control over different kinds of notifications.
Should you add support for notification channels to your app? If you’re targeting Android 8.0, your app must implement notification channels. An app targeted for Oreo that attempts to send a local notification to the user without using a notification channel will fail to display the notification on Oreo devices. If you don’t target Android 8.0, your app will still run on Android 8.0, but with the same notification behavior as it would exhibit when running on Android 7.1 or earlier.
Creating a Notification Channel
To create a notification channel, do the following:
- Construct a NotificationChannel object with the following:
- An ID string that is unique within your package. In the following example, the string
com.xamarin.myapp.urgentis used. - The user-visible name of the channel (less than 40 characters). In the following example, the name Urgent is used.
- The importance of the channel, which controls how interruptive notifications are posted to the
NotificationChannel. The importance can beDefault,High,Low,Max,Min,None, orUnspecified.
Pass these values to the constructor:
public const string URGENT_CHANNEL = com.xamarin.myapp.urgent;
. . .
string chanName = GetString(Resource.String.noti_chan_urgent);
var importance = NotificationImportance.High;
NotificationChannel chan = new NotificationChannel(URGENT_CHANNEL, chanName, importance);
In this code example,Resource.String.noti_chan_urgentis set to “Urgent”. - An ID string that is unique within your package. In the following example, the string
- Configure the
NotificationChannelobject with initial settings. For example, the following code configures theNotificationChannelobject so that notifications posted to this channel will vibrate the device and appear on the lock screen by default:chan.EnableVibration (true); chan.LockscreenVisibility = NotificationVisibility.Public; - Submit the notification channel object to the notification manager:
NotificationManager notificationManager =
(NotificationManager) GetSystemService (NotificationService);
notificationManager.CreateNotificationChannel (chan);
Posting to a Notifications Channel
To post a notification to a notification channel, do the following:
- Configure the notification using the
Notification.Builder, passing in the channel ID to theSetChannelIdmethod. For example:Notification.Builder builder = new Notification.Builder (this) .SetContentTitle ("Attention!") .SetContentText ("This is an urgent notification message") .SetChannelId (URGENT_CHANNEL); - Build and issue the notification using the Notification Manager’s Notify method:
public const int NOTIFY_ID = 1100;
. . .
notificationManager.Notify (NOTIFY_ID, builder.Build());
That’s it! You can repeat the above steps to create another notification channel for informational messages. For example, this second channel could, by default, disable vibration, set the default lock screen visibility to Private, and set the notification importance to Default.
For a complete code example of Android Oreo Notification Channels in action, see the NotificationChannels sample; this sample app manages two channels and sets additional notification options.
If you aren’t familiar with how to create notifications in Xamarin.Android, see Local Notifications and the Local Notifications Walkthrough.
Discuss this post in the Xamarin Forums

 Light
Light Dark
Dark
0 comments