
An emerging trend in technology is the idea of conversational computing. Instead of issuing a series of commands via taps and clicks, commands will be extracted from natural conversations. We use conversation as an organic way to interact with analog world, and Xamarin makes it easy to add a native conversational interface to the digital world and to your next app. Combine the chat interface with the Microsoft Bot Framework, and the end result is a natural, conversational dialog that will allow you to interact with your users in a new, but familiar, way.
A Chat Interface in Your App
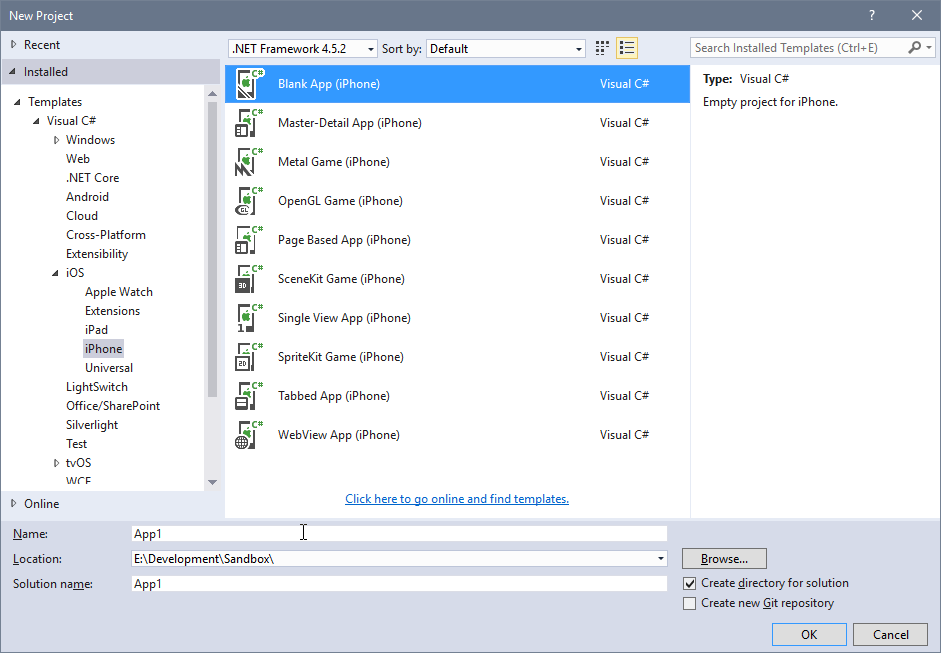
The power of conversation as an interface is that the act of conversation is so natural, seamless and intuitive. To foster such an interaction, it is important the the UI feels natural as well. With Xamarin, we are able to design such an interface, one that fits perfectly within the expectations of the app platform. To demonstrate this, we are going to design an iOS chat interface, inspired by the Xamarin Shopping app. We will design an interface that acts as a customer support chat client for the shopping app. To get started, we will create a Blank App (iPhone) in Visual Studio.
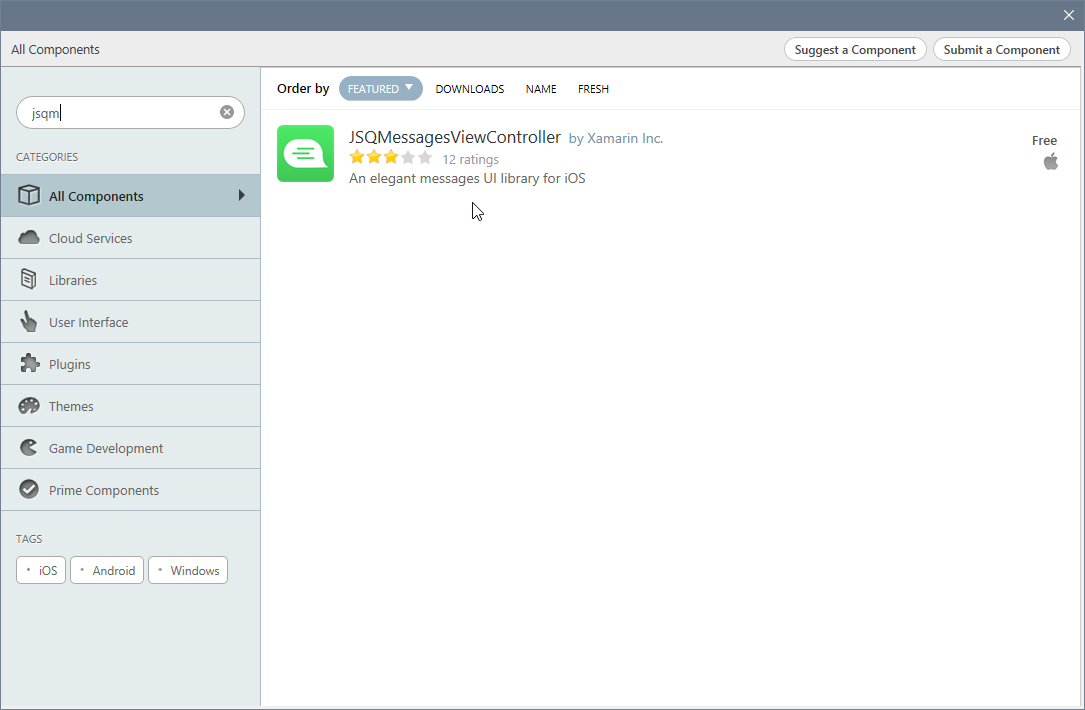
Our iOS app is going to utilize a fantastic messaging view controller, called JSQMessagesViewController, which is available in the Xamarin Component Store. You should be able to add it to your app by opening the Component Store and adding JSQMessagesViewController to the app.
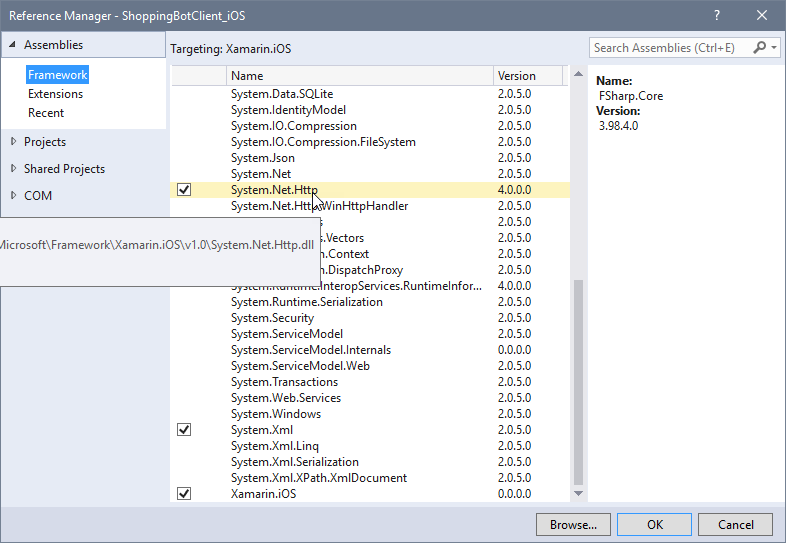
Furthermore, since we will be making some HTTP calls, we will need to add System.Net.Http via the Add Reference dialog.
Now that we have those requirements in place, we can get down to the writing the code! Our first requirement will be to add a UIViewController to our app, which will host the chat interface. For the sample, I created a UIViewController named ChatPageViewController, with a base class of MessagesViewController.
Once we have our view controller created, we must declare a few class level variables, and instantiate an HttpClient object to manage the communication with the Bot in Azure. Our class level variables should look as follows:
        MessagesBubbleImage outgoingBubbleImageData, incomingBubbleImageData;
        List messages = new List();
        int messageCount = 0;
        private HttpClient _client;
        private Conversation _lastConversation;
        string DirectLineKey = "[Add Direct Line Key]";

        //Tracking of which user said what
        User sender = new User { Id = "2CC8343", DisplayName = "You" };
        User friend = new User { Id = "BADB229", DisplayName = "Xamarin Bot" };

        //Holds the entire message history for a given session
        MessageSet ms = new MessageSet();
Within the ViewDidLoad method, we need to must instantiate an HttpClient object using the class level variable we declared, as well as set a few view options, and print a welcome message. The ViewDidLoad method should look similar to:
        public override async void ViewDidLoad()
        {
            base.ViewDidLoad();

            CollectionView.BackgroundColor = new UIColor(red: 0.00f, green: 0.12f, blue: 0.31f, alpha: 1.0f);
            Title = "Xamarin Shopping Bot";

            //instantiate an HTTPClient, and set properties to our DirectLine bot
            _client = new HttpClient();
            _client.BaseAddress = new Uri("https://directline.botframework.com/api/conversations/");
            _client.DefaultRequestHeaders.Accept.Clear();
            _client.DefaultRequestHeaders.Accept.Add(new MediaTypeWithQualityHeaderValue("application/json"));
            _client.DefaultRequestHeaders.Authorization = new AuthenticationHeaderValue("BotConnector",
                DirectLineKey);
            var response = await _client.GetAsync("/api/tokens/");
            if (response.IsSuccessStatusCode)
            {
                var conversation = new Conversation();
                HttpContent contentPost = new StringContent(JsonConvert.SerializeObject(conversation), Encoding.UTF8,
                    "application/json");
                response = await _client.PostAsync("/api/conversations/", contentPost);
                if (response.IsSuccessStatusCode)
                {
                    var conversationInfo = await response.Content.ReadAsStringAsync();
                    _lastConversation = JsonConvert.DeserializeObject(conversationInfo);
                }

            }

            // You must set your senderId and display name
            SenderId = sender.Id;
            SenderDisplayName = sender.DisplayName;

            // These MessagesBubbleImages will be used in the GetMessageBubbleImageData override
            var bubbleFactory = new MessagesBubbleImageFactory();
            outgoingBubbleImageData = bubbleFactory.CreateOutgoingMessagesBubbleImage(UIColorExtensions.MessageBubbleLightGrayColor);
            incomingBubbleImageData = bubbleFactory.CreateIncomingMessagesBubbleImage(new UIColor(red: 0.88f, green: 0.07f, blue: 0.55f, alpha: 1.0f));

            // Remove the AccessoryButton as we will not be sending pics
            InputToolbar.ContentView.LeftBarButtonItem = null;


            // Remove the Avatars
            CollectionView.CollectionViewLayout.IncomingAvatarViewSize = CoreGraphics.CGSize.Empty;
            CollectionView.CollectionViewLayout.OutgoingAvatarViewSize = CoreGraphics.CGSize.Empty;

            // Load some messagees to start
            messages.Add(new Message(friend.Id, friend.DisplayName, NSDate.DistantPast, "I am the Shopping Bot!"));
            FinishReceivingMessage(true);
        }
As our MessageViewController is essentially a customized UICollectionViewController, we must add some methods in to build the
UICollectionView.
        public override UICollectionViewCell GetCell(UICollectionView collectionView, NSIndexPath indexPath)
        {
            var cell = base.GetCell(collectionView, indexPath) as MessagesCollectionViewCell;

            // Override GetCell to make modifications to the cell
            // In this case darken the text for the sender
            var message = messages[indexPath.Row];
            if (message.SenderId == SenderId)
                cell.TextView.TextColor = UIColor.Black;

            return cell;
        }

        public override nint GetItemsCount(UICollectionView collectionView, nint section)
        {
            return messages.Count;
        }

        public override IMessageData GetMessageData(MessagesCollectionView collectionView, NSIndexPath indexPath)
        {
            return messages[indexPath.Row];
        }

        public override IMessageBubbleImageDataSource GetMessageBubbleImageData(MessagesCollectionView collectionView, NSIndexPath indexPath)
        {
            var message = messages[indexPath.Row];
            if (message.SenderId == SenderId)
                return outgoingBubbleImageData;
            return incomingBubbleImageData;

        }

        public override IMessageAvatarImageDataSource GetAvatarImageData(MessagesCollectionView collectionView, NSIndexPath indexPath)
        {
            return null;
        }
Finally, we have a few classes to create to handle our messages and identities.
    public class MessageSet
    {
        public BotMessage[] messages { get; set; }
        public string watermark { get; set; }
        public string eTag { get; set; }

    }

    public class BotMessage
    {
        public string id { get; set; }
        public string conversationId { get; set; }
        public DateTime created { get; set; }
        public string from { get; set; }
        public string text { get; set; }
        public string channelData { get; set; }
        public string[] images { get; set; }
        public Attachment[] attachments { get; set; }
        public string eTag { get; set; }
    }

    public class Attachment
    {
        public string url { get; set; }
        public string contentType { get; set; }
    }

    public class Conversation
    {
        public string conversationId { get; set; }
        public string token { get; set; }
        public string eTag { get; set; }
    }
Now that we have all of our objects created and variables set, we can get down to the business of sending and receiving messages from our Bot! Our first task is to respond to the button click on the “send” button. Here we want to gather the message, display some indicators, and send the message to our Bot:
        public override async void PressedSendButton(UIButton button, string text, string senderId, string senderDisplayName, NSDate date)
        {
            //Clear the text and play a send sound
            InputToolbar.ContentView.TextView.Text = "";
            InputToolbar.ContentView.RightBarButtonItem.Enabled = false;
            SystemSoundPlayer.PlayMessageSentSound();

            //set message details and add to the message queue
            var message = new Message("2CC8343", "You", NSDate.Now, text);
            messages.Add(message);
            FinishReceivingMessage(true);

            //Show typing indicator to add to the natual feel of the bot
            ShowTypingIndicator = true;

            //send message to bot and await the message set
            ms = await SendMessage(text);

            //iterate through our message set, and print new messasges from the bot
            while (ms.messages.Length > messageCount)
            {
                if (ms.messages[messageCount].from == "XamarinBot")
                {

                    ScrollToBottom(true);

                    SystemSoundPlayer.PlayMessageReceivedSound();

                    var messageBot = new Message(friend.Id, friend.DisplayName, NSDate.Now, ms.messages[messageCount].text);
                    messages.Add(messageBot);

                    FinishReceivingMessage(true);
                    InputToolbar.ContentView.RightBarButtonItem.Enabled = true;

                }
                messageCount++;
            }
        }
Now we come down to our last bit of code for our view controller, which is the SendMessage method. Here, we take the text input from PressedSendButton and communicate with our Bot via DirectLine.
        public async Task SendMessage(string messageText)
        {
            try
            {

                var messageToSend = new BotMessage() { text = messageText, conversationId = _lastConversation.conversationId };
                var contentPost = new StringContent(JsonConvert.SerializeObject(messageToSend), Encoding.UTF8, "application/json");
                var conversationUrl = "https://directline.botframework.com/api/conversations/" + _lastConversation.conversationId + "/messages/";


                var response = await _client.PostAsync(conversationUrl, contentPost);
                var messageInfo = await response.Content.ReadAsStringAsync();

                var messagesReceived = await _client.GetAsync(conversationUrl);
                var messagesReceivedData = await messagesReceived.Content.ReadAsStringAsync();

                var messages = JsonConvert.DeserializeObject(messagesReceivedData);

                return messages;
            }
            catch (Exception ex)
            {
                Console.WriteLine(ex.Message);
                return null;
            }
        }
Finally, we must use the AppDelegate to launch the ChatPageViewController when the application is opened, and we do this via:
        public override bool FinishedLaunching(UIApplication app, NSDictionary options)
        {
            // create a new window instance based on the screen size
            window = new UIWindow(UIScreen.MainScreen.Bounds);

            // If you have defined a root view controller, set it here:
            window.RootViewController = new UINavigationController(new ChatPageViewController());

            // make the window visible
            window.MakeKeyAndVisible();

            return true;
        }
Now that the app is designed, we will want to configure a bot for the conversation.
Adding Microsoft Bot Framework
The bot service consists of two parts, one being the language processor (LUIS) and the other being the Bot Service application, which we will host in Azure. For our purposes, we are going to import a custom LUIS app created for this sample. To get LUIS configured, you will want to go to luis.ai and sign in using your Microsoft account. Once on the main page, you will want click on “New App” and then “Import Existing App”. You can download the LUIS app in JSON format from GitHub.
Now that we have a LUIS service created, it is time to get busy creating the Bot application! You may have noticed that for the client, we only need to make a few HTTP calls. This is because most of the processing for the conversation is done within the Bot Service application. This allows you to use the exact same Bot service for many different platforms, including integrations such as Skype. To get started, you will want to ensure that you have the bot template installed. These items can be downloaded from the Bot Framework page.
The bot project consists of a controller and a dialog. The template includes a default controller which will echo input back to the user. Once we have our dialog configured, we will circle back to our controller and tell it to use the newly created dialog. To create the dialog, add a new class file to your project, naming it something reasonable. The class itself should inherit from the base class of LuisDialog and you will also want to mark the class as [Serializable].
Within the class we just created, we need to create a method for each Intent defined within our LUIS app.
        [LuisIntent("")]
        public async Task None(IDialogContext context, LuisResult result)
        {
            string message = "Sorry, I do not understand. Try asking me for order information or customer service help";
            await context.PostAsync(message);
            context.Done(true);
        }
As you can see from the code snippet, we create a “public async” method which returns a Task and takes an IDialogContext and a LuisResult as inputs. The IDialogContext is the conversation that is taking place, while the LuisResult is the JSON string returned from the LUIS service. Furthermore, the method is marked with an attribute of [LuisIntent("")], which denotes which LUIS Intent the given method is designed to respond to. When the Intent is blank, it becomes the catchall for any utterance which can’t be matched to a known intent. If this method were intended to handle all utterances that are matched with the “Customer Service” intent, we would mark this method with the attribute [LuisIntent("CustomerService")]. However, as this is the catchall intent, we want inform the user that we could not understand what was said, and to suggest some things they can ask about. We post the message to the user via context.PostAsync(message) and mark this conversation as complete.
For more complex conversations, or for conversations where data lookups or other tasks need to occur, there may be a need to call upon other methods from one of our LuisIntent marked methods. For example, the following snippet from a LuisIntent marked method denotes a completion handler to call upon receiving the results of a question prompted to the user.
        [LuisIntent("CustomerService")]
        public async Task customerServiceRequest(IDialogContext context, LuisResult result)
        {
            foreach(var entity in result.Entities)
            {
                if (entity.Type == "ServiceKeyword" && customerSupportKeywords.Contains(entity.Entity.ToLower()))
                {
                    switch(entity.Entity.ToLower())
                    {
                        case "password":
                            PromptDialog.Text(context, SupportUsernameEntered, "What is the email address associated with your account?");
                            break;
                    }
                    [...]
                }
            }
        }
In this truncated method, we detect that the user is asking a question regarding their password, so we want to verify the user by requesting their email address. PromptDialog.Text requests information from the user, and contains a completion handler which calls SupportUsernameEntered.
        private async Task SupportUsernameEntered(IDialogContext context, IAwaitable result)
        {
            var item = await result;
            {
                if (Account.IsFound(item))
                {
                    [...send email...]
                    await context.PostAsync("Account was found, we've sent a reset email to your registered email account");
                    context.Done(true);
                }
                [..]
            }
        }
Within this method, we confirm the account, and send a reset email if the account is found. Once this email is sent, we can consider this interaction completed and end the conversation. In order to have a natural dialog between the user and the app, the Bot service should include many of these conversation paths. Much of these child actions can be defined in LUIS as well, though in our example the conversation is more basic and linear.
Now that we have a basic Bot created, we will need to publish the Bot to Azure. For our purposes, the official documentation should be followed.
Finally, we need to set up a service to communicate with the bot in Azure, using a service called Direct Line. This is a simple REST service which allows for communication between a custom client and the Bot. The Direct Line documentation covers the steps required to connect DirectLine to your bot instance. Once Direct Line is configured, you must modify the DirectLineKey variable within your iOS View Controller to match the API Key for Direct Line.
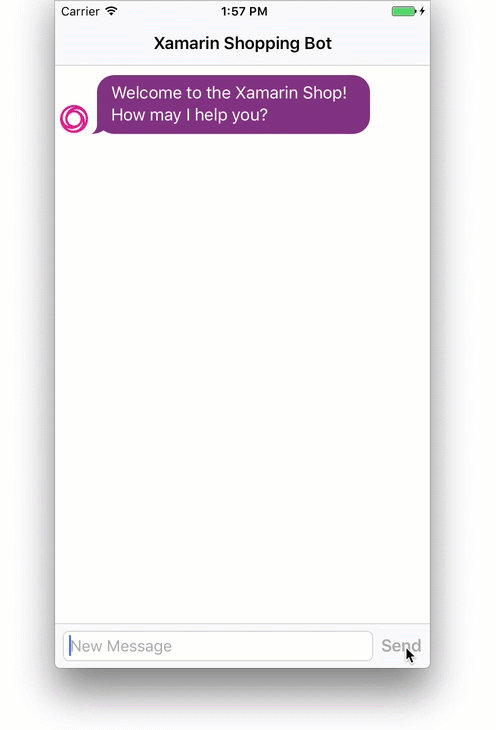
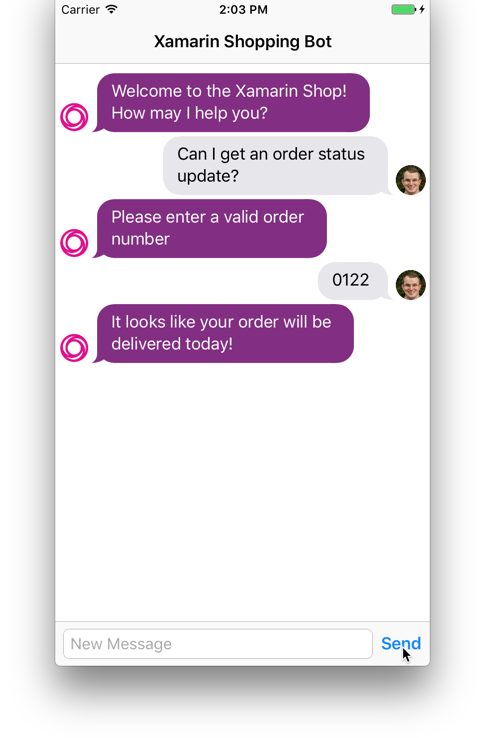
And that’s it! If we run our app, we can have a realistic conversation with our Bot, as seen below:
The Microsoft Bot Framework is an incredibly powerful system, and we have only scratched the surface of what is possible. To try out the full sample, download it from GitHub.