
Scene Kit is a powerful 3D graphics API that makes working with 3D a snap. It was first introduced in OS X 10.8, and has now come to iOS 8. With Scene Kit, creating immersive 3D visualizations and casual 3D games no longer requires expertise in OpenGL. Building on common scene graph concepts, Scene Kit abstracts away the complexities of OpenGL and OpenGL ES, making it very easy to add 3D content to an application. However, if you are an OpenGL expert, Scene Kit has great support for tying in directly with OpenGL as well. It also includes numerous features that complement 3D graphics, such as physics, and integrates very well with several other Apple frameworks, such as Core Animation, Core Image and Sprite Kit.
Scene Kit is extremely easy to work with. It is a declarative API that takes care of rendering. You simply set up a scene, add properties to it, and the magic of Scene Kit brings it all to life.
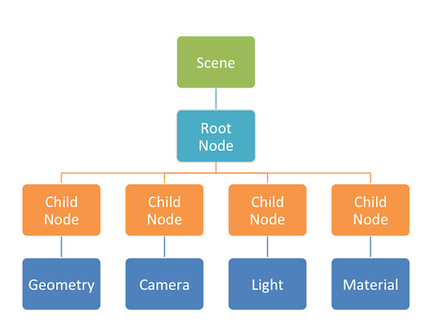
To work with Scene Kit you create a scene graph using the SCNScene class. A scene contains a hierarchy of nodes, represented by instances of SCNNode, defining locations in 3D space. Each node has properties such as geometry, lighting and materials that affect its appearance.
To make a scene appear on screen, you add it to an SCNView by assigning it to the view’s Scene property. Additionally, if you make any changes to the scene, SCNView will update itself to display the changes.
scene = SCNScene.Create ();
sceneView = new SCNView (View.Frame);
sceneView.Scene = scene;
Scenes can be populated from files exported via a 3d modeling tool, or programmatically from geometric primitives. For example, this is how to create a sphere and add it to the scene:
sphere = SCNSphere.Create (10.0f);
sphereNode = SCNNode.FromGeometry (sphere);
sphereNode.Position = new SCNVector3 (0, 0, 0);
scene.RootNode.AddChildNode (sphereNode);
Let There Be Light
At this point the sphere won’t display anything because there is no light in the scene. Lights in Scene Kit are created by attaching SCNLight instances to nodes. There are several types of lights ranging from various forms of directional lighting to ambient lighting. For example the following code creates an omni directional light on the side of the sphere.
// omni-directional light
var light = SCNLight.Create ();
var lightNode = SCNNode.Create ();
light.LightType = SCNLightType.Omni;
light.Color = UIColor.Blue;
lightNode.Light = light;
lightNode.Position = new SCNVector3 (-40, 40, 60);
scene.RootNode.AddChildNode (lightNode);
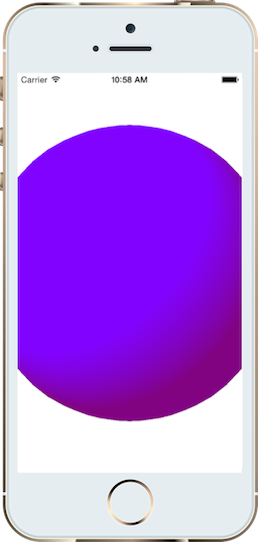
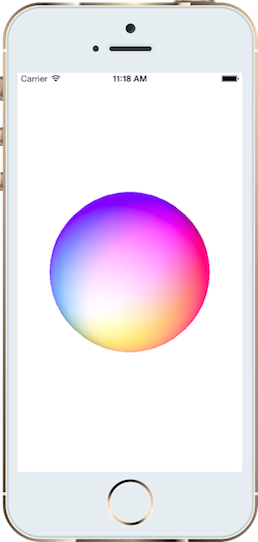
Omni directional lighting produces a diffuse reflection resulting in an even lighting, sort of like shining a flashlight. Creating ambient light is similar, although it has no direction as it shines equally in all directions. Think of it like mood lighting 🙂
// ambient light
ambientLight = SCNLight.Create ();
ambientLightNode = SCNNode.Create ();
ambientLight.LightType = SCNLightType.Ambient;
ambientLight.Color = UIColor.Purple;
ambientLightNode.Light = ambientLight;
scene.RootNode.AddChildNode (ambientLightNode);
With the lights in place, the sphere is now visible in the scene.
Adding a Camera
Adding a camera (SCNCamera) to the scene changes the point of view. The pattern to add the camera is similar. Create the camera, attach it to a node and add the node to the scene.
// camera
camera = new SCNCamera {
	XFov = 80,
	YFov = 80
};
cameraNode = new SCNNode {
	Camera = camera,
	Position = new SCNVector3 (0, 0, 40)
};
scene.RootNode.AddChildNode (cameraNode);
As you can see from the code above, Scene Kit objects can be created using constructors or from the Create factory method. The former allows using C# initializer syntax, but which one to use is largely a matter of preference.
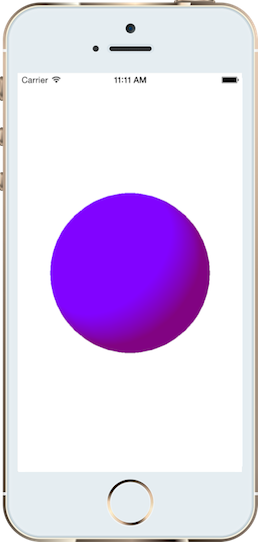
With the camera in place, the entire sphere is visible to the user.
You can add additional lights to the scene as well. Here is what it looks like with a few more omni-directional lights:
Additionally, by setting sceneView.AllowsCameraControl = true, the user can change the point of view with a touch gesture.
Materials
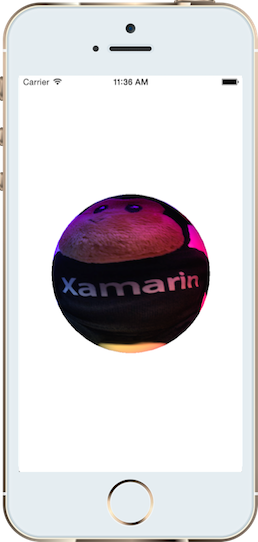
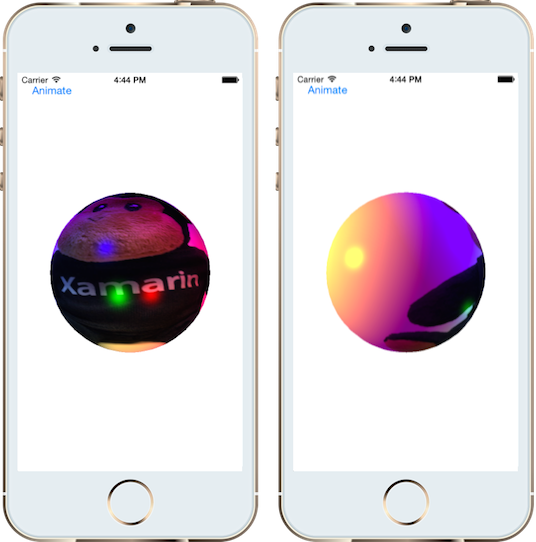
Materials are created with the SCNMaterial class. For example to add an image onto the sphere’s surface, set the image to the material’s diffuse contents.
material = SCNMaterial.Create ();
material.Diffuse.Contents = UIImage.FromFile ("monkey.png");
sphere.Materials = new SCNMaterial[] { material };
This layers the image onto the node as shown below.
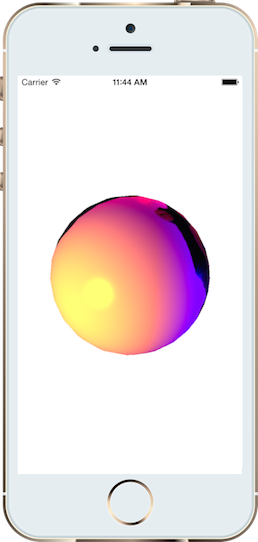
A material can be set to respond to other types of lighting too. For example, the object can be made shiny and have a its specular contents set to display specular reflection, resulting in a bright spot on the surface.
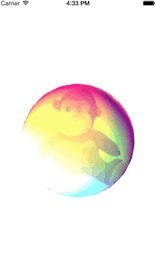
Materials are very flexible, allowing you to achieve a lot with very little code. For example, instead of setting the image to the diffuse contents, set it to the reflective contents instead.
material.Reflective.Contents = UIImage.FromFile ("monkey.png");
Now the monkey sits visually within the sphere, independent of the point of view, creating a monkey in a psychedelic 1960s sphere so to speak.
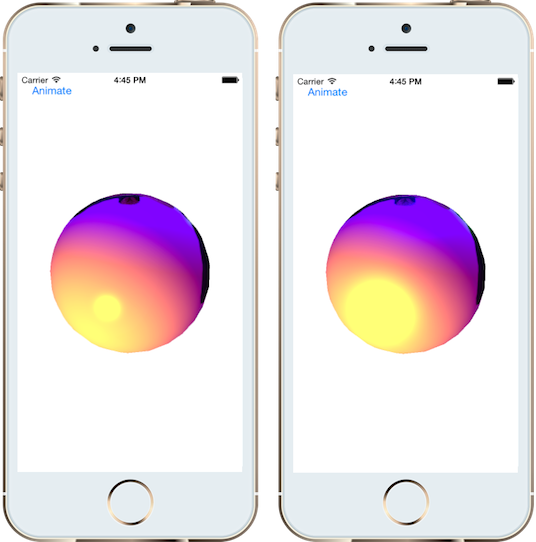
Animation
Scene Kit is designed to work well with Core Animation. You can create both implicit or explicit animations. When creating an implicit animation, Scene Kit provides its own transition class, SCNTransaction.
Here’s a example that rotates the sphere:
SCNTransaction.Begin ();
SCNTransaction.AnimationDuration = 2.0;
sphereNode.Rotation = new SCNVector4 (0, 1, 0, (float)Math.PI * 4);
SCNTransaction.Commit ();
You can animate much more than rotation though. Many properties of Scene Kit are animatable. For example, the following code animates the material’s Shininess to increase the specular reflection.
SCNTransaction.Begin ();
SCNTransaction.AnimationDuration = 2.0;
material.Shininess = 0.1f;
SCNTransaction.Commit ();
As you can see, Scene Kit is incredibly easy to use. This post just scratches the surface though. There are a wealth of additional features including constraints, physics, declarative actions, 3D text, depth of field support, Sprite Kit integration and Core Image integration to name just a few. It’s exciting to see this API come to iOS 8.
The source code from this post is available here.
Discuss this blog post in the Xamarin Forums