
Machine learning is changing the way we interact with each other and improving many aspects of our lives. In recent years, a variety of tools and frameworks have been developed to make it easier to build and deploy machine learning models into user-facing applications.
Amongst these tools is Windows ML, an on-device ML API that enables at-scale deployment of ML models on the breadth of the Windows device ecosystem. Windows ML usage has grown significantly since its introduction in 2018, and many developers that advantage of the API to power innovative and engaging ML experiences on Windows.
Listening to our customers’ feedback, we have recently added new tutorials to the Windows ML documentation. These new tutorials provide an end-to-end introduction to training and deploying an ML model, showing you how to create models from scratch using different products and services, and integrating these models with applications running on Windows devices through Windows ML. No previous knowledge in ML is required!
Build and train your machine learning model in No-Code Environment
If you’re growing your knowledge in machine learning and looking for a no-code way to create a model for computer vision scenarios, you’re in the right place! We’ve added several tutorials showcasing end-to-end walkthroughs of how to create your own model and use it with Windows ML.
If you want to train your model in a cloud environment, the Image Classification with Custom Vision and Windows ML tutorial will guide you through training an image classification model with Azure Custom Vision and deploying it in your application with Windows ML. The Custom Vision service is a great way to train machine learning models in the cloud, without writing a single line of code. To use Azure Custom Vision, you’ll need an Azure subscription, but if you’re new to Azure, you can sign up for a free Azure free account.
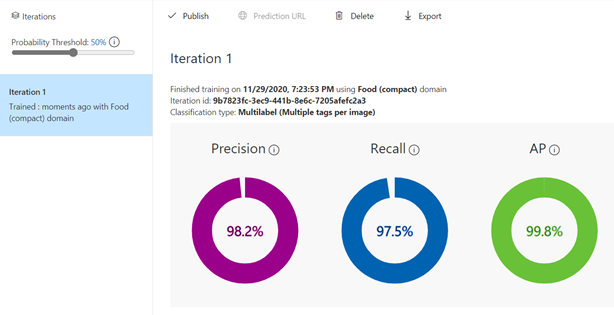
Figure 1: Training result with Custom Vision.
If you want to train a model on your local device, Image Classification with ML.NET and Windows ML tutorial provides step-by-step guidance on how to use ML.NET Model Builder (preview) to build a model to classify images of food and integrate that model with a Windows ML application. ML.NET Model Builder is another great way to build and train machine learning models without having expertise in machine learning. Model Builder is a Visual Studio extension that allows you to train your own model in a non-code environment, locally on the device or by integrating with Azure ML.
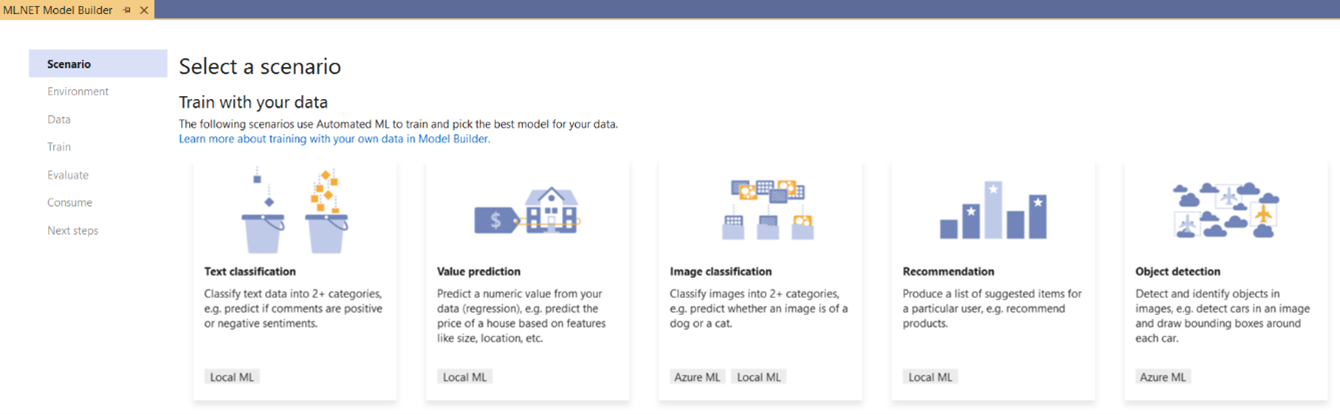
Figure 2: Train your model with ML.NET Model Builder.
Code to build your own custom machine learning model
If you’d prefer hands-on experience with basic machine learning code instead of using an automated service, our new tutorials provide the instructions you need. Basic knowledge in Python and C# programming languages is desired. Previous expertise in machine learning is preferable, but not required.
If you’re interested in learning how to train and deploy a basic image classification neural network model, then check out the Image Classification with PyTorch and Windows ML tutorial. You’ll learn how to use PyTorch to build and train a model to recognize certain types of patterns, letting it classify labels of images from the Python built-in dataset. In the second part of the tutorial, you’ll learn how to export the model to ONNX format and deploy it in a Windows Machine Learning UWP (C#) application running locally on your Windows device.
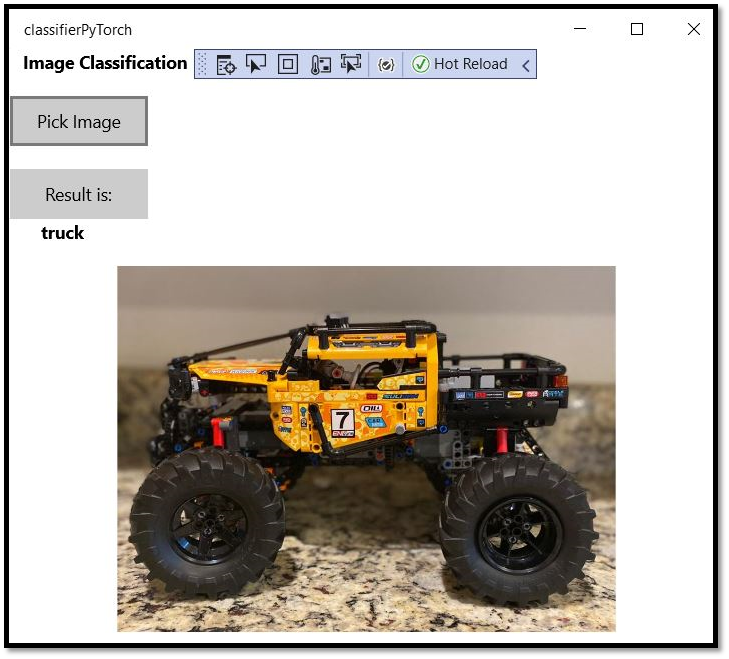
Figure 3: Image Classification model trained with PyTorch and integrated with Windows ML app.
If you want to learn how to train and deploy an object detection model, then the Object Detection with TensorFlow and Windows ML tutorial is the right choice. It will guide you through the process and explain how to use the YOLO architecture to train and evaluate a real-time object detection model in a UWP application. The model will be trained with TensorFlow locally on your machine through DirectML APIs, which provide GPU accelerated training across all Windows devices. You’ll then learn how to integrate the trained model into a UWP application that uses your webcam to detect objects in the frame in real-time, using local Windows ML APIs.
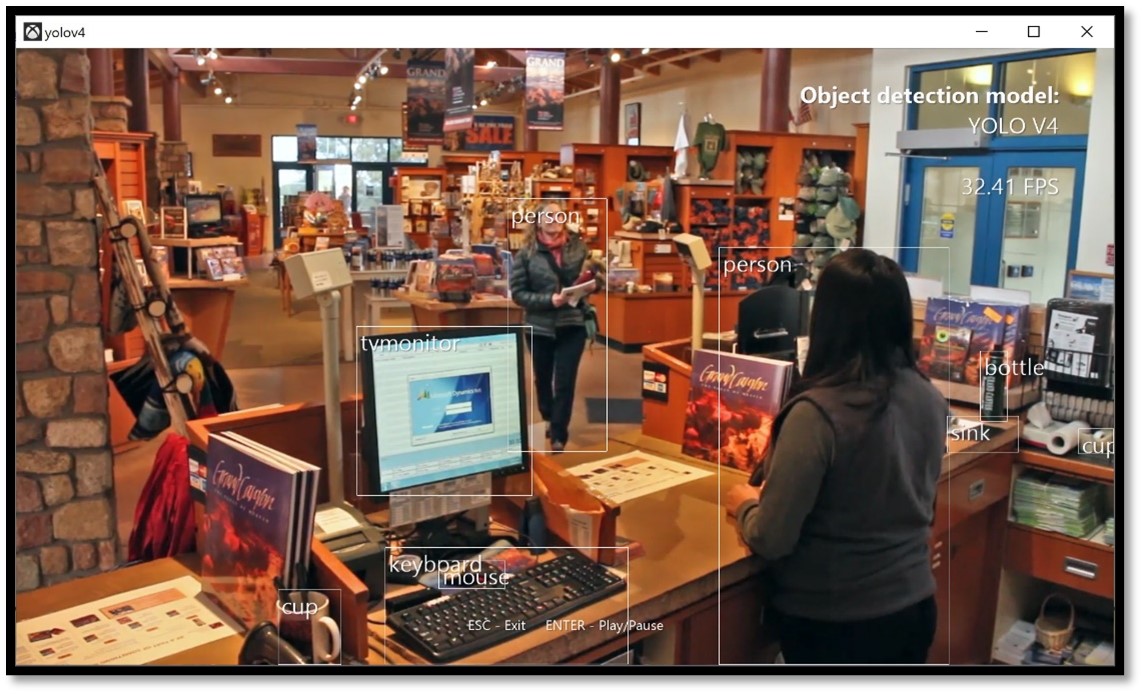
Figure 4: YOLO model trained with TensorFlow and integrated with Windows ML app.
Getting Started
If you’re a developer looking to learn more about machine learning implementation on Windows, get started today with our new tutorial documentation. Whether you’re looking for a simple no-code environment to deploy your machine learning model or interested in coding your own custom model, we’ll show you how to use the framework that works best for you.
| Tutorial | Scenario | Training Environment | |
| No-Code training environment | Custom Vision + Windows ML | Image Classification | Azure Cloud |
| ML.NET + Windows ML | Image Classification | Azure Cloud / Local | |
| Code training environment | PyTorch + Windows ML | Image Classification | Local |
| TensorFlow + Windows ML | Object Detection | Local |
If you want to take things a step forward, you can build upon your knowledge with the Windows ML Advanced Features tutorials. These short tutorials show complex Windows ML capabilities, such as how to select preferable execution devices when you evaluate the ONNX model, or how to execute multiple ML models in the chain with Window ML APIs. You’ll also learn about how to protect your IP by loading an encrypted model resource, decrypting it to a stream, and loading the stream with Windows ML APIs without storing the decrypted model on disk. And if your target platform is older than Windows 10, these tutorials will explain how to port an existing WinML app to the redistributable NuGet package.
PyTorch, the PyTorch logo and any related marks are trademarks of Facebook, Inc
TensorFlow, the TensorFlow logo and any related marks are trademarks of Google Inc.
0 comments