[Update 2/9/2010] The RC version of the extension is now available (using the same link). Users who installed this extension for Beta 2 and customized the theme for VS2010 Beta 2 : If you have installed VS2010 RC on the same computer, you may experience a “rainbow colored” VS. To remedy this problem, please do one of the following:
1. Follow the “Uninstall” instructions at the end of this post and make sure you uninstall the extension and do the cleanup as detailed. You will see Visual Studio starting up with random colors if you have kept the customization from Beta 2 OR customize again in Visual Studio 2010 RC using the Beta 2 version of this extension.
2. Install the RC/RTM version of the extension (now available at the link provided below). After installing the RC/RTM version of the extension and starting Visual Studio, you themes should be automatically upgraded, and the random colors should go away.
Many users have requested different color themes for Visual Studio, or for the ability to change color themes to suit their preferences. I have just released an extension for Visual Studio 2010 Beta 2 that allows users to customize colors used by our shell color service.
What colors are in the shell color service?
Colors used by the command and window management system can be customized using this extension. These are colors that can be read programmatically by anyone via the IVsUIShell.GetVSSysColorEx method. There are a number of specific tool windows (like the Toolbox and the Start Page) that use colors from this color service, so their colors can also be customized. However, other tool windows (such as the Solution Explorer) use native Win32 controls, which are rendered based on the current Win32 theme and are not inherently color-aware inside of Visual Studio. The text editor and tool windows based on it (such as the Output window) already use a different user-customizable color service (in ToolsOptionsEnvironmentFonts and Colors), and are not affected by this extension.
You’ll notice that the color service exposes hundreds of colors, accumulated over many releases of Visual Studio. It can be difficult to determine where colors are used in Visual Studio (I’m working on making it easier to determine where colors are used for a future version of the extension), and it may seem daunting to consider editing the values of hundreds of colors. However, there are a few ways to quickly create a new theme without spending hours—some helpful tips are included below.
You can learn more about the color service and other UI guidelines in the Visual Studio UX Guidelines document.
Walkthrough: Creating a new “Expression” gray theme
A frequent request for Visual Studio is an Expression-style theme, so let’s use that as a scenario for the walkthrough.
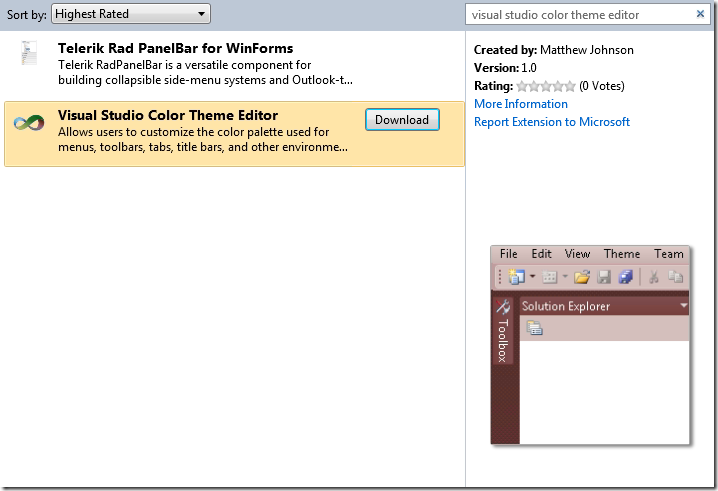
1. Install the extension. You can use the Extension Manager dialog inside Visual Studio (ToolsExtension Manager) and search for “visual studio color theme editor”, or you can download the VSIX file from here.
2. Create a new theme. After you install the extension and launch Visual Studio, you should see a new top-level menu called Theme. The two themes that ship with Visual Studio 2010 are available by default. The Default theme is the Visual Studio 2010 blue theme, and the High Contrast theme is the theme used when a Windows high-contrast theme is selected. The High Contrast theme is built entirely of Windows system theme colors, and as such has a limited palette. There are also three custom themes created as examples—feel free to use them as starting points for your own themes.
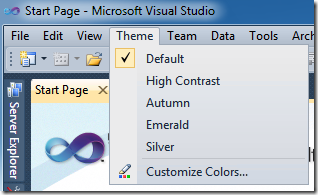
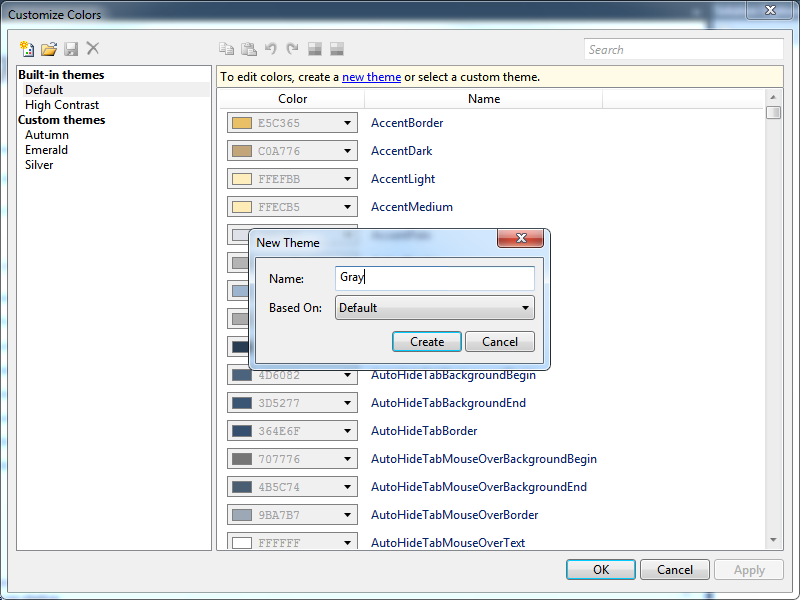
Choosing “Customize Colors…” brings up the dialog that will let you create a new theme. The built-in themes are not editable, but you can create a new theme using the hyperlink in the information bar or the toolbar button on the far left.
3. Change colors to gray. The ![]() Modify Hue/Saturation/Lightness option lets you saturate/desaturate or lighten/darken each color, or rotate the hues of each color. Hue, saturation, and lightness refer to aspects of the HSL color model; if you’re interested in more information about the HSL model and how it relates to RGB, Wikipedia has a great article. Using this dialog, we can desaturate all of the colors to gray by moving the S slider to –100.
Modify Hue/Saturation/Lightness option lets you saturate/desaturate or lighten/darken each color, or rotate the hues of each color. Hue, saturation, and lightness refer to aspects of the HSL color model; if you’re interested in more information about the HSL model and how it relates to RGB, Wikipedia has a great article. Using this dialog, we can desaturate all of the colors to gray by moving the S slider to –100.

4. Apply the theme. After applying the Modify Hue/Saturation/Lightness dialog, choose OK on the Customize Colors dialog. The new Gray theme will be applied and should now show up as checked in the Theme menu!
Editing individual colors
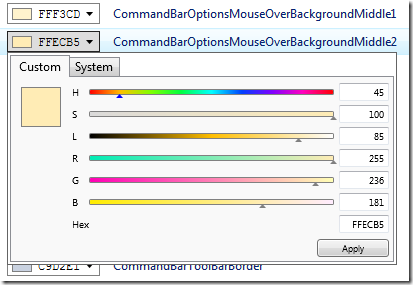
Bulk-editing operation will only get you so far, and you will soon want to change the value of a few individual colors. You can easily do this using the color picker popup. This popup lets you change the HSL or RGB values of the color directly, or modify the raw hexadecimal RGB value. You can also specify that the color should come from one of the Windows system colors. Pressing Enter or clicking Apply will save the value; pressing Escape or clicking away will cancel editing.
Other useful features
- Importing and exporting. By default, your current set of custom themes is saved in the registry, and restored each time you start Visual Studio. However, you can export colors into a VSTHEME file for backup purposes, or to share across multiple machines or with friends. Be careful: importing a theme that you already have will overwrite the in-memory copy; look for improvements in this area in future versions.
- Copy and paste. By selecting one or more colors in the Customize Colors dialog, you can copy the color’s values. In the clipboard, these values are stored as as hex RGB values in a comma-delimited string. You can then paste the values into multiple other color “cells”. I call them “cells” because copying and pasting behaves the same way that Excel behaves when copying and pasting cell values. You can even copy a single color, select multiple cells, and paste that single value into all selected cells with one operation.
- Undo and redo. Any of the operations you take while the Customize Colors dialog is open can be undone and redone while the dialog is open.
- Search filtering. The Search box above the color list can currently be used to filter the color list by name, which can help you quickly identify all colors containing some keyword (for example, finding all of the “StartPage”-related colors).
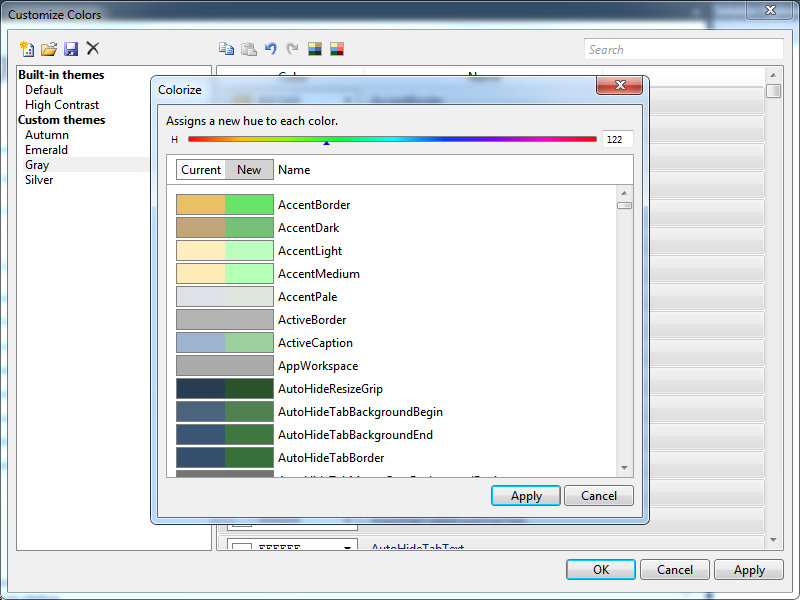
- Colorization. The
 Colorize option lets you apply a single hue to all of the selected colors. Note that colorizing hues is not the same as the “rotate” feature of Modify Hue/Saturation/Lightness. When rotating, colors with different hues will still have different hues after rotating their values, whereas colorizing changes every color’s hue to the same value.

Uninstall
Hopefully everyone will happily use this extension forever, but some may decide to uninstall the extension. If you had any non-Default theme applied before uninstalling, you will find that the colors are still used after restarting Visual Studio (even though the extension is no longer installed).
The reason this happens is that the extension writes registry data to a value that Visual Studio always reads upon startup—even if the extension is not installed. This is a user-specific value (written to the HKCU Visual Studio registry hive), so every user can have their own theme. However, extensions in general are machine-wide. When uninstalling the extension, there isn’t a way to remove the custom theme data from each user’s registry hive, and so each user will have the last-applied theme still applied even after the extension is uninstalled. To avoid this problem, apply the Default theme before uninstalling the extension—applying the Default theme deletes this registry value instead of writing a custom color theme to it, so it will leave Visual Studio in a theme-free state (at least for your user account).
If you need to clean up these registry keys after uninstalling, you can run the following from a command prompt (replace 10.0 with 10.0Exp if you were using the experimental hive):
reg delete HKEY_CURRENT_USERSoftwareMicrosoftVisualStudio10.0UseDebugColorScheme /f
reg delete HKEY_CURRENT_USERSoftwareMicrosoftVisualStudio10.0ThemeColorCache /f
 |
Matthew Johnson – Developer, Visual Studio Platform Short Bio: Matthew has been at Microsoft for three years and on the Visual Studio Platform for two years. He works on WPF-related features of the Visual Studio window layout system. |


0 comments