
Hello Android developers,
Last week we got an ONNX runtime demo running on Android, which classified the subject of images being streamed from the device’s camera. Setup required downloading a pre-trained model and adding it to the sample app on GitHub. This week we’re going to look into the details of preparing inputs for the model, following the sample app’s code.
Model inputs
Pre-trained models in formats that can be shared across platforms are incredibly powerful, but it makes sense that each model must have inputs supplied in a known and repeatable way to get the most accurate results. Models will typically specify the expected format of their input parameters.
FOr example, on the information page for the MOBILENET V2 model, (from last week’s sample) you’ll find the following information along with sample Python code that shows an example of how to pre-process image data before sending to the model.
All pre-trained models expect input images normalized in the same way, i.e. mini-batches of 3-channel RGB images of shape (3 x H x W), where H and W are expected to be at least 224. The images have to be loaded in to a range of [0, 1] and then normalized using mean = [0.485, 0.456, 0.406] and std = [0.229, 0.224, 0.225].
You can use Python notebook to interactively step through the pre-processing code and test the model, such as with this sample image input:
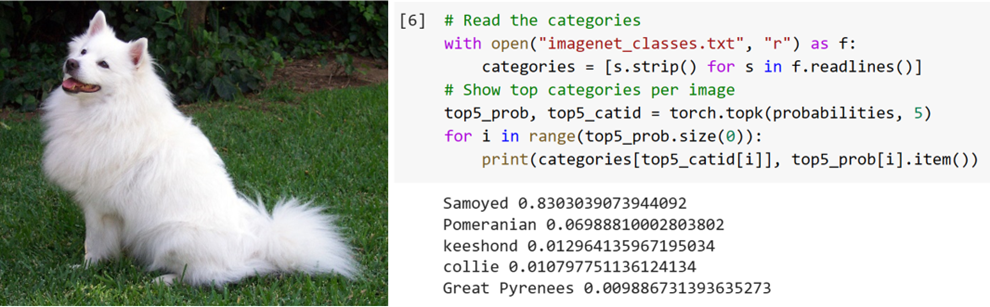
Many clients (including mobile apps on Android) can’t easily re-use the Python code provided, and will have to implement their own pre-processing in a native language like Java or Kotlin. The following sections show examples of how the Python code can be adapted to interact with an ONNX model on Android using Kotlin.
Image input formatting on Android
The sample does its image pre-processing in the analyze function in ORTAnalyzer.kt.
The first step is resizing to the required dimensions (224×224) with this function call:
Bitmap.createScaledBitmap(it, 224, 224, false)
Further manipulation is done in the preProcess function which is defined in ImageUtil.kt. In this code snippet you can see the normalization process on each pixel that matches the parameters specified for the model:
bitmap.getPixels(bmpData, 0, bitmap.width, 0, 0, bitmap.width, bitmap.height)
for (i in 0..IMAGE_SIZE_X - 1) {
    for (j in 0..IMAGE_SIZE_Y - 1) {
        val idx = IMAGE_SIZE_Y * i + j
        val pixelValue = bmpData[idx]
        imgData.put(idx, (((pixelValue shr 16 and 0xFF) / 255f - 0.485f) / 0.229f))
        imgData.put(idx + stride, (((pixelValue shr 8 and 0xFF) / 255f - 0.456f) / 0.224f))
        imgData.put(idx + stride * 2, (((pixelValue and 0xFF) / 255f - 0.406f) / 0.225f))
    }
}
You’ll find some additional image processing code for bitmap conversion to the correct format for ONNX in the ImageUtil.kt file.
Output parsing
The model page sample code also contains information about how to parse the output:
# Tensor of shape 1000, with confidence scores over Imagenet’s 1000 classes
# The output has unnormalized scores. To get probabilities, you can run a softmax on it.
This means the result is a thousand ‘confidence scores’, one for each possible classification. The model result doesn’t include the text descriptions of each possible classification, so as a consumer of the model you need to separately download the classes list and match them up with the scores.
You can find the code that extracts the scores and runs them through the custom functions softMax and getTop3 to get the indices of the highest scoring classifications in ORTAnalyzer.kt:
val rawOutput = ((output?.get(0)?.value) as Array<FloatArray>)[0]
val probabilities = softMax(rawOutput)
result.detectedIndices = getTop3(probabilities)
To display the results with the correct label, in MainActivity.kt the downloaded file (placed in the raw resources directory) is parsed:
resources.openRawResource(R.raw.imagenet_classes).bufferedReader().readLines()
And when the results are displayed, the index of the highest scoring classifications are used to show the correct text value from the list:
detected_item_1.text = labelData[result.detectedIndices[0]]
detected_item_value_1.text = "%.2f%%".format(result.detectedScore[0] * 100)
Any model you decide to add to your apps will have its own input parameter formatting requirements and output parsing rules, so remember to check the model’s documentation while implementing.
Not all models have images as their input or collections of data as the output. For a simpler example, this linear regression sample on GitHub shows how to provide a simple numerical value to a model which returns a single numerical result (check the associated blog for instructions to build, convert, and place the model in the Android code).
Resources and feedback
More information about the ONNX Runtime is available at onnxruntime.ai and also on YouTube.
If you have any questions about applying machine learning, or would like to tell us about your apps, use the feedback forum or message us on Twitter @surfaceduodev.
There won’t be a livestream this week, but check out the archives on YouTube. We’ll see you online again soon!
0 comments