
Hello Flutter developers!
In our last post, Get Started with Flutter on Surface Duo, we walked you through how to add the Surface Duo SDK to your Flutter project and how to use the SDK to obtain information from the SDK library. We can now tell if the device we are running on is a dual-screen device, if your application is running on one screen or both, and even what angle the hinge is currently at. A few of you have even gone so far as to begin creating packages for Flutter to help developers get started even quicker. You are encouraged to check out these packages, perhaps you might even like to contribute to them: multiple_screens, and surface_duo.
In this post, we will pick up where we left off in the last post and walk you through adding one more bit of code to determine the area between the two screens, or Display Mask (hinge), is taking up. Once we have that, we’ll dive in to how you can use the APIs from our previous post, and this new one, in your applications to make them light-up on dual-screen devices. If you’d like to follow along, you can clone the starter_sample application from the Flutter samples GitHub repository.
Adding the Display Mask Code
Our first task is to add code to determine just how much width (spanned, portrait mode) or height (spanned, landscape mode) the hinge is taking up. If you aren’t familiar with all the configurations available on a dual-screen device, we encourage you to read the documentation where you can get all the info. Basically, when your application is spanned across the two screens, there is a portion of the display where the hinge is, that is non-viewable. It is up to you to determine how to handle this area within your application and we do provide some good guidance in our documentation.
Let’s add the following code into our MainActivity.kt file:
 fun getHingeSize(): Int {
        // The size will always be the same,
        // it will either be the height (Double Landscape)
        // or the width (Double portrait)
        val displayMask = DisplayMask.fromResourcesRectApproximation(activity)
        val boundings = displayMask.boundingRects

        if (boundings.isEmpty()) return 0

        val first = boundings[0]
        val density: Float = activity!!.resources.displayMetrics.density
        val height = ((first.right / density) - (first.left / density)).toInt()
        val width = ((first.bottom / density) - (first.top / density)).toInt()

        if (width < height)
        {
            return width
        }else {
            return height
        }
    }
This code will provide us with the height, or width of the hinge. We first get the Display Mask information from the API. If there is no Display Mask, then we are not spanned, and we return zero. Next, we use the information to calculate the height and width of the Display Mask. Note that we could simply return the entire object with the top, bottom, left, and right values and allow the Flutter program to determine how to use them, but in this case we are simply going to return the smaller of the height and width. Why the smaller? Well, if you picture the hinge, you can see that no matter how the device is oriented, the hinge area between the two sides will always be the smaller of height vs. width values.

Figure 1: Application spanned in both double-portrait and double-landscape mode
Now that we have that code in place, let’s use it in the MethodChannel handler. Your new handler will look something like this.
    // Surface Duo: Here is were we define the Method Channel and how we handle the requests
    MethodChannel(flutterEngine.dartExecutor.binaryMessenger,
                  CHANNEL).setMethodCallHandler {
    call, result ->
        if (!isDualScreenDevice()) {
            result.success(false)
        } else {
            try {
                when (call.method) {
                    "isDualScreenDevice" -> {
                        if (isDualScreenDevice()) {
                            result.success(true)
                        } else {
                            result.success(false)
                        }
                    }
                    "isAppSpanned" -> {
                        if (isAppSpanned()) {
                            result.success(true)
                        } else {
                            result.success(false)
                        }
                    }
                    "getHingeAngle" -> {
                        if (!mSensorsSetup) {
                            setupSensors()
                        }
                        result.success(mCurrentHingeAngle)
                    }
                    "getHingeSize" -> {
                    result.success(getHingeSize())
                    }
                    else -> {
                        result.notImplemented()
                    }
                }
            }
        }
    }
Great, we now can get the hinge size; let’s use all this info in our sample application.
Lighting up the application
We are using the stock Flutter template you get when creating a new Flutter app. If you go ahead and span the application in the emulator, you will quickly notice that the view is not ideal for the user.
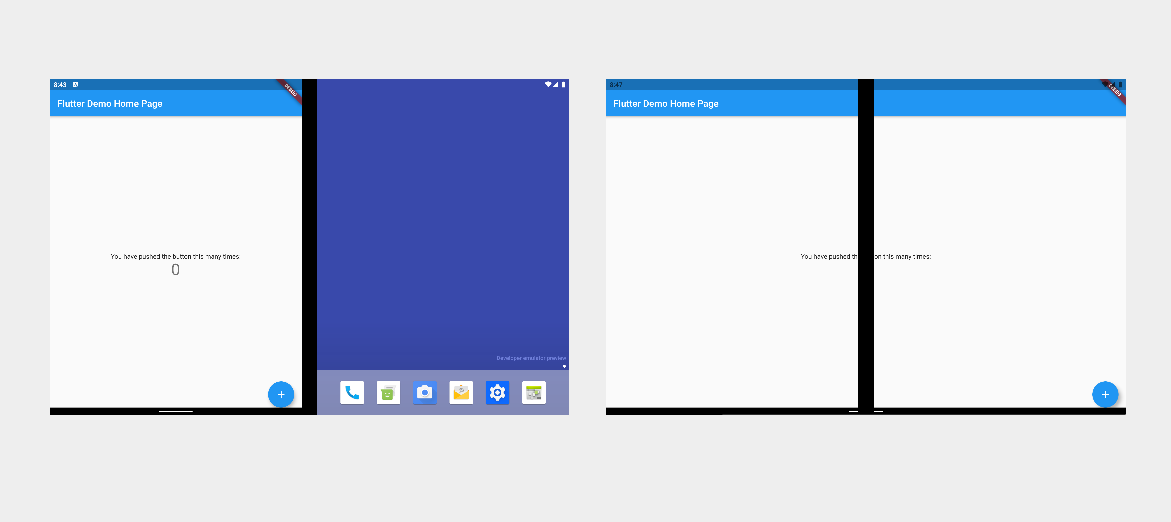
Figure 2: Application on single screen and spanned
The text is hidden underneath the hinge area and the number showing how many times we’ve clicked the button is also obscured. Let’s see how we can utilize the information we now have available to make this more usable. We’ll be doing minimal work to make this one-page application dual-screen aware, but all the techniques used would apply to any screen in your application. In a future post, we’ll dig deeper into how we can make this even easier to migrate an application with a much more complex architecture.
First, we’ll need to determine if we are running on a dual-screen device, and for this verification, we’ll use the isDualScreenDevice MethodChannel. We’ll override the InitiState method and set a class level variable since this only needs to be set once as this value won’t change. Next, pull the content from the body of our Scaffold into a new method called _buildBody.
Our new Scaffold will look like this:
  return Scaffold(
    appBar: AppBar(
      title: Text(widget.title),
    ),
    body: _buildBody(),
    floatingActionButton: FloatingActionButton(
      onPressed: _incrementCounter,
      tooltip: 'Increment',
      child: Icon(Icons.add),
    ),
  );
And our new _buildBody method looks like this:
  Widget _buildBody() {
    return Center(
      child: Column(
        mainAxisAlignment: MainAxisAlignment.center,
        children: <Widget>[
          Text(
            'You have pushed the button this many times:',
          ),
          Text(
            '$_counter',
            style: Theme.of(context).textTheme.headline4,
          ),
        ],
      ),
    );
  }
If you followed along with our first post, you may recall that we had an _updateDualScreenInfo method. We have moved the local variables out of that method and turned them into class level variable on the_MyHomePageState class so we can reference them in other places. You can check the final project if you aren’t sure what changes to make.
In order to ensure that our variables that tell us if the application is spanned and what the display mask size is or updated to when there is a change before we build the body, we need to use a FutureBuilder. We’ll wrap the body of our Scaffold in a FutureBuilder, which will end up looking like this:
  return Scaffold(
  ...
    body: FutureBuilder<void>(
      future: _updateDualScreenInfo(),
      builder: (BuildContext context, AsyncSnapshot<void> snapshot) {
        return _createPage();
      },
    ),
  ...
What is happening here? Well, we’ve set the future to call our method that updates the dual screen info variables. This is inside our build method so each time we try to rebuild the widget this will call our update method. Since we’re calling from our FutureBuilder, it will happen before our builder inside the FutureBuilder runs. With this in place, we can be sure that we’ll always have the most current info when we run our builder. Let’s create a new method, _createPage that simply returns _buildBody() for now. We’ll modify it next.
  Widget _createPage() {
    return _buildBody();
  }
Next, let’s focus on the _createPage method. First, we wrap our return code in an if/else block. If we are not on a dual screen device, or we are but we are not spanned, then we will return the default Center and Column from the template. If we are on a dual-screen device and we are spanned, then we’ll simply return a blank Container for now.
  if(!_isDualScreenDevice || (_isDualScreenDevice && !_isAppSpanned)) {
    // We are not on a dual-screen device or
    // we are but we are not spanned
    return _buildBody();
  } else {
    // We are on a dual-screen device and we are spanned
    return Container();
  }
Ok, so now we have a working app if we are on a single-screen device or a dual-screen device and not spanned, but if we are spanned we will get a blank screen. We need to fix that now.
To fix this, let’s change our else block in the _createPage method. We’ll do something simple, like display the Flutter logo on the left and push the content over to the right side (top and bottom if we’re rotated).
Because we can be in either portrait or landscape mode and spanned, we need to check that first, so we’ll add a new if/else in place of the return Container() line:
  // We are on a dual-screen device and we are spanned
  if (MediaQuery.of(context).orientation == Orientation.portrait) {
    // Portrait is what we get when we have rotated the device
    // and have two "landscape" screens on top of each other,
    // so together they are "portrait"
  } else {
  }
Now let’s focus on the else block. This is where we will end up when the application is spanned on the device in its normal orientation, like in this image:

Figure 3: Image of application spanned in landscape orientation
Here we want a Row with children. We’ll use our _hingeSize information to create an “empty” space in the middle to ensure we don’t lose any content. Our code in the else block should now look like this:
  } else {
    return Row(
      children: [
        Flexible(
          flex:1,
          child: Center(child: FlutterLogo(size: 200.0)),
        ),
        SizedBox(width: _hingeSize.toDouble()),
        Flexible(
          flex:1,
          child: _buildBody(),
        ),
      ],
    );
  }
The beauty in this is that it is very simple. We have a SizedBox that is the width of the hinge and on either size, we have one child that takes up the space on that size. We center a FlutterLogo on one side and then use the original code now in our _buildBody method on the other side. For the if block, all we have to do is copy what we have in the else, then change the Row to be a Column and the SizedBox from a width to a height based box.
  return Column(
    children: [
      Flexible(
        flex: 1,
        child: Center(child: FlutterLogo(size: 200.0)),
      ),
      SizedBox(height: _hingeSize.toDouble()),
      Flexible(
        flex:1,
        child: _buildBody(),
      ),
    ],
  );
We now have a final app that will adjust the output based on if we are on a Dual-Screen device and if the app is spanned across screens or not. There is so much more we can do and will have to do when we need to support navigation from page to page. We need to consider what content should appear where and whether it should it be a new page on the right if the app is spanned. Should it be a single page that lays out differently when spanned vs. not spanned? What happens with the content already on the screen? Lucky for us, there is a lot of guidance already available on this to help us out. What we’ll need to do is implement something that helps us add the functionality in an easy way.
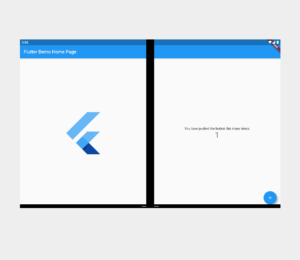
Figure 4: Screenshot of the finished application spanned
Already, we are seeing people beginning to think about this. Check out the beginning of this post and the reference to the packages that have begun popping up. There is room to improve and in our next post, we’ll dig into a way this can be accomplished that has the least amount of code changes on an existing Flutter application.
Resources and feedback
UPDATE: You can find the final project, lightup_sample, in our GitHub repository
We would love to hear from you about your experiences using the Surface Duo SDK, emulator, as well as your thoughts on how you can utilize these in your Android apps.
Please reach out using our feedback forum or message me on Twitter or GitHub.
0 comments