
Hello prompt engineers,
OpenAI recently announced a new feature – function calling – that makes it easier to extend the chat API with external data and functionality. This post will walk through the code to implement a “chat function” in the JetchatAI sample app (discussed in earlier posts).
Following the function calling documentation and the example provided by the OpenAI kotlin client-library, a real-time “weather” data source will be added to the chat. Figures 1 and 2 below show how the chat response before and after implementing the function:
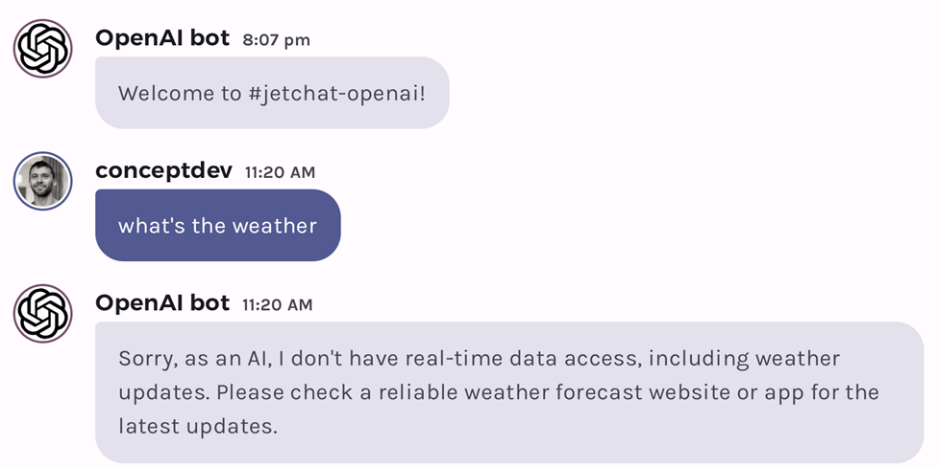
Figure 1: without a function to provide real-time data, chat can’t provide weather updates
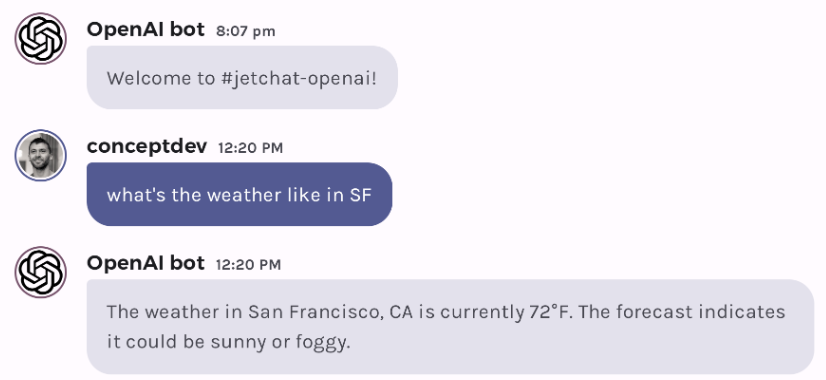
Figure 2: with a function added to the prompt, chat recognizes when to call it (and what parameters are required) to get real-time data
How chat functions work
A “chat function” isn’t actually code running in the model or on the server. Rather, as part of the chat completion request, you tell that model that you can execute code on its behalf, and describe (in both plain text and with a JSON structure) what parameters your code can accept.
The model will then decide, based on the user’s input and the capabilities you described, whether your function might be able to help with the completion. If so, the model response indicates “please execute your code with these parameters, and send back the result”. Rather than show this response to the user, your code extracts the parameters, runs the code, and sends the result to the model.
The model now reconsiders how to respond to the user input, using all the context from earlier in the chat plus the result of your function. It may use all, some, or none of the function result, depending on how well it matches the user’s initial request. The model may also re-phrase, paraphrase, or otherwise interpret your function’s results to best fit the completion.
If you have provided multiple functions, the model will choose the best one (according to its capabilities), and if none seem to be applicable then it will respond with a completion without calling any functions.
How to implement a function
The code added to the JetchatAI sample is a variation of the example provided in the OpenAI Kotlin client library docs. Before adding code make sure to update your build.gradle file to use the latest version of the client library (v3.3.1) which includes function calling support:
com.aallam.openai:openai-client:3.3.1
Also make sure you’re referencing a chat model that supports the function calling feature, either gpt-3.5-turbo-0613 or gpt-4 (see Constants.kt in the sample project). Don’t forget that you’ll need to add your OpenAI developer key to the constants class as well.
Add the function call to the chat
The basic code for making chat completion requests includes just the model name and the serialized conversation (including the most recent entry by the user). You can find this in the OpenAIWrapper.kt file in the JetchatAI sample:
val chatCompletionRequest = chatCompletionRequest {
    model = ModelId(Constants.OPENAI_CHAT_MODEL)
    messages = conversation
}
Figure 3: executing a chat completion without functions
To provide the model with a function (or functions), the completion request needs these additional parameters:
-
functions– a collection offunction, each of which has:-
name– key used to track which function is called -
description– explanation of what the function does – the model will use this to determine if/when to call the function -
parameters– a JSON representation of the function’s parameters following the OpenAPI specification (shown in Figure 5)
-
-
functionCall– the ability to control how functions are called.Automeans the model will decide, but you can also turn the functions off (FunctionMode.None) OR force a specific function to be called withFunctionMode.Namedfollowed by the function’s name.
The updated chat completion request is shown below:
val chatCompletionRequest = chatCompletionRequest {
    model = ModelId(Constants.OPENAI_CHAT_MODEL)
    messages = conversation
    functions {
        function {
            name = "currentWeather"
            description = "Get the current weather in a given location"
            parameters = OpenAIFunctions.currentWeatherParams()
        }
    }
    functionCall = FunctionMode.Auto
}
Figure 4: a function for getting the current weather added to the chat completion request
To keep the code readable the function parameters (and implementation) are in the OpenAIFunctions.kt file. The parameters are set in the currentWeatherParams function, which returns the attributes of all the function parameters, such as:
-
name– each parameter has a name, such as"latitude"and"longitude" -
type– data type, such as"string". This can also be anenumas shown in Figure 5. -
description– an explanation of the parameter’s purpose – the model will use this to understand what data should be provided.
There is also an element to specify which parameters are required, which will also help the model collect information from the user. The parameters for the weather function are described like this:
fun currentWeatherParams(): Parameters {
    val params = Parameters.buildJsonObject {
        put("type", "object")
        putJsonObject("properties") {
            putJsonObject("latitude") {
                put("type", "string")
                put("description", "The latitude of the requested location, e.g. 37.773972 for San Francisco, CA")
            }
            putJsonObject("longitude") {
                put("type", "string")
                put("description", "The longitude of the requested location, e.g. -122.431297 for San Francisco, CA")
            }
            putJsonObject("unit") {
                put("type", "string")
                putJsonArray("enum") {
                    add("celsius")
                    add("fahrenheit")
                }
            }
        }
        putJsonArray("required") {
            add("latitude")
            add("longitude")
        }
    }
    return params
}
Figure 5: describe the shape of the function parameters using JSON
With just the above changes the model will detect that you have declared a function and attempt to use it if appropriate (according to the user’s input). To actually respond to the model’s request, we need to add more code handling the chat completion.
Implement the function call behaviour
The basic code for handling a chat response is very simple – it extracts the most recent message content (from the model), adds it to the conversation history and renders it on screen:
// this value is added to the UI
val chatResponse = completion.choices[0].message?.content ?: ""
// add the response to the conversation history for subsequent requests
conversation.add(
    ChatMessage(
        role = ChatRole.Assistant,
        content = chatResponse
    )
)
Figure 6: handling a chat response without functions
Because we have added a function to the response, it’s possible that the model decided to “call” it, so we need to handle that case after the chat completion by checking the functionCall property of the response. If a function name is provided, this indicates the model wishes to “execute” that function, so we need to extract the parameters, perform the function, and send the function’s output back to the model for consideration.
This additional round-trip to the model is hidden from the user – they do not see the response with the function call, nor do they have any direct input into the request that is sent back with the function’s results. The subsequent response – where the model has considered the function’s results and incorporated them into a final response – is what is rendered in the UI.
if (completionMessage.functionCall != null) {
    // handle function
    val function = completionMessage.functionCall
    if (function!!.name == "currentWeather")
    {
        val functionArgs = function.argumentsAsJson() ?: error("arguments field is missing")
        // CALL THE FUNCTION with the parameters sent back by the model
        val functionResponse = OpenAIFunctions.currentWeather( // implementation to come…
            functionArgs.getValue("latitude").jsonPrimitive.content,
            functionArgs.getValue("longitude").jsonPrimitive.content,
            functionArgs["unit"]?.jsonPrimitive?.content ?: "fahrenheit"
        )
        // add the model’s "call a function" response to the history – this doesn’t show in the UI
        conversation.add(
            ChatMessage(
                role = completionMessage.role,
                content = completionMessage.content ?: "", // required to not be empty
                functionCall = completionMessage.functionCall
            )
        )
        // add the response to the "function call" to the history – this doesn’t show in the UI
        conversation.add(
            ChatMessage(
                role = ChatRole.Function, // this is a new role type
                name = function.name,
                content = functionResponse
            )
        )
        // send the function request/response back to the model
        val functionCompletionRequest = chatCompletionRequest {
            model = ModelId(Constants.OPENAI_CHAT_MODEL)
            messages = conversation }
        val functionCompletion: ChatCompletion = openAI.chatCompletion(functionCompletionRequest)
        // show the interpreted function response as chat completion in the UI
        chatResponse = functionCompletion.choices.first().message?.content!!
        conversation.add(
            ChatMessage(
                role = ChatRole.Assistant,
                content = chatResponse
            )
        )
    }
}
Figure 7: Code to handle a function call request from the model
The above code will successfully define a function for OpenAI and handle the case where the model wishes to call the function, but the actual implementation of the currentWeather() code has not yet been discussed. The next section explains how a basic web service client for weather.gov can be implemented, although the OpanAI model does not care about the local implementation of the function call.
Wire up a web service
To make this demo work without too many dependencies, it uses the free weather data API from weather.gov. Note that this only works for locations within the United States, and the provider requests a unique user-agent be sent with each request (which can be set in Constants.kt) – failure to add a user-agent string may result in failed requests.
The full implementation of currentWeather is in OpenAIFunctions.kt in the JetchatAI sample. There are three steps to using this API:
- Determine the ‘grid location’ for the weather query
This is a web service call with latitude and longitude parameters. It will return 404 for locations outside the USA. Parse the JSON result to determine the grid location (office,gridX,gridY). - Get the weather forecast
Create another web service call to get the weather forecast for the given ‘grid location’. Parse the JSON result to get the forecast information (name,temperature,temperatureUnit,detailedForecast). - Format response
Although there is no strict requirement for formatting, in this case the code sends JSON back to the model using the data classweatherInfo. The model will use the keys and values to interpret the data and use it in the completion shown to the user.
1. Get grid location
This particular API cannot work directly with latitude and longitude, but instead requires the location be converted to a grid reference.
val gridUrl = "https://api.weather.gov/points/$latitude,$longitude"
val gridResponse = httpClient.get(gridUrl) {
    contentType(ContentType.Application.Json)
}
//… then extract grid info
val responseText = gridResponse.bodyAsText()
val responseJson =Json.parseToJsonElement(responseText).jsonObject["properties"]!!
var office = responseJson.jsonObject["gridId"]?.jsonPrimitive?.content
Figure 8: code to convert a lat/long location into a grid reference
2. Get weather forecast
Using the grid reference another web service call will return the weather forecast. The response includes multiple days of information, but the code retrieves just the most current data.
val forecastUrl =
    "https://api.weather.gov/gridpoints/$office/$gridX,$gridY/forecast"
val forecastResponse = httpClient.get(forecastUrl) {
    contentType(ContentType.Application.Json)
}
//… then extract forecast info
Json.parseToJsonElement(responseText).jsonObject["properties"]!!
val periods = responseJson.jsonObject["periods"]!!
val period1 = periods.jsonArray[0]!!
var name = period1.jsonObject["name"]?.jsonPrimitive?.content!!
var temperature = period1.jsonObject["temperature"]?.jsonPrimitive?.content!!
Figure 9: code to get a weather forecast for a grid location
3. Format result
Once the current weather forecast data has been extracted, use the WeatherInfo class to format as JSON to include in the chat response:
val weatherInfo = WeatherInfo(
    latitude,
    longitude,
    temperature,
    unit,
    listOf(name, detailedForecast)
)
return weatherInfo.toJson()
Figure 10: a simple data class is used to format the output as JSON
As mentioned above, the model doesn’t require a specific/declared response format – it will use all the context you provide (e.g., the key names as well as the data values) to help it understand the data and incorporate it in the response to the user.
One last thing – grounding
The model cannot know your location by default, so with the implementation already shown if the user asks “what’s the weather” the model will respond with a question about their location. To help make the chat seem smarter we could use the location services APIs to determine the device’s location and ground each message with that information – but for now the demo uses a hardcoded default location that you can set in Constants.kt.
val groundedMessage = "Current location is ${Constants.TEST_LOCATION}.\n\n$message"
Figure 11: simple grounding data added to the prompt
With this added to the prompt (but not shown in the UI), it’s easy to ask for local weather or to give another location:
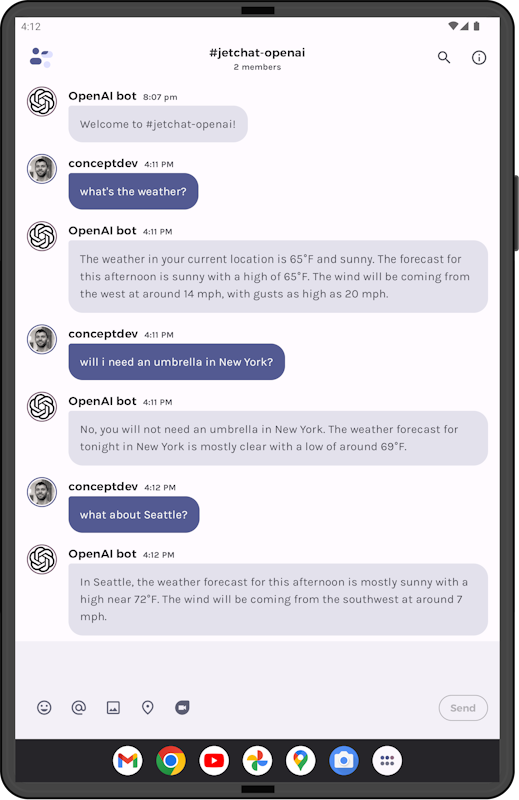
Figure 12: screenshot of the weather function in action
Feedback and resources
You can find the code for this post (plus more) in this pull request on the JetchatAI repo.
If you have any questions, use the feedback forum or message us on Twitter @surfaceduodev.
There will be no livestream this week, but you can check out the archives on YouTube.
0 comments