

Yesterday’s and today’s Ignite sessions have been jam packed with updates. From new AI infrastructure to the new Copilot Studio, Microsoft has had a lot to share! At the center of it all, however, is still AI Orchestration: the layer that uses AI to retrieve data, call functions, and ultimately do real work. That’s where Semantic Kernel comes in.
As our contribution to Ignite, we wanted to share two huge announcements:
- Our new Gen-4 and Gen-5 planners are leaps and bounds better.
- Our initial integration with OpenAI Assistants is now available.
To access them, get the latest Semantic Kernel packages from NuGet. Keep reading to learn more about these new enhancements that have come to Semantic Kernel.
Introducing our Gen-4 and Gen-5 planners.
Up until today, Semantic Kernel has had three out-of-the-box planners: Action planner, Sequential planner, and Stepwise planner. With each subsequent generation, we took the latest and greatest AI research to help developers use AI to orchestrate plugins and functions.
A lot has changed since we launched these initial planners though, so as part of Ignite, we wanted to provide our customers with updated planners that took advantage the latest AI research.
With our new planners, you can now use 2-3X more functions, leverage complex objects, and even use features like loops and if conditions. To learn more, keep reading about our new planners!
|
|
 Teresa Hoang
Gen-4: Generate multi-step plans with the Handlebars planner.
During OpenAI’s Dev Day, OpenAI showed how you could use their new code interpreter tool. With this tool, Assistants can run code in a Python sandbox to answer requests. Not all functions, however, are suited for code interpreter. For example, for performance reasons, you may want to execute a bunch of native functions locally instead of in a Python sandbox in the cloud. For these scenarios, we wanted to provide a planner that could generate an entire plan that could be execute locally.
At the heart of our new planner is Handlebars. With Handlebars, we’re able to load in your functions as custom helpers and bake in additional utility functionality that help stabilize plan creation, such as string concatenation and JSON. Moreover, the planner can leverage Handlebars’ own built-in helpers to write loops and conditions. Most importantly though, nearly all coding languages have a Handlebars SDK, making it possible to easily port this planner to our Python and Java SDKs later.
Just like our existing planners, you can easily use it by simply 1) loading the kernel with any supported functions, 2) creating the planner with your configuration, 3) using the CreatePlanAsync() method, and finally 4) executing the plan.
var planner = new HandlebarsPlanner(new HandlebarsPlannerConfig() { AllowLoops = allowLoopsInPlan });
Console.WriteLine($"Goal: {goal}");

// Create the plan
var plan = await planner.CreatePlanAsync(kernel, goal);
Console.WriteLine($"\nOriginal plan:\n{plan}");

// Execute the plan
var result = await plan.InvokeAsync(kernel);
Console.WriteLine($"\nResult:\n{result.GetValue<string>()}\n");
During the plan creation step, the planner will use an LLM to generate a Handlebars template that can address the user’s need. For example, if a user asked “Create a book with 3 chapters about a group of kids in a club called ‘The Thinking Caps,” the planner would generate the following template.
{{!-- Step 1: Initialize the book title and chapter count --}}
{{set "bookTitle" "The Thinking Caps"}}
{{set "chapterCount" 3}}

{{!-- Step 2: Generate the novel outline with the given chapter count --}}
{{set "novelOutline" (WriterPlugin-NovelOutline input=(get "bookTitle") chapterCount=(get "chapterCount"))}}

{{!-- Step 3: Loop through the chapters and generate the content for each chapter --}}
{{#each (range 1 (get "chapterCount"))}}
    {{set "chapterIndex" this}}
    {{set "chapterSynopsis" (MiscPlugin-ElementAtIndex input=(get "novelOutline") index=(get "chapterIndex"))}}
    {{set "previousChapterSynopsis" (MiscPlugin-ElementAtIndex input=(get "novelOutline") index=(get "chapterIndex" - 1))}}

    {{!-- Step 4: Write the chapter content using the WriterPlugin-NovelChapter helper --}}
    {{set "chapterContent" (WriterPlugin-NovelChapter input=(get "chapterSynopsis") theme=(get "bookTitle") previousChapter=(get "previousChapterSynopsis") chapterIndex=(get "chapterIndex"))}}

    {{!-- Step 5: Output the chapter content --}}
    {{json (get "chapterContent")}}
{{/each}}
We can then render this template to get all the chapter contents. In this example, we leveraged GPT-4, so the planner was capable enough to use a loop to create all the required chapters.
If you want to see how we made our planner work, we recommend checking out the underlying prompt for our Handlebars planner. There, you’ll see the instructions, samples, and function manual we provided the LLM. We also recommend checking out the samples in our kernel syntax examples.
|
|
 Gina Triolo
Gen-5: With Stepwise planner v2, leverage the best of OpenAI.
The other big advancement from OpenAI has been the improvements to function calling. With function calling, OpenAI models are much better at picking the right function and invoking it with the correct arguments. During our Beta6 release, we completed our integration with function calling which allowed us to bake it into our updated Stepwise planner to get these benefits.
Using the updated Stepwise planner is easy. Simply create it with configuration and then execute it with your ask.
var config = new FunctionCallingStepwisePlannerConfig
{
    MaxIterations = 15,
    MaxTokens = 4000,
};

var planner = new FunctionCallingStepwisePlanner(config);

FunctionCallingStepwisePlannerResult result = await planner.ExecuteAsync(kernel, question);
Console.WriteLine($"Q: {question}\nA: {result.FinalAnswer}");
Behind the scenes, we’ll then create a Chat History object and make repeated calls to OpenAI with function calling until the user ask is completed. This greatly reduces the number of lines of code you need to write while using function calling because we invoke the functions for you.
If you’re interested in all the steps the Stepwise planner took, you can print out the entire chat history. There, you’ll see all of the function calls, the function results, and how the AI reasoned over them.
Console.WriteLine($"Chat history:\n{result.ChatHistory?.AsJson()}");
If you want to see the new Stepwise planner in action, we recommend checking out its sample in our kernel syntax examples.
|
|
|
 Chris Rickman
 Gil LaHaye
Start developing OpenAI Assistants with Semantic Kernel.
With our initial integration with OpenAI Assistants, you can now quickly and easily create a new assistant just like a kernel. To get access to the new functionality, you’ll want to add the experimental Semantic Kernel NuGet package to your project.
Create a new assistant in a few lines of code.
Getting started with Assistants with Semantic Kernel is extremely easy. Simply use the AssistantBuilder with your OpenAI API Key, model, instructions, and functions. Behind the scenes, we’ll perform all the right API calls to create your Assistant in OpenAI.
var assistant =
    await AssistantBuilder.FromDefinitionAsync(
        ApiKey,
        "gpt-3.5-turbo-1106",
        EmbeddedResource.Read("Assistants.productManagerAssistant.yaml"),
        functions);
Afterwards, you can immediately start using the assistant in a multi-turn chat. In the following example, we demonstrate how you can easily create a new conversation thread and then invoke it with your assistant.
var thread = await assistant.NewThreadAsync();
foreach (var message in messages)
{
    var messageUser = await thread.AddUserMessageAsync(message);
    DisplayMessage(messageUser);

    var assistantMessages = await thread.InvokeAsync(assistant);
    DisplayMessages(assistantMessages);
}
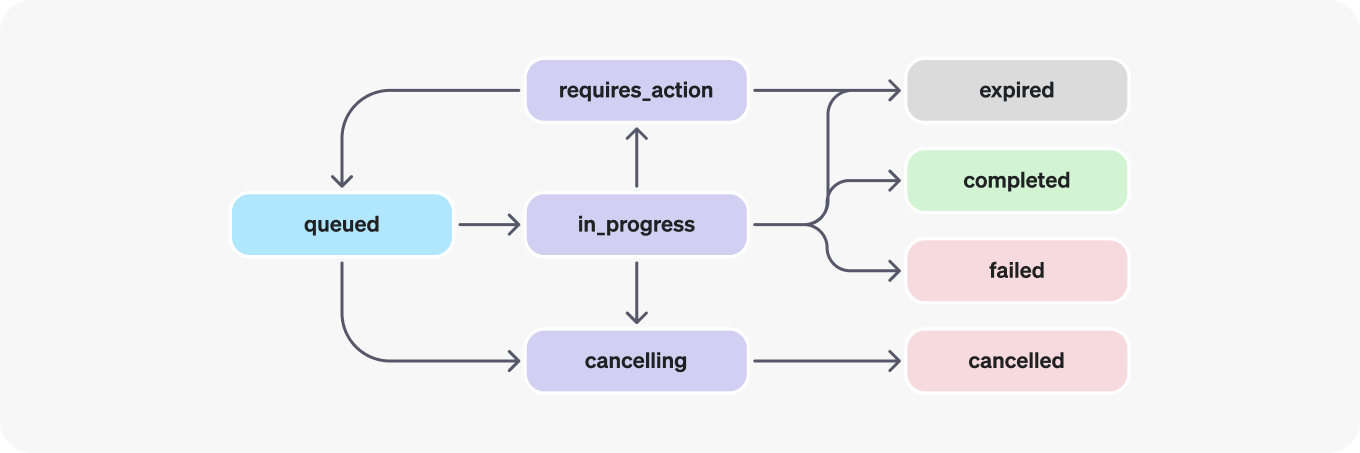
Because we know about your functions, we can automatically handle all the logic necessary to run a thread with an assistant. Everything from polling the status, calling your functions, and handling failure cases is all handled by Semantic Kernel.
Put another way… as a developer, you won’t have to build out logic yourself to handle the different states of OpenAI threads. Semantic Kernel does all of this for you.
To try the different ways you can use an Assistant in Semantic Kernel to call plugins, check out the sample here in our Syntax Examples.
Creating hierarchical chat with Semantic Kernel
One of the most exciting things we’ve prototyped so far has been the ability to use multiple assistants together. This was heavily inspired by the great work from Autogen. We achieved this by modeling Assistants as plugins themselves.
For example, you can see how we’ve created multiple agents below and imported them into the final product manager assistant so that the PM can use them to delegate tasks.
var designerAssistant =
    await AssistantBuilder.FromDefinitionAsync(
    TestConfiguration.OpenAI.ApiKey,
    model: OpenAIFunctionEnabledModel,
    template: EmbeddedResource.Read("Assistants.designerAssistant.yaml"),
    functions: functions.Values);

var developerAssistant =
    await AssistantBuilder.FromDefinitionAsync(
    TestConfiguration.OpenAI.ApiKey,
    model: OpenAIFunctionEnabledModel,
    template: EmbeddedResource.Read("Assistants.developerAssistant.yaml"));

var helperAssistants = Import(designerAssistant, developerAssistant).ToArray();

var productManagerAssistant =
    await AssistantBuilder.FromDefinitionAsync(
    TestConfiguration.OpenAI.ApiKey,
    model: OpenAIFunctionEnabledModel,
    template: EmbeddedResource.Read("Assistants.productManagerAssistant.yaml"),
    functions: helperAssistants);
This approach allows you to create highly specialized assistants with their own instructions and functions. These specialized assistants will be easier to evaluate and test. You can then bring them together in a team just like people in the real world. Check out the assistant delegation sample to see it in action.
We’re going to keep on experimenting with Assistants.
This is by no means it. We’re already hard at work on the next round of improvements to our integration with Assistants. To see where we’re headed, check out our other dedicated blog posts about the Assistants:
- OpenAI Assistants: The future of Semantic Kernel
- OpenAI Assistants: A first look into using OpenAI Assistants with Semantic Kernel
- OpenAI Assistants: The power of templated assistants
Have feedback?
Feel free to join our current discussions on our V1 proposal and our integration with Assistants on our GitHub discussion boards. You can also create new issues and discussions on our GitHub to start a conversation with us and the rest of the community!
This is the way!! Fantastic direction and agility as well as execution… Love what Semantic Kernel is becoming and how it is evolving, day by day… great work!!