Using PowerShell to Migrate DHCP Servers: Part 1
Summary: Microsoft PFE, Ian Farr, talks about using Windows PowerShell to migrate DHCP servers.
Microsoft Scripting Guy, Ed Wilson, is here. Today we welcome back guest blogger, Ian Farr.
Episode 1: A New Hope
In a galaxy very, very near to here, when you are not cleaning-up droids, you administer a DHCP infrastructure in Windows Server 2003 with two servers in a split scope configuration. Because extended support for Windows Server 2003 ends on the July 14, 2015, you’ve read about the new features in Windows Server 2012, and you want some DHCP failover goodness! (For more information, see Step-by-Step: Configure DHCP for Failover.)
So…how do you seamlessly migrate your current DHCP infrastructure, combining the split scopes into a load-balanced failover relationship? And how, on a desert-planet-in-a-binary-star-system, can the PowerShell help out?
I’ll answer with an example migration process:
- Transfer the configuration from the DHCP servers running Windows 2003 to two newly-prepared DHCP servers running Windows Server 2012.
- Compare the DHCP server configuration on the new servers.
- Compare the DHCP scope settings on the DHCP servers running Windows Server 2012.
- Configure a load-balanced failover relationship between the DHCP servers running Windows Server 2012.
- Activate the two servers running Windows Server 2012 in Active Directory.
Figure 1 Migration overview
Windows PowerShell is what gives scripters their power. You must learn the ways of the PowerShell if you are to implement a DHCP infrastructure in Windows Server 2012. Let’s begin our scripter training by looking at the first two migration steps…

Step 1: Migration tools
The migration tools you are looking for are the Windows PowerShell-based Windows Server Migration Tools. They are awesome! Need I say more? Well, yes…
On each of the servers running Windows Server 2003, the Windows Server Migration Tools capture the DHCP configuration as separate images. Each image is then imported to the corresponding DHCP server running Windows Server 2012. No need to worry about transferring from a 32-bit host to a 64-bit host. Apart from some initial configuration, it’s as simple as that!
Here’s how you list the features available for export on the source servers:
Get-SmigServerFeature
For example:
Here’s a sample export command:
Export-SmigServerSetting -FeatureID "DHCP" -Path "c:\smig_export_dhcp" -Verbose
And here’s a sample import command for the target servers:
Import-SmigServerSetting -FeatureID "DHCP" -Path "c:\smig_import_dhcp" -Verbose -Force
Note Add the DHCP server role to the servers running Windows Server 2012 before you import the migration image to ensure that the management tools are present.
For more information about the initial configuration of the Windows Server Migration Tools, see Install, Use, and Remove Windows Server Migration Tools.
Step 2: DHCP server comparison script
Are you a little short on DHCP server comparison script? On with the scripter training…
Before you add DHCP host servers to a failover relationship, it’s good practice to ensure that the server settings are consistent. I wrote a script to produce an Excel report that highlights discrepancies between two DHCP servers. You can download it here: Compare DHCP Server Settings with PowerShell DHCP Cmdlets.
The script performs a number of checks, and the results of each test are written to a separate worksheet.
- Matching objects are presented side by side in yellow and turquoise for ease of comparison
- For matching objects, specific property discrepancies have the property name highlighted in red.
- Objects that are unique to one DHCP server are highlighted in green (for DHCP server 1) or in orange (for DHCP server 2). These entries appear at the end of the relevant worksheet.
How do we generate the report content? Use Windows PowerShell, young scriptwalker!
DHCP server module for Windows PowerShell
There are 103 cmdlets in the DHCP server module for Windows PowerShell, which was introduced with Windows Server 2012 and Windows PowerShell 3.0. The script uses 10 of these cmdlets to jump to hyperspace to compare server settings:
- Get-DhcpServerAuditLog
- Get-DhcpServerDatabase
- Get-DhcpServerSetting
- Get-DhcpServerVersion
- Get-DhcpServerv4Class
- Get-DhcpServerv4DnsSetting
- Get-DhcpServerv4FilterList
- Get-DhcpServerv4OptionDefinition
- Get-DhcpServerv4OptionValue
- Get-DhcpServerv4Policy
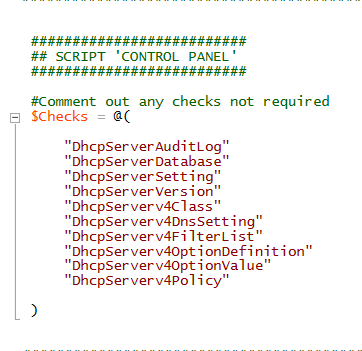
The Compare_DHCP_Server_Settings.ps1 script has a “control panel” (as shown in Figure 2) to determine which checks are included when the script is executed.
Figure 2 Control panel used by script
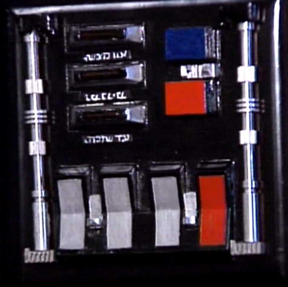
Hmmm, if only my script control panel looked more like the one in Figure 3!
Figure 3 Dream control panel
Where was I? Oh, yes…
Scripter training. Each of the included checks is executed against the two DHCP server names that were passed as script parameters.
The checks are part of an array that is looped through $Checks. A Switch statement is used to evaluate each iterated check. Why? Some of the cmdlets return a single object; some cmdlets return multiple objects. A different function is used to perform the object comparison in each of these scenarios.
ForEach ($Check in $Checks) {
Switch ($Check) {
"DhcpServerAuditLog" {$Single = $True}
"DhcpServerv4Class" {$Single = $False; $ComparisonProperty = "Name"}
Where a cmdlet returns a single object, $Single is set to True. Where a cmdlet returns multiple objects, $Single is False, and a common comparison property for the resultant objects is defined (more about this later).
With the current check matched by Switch, $Single is tested to define the function to call. The test also determines what parameter values get passed to the function by a technique called splatting. If you’ve not seen splatting before, it’s used to pass parameter values as a single entity (use Get-Help to find more about splatting).
In the script, the splatted parameter values are defined in a hash table.
If ($Single) {
#Splatted parameters
$Parameters = @{
DhcpCmdlet = "Get-$Check"
DhcpServer1 = $DhcpServer1
DhcpServer2 = $DhcpServer2
SheetNumber = $i
SheetName = $Check
} #End of $Parameters
#Target function
$Function = "Compare-SingleObject"
} #End of If ($Single)…
Where $Single is false, an additional property is added to the splatted parameters. This is the $ComparisonProperty mentioned earlier:
Else {
#Splatted parameters
$Parameters = @{
DhcpCmdlet = "Get-$Check"
DhcpServer1 = $DhcpServer1
DhcpServer2 = $DhcpServer2
SheetNumber = $i
SheetName = $Check
ComparisonProperty = $ComparisonProperty
} #End of $Parameters
#Target function
$Function = "Compare-MultipleObjects"
} #End of Else ($Single)…
With $Parameters and $Function defined, the comparison check is executed:
&$Function @Parameters
There are two things to note here. The first is the use of the call operator, &, to invoke the stored function. Without this, Compare-SingleObject or Compare-MultipleObjects are returned as strings. The second is that $Parameters becomes @Parameters. @ means splat!
The Compare-SingleObject function calls the current check, $DhcpCmdlet, against each DHCP server and stores the results in a variable:
$Output1 = &$DhcpCmdlet -ComputerName $DhcpServer1
$Output2 = &$DhcpCmdlet -ComputerName $DhcpServer2
A list of property names for the resultant object type is then retrieved:
$Properties = ($Output1[0] | Get-Member -Type Properties).Name
Each property from each server is compared:
ForEach ($Property in $Properties) {
$Result = Compare-Object -ReferenceObject $Output1 -DifferenceObject $Output2 -IncludeEqual -Property $Property
If they don’t match, the property name in the Excel report is marked as red:
If ($Result.SideIndicator -ne "==") {
$ExcelSheet.Cells.Item($j,1).Interior.ColorIndex = 3
} #End of If ($Result.SideIndicator -ne "==")
Compare-MultipleObjects
The Compare-MultipleObejcts function takes an extra parameter—a comparison property for the DHCP cmdlet executed. Here’s how the function works…
As with the Compare-SingleObject function, the check is executed against both servers, and a list of property names for the resultant objects are stored in a variable. This time the returned array of objects are compared with the aid of the comparison property. It is important that the selected $ComparisonProperty always have a value.
$Comparison = Compare-Object -ReferenceObject $Output1 -DifferenceObject $Output2 -IncludeEqual -Property $ComparisonProperty
Now, we need to deal with the fact that some objects might be on both servers, some objects on only the first DHCP server, and some objects on only the second DHCP server.
To check for objects present on both servers, test for the equals indicator, ==, from the comparison results:
If ($Comparison.SideIndicator -Contains "==") {
Where objects are present on both servers, write the details to a $Results variable, and continue to use the comparison property as the common reference:
$Results = $Comparison | Where-Object {$_.SideIndicator -eq "=="} | Select $ComparisonProperty
Loop through each mutual object and rerun the current check again against a specific iteration of $Result.$ComparisonProperty on both servers:
ForEach ($Result in $Results) {
$Value1 = &$DhcpCmdlet $Result.$ComparisonProperty -ComputerName $DhcpServer1
$Value2 = &$DhcpCmdlet $Result.$ComparisonProperty -ComputerName $DhcpServer2
Then, as with Compare-SingleObject, loop through each of the object’s properties and compare the value from each server. Highlight discrepancies in red, for example:
Next, check for objects that are present only on the first DHCP server. Test for the left side indicator (<=):
If ($Comparison.SideIndicator -Contains "<=") {
Run the current DHCP cmdlet against the first DHCP server:
$Value1 = &$DhcpCmdlet $Result.$ComparisonProperty -ComputerName $DhcpServer1
Loop through the properties and write them to the report. Highlight the Excel cells in green:
$ExcelSheet.Cells.Item($k,2).Interior.ColorIndex = 43
Finally, the check for objects that are present on only the second DHCP server has almost identical script to the first server check, except you are testing for the right-side indicator:
If ($Comparison.SideIndicator -Contains "=>") {
Loop through the properties, and write them to the report. Highlight the Excel cells in orange:
$ExcelSheet.Cells.Item($j,3).Interior.ColorIndex = 44
Upon completion, you’ll have an Excel spreadsheet in the same folder as the script, which is saved in the following format:
<YearMonthDayHourMinuteSecond>_<DhcpServer1>_<DhcpServer2>_DHCP_Server_Comparison.xls
Analyse the report and perform appropriate configuration changes to bring the servers in line. Pay particular attention to classes, option definitions, and option values. And please let me know if you spot a two meter-wide exhaust port!
Well, that’s it for Episode 1. Sadly, there are no huge explosions or fancy award ceremonies to finish with. However, our DHCP data from our server running Windows Server 2003 is now seamlessly migrated to our DHCP servers running Windows Server 2012, and we’ve compared and corrected any errant settings. In Episode 2, we’ll complete our scripter training and the migration process.
May the PowerShell be with you!
~Ian
Thanks, Ian! Our DHCP migration lesson will continue tomorrow with Ian returning to conclude his series.
I invite you to follow me on Twitter and Facebook. If you have any questions, send email to me at scripter@microsoft.com, or post your questions on the Official Scripting Guys Forum. See you tomorrow. Until then, peace.
Ed Wilson, Microsoft Scripting Guy


 Light
Light Dark
Dark
0 comments