Summary: Microsoft PFE, Chris Wu, talks about using Windows PowerShell 3.0 to automate Windows Live.
Microsoft Scripting Guy, Ed Wilson, is here. Welcome back to guest blogger, Chris Wu. Take it away Chris…
One advantage of Windows PowerShell that I’ve really enjoyed is the ability to test various APIs at ease. There is no need for Visual Studio, serious UI design, or commitment to a project. Windows PowerShell makes it possible to experiment and understand the core logics of different API systems through line-by-line executions.
Windows Live is one such system I always wanted to play with—more specifically, SkyDrive and Outlook contacts and calendar. Let’s say I want to share a script with the public, but keep the configuration file that’s specific to my environment (such as my machine name, IP addresses, and credentials) safe and portable through SkyDrive. Although the desktop SkyDrive application can fill the bill by syncing files from the cloud to computers I own (hence they become easily accessible), there are also cases where this practice is inconvenient or unsafe.
Microsoft released Live SDK 5.3 in 2012. It provides a set of APIs for a variety of application platforms to integrate Windows Live services. Windows Store apps, Windows Phone apps, iOS, and Android apps have their own APIs. Desktop and mobile applications (the category that Windows PowerShell scripts fall in) can use the Live Connect Representational State Transfer (REST) API to programmatically achieve the same.
Before any coding work, we need to register our script as an application on the Live Connect app management site. Follow these three simple steps:
- Go to the site and sign in with your Microsoft account credentials.
- Click Create application, give the application a display name and primary language, and read and accept Terms of Use and privacy statement.
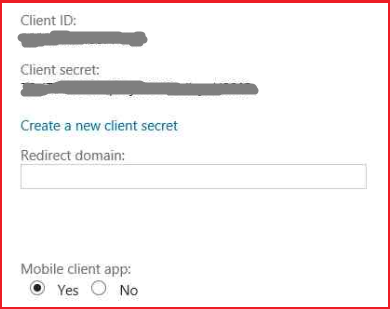
- In the application’s API setting, leave the Redirect domain field blank, and select Yes for Mobile client app.
That last step is very important because our script will use a special redirect URL after user authentication, and a different OAuth 2.0 authentication flow than other applications.
When you register, you will get the following IDs:
- A client ID that looks like this: 00000000603E0BFE
- A secret ID that looks like this: qXipuPomaauItsIsmwtKZ2YacGZtCyXD
Both are unique to the application. The secret ID should be kept in a safe place, or it may be misused by malicious scripts disguising to be yours. (You can change the client ID afterwards.) Keep these two pieces of information handy, and we will use them in a moment.
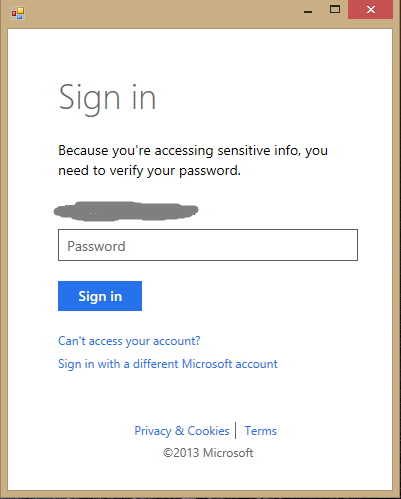
Our script needs to access user information; so first, we need to allow the user to sign in and give consent. We’ll do so by hosting a WebBrowser control to direct the user to the Microsoft authorization page. After the user successfully signs in and accepts the scope of information the script can access, we get an access token by reading the URI that the user is redirected to. More information about this process can be found on the Live SDK Core Concepts site. Depending on the scenario, one of the following OAuth 2.0 grant flows can be used:
- Implicit grant flow: ideal for a public environment where explicit user sign-in and consent is required
- Authorization code grant flow: ideal for automation in a safe environment
Implicit grant flow
Specifying response_type=token when sending the user to the authorization page starts an implicit grant flow. After the user signs in, the Live Connect authorization server redirects the WebBrowser control to a special URI with an access token and its period of validity (usually 3600 seconds). A script can then access authorized information by using the access token.
$ClientID = “00000000603E0BFE”
$RedirectUri = “https://login.live.com/oauth20_desktop.srf”
$AuthorizeUri = “https://login.live.com/oauth20_authorize.srf”
$Scope = “wl.skydrive”
#region – Implicit grant flow
Add-Type -AssemblyName System.Windows.Forms
$OnDocumentCompleted = {
if($web.Url.AbsoluteUri -match “access_token=([^&]*)”) {
$script:AccessToken = $Matches[1]
if($web.Url.AbsoluteUri -match “expires_in=([^&]*)”) {
$script:ValidThru = (get-date).AddSeconds([int]$Matches[1])
}
$form.Close()
}
elseif($web.Url.AbsoluteUri -match “error=”) {
$form.Close()
}
}
$web = new-object System.Windows.Forms.WebBrowser -Property @{Width=400;Height=500}
$web.Add_DocumentCompleted($OnDocumentCompleted)
$form = new-object System.Windows.Forms.Form -Property @{Width=400;Height=500}
$form.Add_Shown({$form.Activate()})
$form.Controls.Add($web)
$web.Navigate(“$AuthorizeUri`?client_id=$ClientID&scope=$Scope&response_type=token&redirect_uri=$RedirectUri”)
$null = $form.ShowDialog()
#endregion
The previous script snippet defines a scope of wl.skydrive, which will request access to user’s SkyDrive data in Read-only mode. The previous image show what the user will see when running the code. If a script wants to have Write access to SkyDrive and also utilize a single sign-on (so users don’t have to type a user name and password if they are already signed-in with other applications that use a Microsoft ID), the scope can be changed to:
$Scope = “wl.skydrive_update”,”wl.signin” -join “%20”
Note The space between multiple scope and permission strings is encoded because it will be used as part of the URI.
After we get an access token (saved in the $AccessToken variable), we can start browsing SkyDrive and so on:
Authorization code grant flow
In this work flow, two steps are required to retrieve an access token. First, sign in the user with response_type=code, which will return an authorization code.
In the second step, a script needs to invoke a Rest method with the client secret and authorization code to get a temporary access token. This access token, like that in the previous scenario, is valid for only one hour. However, if the script is granted offline access permission, refresh_token will also be provided in the response, which enables a script to renew the access token and visit Windows Live services for a longer period of time without a user’s explicit consent on every run.
The following script snippet shows how it’s done.
Note This snippet requires Windows PowerShell 3.0 because it uses the Invoke-RestMethod cmdlet.
$ClientID = “00000000603E0BFE”
$Secret = “qXipuPomaauItsIsmwtKZ2YacGZtCyXD”
$RedirectUri = “https://login.live.com/oauth20_desktop.srf”
$AuthorizeUri = “https://login.live.com/oauth20_authorize.srf”
$Scope = “wl.skydrive_update”,”wl.signin”,”wl.offline_access” -join “%20”
#region – Authorization code grant flow…
Add-Type -AssemblyName System.Windows.Forms
$OnDocumentCompleted = {
if($web.Url.AbsoluteUri -match “code=([^&]*)”) {
$script:AuthCode = $Matches[1]
$form.Close()
}
elseif($web.Url.AbsoluteUri -match “error=”) {
$form.Close()
}
}
$web = new-object System.Windows.Forms.WebBrowser -Property @{Width=400;Height=500}
$web.Add_DocumentCompleted($OnDocumentCompleted)
$form = new-object System.Windows.Forms.Form -Property @{Width=400;Height=500}
$form.Add_Shown({$form.Activate()})
$form.Controls.Add($web)
# Request Authorization Code
$web.Navigate(“$AuthorizeUri`?client_id=$ClientID&scope=$Scope&response_type=code&redirect_uri=$RedirectUri”)
$null = $form.ShowDialog()
# Request AccessToken
$Response = Invoke-RestMethod -Uri “https://login.live.com/oauth20_token.srf” -Method Post -ContentType “application/x-www-form-urlencoded” -Body “client_id=$ClientID&redirect_uri=$RedirectUri&client_secret=$Secret&code=$AuthCode&grant_type=authorization_code”
$AccessToken = $Response.access_token
$ValidThru = (get-date).AddSeconds([int]$Response.expires_in)
$RefreshToken = $Response.refresh_token
#endregion
Apparently, the previous snippet discloses the client secret, so it should only be used in a secure environment. When the time comes to refresh the access token, another Rest method needs to be called:
# Refresh AccessToken
$Response = Invoke-RestMethod -Uri “https://login.live.com/oauth20_token.srf” -Method Post -ContentType “application/x-www-form-urlencoded” -Body “client_id=$ClientID&redirect_uri=$RedirectUri&grant_type=refresh_token&refresh_token=$RefreshToken”
$AccessToken = $Response.access_token
$ValidThru = (get-date).AddSeconds([int]$Response.expires_in)
$RefreshToken = $Response.refresh_token
One benefit of authorization code grant flow is that once the initial authorization code is acquired, the rest of the process doesn’t need to host a WebBrowser control. This makes it possible to run on the Windows RT operating system. Due to restrictions in Windows RT, Windows PowerShell cannot host a console.
A feasible workaround is to launch an Internet Explorer window to complete the sign-in and authorization process, and then manually copy the redirected URI that contains the authorization code to a Windows PowerShell window so that the script can continue. Admittedly, this involves manual switching between applications; hence, it is not an automated process. However, after we pass that step, refreshing the access token can be fully scripted—as long as you remember to always save the ever-changing refresh token.
The following script snippet shows how to get a valid $AccessToken and the initial $RefreshToken in Windows RT:
$ClientID = “00000000603E0BFE”
$Secret = “qXipuPomaauItsIsmwtKZ2YacGZtCyXD”
$RedirectUri = “https://login.live.com/oauth20_desktop.srf”
$AuthorizeUri = “https://login.live.com/oauth20_authorize.srf”
$Scope = “wl.skydrive_update”,”wl.signin”,”wl.offline_access” -join “%20”
#region – Authorization code grant flow for RT…
# Request Authorization Code in IE
Start-Process “$AuthorizeUri`?client_id=$ClientID&scope=$Scope&response_type=code&redirect_uri=$RedirectUri”
$Uri = Read-Host “After authorization, copy Uri from IE and paste here”
if ($Uri -match “code=([^&]*)”) {
$AuthCode = $Matches[1]
}
# Request AccessToken
$Response = Invoke-RestMethod -Uri “https://login.live.com/oauth20_token.srf” -Method Post -ContentType “application/x-www-form-urlencoded” `
-Body “client_id=$ClientID&redirect_uri=$RedirectUri&client_secret=$Secret&code=$AuthCode&grant_type=authorization_code”
$AccessToken = $Response.access_token
$ValidThru = (get-date).AddSeconds([int]$Response.expires_in)
$RefreshToken = $Response.refresh_token
#endregion
We should end up with a valid access token that opens the door to Windows Live. In my next blog posts, we will see how to perform common tasks.
But before I conclude this post, here is a best practice reminder: A script should properly sign out a user at the end of a session. Sending the following web request can help ensure that the user’s data isn’t left unattended:
Invoke-WebRequest “https://login.live.com/oauth20_logout.srf?client_id=$ClientID&redirect_uri=$RedirectUri”
~Chris
Thank you, Chris, Join us tomorrow when Chris will be back for more exciting Windows PowerShell fun.
I invite you to follow me on Twitter and Facebook. If you have any questions, send email to me at scripter@microsoft.com, or post your questions on the Official Scripting Guys Forum. See you tomorrow. Until then, peace.
Ed Wilson, Microsoft Scripting Guy


0 comments