Deploy a PowerShell Module with SharePoint Cmdlets
Summary: In this article, Scripting Guys guest blogger Brian Jackett illustrates how to deploy a Windows PowerShell module with SharePoint cmdlets.
![]()
Hey, Scripting Guy! I would love to be able to use Windows PowerShell to deploy a module with the SharePoint 2010 cmdlets. Is this possible?
— JB
![]()
Hello JB,
Microsoft Scripting Guy Ed Wilson here, I am certain it is possible. To talk about this, I am going to turn the keyboard over to Brian Jackett.
Brian Jackett is a senior consultant at Sogeti USA specializing in Microsoft Collaboration and BI technologies, primarily SharePoint development and administration. He has been using Windows PowerShell for almost 3 years to help boost his productivity in all facets of work and personal projects. Brian is a steering committee member of the Buckeye SharePoint User Group and enjoys giving back to the community through giving presentations, planning and volunteering at conferences, maintaining a Microsoft centric blog, and contributing to the SharePoint Twitterverse. He also holds several Microsoft Certified Technology Specialist (MCTS) and Microsoft Certified IT Professional (MCITP) certifications for SharePoint technologies.
Deploying a Custom PowerShell Module for SharePoint 2010
In case you have missed the news, Microsoft is supporting Windows PowerShell for SharePoint 2010 in a big way. As a small example, Microsoft has released more than 500 cmdlets specifically for SharePoint Server 2010. That is a staggering number when you consider that Windows PowerShell V2 shipped with roughly 400 cmdlets when it released. One very nice feature of Windows PowerShell is that is extensible, first with snap-ins in version 1.0 and now modules in version 2.0. In this post, we will explore how to create your own custom module for SharePoint, install it, and uninstall it. As an added bonus, we will make this module available to all users and Windows PowerShell hosts by using the global profile of the target computer.
Windows PowerShell Modules
Windows PowerShell 2.0 is extensible through two means: modules and snap-ins. Snap-ins allowed users to create classes in Visual Studio, which then added cmdlets to Windows PowerShell. Modules take this one step further by allowing users to add other resources such as functions, variables, and scripts. Additionally modules can be created directly in Windows PowerShell, not just in Visual Studio as they were with snap-ins. For more information about modules versus snap-ins, see this MDSN article.
Deployment Overview
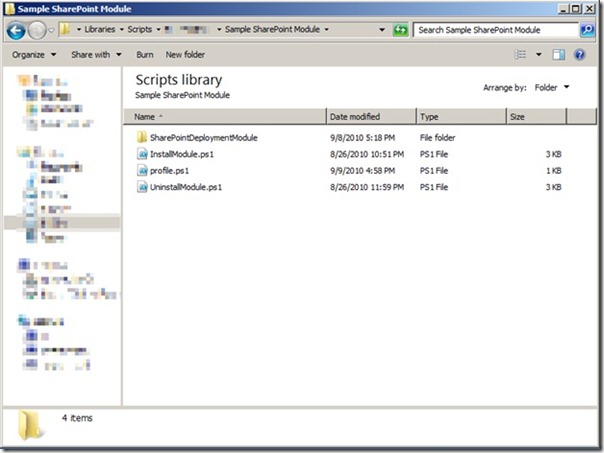
1. Create sample module.
2. Create sample global profile.
3. Run the installation script.
a. Copy module folder to recognized location.
b. Add global profile content.
c. Import module.
4. Run the uninstallation script.
a. Remove module.
b. Delete module folder.
c. Remove custom global profile content.
The files required to perform this operation are shown in the following image.
Sample Module
Consider a sample module that has a custom function to return the SharePoint farm name. To do so, we will get the local farm with the Get-SPFarm cmdlet and then access the Name property. The module might look something like the following (note the use of advanced functions). For more information about writing modules, check out this post by the Scripting Guys.
function Get-MySPFarmName
{
<#
.Synopsis
Get local SharePoint farm name.
.Description
Get local SharePoint farm name.
.Example
Get-MySPFarmName
Get local SharePoint farm name.
#>
[CmdletBinding()]
param(
)#end param
Process
{
(Get-SPFarm).Name
}
} #end Get-MySPFarmName
Export-ModuleMember Get-MySPFarmName
Sample Global Profile
Now that we have a module, we need to import it into our Windows PowerShell session. There are a few ways to accomplish this, but I will show you how to use the global profile to load automatically our module for all users when any Windows PowerShell host is started. Below is a sample profile with two functions. The first loads the SharePoint snap-in (which contains all of the SharePoint 2010 cmdlets), and the second imports our custom module. In both cases, we first check if the snap-in or module has been loaded before taking any actions. You can also load additional snap-ins by adding them to the $snapinsToCheck array if desired.
function Load-Snapins()
{
$snapinsToCheck = @(“Microsoft.SharePoint.PowerShell”)
$currentSnapins = Get-PSSnapin
$snapinsToCheck | ForEach-Object `
{$snapin = $_;
if(($CurrentSnapins | Where-Object {$_.Name -eq “$snapin”}) -eq $null)
{
Write-Host “$snapin snapin not found, loading it”
Add-PSSnapin $snapin
Write-Host “$snapin snapin loaded”
}
}
}
function Load-Modules()
{
if((Get-Module | Where-Object {$_.Name -eq “SharePointDeploymentModule”}) -eq $null)
{
Write-Host “SharePointDeploymentModule module not found, importing it”
Import-Module SharePointDeploymentModule
Write-Host “SharePointDeploymentModule module imported”
}
}
#Begin calling functions
Load-Snapins
Load-Modules
Installation
At this point, we have the module and sample profile, but we need to deploy them to their respective target locations. This is where our installation script comes into play. This script will do a number of things. First, it will copy our module folder to a location recognized by Windows PowerShell. Luckily Windows PowerShell provides a default variable ($env:psmodulepath) for the desired module location. We will place our module folder as a subfolder of that location.
Next, we will add the contents of our sample global profile to the actual global profile. If a global profile does not yet exist, we will create it. We then do a string comparison between the content of our sample global profile and the actual global profile. If the global profile does not contain our content, we will add it.
Last, we will import the module that was just copied so that it is available in our current Windows PowerShell session.
Note: Before running the installation script, if you are running on a computer with UAC enabled, make sure that you are running your Windows PowerShell instance with elevated privileges (Run as Administrator). This is necessary because we are going to be adding a file to a system folder that requires additional permissions.
$moduleToInstall = “SharePointDeploymentModule”
$moduleInstallDirectory = Join-Path -Path ($env:psmodulepath -split “;”)[1] -ChildPath “$moduleToInstall”
if(!(Test-Path $moduleInstallDirectory))
{
$globalProfileLocation = (Join-Path -Path $PSHome -ChildPath “profile.ps1”)
if(!(Test-Path $globalProfileLocation))
{
New-Item -Path $globalProfileLocation -ItemType file -force
Write-Host “Created global profile: $globalProfileLocation”
}
$profileContentToAdd = Get-Content .\profile.ps1
[System.Text.StringBuilder]$stringRef = New-Object System.Text.StringBuilder
$profileContentToAdd | ForEach-Object {$stringRef.Append($_)} | Out-Null
[System.Text.StringBuilder]$stringDiff = New-Object System.Text.StringBuilder
(Get-Content $globalProfileLocation) | ForEach-Object {$stringDiff.Append($_)} | Out-Null
# if global profile doesn’t already contain contents to add then add it
if(!$stringDiff.ToString().Contains($stringRef.ToString()))
{
Add-Content -Path $globalProfileLocation -Value (Get-Content .\profile.ps1)
Write-Host “Custom global profile content not found, copying”
}
else
{
Write-Host “Custom global profile content already exists, skipping add”
}
Copy-Item -Path .\$moduleToInstall -Destination ($env:psmodulepath -split “;”)[1] -Recurse
Write-Host “Copied module folder: $moduleInstallDirectory”
Import-Module $moduleToInstall
Write-Host “Imported module: $moduleToInstall”
}
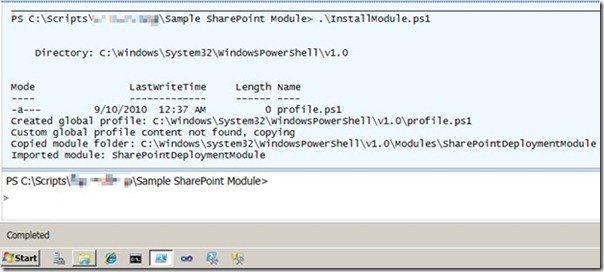
Running the installation script on a fresh Windows PowerShell ISE configuration is shown in the following image.
Uninstallation
Being able to deploy our modules is one thing, but we also want to be able to remove them if the need arises. Removing the module and deleting the module folder are fairly simple tasks, but I will also show you how to remove the global profile contents that we previously added. Take a look at the uninstall script below.
$moduleToUninstall = “SharePointDeploymentModule”
$moduleInstallDirectory = Join-Path -Path ($env:psmodulepath -split “;”)[1] -ChildPath “$moduleToUninstall”
if((Get-Module | Where-Object {$_.Name -eq $moduleToUninstall}) -ne $null)
{
Remove-Module $moduleToUninstall
Write-Host “Removed module: $moduleToUninstall”
}
else
{
Write-Host “$moduleToUninstall module not imported, skipping removal”
}
if((Test-Path $moduleInstallDirectory))
{
Remove-Item -Path $moduleInstallDirectory -Recurse -Force
Write-Host “Deleted module folder: $moduleInstallDirectory”
}
else
{
Write-Host “$moduleInstallDirectory does not exist, skipping deletion”
}
# retract content that was previously added to profile and rewrite global profile
$globalProfileLocation = (Join-Path -Path $PSHome -ChildPath “profile.ps1”)
$profileContentToRemove = Get-Content .\profile.ps1
if(Test-Path $globalProfileLocation)
{
$contentDifferences = Compare-Object $profileContentToRemove (Get-Content $globalProfileLocation)
# if global profile contains content to be removed, clear and rewrite without custom elements
Clear-Content $globalProfileLocation
$linesToAdd = $contentDifferences | Where-Object {$_.SideIndicator -eq “=>”} | Select-Object InputObject
$linesToAdd | foreach {$_.InputObject} | Add-Content $globalProfileLocation
Write-Host “Custom global profile content removed”
}
else
{
Write-Host “Global profile does not exist, skipping text removal”
}
Running the uninstallation script after the installation script is shown in the following image.
Conclusion
In this post, we have covered creating a sample profile, creating a sample global profile, installing our module and profile, and uninstalling our module and profile. Our global profile loads the Windows PowerShell snap-in for SharePoint so that we can always be assured of having access to the native SharePoint cmdlets no matter which Windows PowerShell host we are running. Our custom module contained a function that made use of a cmdlet in the SharePoint PowerShell snap-in. From here you can add more custom functions, variables, or other elements to our custom module. I hope you have learned something new and take the time to try out these scripts for yourself. Thanks for reading.
For more information about creating and deploying Windows PowerShell modules see these Hey, Scripting Guy! posts.
JB, that is all there is to using Windows PowerShell to deploy a SharePoint module. Guest Blogger Week will continue tomorrow when we will feature Sean McCown as he talks about using Windows PowerShell to run TSQL commands. It is a most excellent article.
We invite you to follow us on Twitter and Facebook. If you have any questions, send email to us at scripter@microsoft.com, or post your questions on the Official Scripting Guys Forum. See you tomorrow. Until then, peace.
Ed Wilson and Craig Liebendorfer, Scripting Guys


 Light
Light Dark
Dark
0 comments