Customize Colors and Fonts in the Windows PowerShell ISE
Summary: Customize colors and fonts in the Windows PowerShell ISE. The Microsoft Scripting Guys show you how to script the script editor. How meta!
Microsoft Scripting Guy Ed Wilson here. In just about two weeks it will be my birthday, and I have begun my mission to figure out what the female carbon based life form that inhabits my domicile has bought me. Our birthdays are only two weeks apart, and so it is always a special time in our humble abode at this time of the year. I go on line and look up credit card purchases, snoop around in closets, look on the table for receipts, look behind the seat in the car, and look in the trunk. In short, it is a full-scale investigative exercise. It is not as if I base her present on what she gets me or anything like that. Rather it is more like a game of hide and seek combined with a scavenger hunt. For her part, she has to anticipate where I will be seeking, what I avenue of investigation I may pursue, and then do the opposite.
In the past, when writing scripts, it seems like the game I just described. The goal is to find information, and it appears the information is hidden. Luckily, with Windows PowerShell, the Get-Member cmdlet is available to retrieve the needed information. Get-Member is always available, and once mastered, becomes a constant and true companion.
I have been talking about working with the Windows PowerShell ISE for a while now, and there will be at least two more articles next weekend. By the way, next weekend’s articles will absolutely rock!
To pull together the things we have looked at so far in our articles about customizing the Windows PowerShell ISE, I decided to create a script that will modify both the colors and the fonts used by the Windows PowerShell ISE. Before running the script (it is certain you will hate my color choices, as well as my font selections) make sure you remember the command that will reset the Windows PowerShell ISE back to its default configuration.
$psISE.Options.RestoreDefaults()
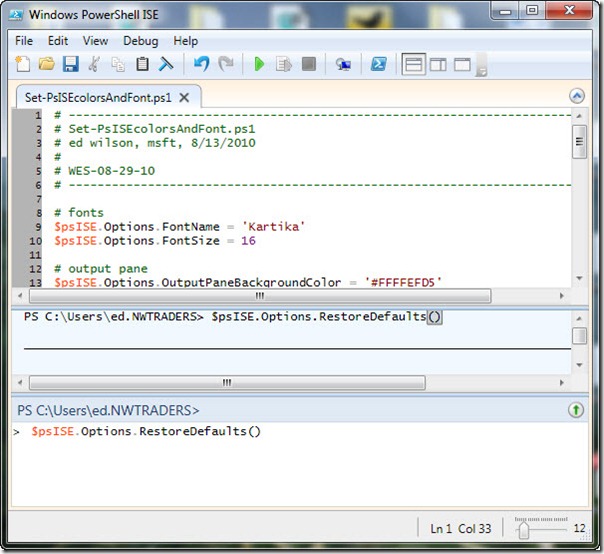
The default Windows PowerShell ISE is shown in the following image.
The complete Set-PsISEcolorsAndFonts.ps1 script is shown here.
Set-PsISEcolorsAndFont.ps1
# fonts
$psISE.Options.FontName = ‘Kartika’
$psISE.Options.FontSize = 16
# output pane
$psISE.Options.OutputPaneBackgroundColor = ‘#FFFFEFD5’
$psISE.Options.OutputPaneTextBackgroundColor = ‘#FFFFEFD5’
$psISE.Options.OutputPaneForegroundColor = ‘#FF000000’
# command pane
$psISE.Options.CommandPaneBackgroundColor = ‘#FFFAEBD7’
# script pane
$psISE.Options.ScriptPaneBackgroundColor = ‘#FFFAEBD7’
# tokens
$psISE.Options.TokenColors.item(‘Command’) = ‘#FFA0522D’
$psISE.Options.TokenColors.item(‘Operator’) = ‘#FFA0522D’
$psISE.Options.TokenColors.item(‘Unknown’) = ‘#FFFFFFFF’
$psISE.Options.TokenColors.item(‘Member’) = ‘#FFFFFFFF’
$psISE.Options.TokenColors.item(‘Position’) = ‘#FFFFFFFF’
$psISE.Options.TokenColors.item(‘GroupEnd’) = ‘#FFFFFFFF’
$psISE.Options.TokenColors.item(‘GroupStart’) = ‘#FFFFFFFF’
$psISE.Options.TokenColors.item(‘LineContinuation’) = ‘#FFFFFFFF’
$psISE.Options.TokenColors.item(‘NewLine’) = ‘#FFFFFFFF’
$psISE.Options.TokenColors.item(‘StatementSeparator’) = ‘#FFFFFFFF’
$psISE.Options.TokenColors.item(‘Comment’) = ‘#FFAEAEAE’
$psISE.Options.TokenColors.item(‘String’) = ‘#A2BC13’
$psISE.Options.TokenColors.item(‘Keyword’) = ‘#FFFFDE00’
$psISE.Options.TokenColors.item(‘Attribute’) = ‘#FF84A7C1’
$psISE.Options.TokenColors.item(‘Type’) = ‘#FF84A7C1’
$psISE.Options.TokenColors.item(‘Variable’) = ‘#EE9A00’
$psISE.Options.TokenColors.item(‘CommandParameter’) = ‘#FFFFDE00’
$psISE.Options.TokenColors.item(‘CommandArgument’) = ‘#FFFFFFFF’
$psISE.Options.TokenColors.item(‘Number’) = ‘#FF4169E1’
$psISE.Options.TokenColors.item(‘LoopLabel’) = ‘#FF4169E1’
The hardest thing about the Set-PSISEcolorsAndFonts.ps1 script is choosing the colors to use for colorizing the various parts of a script. These are used by the tokenizer, and depending on if the code is a variable, a keyword, a string etc., you can choose what color to use. By using the scripts and commands we looked at in the earlier Weekend Scripter articles in this series, you are now armed with the information you need to allow you to modify this script to your preferences. The cool thing, we did it all using Windows PowerShell.
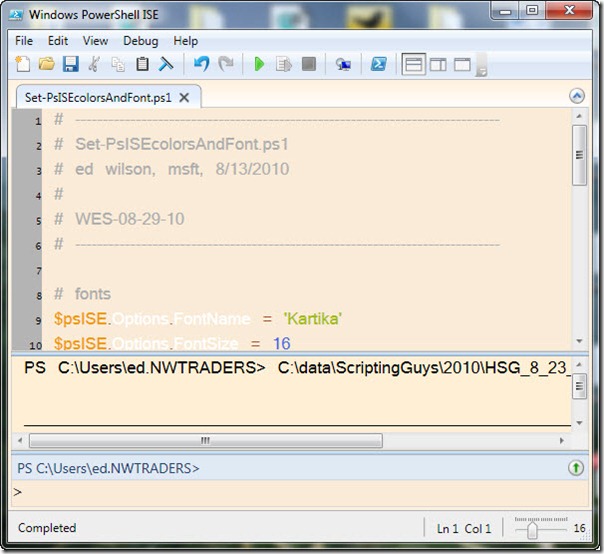
After running the Set-PsISEcolorsAndFonts.ps1 script, the Windows PowerShell ISE changes to the one seen in the following image.
Join us tomorrow as we begin a new week on the Script Center. We would love you to follow us on Twitter and Facebook. If you have any questions, send email to us at scripter@microsoft.com, or post your questions on the Official Scripting Guys Forum. See you tomorrow. Until then, peace.
Ed Wilson and Craig Liebendorfer, Scripting Guys


 Light
Light Dark
Dark
2 comments
This article is quite out of date for later versions of Powershell (and powershell_ise).
For example, to change the background color to black for the command window, the command is actually:
$psISE.Options.ConsolePaneBackgroundColor = ‘#000000’
For anyone reading this, start with a:
$psISE.Options | GM
to show you some of the options.
Or just come back from the 80’s and use UI – Tools – Options…