Create a PowerShell Scheduled Job
Summary: Learn how to create a Windows PowerShell scheduled job.
Microsoft Scripting Guy, Ed Wilson, is here. Well, the Scripting Wife and I are about to straighten up the scripting house after the Windows PowerShell Saturday luau we had on Friday and the scripting slumber party we had over the weekend. Frankly, it is an awful lot of work to put on a Windows PowerShell Saturday event, and it would not have been possible without Windows PowerShell Charlotte User Group president (and Windows PowerShell MVP), Jim Christopher; Windows PowerShell Charlotte user member, Brian Wilhite; and the Scripting Wife. In all sincerity, if it were not for these three completely awesome people, Windows PowerShell Saturday in Charlotte would not have happened.
We are also looking forward to Windows PowerShell Saturday in Atlanta on October 27, 2012. In fact, all of us will attend the Atlanta Windows PowerShell Saturday event. Registration opens soon, and it will sell out (as did the Columbus and the Charlotte Windows PowerShell Saturday events). So you should stand by to register to ensure a seat.
Creating a PowerShell scheduled job
One of the cool new features of Windows PowerShell is the updatable Help. This enables Help to update to the latest content easily. In fact, as we speak, Help is being updated. Therefore, it is important to update the Help on a regular basis. The problem is that I sometimes forget to do this. This is where Windows PowerShell scheduled jobs come into play. I created a scheduled job to update Help for me. To look at the cmdlets available in the PSScheduledJob module, I use the Get-Command cmdlet. This is shown here.
PS C:\> gcm -Module PSScheduledJob
CommandType Name ModuleName
———– —- ———-
Cmdlet Add-JobTrigger PSScheduledJob
Cmdlet Disable-JobTrigger PSScheduledJob
Cmdlet Disable-ScheduledJob PSScheduledJob
Cmdlet Enable-JobTrigger PSScheduledJob
Cmdlet Enable-ScheduledJob PSScheduledJob
Cmdlet Get-JobTrigger PSScheduledJob
Cmdlet Get-ScheduledJob PSScheduledJob
Cmdlet Get-ScheduledJobOption PSScheduledJob
Cmdlet New-JobTrigger PSScheduledJob
Cmdlet New-ScheduledJobOption PSScheduledJob
Cmdlet Register-ScheduledJob PSScheduledJob
Cmdlet Remove-JobTrigger PSScheduledJob
Cmdlet Set-JobTrigger PSScheduledJob
Cmdlet Set-ScheduledJob PSScheduledJob
Cmdlet Set-ScheduledJobOption PSScheduledJob
Cmdlet Unregister-ScheduledJob PSScheduledJob
I used three steps to create a Windows PowerShell scheduled job (although you do not need to perform all three steps if you do not want or need to do so).
Create a trigger
First, I decided I wanted to create a trigger—something that will kick off my Windows PowerShell scheduled job. Because I want to do this every day, it is easy—I use the Daily parameter and specify a specific time. After I create the new job trigger, I need to store the returned job trigger in a variable so I can supply it to the Register-ScheduledJob cmdlet. Here is the command I used to create the job trigger.
$dailyTrigger = New-JobTrigger -Daily -At “2:00 PM”
Create options for the scheduled job
Next, to specify options for the Windows PowerShell scheduled job, I use the New-ScheduledJobOption cmdlet. The two options that I want to specify are StartIfOnBattery and StartIfIdle. I want the job to run even if the computer is running on battery (by default, the job will not run if on battery). In addition, I want to start the job only if the laptop is idle (for example, if I am actively writing a Windows PowerShell script, I do not want the laptop to begin the process of downloading and installing new Windows PowerShell Help.) When creating the scheduled job options, I store the resulting object to a variable that I will use when I create the actual scheduled job. Here is the command.
$option = New-ScheduledJobOption -StartIfOnBattery –StartIfIdle
Register the scheduled job
Now it is time to register the Windows PowerShell scheduled job. (Yes, you use Register-ScheduledJob to register the Windows PowerShell scheduled job.) When I register the scheduled job, I first provide a decent name for the job. Then I specify my command as a ScriptBlock. Finally I supply the trigger and the options I stored previously in variables. The complete command is shown here.
Register-ScheduledJob -Name UpdateHelp -ScriptBlock `
{Update-Help -Module * -Force} -Trigger $dailyTrigger -ScheduledJobOption $option
Look at the scheduled job
To look at the scheduled job, open the Task Scheduler MMC by typing the following command.
Taskschd.msc
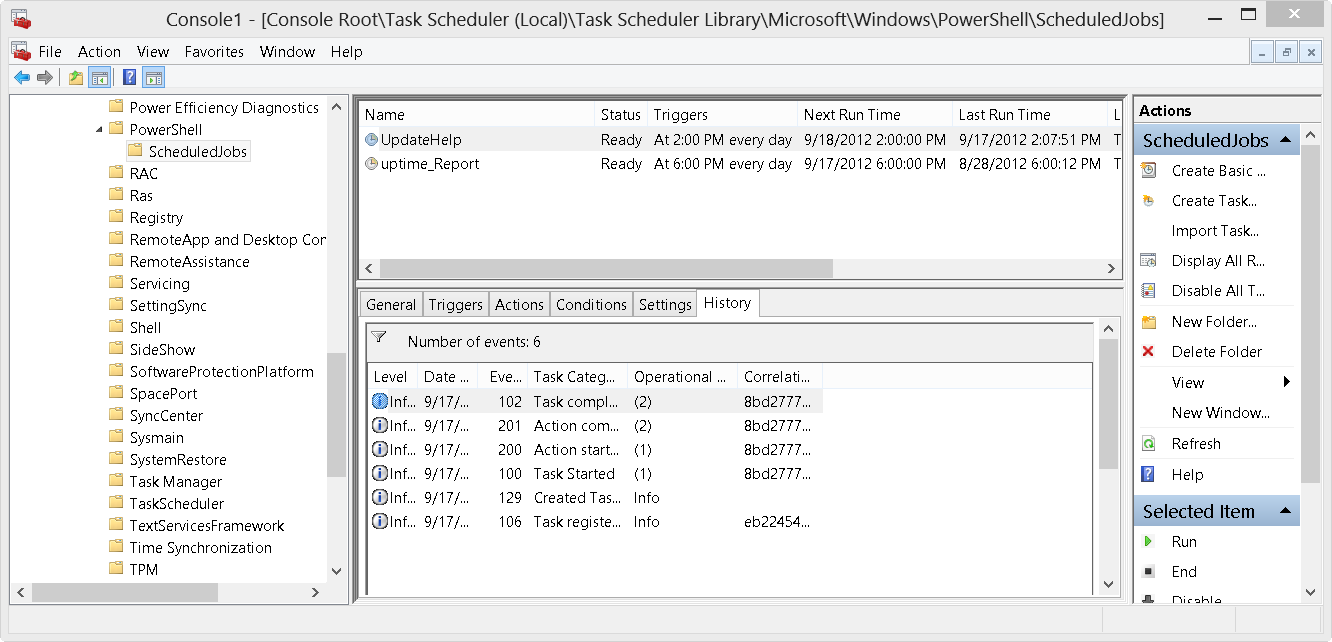
To find the Windows PowerShell scheduled jobs, navigate to the following node in the Task Scheduler: Task Scheduler Library\Microsoft\Windows\PowerShell\Scheduled Jobs. Under the Scheduled Jobs node, I find a folder for each Windows PowerShell scheduled job as shown in the following image.
Well, that is about it for now. Join me tomorrow when I will talk about more cool Windows PowerShell 3.0 stuff.
I invite you to follow me on Twitter and Facebook. If you have any questions, send email to me at scripter@microsoft.com, or post your questions on the Official Scripting Guys Forum. See you tomorrow. Until then, peace.
Ed Wilson, Microsoft Scripting Guy


 Light
Light Dark
Dark
0 comments