Change Drive Letters and Labels via a Simple PowerShell Command
Summary: Microsoft Scripting Guy, Ed Wilson, shows you how to change drive letters and labels with a simple Windows PowerShell command.
![]()
Hey, Scripting Guy! First of all, I want to thank you for being cool and for all the neat things you do with the Windows PowerShell community. Second of all, I was reading your blog last week where you were talking about writable properties in WMI. You said it would allow you to do things. What kind of things did you have in mind? By the way, when can I sign up for the 2011 Scripting Games?
—EB
![]() Hello EB, Microsoft Scripting Guy, Ed Wilson, here. Thank you for your kind words; I absolutely love working with the community. It lets me combine two of my favorite things—talking and Windows PowerShell. Therefore, I am happiest when I am talking about Windows PowerShell.
Hello EB, Microsoft Scripting Guy, Ed Wilson, here. Thank you for your kind words; I absolutely love working with the community. It lets me combine two of my favorite things—talking and Windows PowerShell. Therefore, I am happiest when I am talking about Windows PowerShell.
EB, if you are as anxious about the 2011 Scripting Games as I am, you will want the following line of code—perhaps add it to your Windows PowerShell Profile so that it runs every time you start Windows PowerShell. Here is the code and the associated results when it runs in the Windows PowerShell console.
PS C:\> “$(([datetime]’4/4/11′ -[datetime]::today).days) Days until 2011 Scripting Ga
mes”
21 Days until 2011 Scripting Games
When I tweeted this, Microsoft MVP Tobias Weltner (@TobiasPSP) tweeted an easier way to obtain the previous information. Here is his code.
(New-TimeSpan -End 4/4/11).days
According to the text file of WMI methods and writable properties that I created in Sunday’s Weekend Scripter blog, there are three writable properties for the Win32_Volume WMI class.
Keep in mind that the Win32_Volume WMI class does not appear in Windows XP. The Win32_Volume WMI class debuted with Windows Server 2003. The Win32_LogicalDisk WMI class provides some of the capabilities of the Win32_Volume WMI class, but not all of them. For example, by using Win32_LogicalDisk, you can change the VolumeName property, but not change the drive letter or enable indexing.
The methods and properties for the class are shown in the following image.
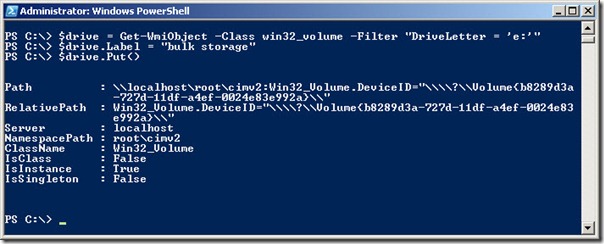
There are several ways to use these properties. The way I have always used these types of properties in the past, is the way I did it in Windows PowerShell 1.0. That is, grab an instance of the object, store it in a variable, assign a new value to the property, and call the put method. The code to write a new label for drive E is shown here.
$drive = gwmi win32_volume -Filter “DriveLetter = ‘E:'”
$drive.Label = “Bulk storage”
$drive.put()
When I attempt to do this, an error message appears. The error, which is shown in the following image, is misleading.
The reason for this error is that the Windows PowerShell prompt is not running with Administrator rights. Unfortunately, the error that bubbles back up from WMI does not tell us that the problem is related to rights. I want to change the label that is associated with drive E. The original label says New Volume as shown in the following image.
I right-click my Windows PowerShell icon and click Run As Administrator from the Tasks list. When I open the Windows PowerShell console as an administrator and run the three commands, the drive E label updates. The command and its associated output are shown in the following image.
The updated drive label is shown here.
However, by using the Set-WmiInstance Windows PowerShell cmdlet, I can update multiple properties at the same time by using a hash table. The easiest way to use Set-WmiInstance is to first use the Get-WmiObject cmdlet to retrieve an input object that represents the object you wish to modify. In this case, the object is drive E, and it is an instance of the Win32_Volume WMI class.
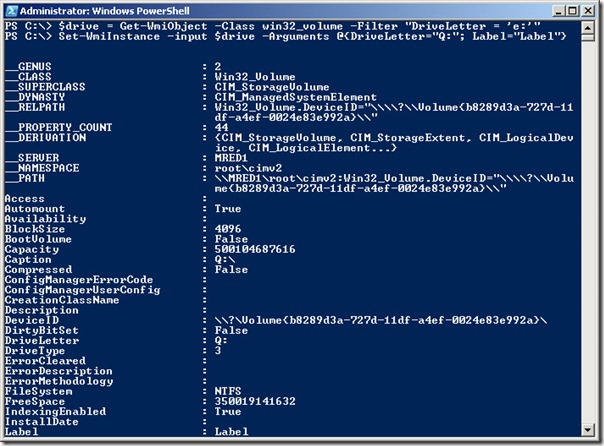
After I have the WMI object that represents the drive stored in the $drive variable, I call the Set-WmiInstance Windows PowerShell cmdlet and pass the $drive variable to the input parameter. The hash table consists of the properties that I want to modify and the new values for those properties. The code is shown here.
$drive = Get-WmiObject -Class win32_volume -Filter “DriveLetter = ‘e:'”
Set-WmiInstance -input $drive -Arguments @{DriveLetter=”Q:”; Label=”Label”}
The command and its associated output are shown in the following image.
One thing that is pretty cool is that when the drive letter has changed, my Windows 7 machine thinks a new drive has attached. Therefore, the AutoPlay dialog box appears, as shown in the following image.
The drive with its updated drive letter of Q and its updated drive label of Label are shown in the following image.
As you can see, using the Set-WmiInstance Windows PowerShell cmdlet to modify writable WMI properties is easier and more intuitive than making multiple property value assignments (after you master the hash table). The cool thing is that multiple properties can be modified at one time instead of making multiple value assignments followed by the put method.
EB, that is all there is to writing to WMI properties. Join me tomorrow when I will talk about calling WMI methods.
I invite you to follow me on Twitter and Facebook. If you have any questions, send email to me at scripter@microsoft.com, or post your questions on the Official Scripting Guys Forum. See you tomorrow. Until then, peace.
Ed Wilson, Microsoft Scripting Guy


 Light
Light Dark
Dark
0 comments