
Premier Field Engineer Greg Schunemann discusses his experience with managing work item form customizations after an upgrade to Azure DevOps Server 2019.
More and more organizations are upgrading their on-premises Team Foundation Server instances, many having the end goal of migrating to Azure DevOps Services in the cloud. If you are upgrading from a pre-2017 version of Team Foundation Server, you’ll notice that work items have been given a major facelift. If your pre-2017 Team Foundation Server collection or project has a fair number of customizations to the work item forms, there is a good possibility that your work items will look very different after upgrading to Azure DevOps Server. This is due to some changes in the XML which defines how the work items are rendered in the browser.
This blog post will highlight a case from the field to shed some light on what changes are made to the work item form, also known as the ‘Best-effort transformation’. We’ll walkthrough a case from the field where the custom work item was very different after upgrade.
Problem Statement
The work item type ‘Change Request’ form does not display properly in the web UI as a result of upgrading Team Foundation Server 2012 Update 4 to Azure DevOps Server 2019 Update 1. Prior to upgrade, the Change Request work item (WI) form displayed in the web UI as follows:
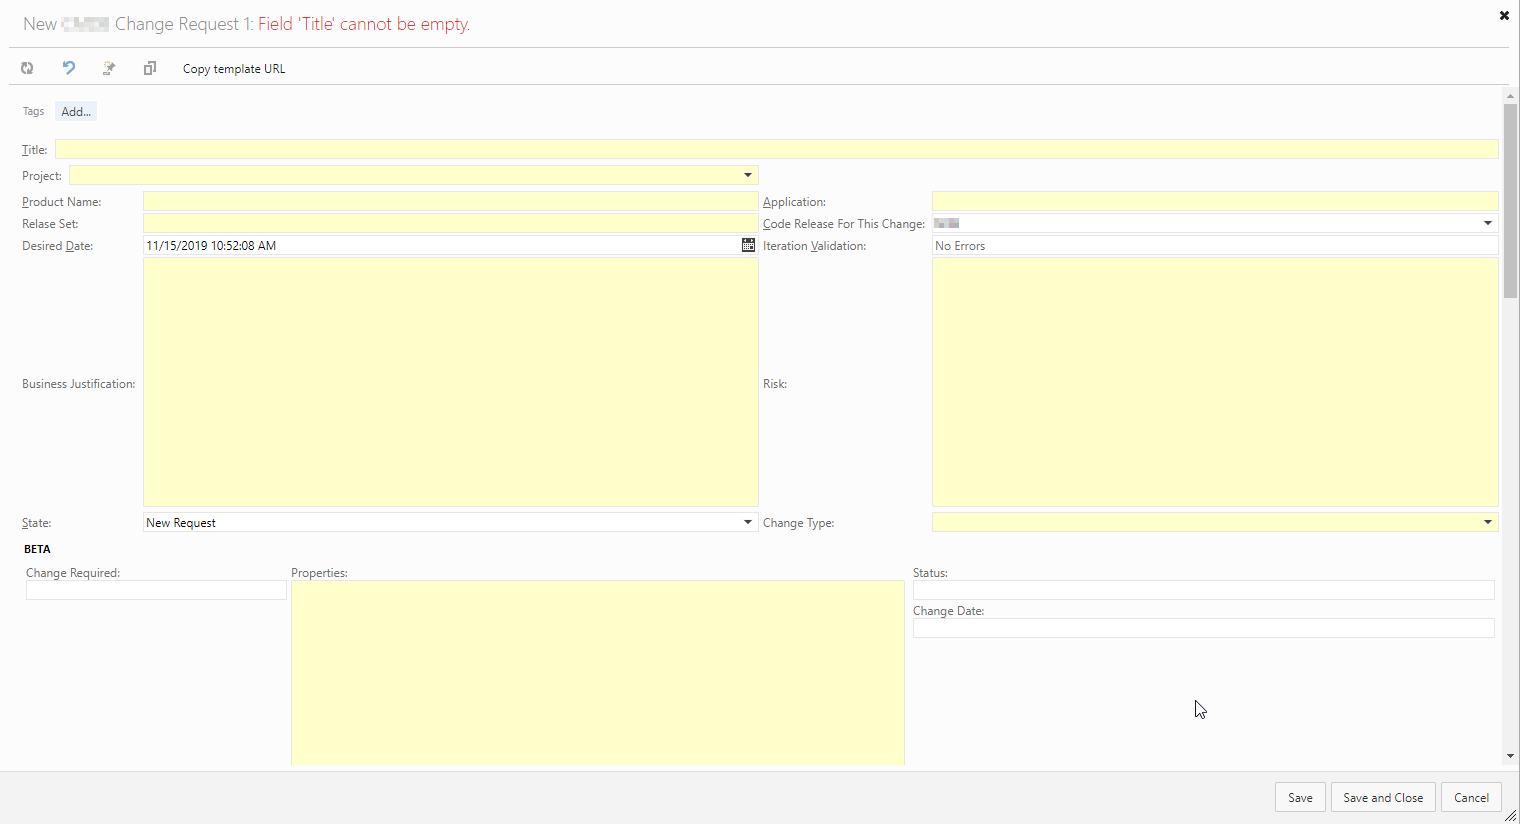
Note that many of the fields shown are custom, and they are placed in what we’ll call the ‘header’ of the form (more on that later). Also, note the grouping of fields under a section titled BETA; from left to right, the fields ‘Change Required’, ‘Properties’, ‘Status’ and ‘Change Date’ are shown. This same structure repeats with the subsequent sections titled Dev, QC, QA, and PROD (not shown). This structure led to a long work item form, which the user needed to scroll downwards to enter/view all fields.
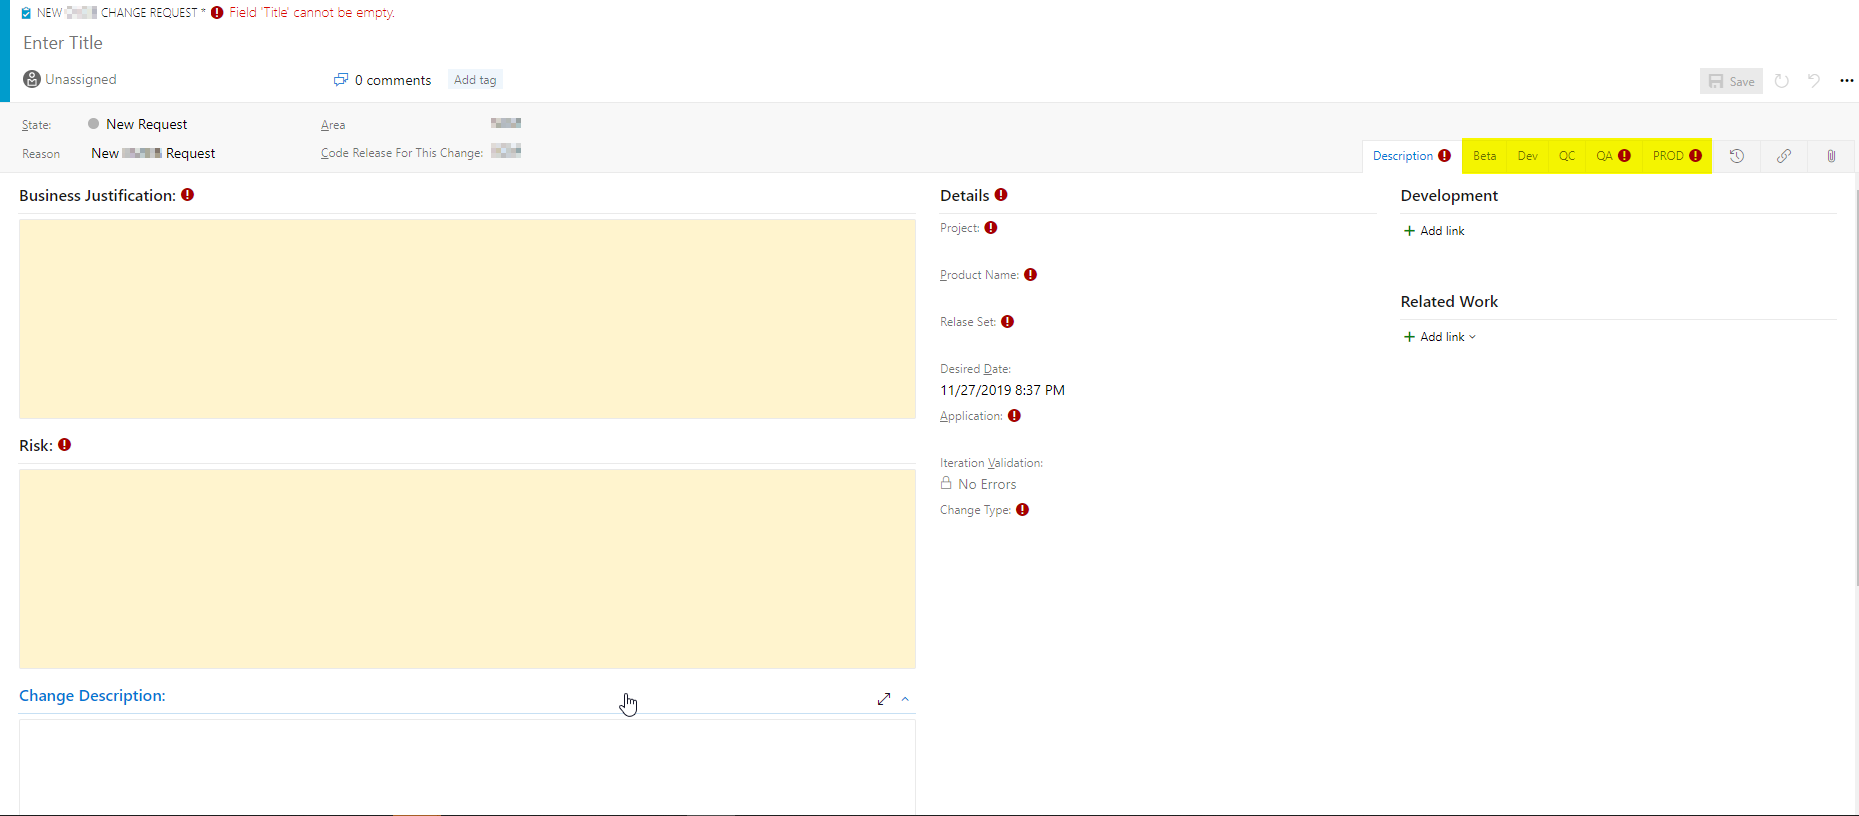
After upgrade to Azure DevOps Server 2019 Update 1, the CMDB Change Request work item form is displayed in the web UI as follows:
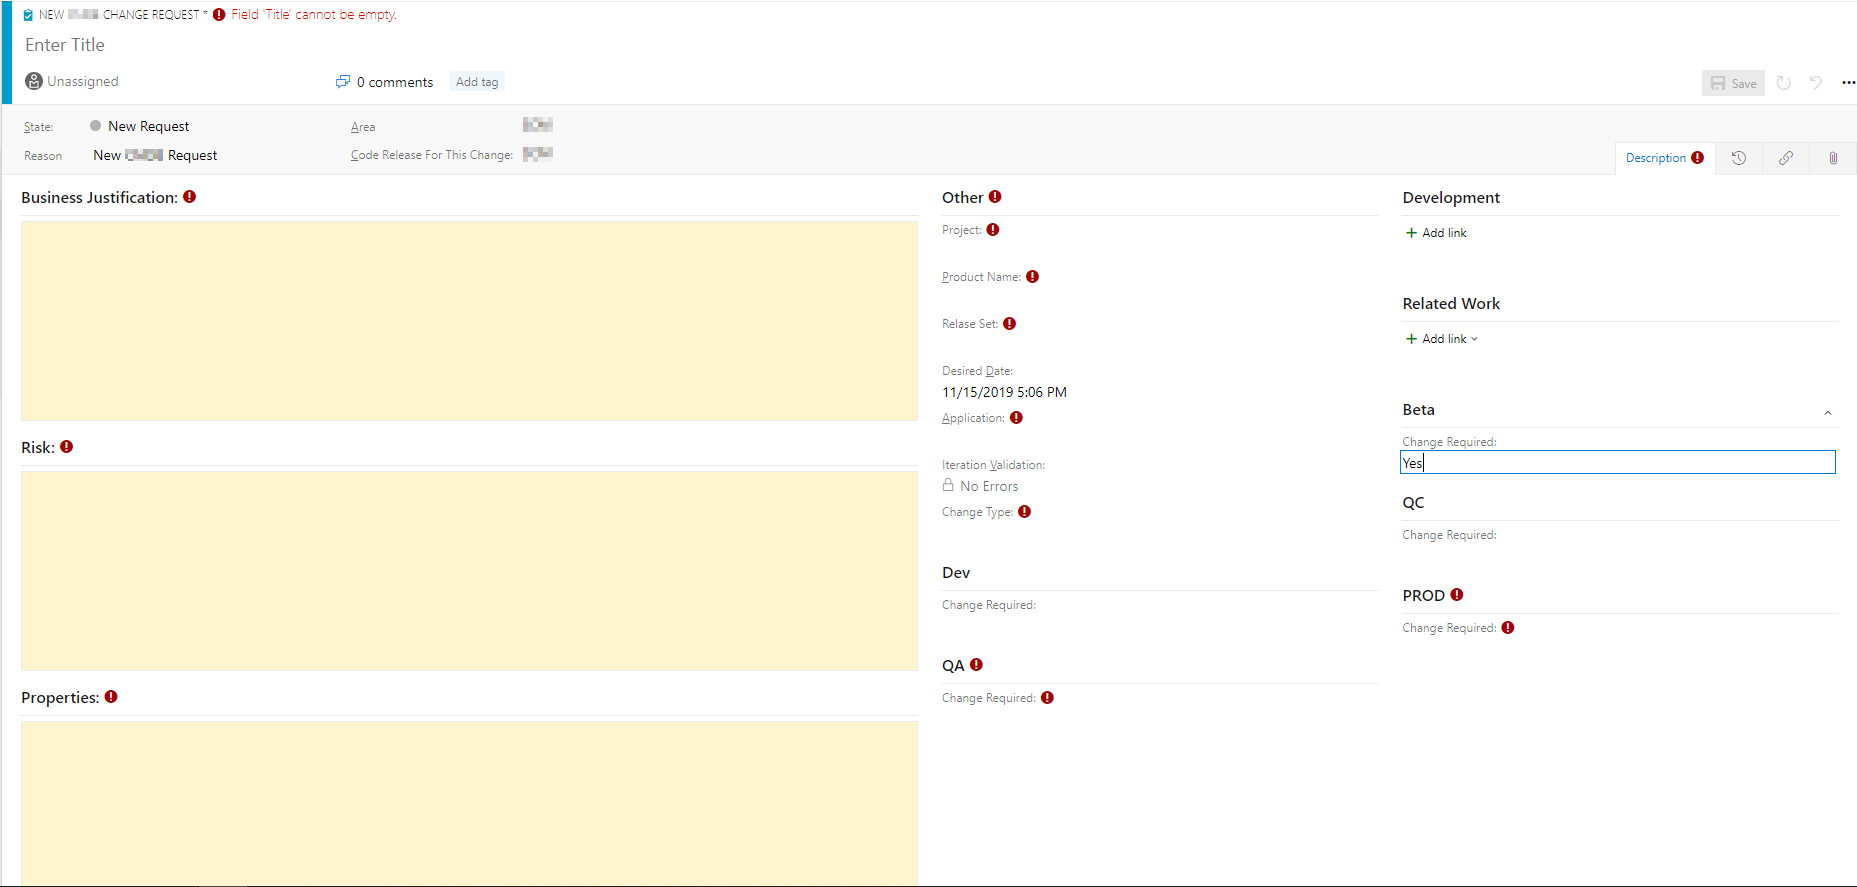
Note that the Beta section is now pushed to the right of the form, and the fields of ‘Properties’, ‘Status’ and ‘Change Date’ are not shown. The ‘Properties’ field is not shown until the value of ‘Yes’ is entered for the ‘Change Required’ filed. Once ‘Yes’ is entered, ‘Properties’ appears on the left of the form, under ‘Risk’. Removing the ‘Yes’ value causes the ‘Properties’ field to disappear. These same undesired behaviors and field locations are repeated for each of the Dev, QC, QA, and PROD field groups defined on the old form.
Causes for incorrect display
Prior to TFS 2017 Update 2, the .xml tag <Layout> was used to render the WI form. <Layout> has been deprecated in favor of the new <WebLayout> .xml tag (although <Layout> is still a required element of the work item form). During the upgrade process from versions of TFS earlier than TFS 2017.2, TFS attempts a ‘Best Effort Transformation of Layout to WebLayout’. Depending on the complexity of the old <Layout> tag, there may be unexpected results.
In the upgrade of the Change Request work item form, there were a combination of factors that led to the incorrect rendering of the WI form; these contributing factors are detailed in the following sections.
Limits on customization to the SystemControls section
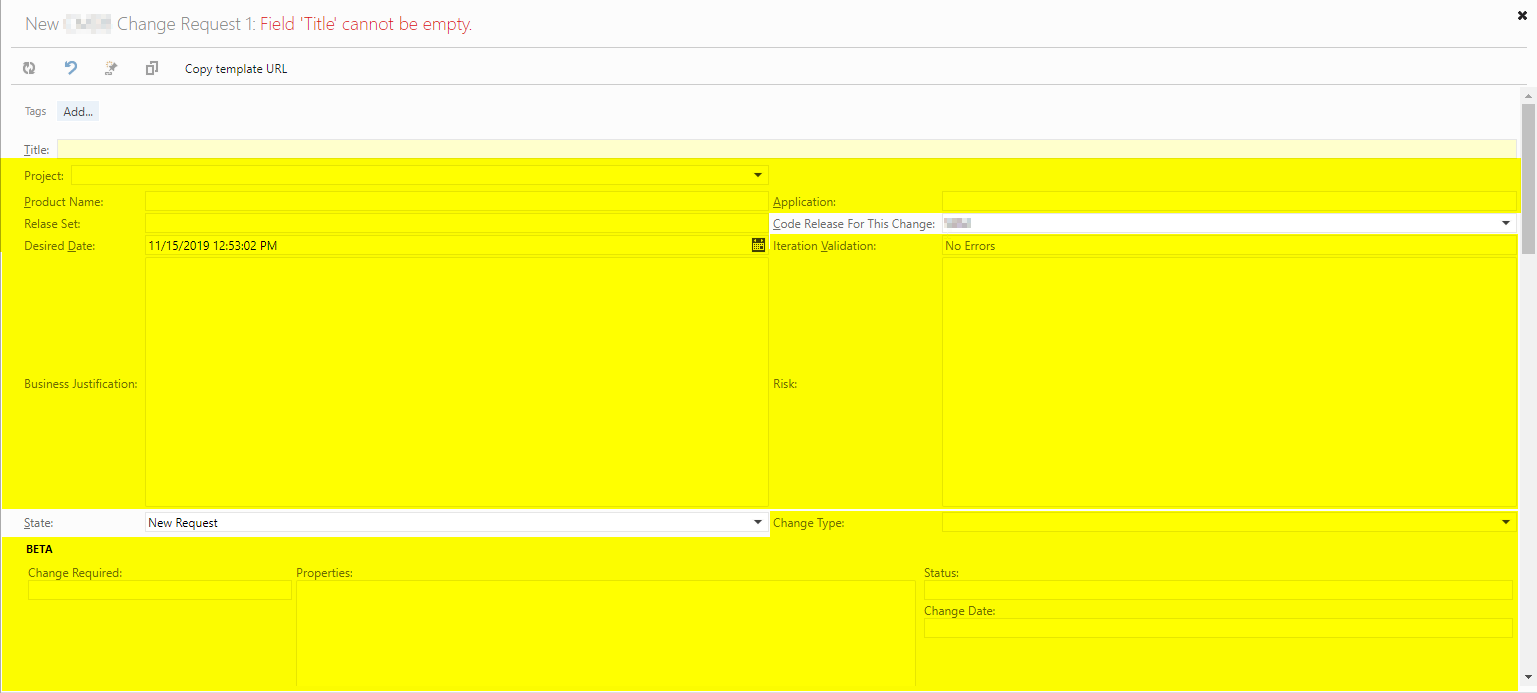
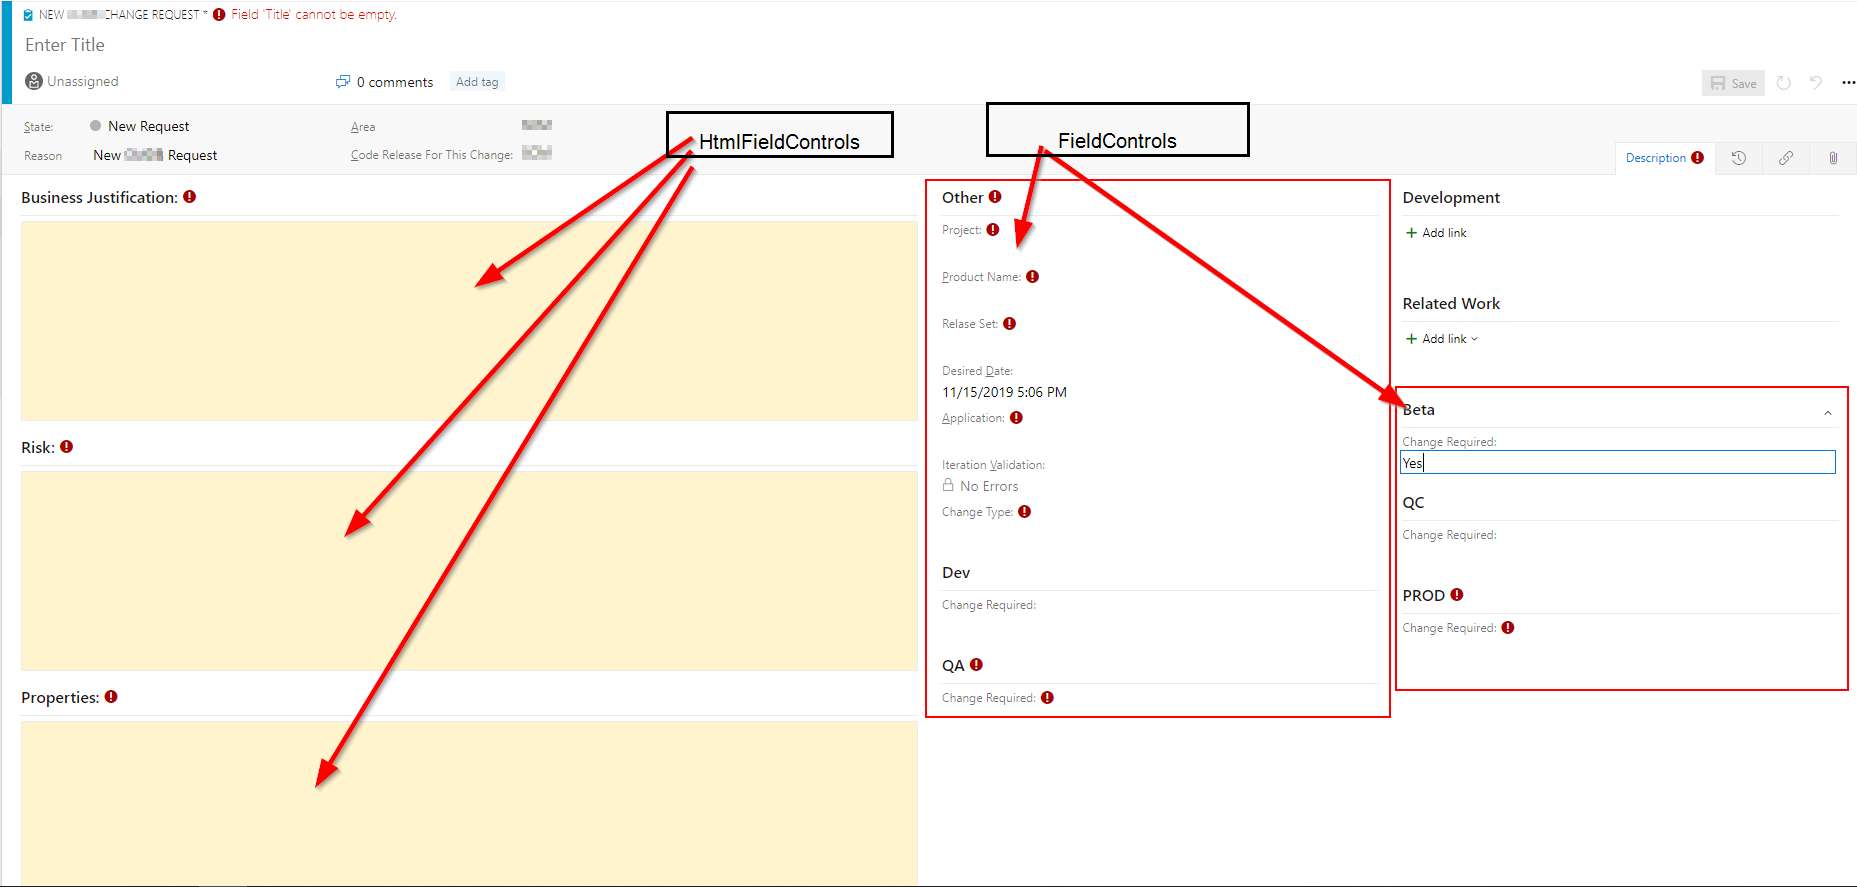
In <WebLayout>, we have a section defined as <SystemControls>. This section acts as a WI form header and is highlighted in the screenshot below.
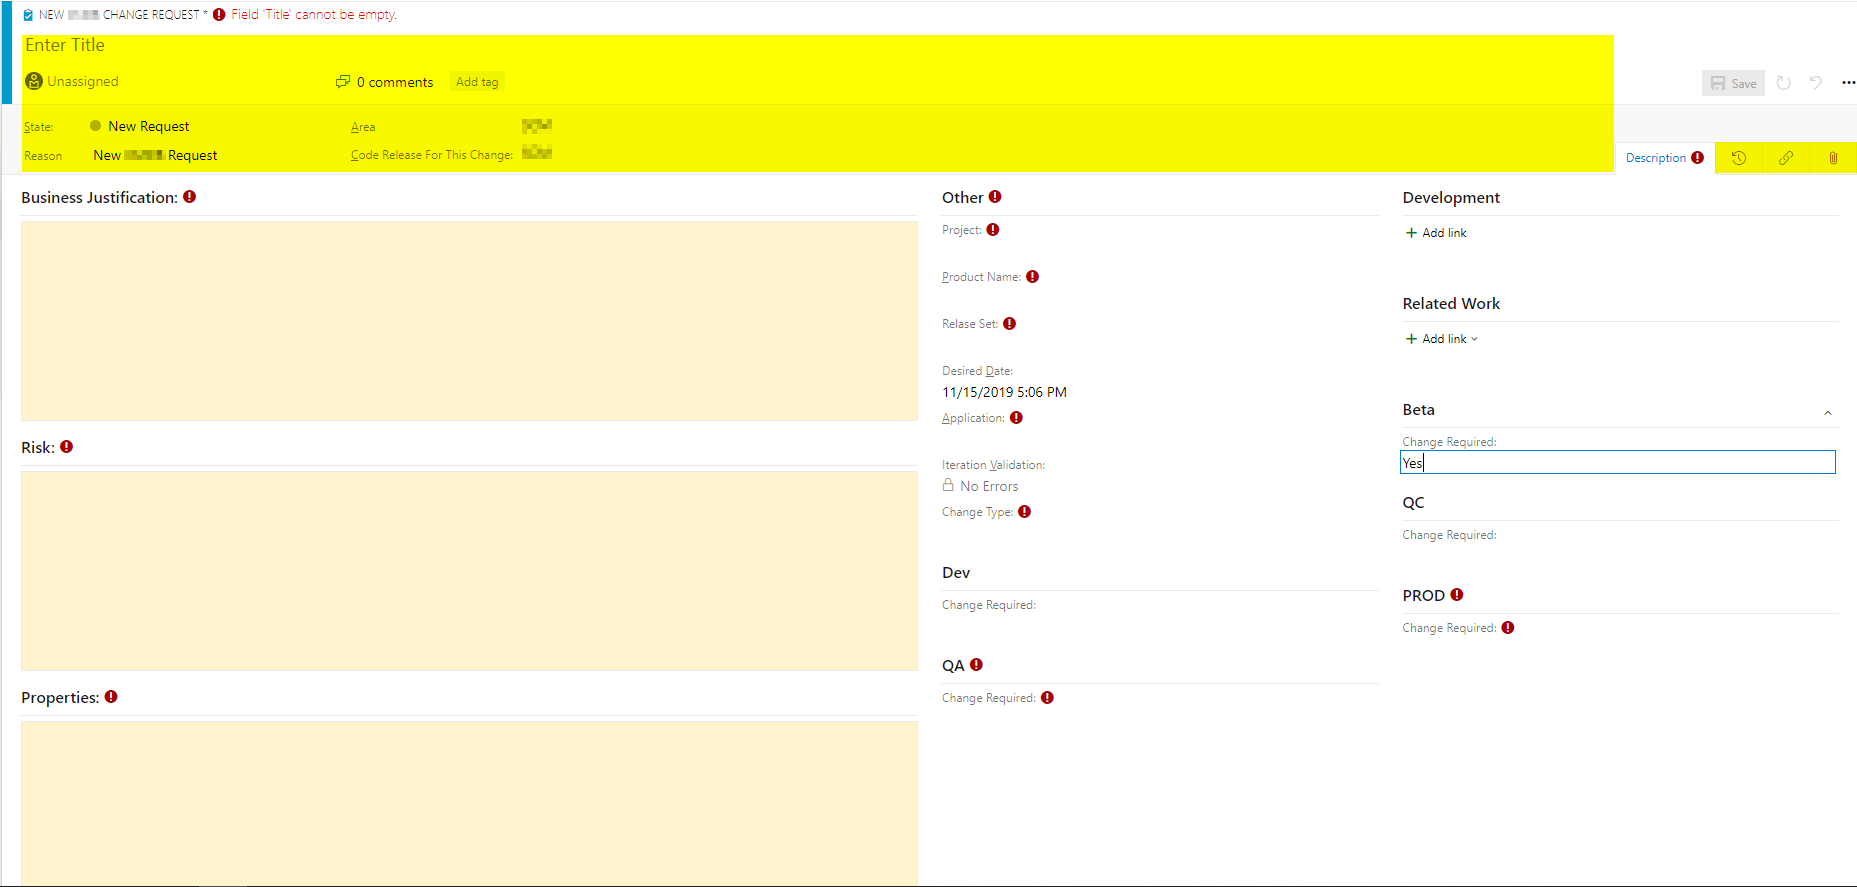
The ability to customize the <SystemControls> section is limited in the new <WebLayout>. In the old version of the WI Layout, there was much more flexibility around customizations that could be made to this area of the work item; the Change Request form has much of its customization done there, as shown in the areas highlighted below:
As part of the upgrade, Azure DevOps moved these fields out of the <SystemControls> section.
NOTE: There are 3 types of fields that are defined here as part of this form:
HtmlFieldControl,FieldControl, andDateTimeControl. AnHtmlFieldControlis the larger text box which has greater control over text and format; aFieldControlis shown as a simple text box and aDateTimeControllimits the user to data entry in DateTime format.
During the upgrade process, Azure DevOps does a ‘best effort’ guess at where the fields should appear, while conforming to new work item layout structure.
In the out-of-the-box WI templates, the larger HtmlFieldControls are displayed on the left side of the form, while FieldControls and DateTimeControls are displayed on the right side. Based on this standard, the upgrade process places all HtmlFieldControls on the left side of the form; all FieldControls were placed on the right side of the WI form, each in their own section or group.
Changes to fields defined as READONLY
In <WebLayout>, fields defined as read-only which have no set value are not displayed on the WI form by default.
It was discovered the example work item had a fair amount of custom logic built into the form. Much of this logic involved setting certain fields as read-only based on certain conditions and is valid. However, many of the custom fields were set as read-only when this work item is in the ‘New’ state and therefore have no value. Due to this, the fields were not visible on the form after the upgrade.
Steps Taken to Address Work Item Field Issues
The following sections describe the actions to return the work item form to a usable state.
Add the ShowEmptyReadOnlyFields attribute to <WebLayout>
To allow for empty, read-only fields to be visible on the work item form the ShowEmptyReadOnlyFields attribute must be set to true for the <WebLayout>. To set this, locate the opening <WebLayout> tag in the work item xml, and add the following text: ShowEmptyReadOnlyFields=”true”
When done, the <WebLayout> opening tag should look similar to below:

….
Create tabbed pages for each environment
Recall that in the original work item form, there was a section defined for each environment (BETA, DEV, QA, QC, PROD), and each environment had four fields associated (Properties, ChangeRequired, Status, ChangeDate). After upgrade, these sections were rearranged and the relationships between the fields became unclear. The next steps will bring the related fields back together and place them in their own tab on the work item form.
In <WebLayout>, different areas of the work item form are defined as follows (from top level down): Page, Section, Group, Control. The following image highlights these areas:
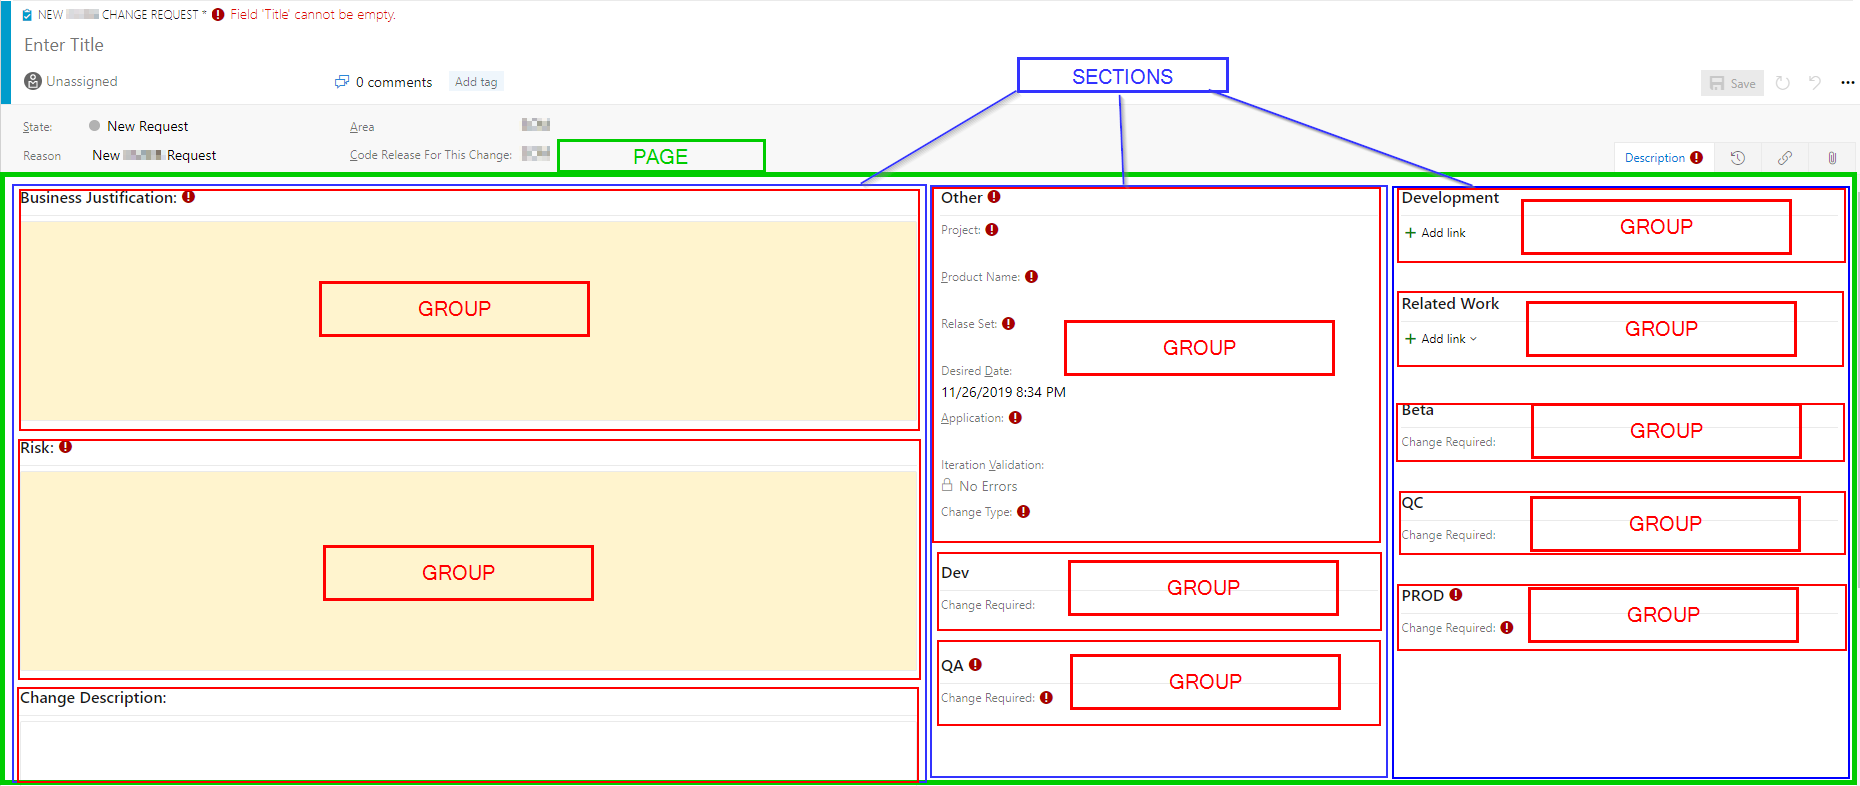
Notice there is one Page, titled ‘Description’, which consists of 3 different Sections. Each section has its own Groups defined, which may contain one or more Controls. The goal for this work item is to gather related fields (Properties, ChangeRequired, Status, ChangeDate) and place them in their own environment page (BETA, DEV, QA, QC, PROD).
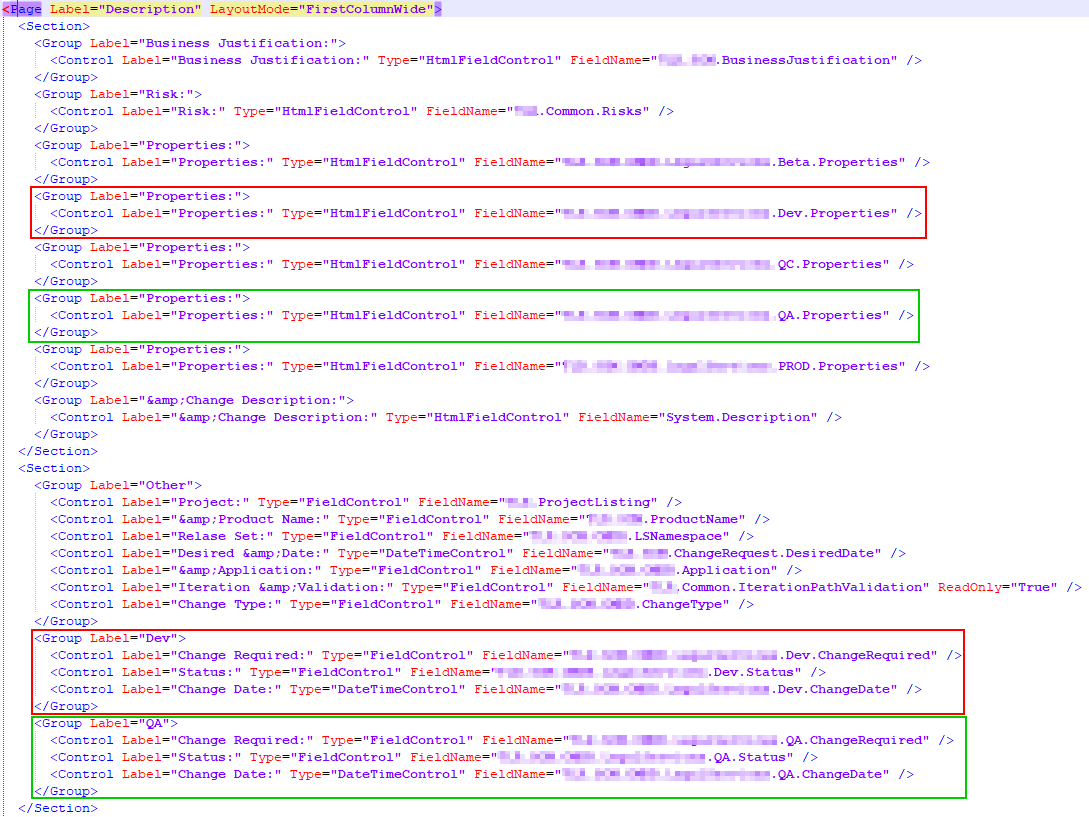
Examine the .xml snippet from the incorrect work item form below. Notice that the related fields for the DEV and QA environments have been split across separate sections. Similarly, the related fields for BETA, QC, PROD have also been split across separate sections. These fields (Controls) will need to be gathered and placed in their own page using the subsequent steps. We’ll examine the steps taken for the BETA environment fields.
Define the new page(s) on the work item form
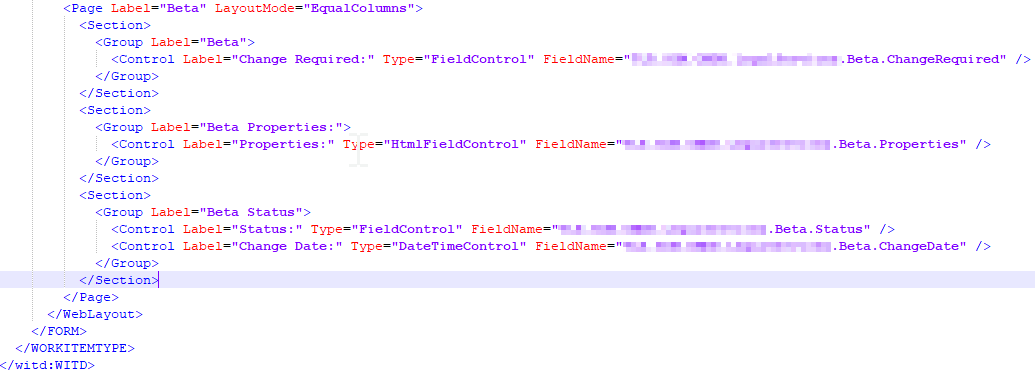
Locate the closing tag for the ‘Description’ page, located near the end of the WebLayout section. Insert a new <Page> section and set the label to match the environment which will be referenced. Set LayoutMode to “EqualColumns”. Using this LayoutMode will render a page where each column is one-third of the page.

Working methodically, build out the work item form. Start with the “ChangeRequired” field. Cut the existing “ChangeRequired” control and paste it in the new page. Wrap this control with a Group tag (providing a title to match the environment), and finally wrap this group with a Section tag. When complete, the Page should look as follows:
Next, create the center section. Add a new Section tag after the previous but inside the Page closing tag. Locate the existing “Properties” control on the Description page – cut the control and it’s Group wrapper and paste to the new section. When complete, the page should look as follows:
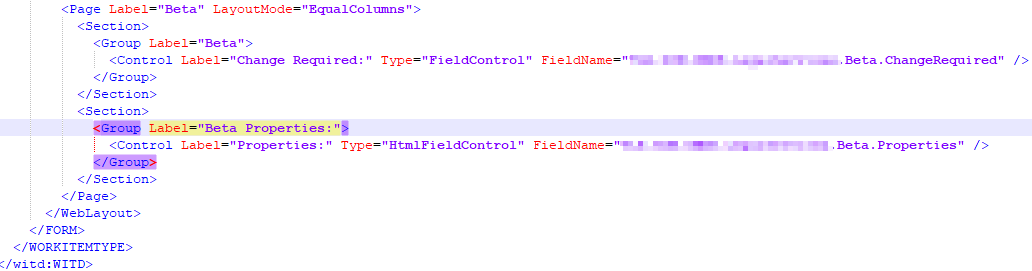
The right-side section of the form will consist of 2 controls in a group. Add a new Section tag subsequent to the previous. Add a Group tag and provide the appropriate label. Cut and paste the fields for “Status” and “ChangeDate” to the new Group. The completed page should look as follows:
NOTE: Be sure to clean up empty
Grouptags as their contents are moved to the new page. Any emptyGrouptags may create errors upon import.
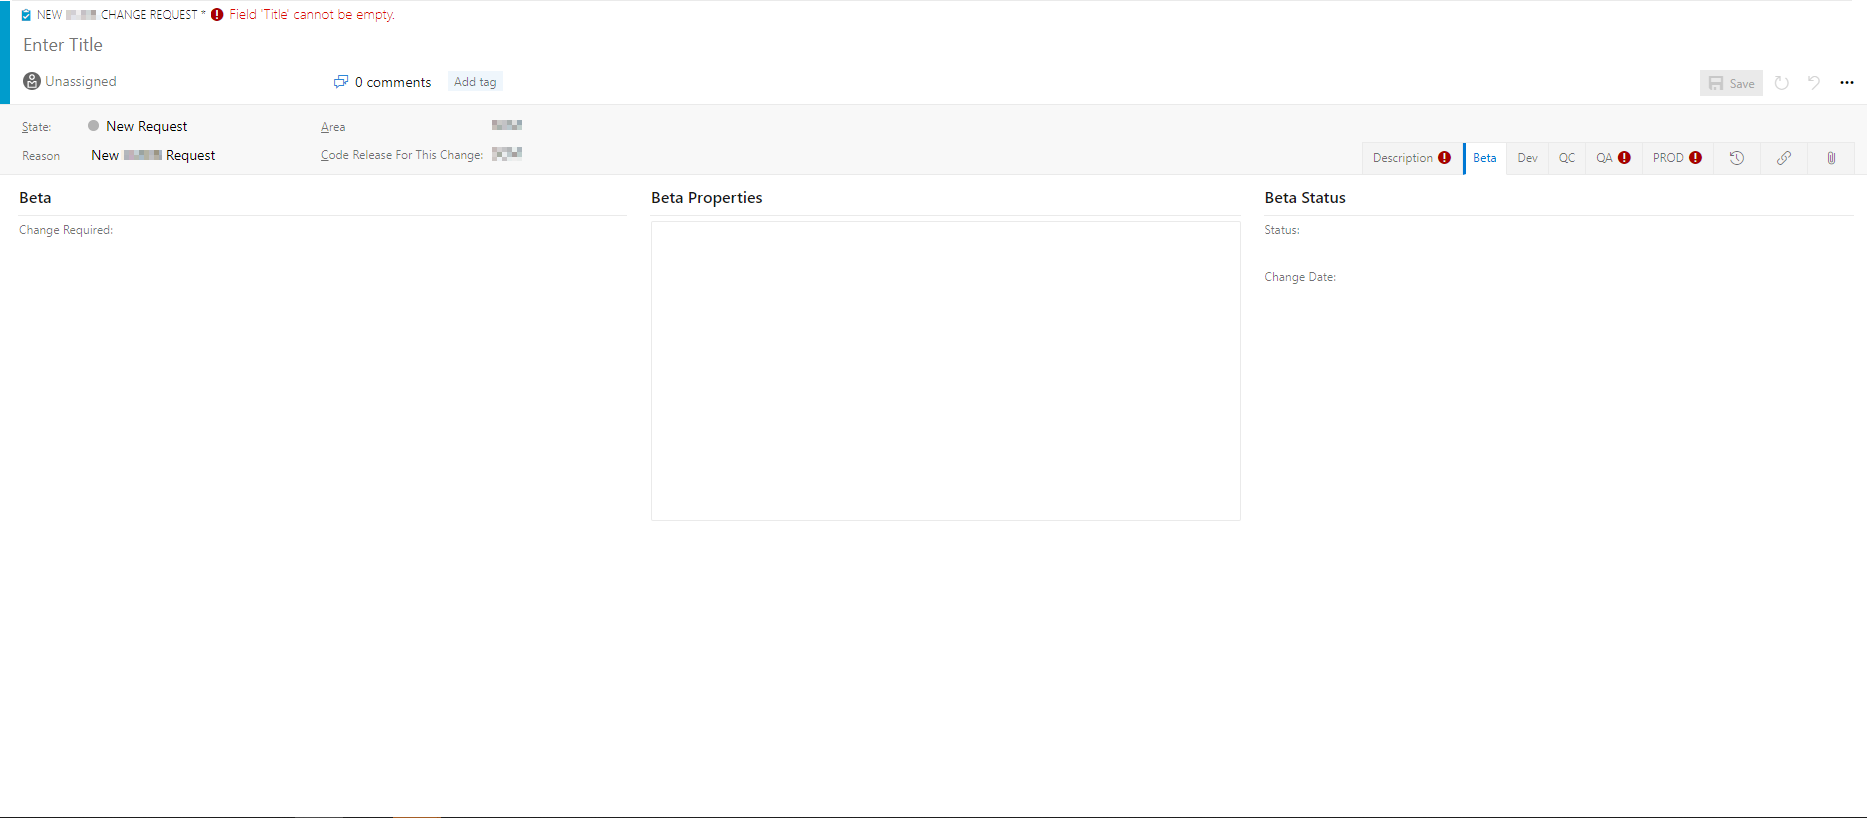
Repeat the steps for defining new pages for each the remaining environments fields (DEV, QA, QC, PROD). Push the new .xml definition back to the server using one of the following: TFS Team Project Manager, Process Template Editor extension for Visual Studio, or witadmin. Navigate to the project and create a new work item of type Change Request. The form should now look as follows, with each environment in its own tab:
Notice that environment fields are grouped into tabs, and the layout of each tab should look as seen below:
Conclusion
While most organizations will be able to upgrade to Azure DevOps and the new work item form without much pain, we’ve seen that some of the more-heavily customized work item forms may take some effort to get back to a functional state. Hopefully this blog helped to shed some light on what happens during the upgrade process and will help you on your way to fixing up those forms.
Links
WebLayout and Control elements reference
Handling a TFS 2018 Upgrade from Old form to New form
0 comments