Sr. Application Development Manager Chris Tjoumas outlines a process for using Azure virtual machines to configure a UniFi controller in your home network.
If you are using the UniFi controller to setup a home network and you want to setup guest access and direct them to a guest portal, you will need the UniFi controller to be running 24×7. If you don’t want to keep your home machine constantly running (or at least during the day, every day), you can setup a virtual machine in Azure to create a UniFi cloud controller.
To run the UniFi Controller software on Azure, follow these steps:
- Create new Virtual Machine (VM) resource
- Give the VM a name, region, resource group, Windows Server 2016 Datacenter image, and choose the smallest size (I chose standard B1s). Finally, enter a username and password for the VM admin.
- Even though this is a relatively inexpensive VM, you should also consider setting up a schedule for this VM so that it shuts down at night and starts up in the morning, unless you plan on having guests join your network at the wee hours of the morning.
- Click the “Next” button to select the disks, and select the Standard HDD option.
- Leave the other settings at their default values, then click the “Review and create” button. Once validation passes, click the “Create” button.
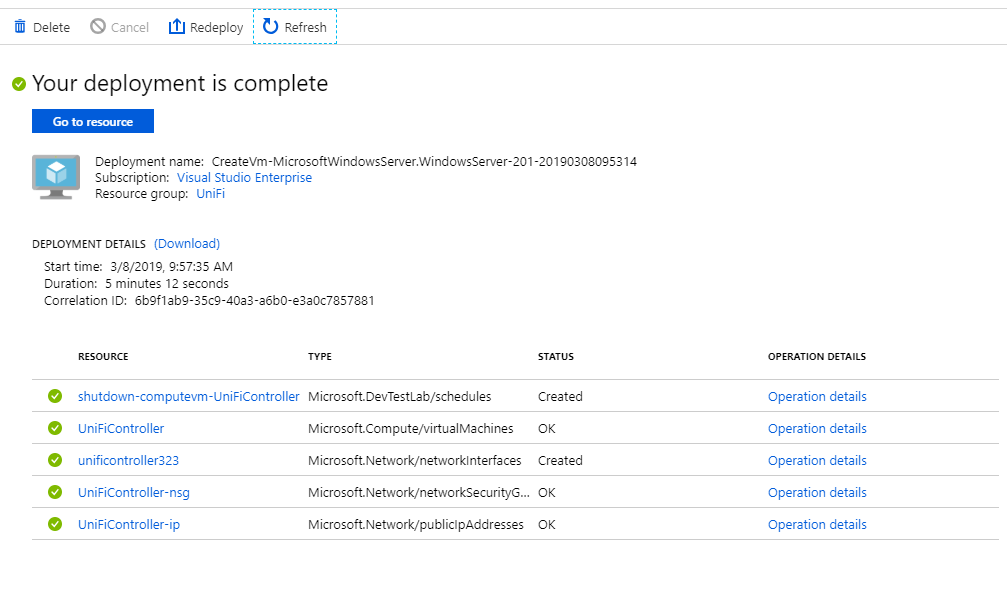
- Once the VM is provisioned, you’ll see the following screen (note that all of the networking was created for you):

Next, click the “Go to resource” button. When you see the overview section, take note of the Public IP Address and write this down for later:

Now we need to set the public IP address of the server to be static:
- Click on “Networking” on the left side of the portal
- In the Networking view, click the Public IP address:

- Set the option for Assignment to Static and click “Save”.
Next, we need to set the local IP address of the server to be static:
- Go back to Networking (the top breadcrumb menu will take you there), then click on the Network interface:

- Click on IP configurations on the left, then click on ‘ipconfig1’.
- Set the Assignment to Static and click Save
Finally, we need to open the ports necessary to run the controller. In order to do this, we’ll need to add inbound port rules:
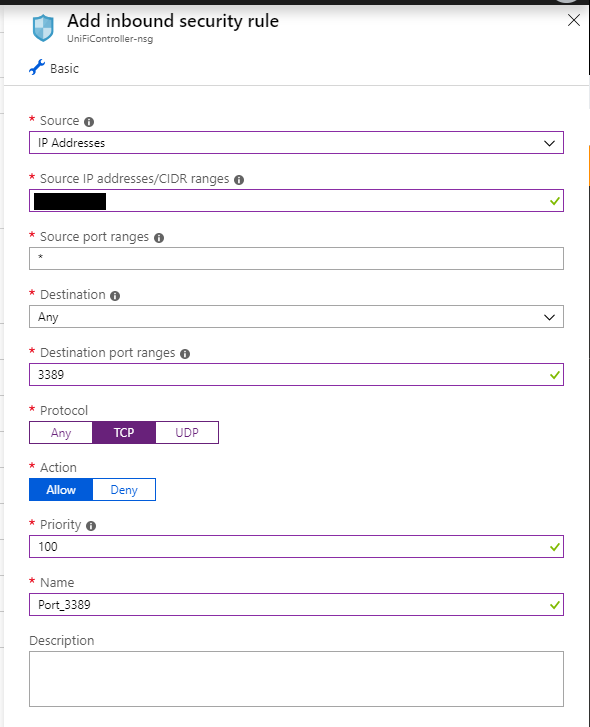
- Go back to Networking, and then click on the “Add inbound port rule” button:

- We are going to allow RDP access in order for you to be able to remote in and configure the controller / VM. You can leave the Source IP as Any, but to add the security of only allowing IPs from your home, put in your IP address. RDP requires port 3389 to be open and uses TCP (you may also use a CIDR block to allow any IPs in your home – check out my CIDR notation blog post for more information):

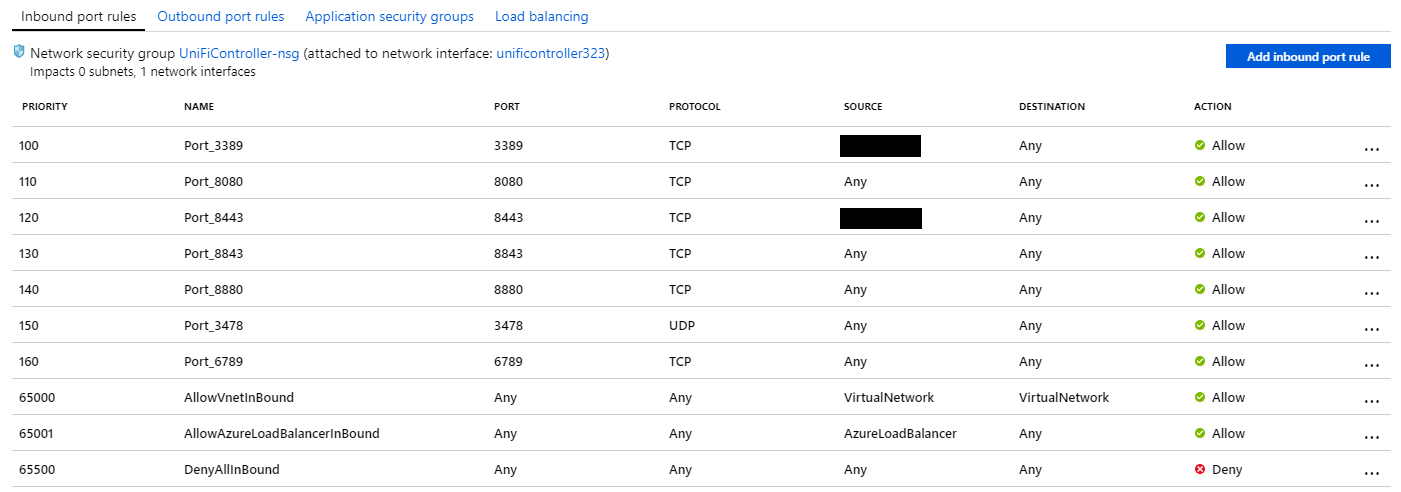
- Repeat this last step and add the following inbound security rules as shown here (pay attention to the Priority):
(Note: when configuring port 8443, you can set the Source IP to your home IP for added security, as this is the port which allows access to the configuration web page of the controller)

After the networking has been configured, go back to the VM and click the “Connect” button. This will download an RDP file configured to remote into the virtual machine. Launch this RDP file, and connect using the username/password you configured when the VM was created. Once you have established a connection, perform the following steps inside the VM:
- install the Chrome browser as the UniFi controller works best in this browser
- Download the latest version of the UniFi SDN Controller for Windows: https://www.ui.com/download/unifi/
- Download the 64-bit version of Java 8: https://www.oracle.com/technetwork/java/javase/downloads/jre8-downloads-2133155.html
- Install Java, accepting all of the default options
- Install the UniFi Controller and run the Controller after installation
- When prompted, check both boxes to allow Java to open the required ports
- When the controller is started, click the “Launch a Browser to Manage the Network” button. Make sure to run this in Chrome as IE is not fully supported
- Select your timezone and click Next.
- We won’t configure devices initially; click Next and then click Skip on the next WiFi screen
- Enter your admin credentials and click Next
- Review configuration details and click Next
- You can link the cloud controller to your ubnt.com account if you have one, otherwise you can skip this
- If you are presented at the login screen, log back in to the controller. Click the Settings icon on the bottom left of the screen
You must reset the AP to clear any previous configuration. After you reset it, you will issue a set-inform command with the IP address of your UniFi controller in Azure. This will tell your AP that the controller is located at this IP address, and it will set itself as visible to your controller in order to be adopted.
- SSH into the AP (default password is ubnt)
- Execute the reset command: syswrapper.sh restore-default
- Execute the set-inform command with the IP address of your Unifi controller in Azure: set-inform http://<your VM DNS name>:8080/inform. Note, you can find the DNS name on the overview of your VM in Azure
Once you go back to your controller in your Azure VM, click on your Devices menu on the left. You should now see your Access Point set to Ready to Adopt. Once you adopt your device, you’re all set! Through your controller, which you can also run anywhere by going to your controller via your DNS in a web browser (https://your DNS name:8443), you can setup your guest network and configure your AP. And best of all, now that you have your controller running in Azure, your guest network will remain up and running as long as your VM is running. Enjoy!

Is it just me, or did you open a port on the VM for 8443, then tell the AP to look to port 8080?
Thanks for the comment Craig - Both ports are being open. In the section where we are opening the ports, step 2 shows how to open a port (3389 in this case, in order to allow for an RDP into the VM) and step 3 lists all of the ports which should also be opened, which includes both ports 8443 and port 8080. Port 8080 is for the AP to be able to inform the controller that it is ready to be adopted (once you SSH into the AP, you tell it to inform the AP by running http://<your VM...