
In this post, Yanzhong Liang (Microsoft Cloud Solution Architect) and Todd Shain (United Healthcare Group) share some learnings from the field, moving data between environments with Azure Data Factory.
In this article, we will take a look at how to transfer files between your on-premises or private network and Azure cloud storage, automatically.
Consider a scenario where researchers need to securely transfer small or large files, like databases, from virtual machines to Azure cloud storage for archiving and backup purposes. They also need to download result files or data to local machines, then upload that to storage. One approach might be to use something like AzCopy.
AzCopy is a command-line utility that can use to transfer data in or out of a storage account (blobs or files). This can be used on Windows, Linux or macOS systems. The same utility also can use to migrate data from one storage account to another.
However, this manual process is tedious, time-consuming, and prone to errors. This approach is not realistic with enterprise level data– moving a large number of files with high frequency. Data move automation is a better way to accomplish this.
Therefore, we will explore this approach in this blog with a real-world example.
These are 3 typical cases we needed to solve for:
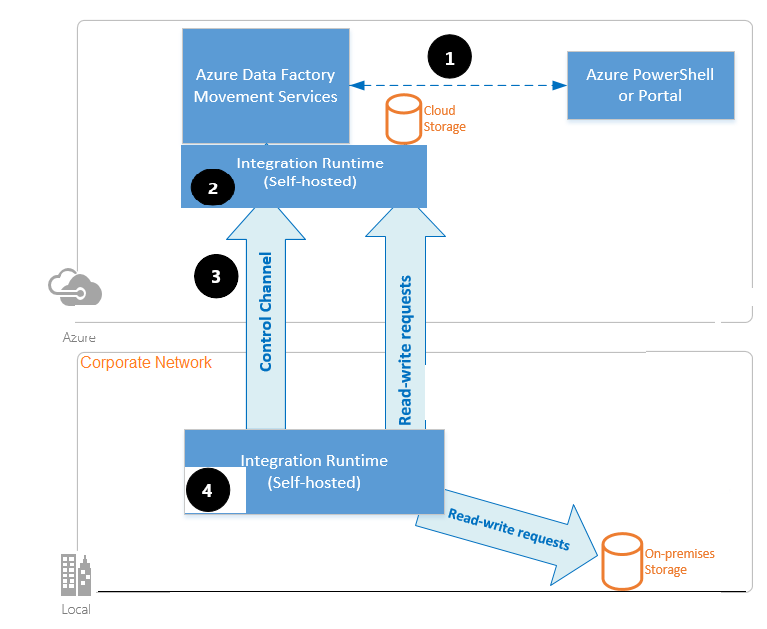
- Data store is located inside an on-premises network, an Azure virtual network, or Amazon Virtual Private Cloud, and you need to configure a self-hosted integration runtime to connect to it.
- Data store is a managed cloud data service, you can use the Azure Integration Runtime. If the access is restricted to IPs that are approved in the firewall rules, you can add Azure Integration Runtime IPs to the allow list
- Use the managed virtual network integration runtime feature in Azure Data Factory to access the on-premises network without installing and configuring a self-hosted integration runtime.
This post will cover option 1 only. The other two will be covered in separate posts.
There was sufficient Microsoft documentation covering almost all areas for using self-hosted integration runtime to implement a data move, however, the docs glossed over details that made it hard to configure a working environment quickly. Through my research and testing, I compiled some of these details into this post to help any other customers struggling with similar cases.
The overall high-level architecture
Cloud setup
Create a self-hosted IR (SHIR) via UI
Use the following steps to create a self-hosted IR using the Azure Data Factory or Azure Synapse UI.
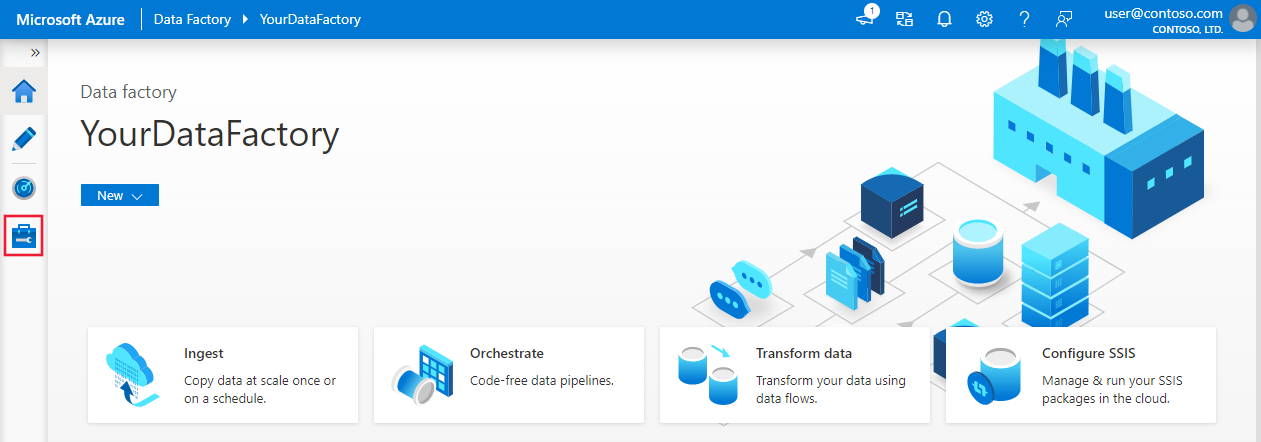
- On the home page of the Azure Data Factory UI, select the Manage tab from the leftmost pane.
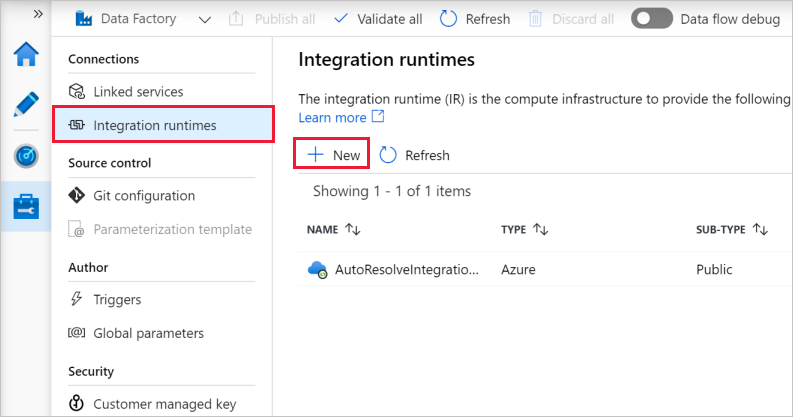
- Select Integration runtimes on the left pane, and then select +New.
- On the Integration runtime setup page, select Azure, Self-Hosted, and then select Continue.
- On the following page, select Self-Hosted to create a Self-Hosted IR, and then select Continue.
Click the new created SHIR, copy the authentication key.
Setup private network/virtual machine
- Download and install self-hosted integration runtime from Microsoft web side.
Note:- Scanning some data sources requires additional setup on the self-hosted integration runtime machine. For example, JDK, Visual C++ Redistributable, or specific driver. For your source, refer to each source article for prerequisite details. Any requirements will be listed in the Prerequisites section.
- Self-hosted integration runtime requires a 64-bit Operating System with .NET Framework 4.7.2 or above. See .NET Framework System Requirements for details.
- You must be an administrator on the machine to successfully install and configure the self-hosted integration runtime.
- If you use the Self-Hosted Integration runtime to scan Parquet files, you need to install the 64-bit JRE 8 (Java Runtime Environment) or OpenJDK on your IR machine. Check our Java Runtime Environment section at the bottom of the page for an installation guide.
Java Runtime Environment Installation
If you scan Parquet files using the self-hosted integration runtime with Microsoft Purview, you’ll need to install either the Java Runtime Environment or OpenJDK on your self-hosted IR machine.
When scanning Parquet files using the self-hosted IR, the service locates the Java runtime by firstly checking the registry (HKEY_LOCAL_MACHINE\SOFTWARE\JavaSoft\Java Runtime Environment\{Current Version}\JavaHome) for JRE, if not found, secondly checking system variable JAVA_HOME for OpenJDK. You can set JAVA_HOME under System Settings, Environment Variables on your machine. Create or edit the JAVA_HOME variable to point to the Java jre on your machine. For example: C:\Program Files\Java\jdk1.8\jre
-
-
- To use JRE: The 64-bit IR requires 64-bit JRE. You can find it from here.
- To use OpenJDK: It’s supported since IR version 3.13. Package the jvm.dll with all other required assemblies of OpenJDK into self-hosted IR machine and set system environment variable JAVA_HOME accordingly.
-
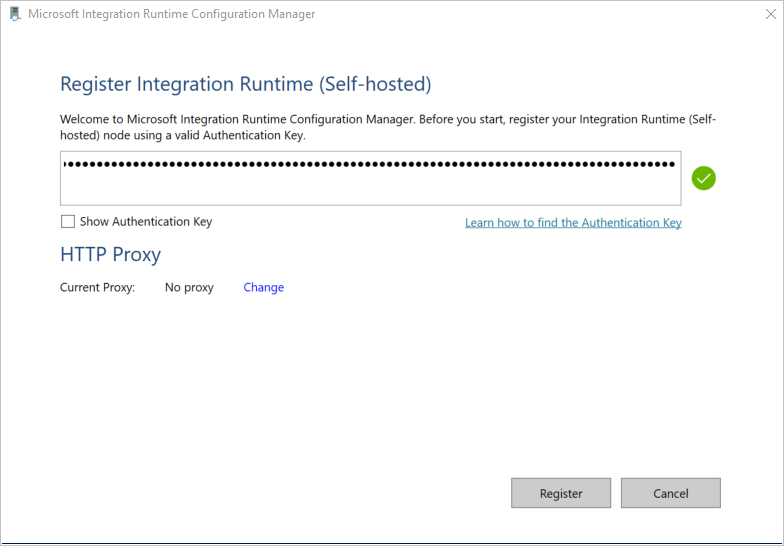
- Register the self-hosted integration runtime.
Paste the authentication key from portal side (just copied on cloud side) and click the register key.
- After the self-hosted integration runtime is registered successfully, you see the following window:
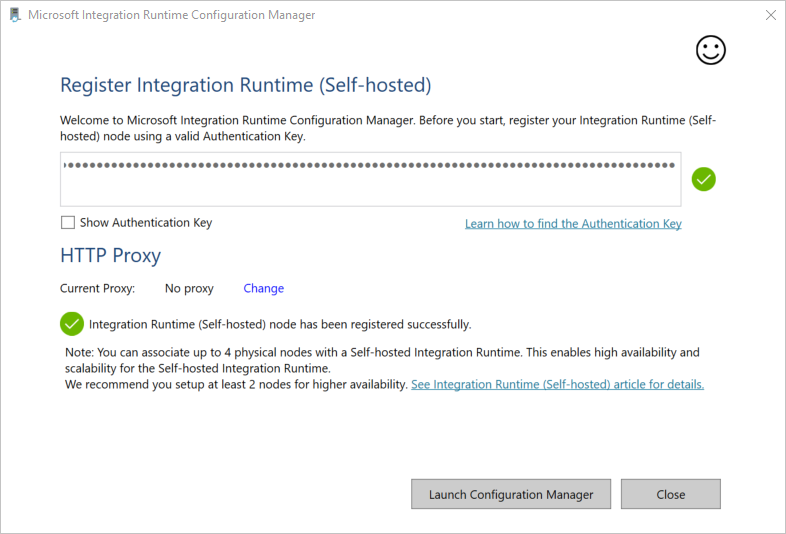
After the self-hosted integration runtime is registered successfully, the following permission should be set from command line if it is never done.
C:\Program Files\Microsoft Integration Runtime\5.0\Shared> .\dmgcmd.exe -DisableLocalFolderPathValidation -EnableLocalMachineAccess
C:\Program Files\Microsoft Integration Runtime\5.0\Shared> .\dmgcmd.exe -EnableLocalMachineAccess
Note: prepare the service account on this virtual machine
Userid/password
If domain user such as:
\corporate\lyxxxx, the domain name should be included as well.
If the file share folder is a network drive such as:
\\OneDrive\test
If local folder:
C:\test
These will be used in portal side pipeline configuration.
When you run the self-hosted integration runtime setup version 3.3 or later, by default the self-hosted integration runtime installer disables Remote Access from Intranet on the self-hosted integration runtime machine.
When you use a firewall from a partner or others, you can manually open port 8060 or the user-configured port.
Ports and firewalls
There are two firewalls to consider:
- The corporate firewall that runs on the central router of the organization
- The Windows firewall that is configured as a daemon on the local machine where the self-hosted integration runtime is installed
At the corporate firewall level, you need to configure the following domains and outbound ports:
| Domain names | Outbound ports | Description | |
|---|---|---|---|
| Public Cloud: *.servicebus.windows.net Azure Government: *.servicebus.usgovcloudapi.net China: *.servicebus.chinacloudapi.cn | 443 | Required by the self-hosted integration runtime for interactive authoring. It’s not required if self-contained interactive authoring is enabled. | |
| Public Cloud: {datafactory}.{region}.datafactory.azure.net or *.frontend.clouddatahub.net Azure Government: {datafactory}.{region}.datafactory.azure.us China: {datafactory}.{region}.datafactory.azure.cn | 443 | Required by the self-hosted integration runtime to connect to the Data Factory service. For new created Data Factory in public cloud, find the FQDN from your Self-hosted Integration Runtime key, which is in format {datafactory}.{region}.datafactory.azure.net. For old Data factory and Azure Synapse Analytics, if you don’t see the FQDN in your Self-hosted Integration key, use *.frontend.clouddatahub.net instead. | |
| download.microsoft.com | 443 | Required by the self-hosted integration runtime for downloading the updates. If you have disabled auto-update, you can skip configuring this domain. | |
| Key Vault URL | 443 | Required by Azure Key Vault if you store the credential in Key Vault. | |
Important considerations
When installing a self-hosted integration runtime consider following
- Keep it close to your data source but not necessarily on the same machine
- Don’t install it on the same machine as Power BI gateway
- Windows Server only(FIPS-compliant encryption servers might cause jobs to fail)
- Share across multiple data sources
- Share across multiple data factories
Azure data factory config
The following should be configured in Azure data factory studio.
All configured should use the defined integration runtime: Integrationruntime1
Not use: AutoResolveIntegrationRuntime (default)
The most important part is to create source and destination linked service from:
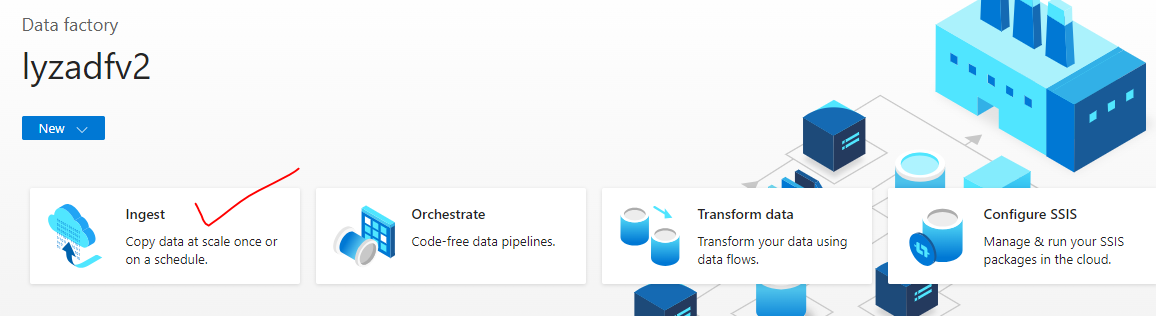
Start with Ingest.
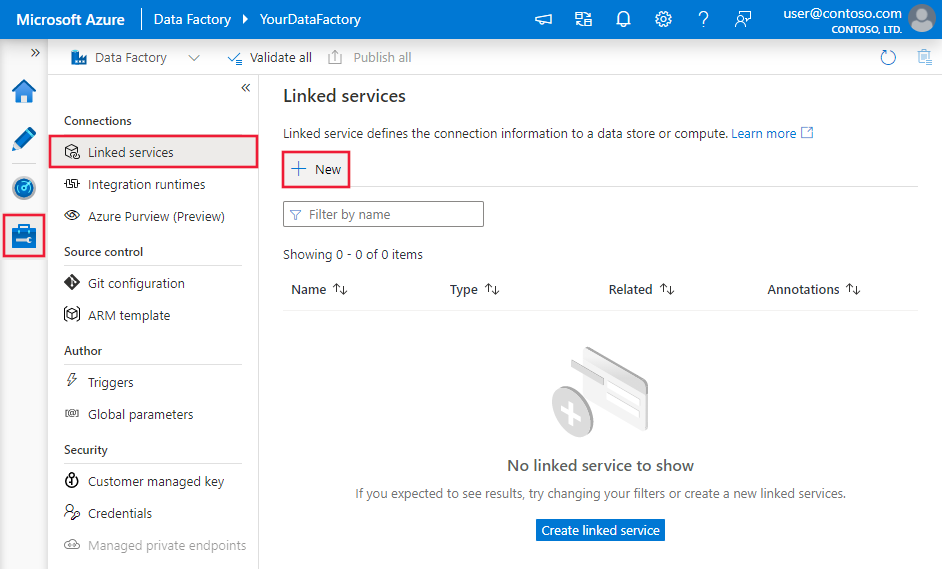
- Create a file system linked service using UI (source part)
Use the following steps to create a file system linked service in the Azure portal UI.- Browse to the Manage tab in your Azure Data Factory or Synapse workspace and select Linked Services, then click New:
- Search for file and select the File System connector.
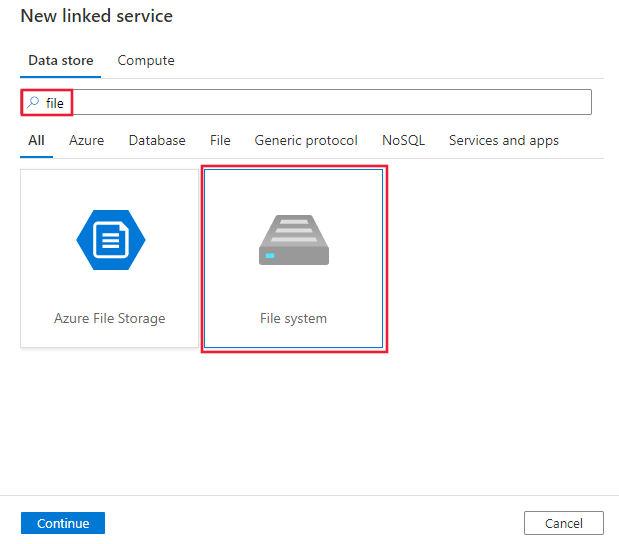
- Configure the service details, test the connection, and create the new linked service.
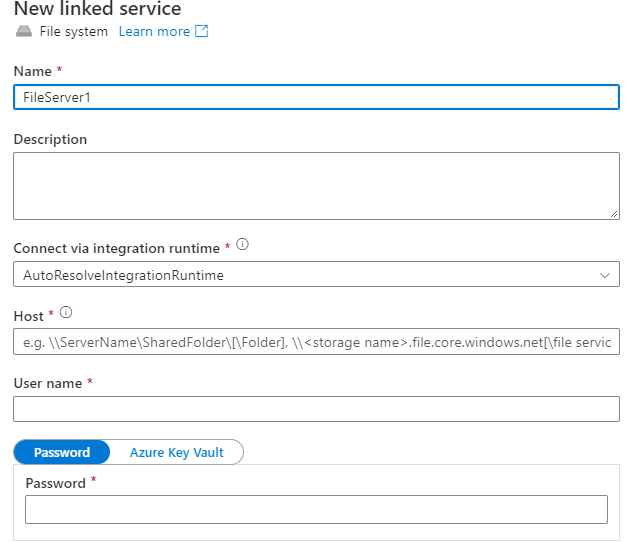 Note:
The host can be either:
Note:
The host can be either:
Network share folder:
\\<your servername>\<foldername>
Local folder such as: c:\shared
\\ c:\shared, no need to add host name
User Name and password should be AAD user name/password or local account
User Name from AAD: \<corporate>\<user name> corporate name should your domain name such as \finance, hr etc.
Local account: user name only
After setup Linked service, make sure test successful.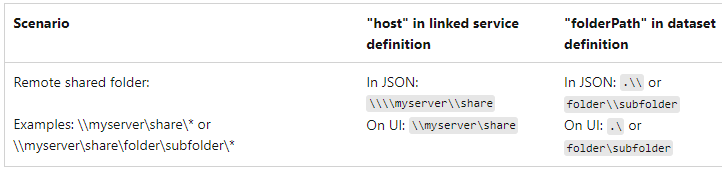 You need to create linked source and Linked target.
If you copy files from private virtual machine. Config it as source.
If you use a storage as target, config storage as target. - Create storage linked service using UI (destination part)
Config destination linked service, make sure to use the integration runtime in above step, do not use default one.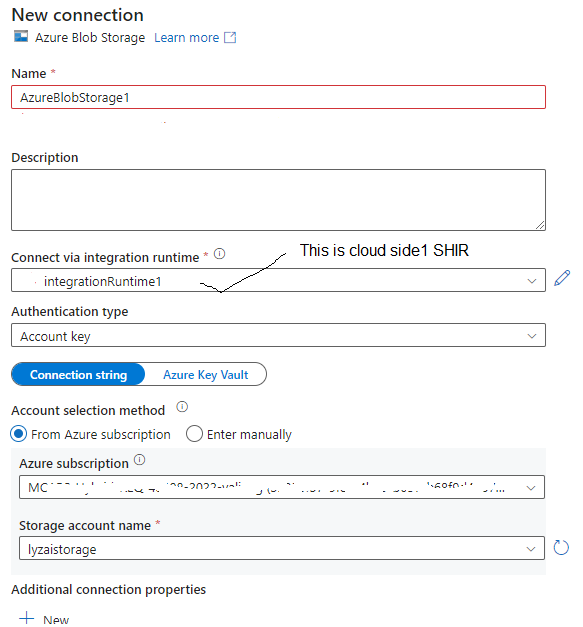
After creating the destination linked service, we can config the copy pipeline:
 Config source
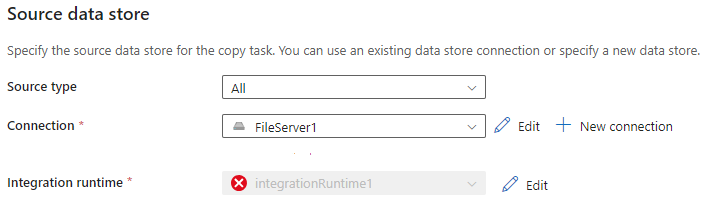 Make sure select the Integration runtime defined during installation step.
Config destination
Make sure select the Integration runtime defined during installation step.
Config destination
 It’s better to use binary mode, other modes like json, csv, the system will validate the date format, very easy to get validation errors.
After above two steps are finished, you can set up the schedule to run the pipeline.
It’s better to use binary mode, other modes like json, csv, the system will validate the date format, very easy to get validation errors.
After above two steps are finished, you can set up the schedule to run the pipeline.
Lessons
If you are relying solely on the Data Factory documentation, you may have to spend some working through these combinations on your own (expect some trial and error along the way).
This document has highlighted all detail level configuration information so that any user can easily follow along to set up a new data factory pipeline.
In this post, we use file system and blob storage as example, but all configurations apply to other case with slight adjustments.
0 comments