
This blog post applies to the Windows PowerShell Integrated Scripting Environment (ISE) in Windows 8 and Windows Server 2012. The ISE is also fully supported and available when Server 2012 is deployed using the Minimal Server Interface. To start ISE, type ise in a PowerShell console and press Enter
Snippets provide a convenient way to paste arbitrary text into the ISE console and script editor, right where you need it. The idea is to provide improved productivity, discoverability, and usability:
- To save you from typing repetitive or long text (or hunting for the script to copy-and-paste from)
- To save you a trip to Get-Help (think about all the attributes on script cmdlets)
- Beginners may insert an if statement as a means of learning PowerShell syntax
For those of you who are familiar with Visual Studio’s Snippets, the ISE version uses the same shortcut key, but it will surely feel like a “poor man’s version” :-), lacking the ability to tab between fields, among other things.
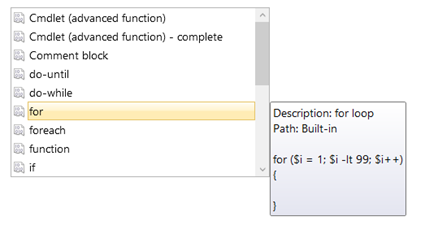
You can list available Snippets by pressing Ctrl+J or selecting “Start Snippets” from the “Edit” menu. Notice that a tooltip displays the actual text which will be inserted, as you move over the selections in the Snippets drop-down. Here’s what it looks like:
There are 3 types of snippets:
- Default snippets, which ship with PowerShell ISE 3.0
- User-defined snippets
- Module-based snippets
Default Snippets
Consider these to be the “starter set” of snippets: PowerShell code that is either frequently used, or hard to discover. Press Ctrl+J to start Snippets and look through the various default snippets.
For those of who may have developed a specific coding style over the years, and feel very strongly about whether the curly braces belong on the same line or on the next line :-), you’ll be pleased to know that you can hide the default snippets, either through the Options dialog (at the bottom of the “General Settings” tab), or directly through the ISE object model at the command line:
![]()
User-Defined Snippets
You can create your own snippets and add them to the snippets drop-down list using the New-IseSnippet cmdlet. Here’s the cmdlet syntax, using one of my favorite new features: Show-Command:
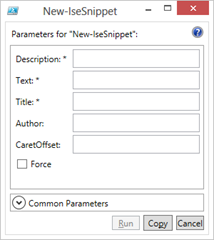 Note that you can also type New-IseSnippet anywhere in the ISE, and then press Ctrl+F1 when the caret (you may be calling it “cursor”) is anywhere within the cmdlet string.
Here’s an example: I often find myself wanting to show the definition (body) of a function. for that, I would have to type Get-Command, followed by the function name, wrap the whole thing in parentheses, and then append .Definition. A snippet comes in handy:
New-IseSnippet -Title “Show Definition” -Description “Shows command definition” -Text “(Get-Command ).Definition” -CaretOffset 13
This example adds a “Show Definition” snippet to the snippets list, and inserts the following text when selected: (Get-Command ).Definition
Notes:
- The caret is placed 13 characters after the start of the snippet text (ready for you to enter the command name). This is what the –CaretOffset parameter is for
- Example usage: (Get-Command prompt).Definition
- To see all user-defined snippets, type: Get-IseSnippet
- To remove a snippet, go to the folder which contains all user-defined snippets (available from Get-IseSnippet) and delete the corresponding snippet file.
If you prefer to hand-craft your snippets instead of using the cmdlet, just create an XML file like the one below, and copy it to the snippets “home” folder, which you can get using one of the following methods:
- Join-Path (Split-Path $profile.CurrentUserCurrentHost) “Snippets”
- Type Get-IseSnippet and copy the displayed path
Any snippets in the snippets home folder will be loaded automatically by the ISE when it starts. If you don’t want to place your snippets in the home folder, you can place them anywhere (C:\temp for example), but then you must load them explicitly in your ISE profile using: Import-IseSnippet -Path ‘C:\Temp’
Snippets files have an extension of .snippets.ps1xml and have the following structure:
<?xml version=’1.0′ encoding=’utf-8′ ?> <Snippets xmlns=’http://schemas.microsoft.com/PowerShell/Snippets’> <Snippet Version=’1.0.0′> <Header> <Title>Show Definition</Title> <Description>Shows command definition</Description> <Author></Author> < SnippetTypes> < SnippetType>Expansion</SnippetType> </SnippetTypes> </Header>
<Code> <Script Language=’PowerShell’ CaretOffset=’13’> <![CDATA[(Get-Command ).Definition]]> </Script> </Code>
</Snippet> < /Snippets>
Where:
- Title: The name which appears in the snippets drop-down list
- Description: The description which appears in the snippet tooltip
- Cdata: The tag which contains the actual snippet text
Module-Based Snippets
To load all module-based snippets (which only works for modules which have already been imported using Import-Module), use: Import-IseSnippet -Module Xyz
If you’re shipping a module with snippets, place your snippet files into a “Snippets” folder, directly under the module folder.
I hope that this quick walk-through will encourage you to use snippets, create your own, and share them with the community.
ref@
Refaat Issa
Program Manager, Windows Server Manageability
Microsoft Corporation
0 comments