

WMI is arguably one of the greatest tools a system administrator can have. You can manage Windows workstations, interact with Microsoft products, like the Configuration Manager, monitor server’s resources and many more. Today, we are going to look at the different ways we can use WMI with PowerShell. Hopefully, at the end, you will not have a favorite, but know what to use for each occasion.
The Ways
There are three tools for managing WMI I want to share with you.
- The System.Management namespace.
- The WMI Scripting API.
- The CIM cmdlets.
Wait, what about the WMI Cmdlets, like Get-WmiObject? There are two reasons we are not covering these today. These commands are only available for Windows PowerShell, and you will come to learn that the System.Management namespace is very similar. If you are still resisting trying PowerShell 7, I could not recommend it enough.
The Procedure
I want to cover tasks we face everyday while administering Windows devices. We will look at:
- Querying.
- Calling a WMI Class method.
- Creating, Updating and Deleting a WMI Class Instance.
- Bonus: Creating, Populating and Deleting a custom WMI Class.
I also want to show the pros and cons of each method, and where one stands out from the others.
The System.Management Namespace
If I had to pick a favorite, it would be this one. Bringing an object-oriented “feel” to WMI, this .NET namespace makes WMI management intuitive. Plus, if you are a C# developer, this will feel like home.
Querying
To perform a query, we need an instance of the ManagementObjectSearcher class. There are three constructors worth looking at:
ManagementObjectSearcher(String)- The simplest one. Creates a searcher object specifying the query string.
ManagementObjectSearcher(String, String)- Creates the object with the query and the scope.
ManagementObjectSearcher(ManagementScope, ObjectQuery)- The same as the previous one, but with instances of the objects instead of strings. This gives you more options.
Once we have the searcher, we call the Get method to return the ManagementObjects.
$query = "Select * From Win32_Process Where Name = 'powershell.exe'"
$searcher = [wmisearcher]($query)
$result = $searcher.Get()
The $result variable holds an instance of the ManagementObjectCollection class. This collection contains all the Win32_Process instances in the form of ManagementObjects.
$result = $searcher.Get()
$result | Format-Table -Property ProcessId, Name, ExecutablePath -AutoSize

```Output
ProcessId Name           ExecutablePath
--------- ----           --------------
     4116 powershell.exe C:\Windows\System32\WindowsPowerShell\v1.0\powershell.exe
This is how it looks like using the second and third constructors.
$query = "Select * From Win32_Process Where Name = 'powershell.exe'"
$scope = 'root\cimv2'
$searcher = [wmisearcher]::new($scope, $query)
$result = $searcher.Get()

# Or

$query = [System.Management.ObjectQuery]::new("Select * From Win32_Process Where Name = 'powershell.exe'")
$scope = [System.Management.ManagementScope]::new('root\cimv2')
$scope.Connect()
$searcher = [System.Management.ManagementObjectSearcher]::new($scope, $query)
$result = $searcher.Get()
Calling a WMI Method
We could either call a method on the ManagementObject resultant from our query operation, like Terminate, or call a method on the WMI Class object. Let’s create a new process using the Create method.
$commandLine = 'powershell.exe -ExecutionPolicy Bypass -Command "Write-Output ''Howdy! From WMI!''; Read-Host"'
$processClass = [wmiclass]'Win32_Process'
# The parameters are: CommandLine, CurrentDirectory and ProcessStartupInformation.
$processClass.Create($commandLine, $null, $null)
If the method succeeds, you should be presented with a PowerShell console, and the Output Parameters:
__GENUS          : 2
__CLASS          : __PARAMETERS
__SUPERCLASS     :
__DYNASTY        : __PARAMETERS
__RELPATH        :
__PROPERTY_COUNT : 2
__PROPERTY_COUNT : 2
__DERIVATION     : {}
__SERVER         :
__NAMESPACE      :
__PATH           :
ProcessId        : 11896
ReturnValue      : 0
PSComputerName   :
Creating, Updating and Deleting a WMI Class Instance
We are going to use the ManagementClass.CreateInstance() method to create a new instance of the SMS_Collection class and Put to save it to the namespace.
$collection = ([wmiclass]'root\SMS\site_PS1:SMS_Collection').CreateInstance()
$collection.Name = 'AwesomeDeviceCollection'
$collection.LimitingCollectionID = 'PS1000042'
$collection.Put()
# The Get() method updates the $collection object with the new
# property values populated by the Config Manager.
$collection.Get()
Updating and deleting.
$collection = [wmiclass]"root\SMS\site_PS1:SMS_Collection.CollectionID='PS1000043'"
$collection.Name = 'AwesomeDeviceCollection_NewName'
$collection.Put()

# Deleting

$collection.Delete()
The WMI Scripting API
The WMI Scripting API is nothing more than the exposure of the WMI COM interfaces through a Runtime Callable Wrapper. Or WMI COM Object, for short. This method of managing WMI is not as straight forward as the System.Management namespace, but its implementation gives great flexibility.
Querying
To start, we need to instantiate a SWbemLocator object, which will be the interface to the other objects, and obtain a SWbemServices object, by connecting to the server.
$locator = New-Object -ComObject 'WbemScripting.SWbemLocator'
$services = $locator.ConnectServer()
Then, we use the ExecQuery method, from the SWbemServices object to perform our query. This method returns a SWbemObjectSet, which is a collection of SWbemObjects. Its properties are under the Properties_ property.
$result = $services.ExecQuery("Select * From Win32_Process Where Name = 'powershell.exe'")
$object = $result | Select-Object -First 1
$value = $object.Properties_['ProcessId'].Value
Calling a WMI Method
First, we need to create an instance of the __Properties class, which holds the input parameters for the Create method. Then, we use the SWbemServices.ExecMethod() method to call Create.
$commandLine = 'powershell.exe -ExecutionPolicy Bypass -Command "Write-Output ''Howdy! From WMI!''; Read-Host"'
$parameters = $object.Methods_['Create'].InParameters.SpawnInstance_()
$parameters.Properties_['CommandLine'].Value = $commandLine

$output = $services.ExecMethod('Win32_Process', 'Create', $parameters)
The $output variable contains a SWbemObject, which is an instance of the Output Parameters property class.
$services.ExecMethod('Win32_Process', 'Create', $parameters)Value : 16172
Name : ProcessId
IsLocal : True
Origin : __PARAMETERS
CIMType : 19
Qualifiers_ : System.__ComObject
IsArray : False
Value : 0
Name : ReturnValue
IsLocal : True
Origin : __PARAMETERS
CIMType : 19
Qualifiers_ : System.__ComObject
IsArray : FalseCreating, Updating and Deleting a WMI Class Instance
Let’s replicate our last example using the Scripting API.
$collection = $services.Get('\\.\root\SMS\site_PS1:SMS_Collection').SpawnInstance_()
$collection.Properties_['Name'].Value = 'AwesomeDeviceCollection'
$collection.Properties_['LimitingCollectionID'].Value = 'PS1000042'
$collection.Put_()
Updating and deleting.
$collection = $services.Get("\\.\root\SMS\site_PS1:SMS_Collection.CollectionID='PS1000043'")
$collection.Properties_['Name'].Value = 'AwesomeDeviceCollection_NewName'
$collection.Put_()

# Deleting

$collection.Delete_()
The CIM Cmdlets
When you just want to perform a WMI query to analyze data, and not necessarily interact with it, you cannot beat the CIM Cmdlets. They are extremely fast, and provide unique tools like auto-complete for class and namespace names and easy class retrival with Get-CimClass.
Querying
Performing queries with the CIM Cmdlets is very pleasant. One line does it all.
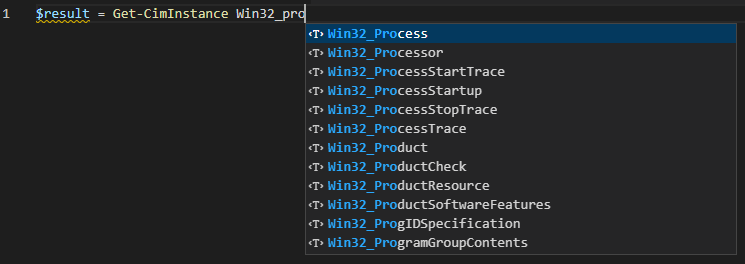
$result = Get-CimInstance -Query "Select * From Win32_Process Where Name = 'powershell.exe'"The parameters are very similar to the Get-WmiObject ones, and can be used as follows.
$result = Get-CimInstance -ClassName 'Win32_Process' -Filter "Name = 'powershell.exe'"The auto-complete feature in Visual Studio Code.
Calling a WMI Method
The CIM Cmdlets introduces a unique way of calling WMI Methods. The results of a CIM query are called CimInstances, and you cannot call instance methods like you would with the other two options. Instead, you call another Cmdlet called Invoke-CimMethod.
$commandLine = 'powershell.exe -ExecutionPolicy Bypass -Command "Write-Output ''Howdy! From WMI!''; Read-Host"'
$result = Get-CimClass -ClassName 'Win32_Process'
$params = @{
  MethodName = 'Create'
  Arguments = @{
    CommandLine = $commandLine
  }
}
$output = $result | Invoke-CimMethod @params

# Or
$params = @{
  ClassName = 'Win32_Process'
  MethodName = 'Create'
  Arguments = @{
    CommandLine = $commandLine
  }
}
$output = Invoke-CimMethod @params
And the result:
Invoke-CimMethod -ClassName 'Win32_Process' -MethodName 'Create' -Arguments @{ CommandLine = $commandLine }ProcessId ReturnValue PSComputerName
--------- ----------- --------------
14932 0Have a hard time remembering parameters? Me too! Luckily auto-complete also works with them.

Creating, Updating and Deleting a WMI Class Instance
If you used the old WMI Cmdlets before, this will look familiar.
$params = @{
  Namespace = 'root\SMS\site_PS1'
  ClassName = 'SMS_Collection'
  Property = @{
    Name = 'AwesomeDeviceCollection'
    LimitingCollectionID = 'PS1000042'
  }
}
$collection = New-CimInstance @params
Updating and deleting.
$params = @{
  Namespace = 'root\SMS\site_PS1'
  Query = "Select * From SMS_Collection Where Name = 'AwesomeDeviceCollection'"
  Property = @{
    Name = 'AwesomeDeviceCollection_NewName'
  }
}
Set-CimInstance @params

#Or

$params = @{
  Namespace = 'root\SMS\site_PS1'
  Query = "Select * From SMS_Collection Where Name = 'AwesomeDeviceCollection'"
}
$collection = Get-CimInstance @params
$collection | Set-CimInstance -Property @{
  Name = 'AwesomeDeviceCollection_NewName'
}

#Deleting

$params = @{
  Namespace = 'root\SMS\site_PS1'
  Query = "Select * From SMS_Collection Where Name = 'AwesomeDeviceCollection'"
}
$collection = Get-CimInstance @params
$collection | Remove-CimInstance
Pros and Cons
-
The System.Management namespace is great for acquiring instances of objects or classes. The aliases like
[wmi]or[wmiclass]makes it easy to work with them, if you know their path. Calling methods is also very intuitive. In the other hand, querying and doing more complex operations can be time-consuming, and can involve more objects to keep track of. -
Using the WMI Scripting API is great when you have to build whole scripts to manage WMI. Once you have the SWbemServices object you can work with pretty much anything else. It is also rewarding performance-wise, compared to the previous method, since you are working with the RCW interfaces directly. The System.Management namespace will wrap these interfaces to provide abstraction. But this comes at a cost. If you want to retrieve single objects or perform queries to analyze data, this method can be a little annoying to work with.
-
The CIM cmdlets are number one on performance when querying multiple-object datasets. The CimInstance object is great to work with, specially when combining with other known objects, like the PSCustomObject. On the other hand, calling methods is not as straight forward as on the previous methods. And to access methods like Put, Get or Delete can be challenging.
Bonus
Let’s create our own Namespace under root, and implement a custom class! We will use the System.Management namespace, but now you can use what you learn to implement this using the other methods as well.
$namespace = ([wmiclass]'root:__Namespace').CreateInstance()
$namespace.Name = 'ScriptingBlogCoolNamespace'
$namespace.Put()
Path : \\.\root:__NAMESPACE.Name="ScriptingBlogCoolNamespace"
RelativePath : __NAMESPACE.Name="ScriptingBlogCoolNamespace"
Server : .
NamespacePath : root
ClassName : __NAMESPACE
IsClass : False
IsInstance : True
IsSingleton : False$class = [wmiclass]::new('root\ScriptingBlogCoolNamespace', '', $null)
$class['__Class'] = 'CustomClass'
$class.Qualifiers.Add('Static', $true)
$class.Properties.Add('Source', 'Custom class with .NET!')
$class.Properties.Add('PropertyKey', 1)
## You need a Key property, otherwise WMI wouldn't be able to assemble the path of a new instance.
$class.Properties['PropertyKey'].Qualifiers.Add('Key', $true)
$class.Put()Path : \\.\root\ScriptingBlogCoolNamespace:CustomClass
RelativePath : CustomClass
Server : .
NamespacePath : root\ScriptingBlogCoolNamespace
ClassName : CustomClass
IsClass : True
IsInstance : False
IsSingleton : False$instance = ([wmiclass]'root\ScriptingBlogCoolNamespace:CustomClass').CreateInstance()
$instance.Source = 'CustomInstance!'
$instance.Put()Path : \\.\root\ScriptingBlogCoolNamespace:CustomClass.PropertyKey=1
RelativePath : CustomClass.PropertyKey=1
Server : .
NamespacePath : root\ScriptingBlogCoolNamespace
ClassName : CustomClass
IsClass : False
IsInstance : True
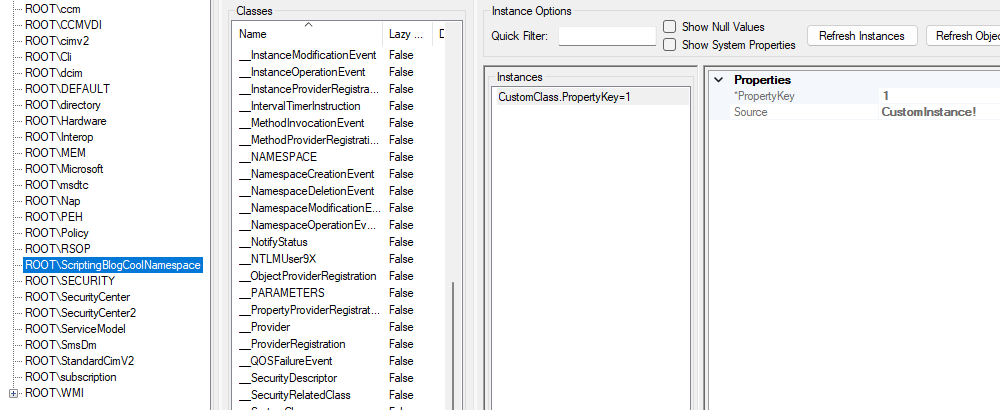
IsSingleton : FalseAnd just like that, we have our own Namespace, Class and Instance! The results on WmiExplorer.
Conclusion
If you made it to the end, hopefully now you have the right tool for the right job, regarding WMI. There is no winner, all of them are good in specific situations. What they all have in common is that they, together, will make you a better System Administrator.
Thank you for following along on this journey, and I see you next time!
Useful links
See what I am up to!
0 comments