

Good day developers!
During Microsoft Build 2023 we announced the capability of creating Custom Connectors from within Visual Studio to quickly build a front-end for your API using Microsoft Power Apps.
I’m thrilled to announce this capability is now generally available in Visual Studio 2022 17.7.
I will take this opportunity to show how you can combine Visual Studio and Power Platform CLI to build a sample Power App from your API.
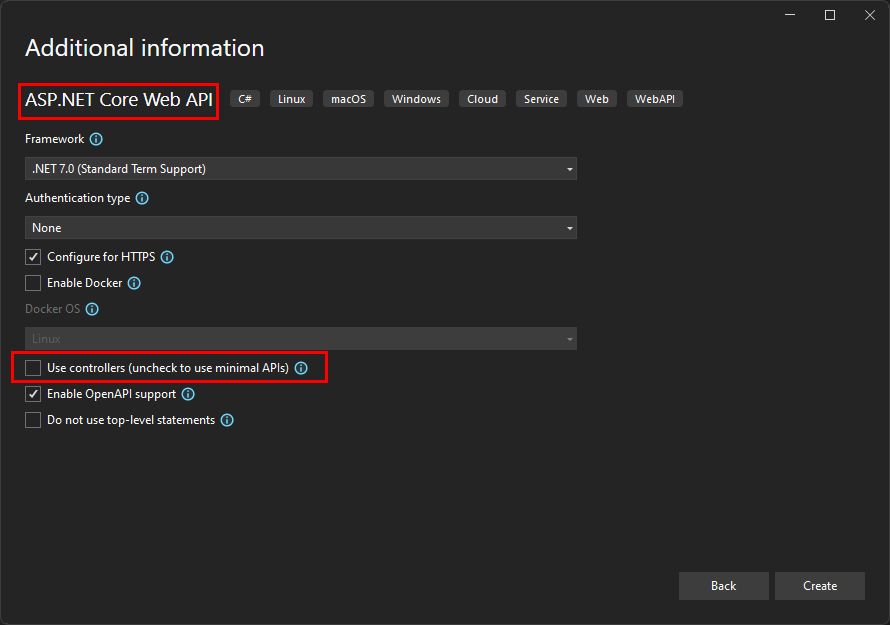
Start from your ASP.NET Core Web API Project in Visual Studio 2022 17.7
You can use this sample API.
If you prefer to create your own project, be sure to:
- Use an ASP.NET Core Web API project type
- Uncheck the option “use controller” (let’s use a minimal API to keep it simple).
- Add the following operation in your program.cs file:
app.MapGet("/countries", () =>
{
    return new List<string> {
        "USA",
        "Canada",
        "Brazil",
        "Netherlands",
        "Malta",
        "New Zealand",
        "Germany",
        "France"
    };
})
.WithName("GetCountries")
.WithOpenApi();
This operation will return an arbitrary list of countries.
Add Power Platform as a connected service
- In your project, right click the connected services node
- select add
- select Microsoft Power Platform
In the “Connect to Microsoft Power Platform” window, be sure to use same account of your Power Platform environment. You can create a free developer environment if you don’t have one.
Fill all the relevant fields and select finish. Visual Studio will then create the Custom Connector in the selected environment and in the selected Solution.
Run your API
During the inner loop you are running your API in your local environment. This feature will leverage dev tunnels to connect your API to Power Platform.
With your API running you can now create a Power App.
Let’s go one step ahead and use Power Platform tools for Visual Studio Code to create a sample application from your API.
Create a sample App from the API
Open your Visual Studio Code with Power Platform tools installed. Create a new authentication for your user.
Let’s now use Power Platform CLI to list the custom connector we have created and get its id.
pac connector list
Then, let’s use the command pac canvas create. This command will generate a canvas app (*.msapp file), based on the operations of your API. This will kickstart the development of your app!
pac canvas create --connector-id [your connector id] --msapp [your file name.msapp]
Now you can open Power Apps Studio and open your .msapp file. Before running, add the created custom connector to your application.
You can use this sample application to learn how to use Power Fx to call your API.
Remember to keep your API running while building your Power App.
And because you are using dev tunnels, you can iterate on your API in real-time, including debugging and hot reload!
What’s next?
Once you have your API published remember to update or create a new Custom Connector.
You can use this feature to provide a great new mobile experience of your legacy APIs. Check this repository with a sample of this scenario.
Check also the video I recorded with Daniel about this feature.
If you have questions or feedback, join the discussion in our GitHub.
Happy coding =)
Mercel, thanks but could you provide an example using authentication?
Let's say we have this working API on the server:
<code>
Let's say you have this *working* client in C#:
<code>
In this example we are using an Azure AD app registration and the OAuth client secret flow for authentication (token issued by Azure AD)). The client obtains a token, and can successfully call the API as an authenticated user. In my org, staff are having trouble using this from Power Automate (not able to configure the authentication), even though it is only a few lines of C# code for client/server.
Could you point...
Good question.
If you are using authentication, you would create the custom connector just like this sample.
You would have one extra step: In the custom connector page (within Power Apps – maker portal), in the created custom connector, select edit security options, and add information needed for authentication.
Let me know if that works for you.
Cheers,
Marcel