Exploring the Essentials: Building Basics with Microsoft Copilot Studio
Don’t know how to start with building an agent in Microsoft Copilot Studio? We’ve got you covered! In our AI in Action: Building with Copilot Studio series on the Microsoft Power Platform YouTube channel, we have several episodes that guide you through how to get started in building an agent. In this series we showcase the different capabilities of building agents with Copilot Studio, which includes building, testing, deploying, analyzing, security and data loss prevention policy.
This blog post will cover the building basics with Microsoft Copilot Studio.
Create an agent using Natural Language
Did you know that you can use your words to build an agent? Gomolemo Mohapi shows how this is an option when creating an agent. When you use natural language to create an agent in Microsoft Copilot Studio, you’re interacting with a conversational copilot builder. You engage with Copilot by responding in plain language to questions and based on the responses, it’ll determine the description and instructions of your agent. This includes
- the task or request your agents completes
- publicly accessible sites that your agent can use as knowledge sources
- the tone of the responses
- what it should not respond to
Once you’ve finished engaging with the conversational copilot builder and you’ve created your agent, in a few minutes your agent is provisioned from the power of using natural language. After it’s been provisioned, you can further modify the agent such as update the name, add an image for your agent, update the instructions that were defined in the initial conversation with Copilot, and add or remove knowledge sources.
Gomolemo also explains how to modify the content moderation settings at the agent level. Moderation levels range from Lowest to Highest. The lowest level generates more answers but with less accuracy, whereas the highest level generates fewer but more relevant answers. The default is High.
You can also test your agent within Microsoft Copilot Studio before publishing it. This is handy when testing modifications to your agent, in the same way you would with iterative development.
Watch Episode 1 – Create an agent using Natural Language
The use case shown in this episode by Gomolemo is creating an agent that answers product questions about Microsoft products.
Learn more:
Add knowledge to your agents
To respond to users with information using your own enterprise data, try grounding your agents with knowledge sources. Knowledge in Microsoft Copilot Studio allows you to add enterprise data from Power Platform, Dynamics 365 data, and external systems to provide relevant information and insights for your end users. You have the ability to ground your agent by:
- uploading documents directly to your agent
- associating publicly accessible websites
- connecting to enterprise services such as SharePoint, Dataverse (preview), ServiceNow Knowledge (preview), Azure AI Search (preview) and more
Knowledge can be added at the agent level and at a topic level using the generative answers node. This means your agent will be equipped with your enterprise data when responding to user requests.
One additional benefit is to enable the generative mode where your agent will use a combination of actions, topics and knolwedge to respond. By having configured knowledge sources for your agent, it decreases the effort in creating topics that cover multiple user requests. Generative AI is used to analyze the request and retrieve information from configured knowledge sources in reponse to user requests.
Currently when adding Dataverse (preview) as an enterprise knowledge source, you can define synonyms and a glossary for the natural language model (NLM) to understand the user utterance. Typically organisations will have jargon or terms that are associated to their industry such as healthcare, insurance, manufacturing and so forth. Defining synonyms and a glossary will help your agent understand the request and respond accordingly using data from Dataverse.
Watch Episode 2 – Add knowledge to your agents
The use cases shown in this episode covers how to add knowledge sources in the form of a SharePoint site, locally upload documents, and data from Dataverse including adding synonyms for table columns and defining a glossary. Dataverse is used for storing data associated to fundraisers.
Learn more:
Build prompt actions for your agent
Topics define the flow of conversation dialogue between agents and users, they enable you to accommodate for different paths an agent may have. This allows users to have a conversation that feels natural and flows appropriately. When building a topic, you add nodes and one of the node types is “Call an action,” where you can select a “prompt” action. A prompt node integrates the custom prompt authoring feature of AI Builder to give instructions to the GPT model for your agent.
Again, if you’re already using Dataverse today, you can ground your topic prompts with your enterprise data. This is achieved by
- Defining the input parameters of your prompt
- Selecting the table and columns from Dataverse to ground your prompt in
- Configuring the output of the response as text or JSON
- Entering the prompt follwed by inserting the inputs and the columns the prompt is to ground its response in
You can test your prompt in real-time before adding it to your topic, allowing you to adjust the prompt where neccessary.
Watch Episode 3 – Build prompt actions for your agent
The use case shown in this episode is to ground a prompt with fundraiser data from tables in Dataverse to summarize donations received to date for fundraisers.
Learn more:
- Use prompts to make your copilot perform specific tasks
- The prompt featured in the episode can be copied from our Power Platform library, filter to AI Builder and select fundraiser-information
Add actions to your agent using connectors
When it comes to extending your agents, you can access a variety of first- and third-party services through actions. Microsoft Copilot Studio integrates with the Power Platform connector model which allows you to consume and connect to over 1,400 first- and third-party services through actions. A connector is a wrapper around an API and can be used across the Power Platform through actions. This enables agents built with Microsoft Copilot Studio to chat over enterprise data and perform certain actions.
You can add multiple types of actions to your agents in Microsoft Copilot Studio:
- Prebuilt connector action – which use Power Platform connectors to access data from other systems, such as popular enterprise products like Salesforce, Zendesk, MailChimp, and GitHub.
- Custom connector action – where a connector can be built to access data from public or private APIs. As a developer, you can use Connected Services within Visual Studio to create custom connectors by setting up a connection with Power Platform. This allows you to debug in real-time with Microsoft Copilot Studio.
- Power Automate cloud flow – build Power Automate cloud flows to perform actions, retrieve and work with data.
- Prompts actions – which use AI Builder and natural language understanding (NLU) to target the specific scenarios and workflows within your business as covered earlier in this blog post.
- Skills – which used the Bot Framework skill manifest that outlines the actions the skill can perform, including its input and output parameters, the skill’s endpoints, and dispatch models for the skill.
- REST APIs – you can use REST APIs (including OpenAI API) to connect an agent you create with external systems and access available data for use within your agent.
Leveraging these actions accelerates building your agent as you can combine pro-code and low-code technqiues for your agent to process tasks and actions on behalf of your users.
Watch Episode 4 – Add actions to your agent using connectors
The use cases shown in this episode first explores agents that are already built for you which uses a first-party connector, followed by adding a prompt action and lastly how to use Connected Services with Visual Studio for a custom connector to publish to Power Platform and debug in real-time when testing your agent.
Learn more:
- Use actions with agents
- The Email Campaign prompt can be copied from our Power Platform prompts library
User authentication for plugin actions
For every action you add that uses a connector to access a data source or a service, it has its authentication method built-in to the connector. As explained by Daniel Laskewitz, you don’t need to configure it at setup but it’s necessary to provide credentials before testing or using the connection. The chosen authentication method defines what authentication is used by your action at run time of the agent.
There are two authentication methods to choose from:
- Copilot author authentication – which gives us the option to use actions that run under the copilot author context.
- User authentication – which enables us to run the actions under user context. This means we can let users access the content they have access to without having to worry about someone accessing data they shouldn’t have access to.
Watch Episode 5 – User authentication for plugin actions
The use case shown in this episode by Daniel is for the agent to get your user profile from Entra ID and display the information to you, where user authentication is used as the authentication method.
Learn more:
Author Topics using Natural Language
Earlier in this blog post I mentioned that you can use the conversational copilot builder experience to create agents. The same can be applied when creating topics. Copilot helps you with the following:
- create topics using natural language
- add, modify or remove nodes from your topics
Create topics using natural language
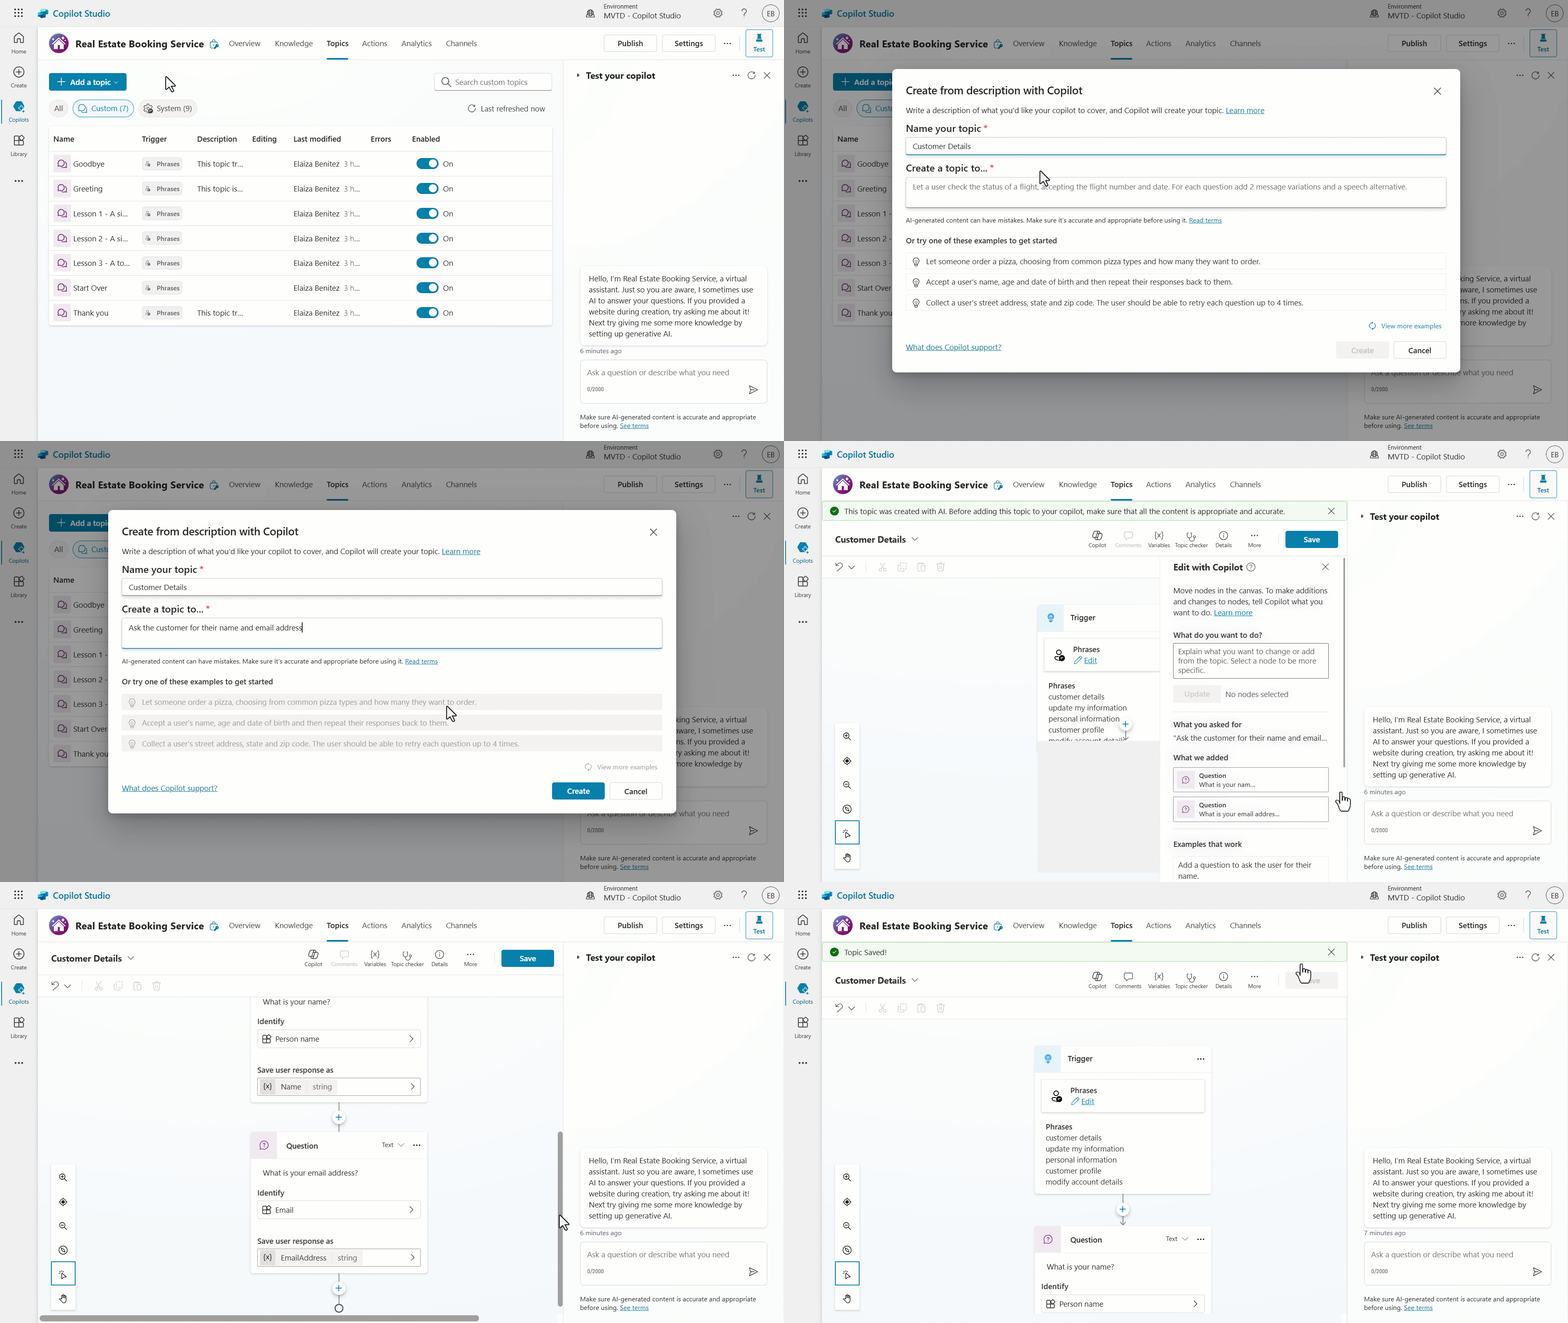
When creating topics with Copilot, you select “Create from description with Copilot,” followed by entering a name for your topic. The final step is to describe the topic you want to create in simple, plain English. You can include questions you want the agent to ask, messages it should show, and details of the desired behavior. Copilot will then magically create the topic for you – no configuration or coding required 😲
Once the topic is created, the “Edit with Copilot” pane will appear and will outline what trigger and nodes were added to the topic from the description provided.
Add or modify nodes from your topics
Once your topic is created, you can select Copilot from the toolbar and using the power of natural language understanding (NLU), you can describe what you’d like to modify. Use simple, plain English to direct Copilot, such as the following:
- add a question to ask the user for their date of birth
- add two message variations to all questions in the topic
- summarize the information collected from the user in an Adaptive Card
You can continue using the “Edit with Copilot” pane to view what modifications were made to the topic, and to make further modifications.
Watch Episode 6 – Author Topics using Natural Language
The use case shown in this episode by Gomolemo is using natural language to add a new topic that helps with booking a salon appointment, and show cases “Edit with Copilot” by updating an existing node and adding a new node that summarizes the information collected by the topic. No coding needed!
Learn more:


0 comments