Taking a Capture
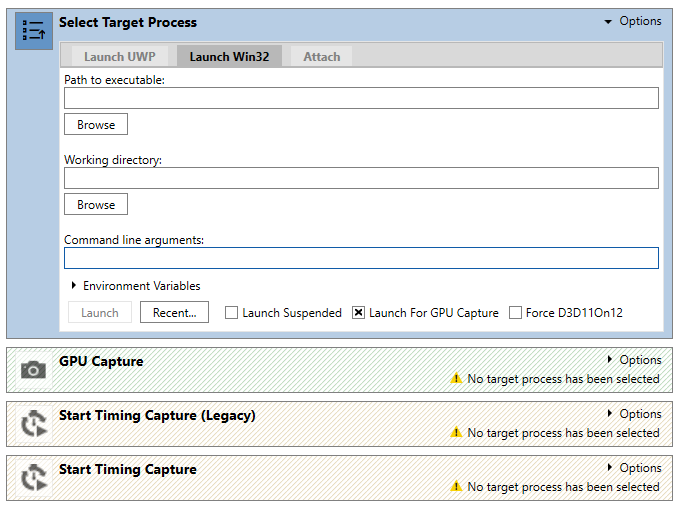
The first step in using PIX is to capture some data from your game. This is done via the PC Connection view, which is the first thing you will see when launching PIX on Windows:
Here, you can do two things:
- Launch a target process through PIX. You can choose whether to Launch For GPU Capture. This instructs PIX to insert necessary instrumentation while the game is starting up. You can also choose whether you would like to force all D3D11 work to be redirected through D3D11On12, to make it capturable by PIX.
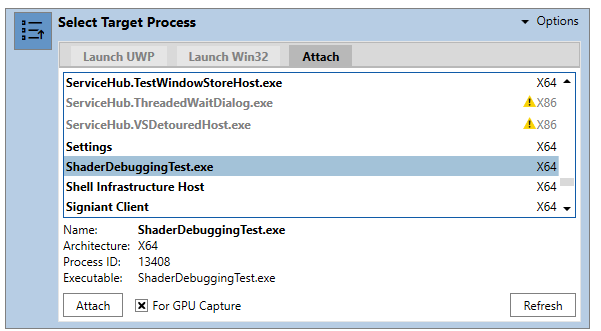
- Attach PIX to an existing process. If you want to attach to an existing process and take a GPU Capture, then the process must have loaded a certain PIX DLL before calling D3D12 APIs such as D3D12CreateDevice or D3D12EnableExperimentalFeatures. See below for details.
After launching or attaching to your application, you can take a capture. Click the icon to the left of your chosen capture type to collect the data. If the GPU Capture button is lit up, then you can also take a GPU Capture by pressing the PrintScreen key while the game has focus. Alternatively, you can use Alt+PrintScreen or an F key to take a capture – by default this is F11, but you can customize this in the PIX settings page accessed by clicking Home>Settings in the PIX UI.
All the different capture types can be saved as PIX capture files, which have a .wpix extension. Each capture you take will be saved into a separate .wpix file.
Some games use one or more launcher executables, which display a splash screen or menu before creating a different process that hosts the actual game. PIX GPU captures are able to follow through this tree of processes, but other capture types only record data from the specific process that they launched or attached to, so if your game uses multiple processes you will need to bypass any launchers and tell PIX how to directly start the main game executable instead.
It is also possible to programmatically control when a GPU capture should be taken from inside your game code.
Attaching to a process for GPU Capture
Note: this feature is currently experimental. There are no known issues with it, but we may change how this works in the future to improve the user experience. Please contact us if you have any feedback or requests for this area.
As-of the April 2021 PIX on Windows release, you can attach PIX on Windows to an existing live process and take a GPU Capture, if that process loaded the matching version of WinPixGpuCapturer.dll before calling any D3D12 APIs such as D3D12CreateDevice. This allows you to launch your game/application outside PIX (e.g. through Visual Studio, or through any other program), and later attach PIX to the process and take a GPU Capture.
If you wish to use this feature then we recommend adding a special mode to your application, such as a command line flag or a dedicated Visual Studio configuration, to make your application load WinPixGpuCapturer.dll. We advise against unconditionally loading the DLL in scenarios where you may write invalid D3D12 code, since WinPixGpuCapturer.dll is not hardened against invalid API usage. Perhaps your application could have a mode where it runs with the D3D12 debug layer active, and a separate mode where it runs with WinPixGpuCapturer.dll loaded, and you switch between these modes as appropriate during application development.
For now, applications must manually find the path to the appropriate version of WinPixGpuCapturer.dll to load, and then load the binary. We will improve the usability of this in the future. Until then, please contact us with feedback and/or suggestions about how we can improve this for you.
Here is sample C++17 code that you can use in your game/application to find the path to WinPixGpuCapturer.dll from the most-recently installed version of PIX:
#include <filesystem>
#include <shlobj.h>

static std::wstring GetLatestWinPixGpuCapturerPath_Cpp17()
{
    LPWSTR programFilesPath = nullptr;
    SHGetKnownFolderPath(FOLDERID_ProgramFiles, KF_FLAG_DEFAULT, NULL, &programFilesPath);

    std::filesystem::path pixInstallationPath = programFilesPath;
    pixInstallationPath /= "Microsoft PIX";

    std::wstring newestVersionFound;

    for (auto const& directory_entry : std::filesystem::directory_iterator(pixInstallationPath))
    {
        if (directory_entry.is_directory())
        {
            if (newestVersionFound.empty() || newestVersionFound < directory_entry.path().filename().c_str())
            {
                newestVersionFound = directory_entry.path().filename().c_str();
            }
        }
    }

    if (newestVersionFound.empty())
    {
        // TODO: Error, no PIX installation found
    }

    return pixInstallationPath / newestVersionFound / L"WinPixGpuCapturer.dll";
}
Here is equivalent code that is compatible with older versions of C++:
#include <shlobj.h>
#include <strsafe.h>

static std::wstring GetLatestWinPixGpuCapturerPath()
{
    LPWSTR programFilesPath = nullptr;
    SHGetKnownFolderPath(FOLDERID_ProgramFiles, KF_FLAG_DEFAULT, NULL, &programFilesPath);

    std::wstring pixSearchPath = programFilesPath + std::wstring(L"\\Microsoft PIX\\*");

    WIN32_FIND_DATA findData;
    bool foundPixInstallation = false;
    wchar_t newestVersionFound[MAX_PATH];

    HANDLE hFind = FindFirstFile(pixSearchPath.c_str(), &findData);
    if (hFind != INVALID_HANDLE_VALUE)
    {
        do
        {
            if (((findData.dwFileAttributes & FILE_ATTRIBUTE_DIRECTORY) == FILE_ATTRIBUTE_DIRECTORY) &&
                 (findData.cFileName[0] != '.'))
            {
                if (!foundPixInstallation || wcscmp(newestVersionFound, findData.cFileName) <= 0)
                {
                    foundPixInstallation = true;
                    StringCchCopy(newestVersionFound, _countof(newestVersionFound), findData.cFileName);
                }
            }
        }
        while (FindNextFile(hFind, &findData) != 0);
    }

    FindClose(hFind);

    if (!foundPixInstallation)
    {
        // TODO: Error, no PIX installation found
    }

    wchar_t output[MAX_PATH];
    StringCchCopy(output, pixSearchPath.length(), pixSearchPath.data());
    StringCchCat(output, MAX_PATH, &newestVersionFound[0]);
    StringCchCat(output, MAX_PATH, L"\\WinPixGpuCapturer.dll");

    return &output[0];
}
After finding the path to WinPixGpuCapturer.dll, we recommend that the application loads WinPixGpuCapturer.dll before calling into D3D12 like this:
// Check to see if a copy of WinPixGpuCapturer.dll has already been injected into the application.
// This may happen if the application is launched through the PIX UI.
if (GetModuleHandle(L"WinPixGpuCapturer.dll") == 0)
{
    LoadLibrary(GetLatestWinPixGpuCapturerPath().c_str());
}
Now if you launch your application, then you will see it in the “Attach” tab in PIX. Check the “For GPU Capture” button, and click Attach. You can now take GPU Captures.