
Summary
We talked in a previous article about enabling OData in your existing ASP.NET Core API using EDM.
One of the biggest advantages of following that method is to be able to take advantage of functionality such as count to enable an on-demand function in almost every web application such as navigation.
In this article, we are going to talk about navigation from an abstract perspective as a plain API call, then leverage that power in a Blazor application to enable data navigation or pagination.
API Navigation
Clone and run the example project I built for OData with EDM and run the project then try the following API call:
api/students?$count=true
The response to that would be:
  "@odata.context": "https://localhost:44374/api/$metadata#Students",
  "@odata.count": 4,
  "value": [
    {
      "Id": "1185ee49-4086-456d-8149-22ea5ea4a726",
      "Name": "Hassan Habib",
      "Score": 100
    },
    {
      "Id": "f1d796c0-9bd4-4522-854d-2f1b64693853",
      "Name": "Cody Allen",
      "Score": 90
    },
    {
      "Id": "696a26c3-90fc-4abf-818f-8d4c961cb9bd",
      "Name": "Sandeep Pal",
      "Score": 120
    },
    {
      "Id": "cd166253-37ed-4c2b-af87-8f74ea7658db",
      "Name": "David Pullara",
      "Score": 50
    }
  ]
}
As you can see the response contains the count of all the data that this API could provide, we are going to need that later for our pagination process.
Now let’s try to control the quantity of that data using $skip and $top functionality as follows:
api/students?$count=true&$skip=1&$top=1
The response to that would be:
{
  "@odata.context": "https://localhost:44374/api/$metadata#Students",
  "@odata.count": 4,
  "value": [
    {
      "Id": "57de16b8-a997-471f-badf-d7f9b3f6dd1f",
      "Name": "Hassan Habib",
      "Score": 100
    }
  ]
}
You will notice that we have full control over navigating through that data.
The skip functionality will allow us to move forward in our list, while the top functionality will enable us to control the amount of data returned with every API call.
however, and since the data isn’t returned in any enforced particular order, using skip and top do not necessarily guarantee returning the same results every time, try to make the call multiple times and see the results change every time.
Therefore, we have to enforce some form of order to assure the returned results are consistent, so we are going to use OrderBy functionality to maintain that order.
Now your API call should look something like this:
api/students/$count=true&$orderby=Name&$skip=1&$top=1
The response to that would be always:
{
  "@odata.context": "https://localhost:44374/api/$metadata#Students",
  "@odata.count": 4,
  "value": [
    {
      "Id": "f92afca4-76e4-4ef2-89c9-2a350861c954",
      "Name": "David Pullara",
      "Score": 50
    }
  ]
}
Now we have more consistent, reliable order of data.
But an API call with ordered data can only seem amazing to back-end engineers but not necessarily to end users, which means we need a powerful easy to use UI framework to help us put that kind of power into action and displaying it to the world.
Thanks to Daniel Roth and his amazing team we now have Blazor, a modern framework for building interactive client-side web UI using .NET and C#.
Integrating with Blazor
In order for you to start a Blazor project you need to have few prerequisites in place which are:
- Install .NET Core 3.0 on your machine, you can find it here
- In VS2019 go to option -> .NET Core -> Use Previews of the .NET Core SDK
Once that’s done, restart your Visual Studio and start a new project.
If you’re still having problems enabling .NET Core 3.0 on your machine, watch this tutorial.
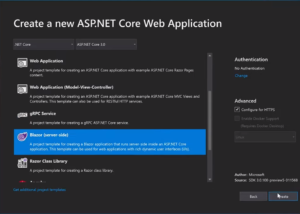
Now you can start a new project with ASP.NET Core and Blazor (server-side), make sure you select ASP.NET Core 3.0 from the dropdown so you can find that type of project as follows:
Once the project is created, you will notice that Blazor comes with a pre-built web application samples such as counter and fetch data.
Let’s start by creating a new folder, call it Models, then let’s define the data models we need to create an integration between Blazor and OData API.
So what we need here is a student and an API response models.
We need the API response model because once we enabled OData with EDM the response became more than just a list of students, it returns more metadata that we are going to use for our pagination project shortly.
So your Student model will be just identical to the one we built in the API project:
using System;

namespace BlazorPagination.Models
{
    public class Student
    {
        public Guid Id { get; set; }
        public string Name { get; set; }
        public int Score { get; set; }
    }
}
But the API response model, let’s call it StudentsApiResponse will look as follows:
using Newtonsoft.Json;
using System.Collections.Generic;

namespace BlazorPagination.Models
{
    public class StudentsApiResponse
    {
        [JsonProperty("@odata.count")]
        public int Count { get; set; }

        [JsonProperty("value")]
        public List<Student> Students { get; set; }
    }
}
Now that we have built the models, let’s build a service class to call our API and serialize the incoming data into consumable strongly typed values, let’s call it StudentsService.cs.
And because we will need to do some JSON serialization then we need to install Newtonsoft.Json package to simplify the serialization process and the notations on our Models.
Once that’s installed, we type the following code to perform an API integration:
using BlazorPagination.Models;
using Newtonsoft.Json;
using System.Net.Http;
using System.Threading.Tasks;

namespace BlazorPagination.Data
{
    public class StudentsService
    {
        public async Task<StudentsApiResponse> GetStudentsAsync(int skip = 0, int top = 0)
        {
            string baseUrl = "https://localhost:1985";
            using (HttpClient client = new HttpClient())
            {
                var response = await client.GetAsync($"{baseUrl}/api/students?$orderby=Name&$count=true&$skip={skip}&$top={top}");

                if (response.IsSuccessStatusCode)
                {
                    var jsonString = await response.Content.ReadAsStringAsync();
                    return JsonConvert.DeserializeObject<StudentsApiResponse>(jsonString);
                }

                return new StudentsApiResponse();
            }
        }
    }
}
Let’s explain what the code is doing exactly.
We created a method GetStudentsAsync that returns the StudentsApiResponse that we get from our API call, and the method has two parameters to control the navigation through the API leveraging OData functionality to skip forward and control the size of the data coming back.
We are using HttpClient to perform an API GET call, we are enforcing the order by name as we have explained above, passing in the value of top and skip through string interpolation.
Then we deserialized the JSON response into StudentApiResponse.
This method is the point of integration between our OData-enabled API and our Blazor application, everything else from here is mainly focused on the rendering of that data.
In the Pages folder, let’s create a new file, FetchStudents.razor to render our data.
FetchStudents.razor will contain some C# code, HTML and Razor code to handle the service calling, rendering and navigation process.
Let’s start with the C# code, we need to reference at the top of our razor page the route let’s call it /fetchstudents – we also need to reference the namespaces where our models live and where our services live.
Finally we need to inject StudentsService so we can call the GetStudentsAsync method in our razor page.
@page "/fetchstudents"
@using BlazorPagination.Data
@using BlazorPagination.Models
@inject StudentsService StudentsService
Then we need to build three functions to handle the navigation of our data, one to be called to initialize the rendering and first page of data, one for navigating forward and one for navigating backward.
Here’s the code for these functions:
@functions {
    List<Student> students;
    int skip = 0;
    int top = 1;
    int count = 0;

    protected override async Task OnInitAsync()
    {
        var response = await StudentsService.GetStudentsAsync(0, top);
        count = response.Count;
        students = response.Students;
    }

    async Task Next()
    {
        skip++;

        var response = await StudentsService.GetStudentsAsync(skip, top);
        students = response.Students;
    }

    async Task Previous()
    {
        skip--;

        var response = await StudentsService.GetStudentsAsync(skip, top);
        students = response.Students;
    }
}
You can think of students, skip, top and count as global variables that are shared across all components in this razor page.
Each one of these functions makes an asynchronous call to our StudentsService method to get new data based on skip and top values.
You’ll notice that we control the values returned by increasing and decreasing the values of skip variable, everything else stays the same.
We made the code redundant for the purpose of this demo, otherwise the call to StudentsService can be simplified.
That wraps all most of the C# code we need for this page.
Now comes the HTML & Razor parts as follows:
We need to have a view when our data is still loading, which is when students are still in null state.
@if (students == null)
{
    <p><em>Loading...</em></p>
}
Now we need to render a table of students as follows:
<table class="table">
        <thead>
            <tr>
                <th>ID</th>
                <th>Name</th>
                <th>Score</th>
            </tr>
        </thead>
        <tbody>
            @foreach (var student in students)
            {
                <tr>
                    <td>@student.Id</td>
                    <td>@student.Name</td>
                    <td>@student.Score</td>
                </tr>
            }
        </tbody>
    </table>
Lastly, comes the navigation part, we need a next button, previous button and a label to show the count and how many pages left as follows:
<label bind="nav">@count/@(skip + 1)</label>

    if (top + skip > 1)
    {
        <button onclick=@Previous> ← </button>
    }

    if (top + skip < count)
    {
        <button onclick=@Next> → </button>
    }
We are showing the total number of pages in addition to the skip value + 1 because it’s zero-based counter.
Then we show and hide Previous and Next buttons based on whether there are any more navigation data in any direction or not. The full code for the FetchStudents.razor page should look like this:
@page "/fetchstudents"
@using BlazorPagination.Data
@using BlazorPagination.Models
@inject StudentsService StudentsService

<h1>Students</h1>

<p>This component demonstrates fetching data from a service.</p>

@if (students == null)
{
    <p><em>Loading...</em></p>
}
else
{
    <table class="table">
        <thead>
            <tr>
                <th>ID</th>
                <th>Name</th>
                <th>Score</th>
            </tr>
        </thead>
        <tbody>
            @foreach (var student in students)
            {
                <tr>
                    <td>@student.Id</td>
                    <td>@student.Name</td>
                    <td>@student.Score</td>
                </tr>
            }
        </tbody>
    </table>

    <label bind="nav">@count/@(skip + 1)</label>

    if (top + skip > 1)
    {
        <button onclick=@Previous> ← </button>
    }

    if (top + skip < count)
    {
        <button onclick=@Next> → </button>
    }
}

@functions {
    List<Student> students;
    int skip = 0;
    int top = 1;
    int count = 0;

    protected override async Task OnInitAsync()
    {
        var response = await StudentsService.GetStudentsAsync(0, top);
        count = response.Count;
        students = response.Students;
    }

    async Task Next()
    {
        skip++;

        var response = await StudentsService.GetStudentsAsync(skip, top);
        students = response.Students;
    }

    async Task Previous()
    {
        skip--;

        var response = await StudentsService.GetStudentsAsync(skip, top);
        students = response.Students;
    }
}
The next thing we need to do here is to register the StudentsService in the startup.cs file in the ConfigureService as a singleton as follows:
services.AddSingleton<StudentsService>();
The last thing we need to do here is to add a navigation option to our Blazor app, so we are going to modify NavMenu.razor file in the Shared folder and add another option for fetching students as follows:
        <li class="nav-item px-3">
            <NavLink class="nav-link" href="fetchstudents">
                <span class="oi oi-list-rich" aria-hidden="true"></span> Fetch Students
            </NavLink>
        </li>
Now let’s run our projects, both the OData API project and Blazor project need to be running at the same time, you can easily configure your solution to do that by simple right-clicking on your solution file, go to properties, under common Properties select Startup Project (it should be selected by default) then choose Multiple startup projects as shows in the following screenshot:

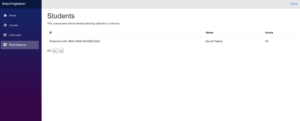
Now, let’s run the project, your navigation menu on the left, go to Fetch Students and start experiencing full navigation experience with Blazor and OData
Final Notes
- Blazor and .NET Core 3.0 are still in preview stage at the time of this article, I encourage you to stay up to date with our blogs to learn more about the latest updates with these technologies.
- This is the source code of the project we built, let us know if you have any issues running it.
Bundling multiple powerful technologies such as Blazor and OData with ASP.NET Core might save you a lot of time implementing functionality that is simply a boilerplate, a functionality that doesn’t necessarily make your application any different from any other. Our mission at Microsoft is to empower you to achieve more, because re-implementing a feature like pagination every time you need to list some data seems like a time-consuming task, instead we build technologies and frameworks like these to make your life easier, and help you get to your end goal faster. and we will continue to build powerful technologies that makes building robust mobile, web and desktop applications even simpler. because we want every developer to turn their ideas into a reality as fast as possible, whether it’s infrastructure, web development, cloud or mobile. I encourage you to keep up with us on the latest products we offer in the software development world, we still have a lot to offer and we invite everyone to come celebrate innovation and success in our open source projects and our communities.
Thank you for the great article, can you please update it to be working on .net core 3 ?
That is totally awesome!
Thanks for sharing!
Thank you for reading 🙂