

Last year at Build 2022, we shared new features to allow customers to manage and assign purchased licenses within Microsoft Teams. It’s previously been up to ISVs to build the license management component into their solution, whether on their landing page or directly within the app. To help streamline the license management experience, we are now offering a new capability for ISVs to choose to offload the license management capabilities to Microsoft where customers can manage and assign licenses—directly in Microsoft Teams.
Why should ISVs enable Microsoft’s license management solution in Microsoft Teams?
- Enable customers to assign and unassign SaaS licenses of ISV/publisher products using Teams and Teams Admin Center.
- Remove the additional development effort for ISVs of building and maintaining their own license management and enforcement system.
- Teams recently announced the GA launch of capability to manage -ISV SaaS purchase subscriptions with Teams for Admins and users within Teams. License Management extends on that capability to provide a seamless embedded post-purchase experience.
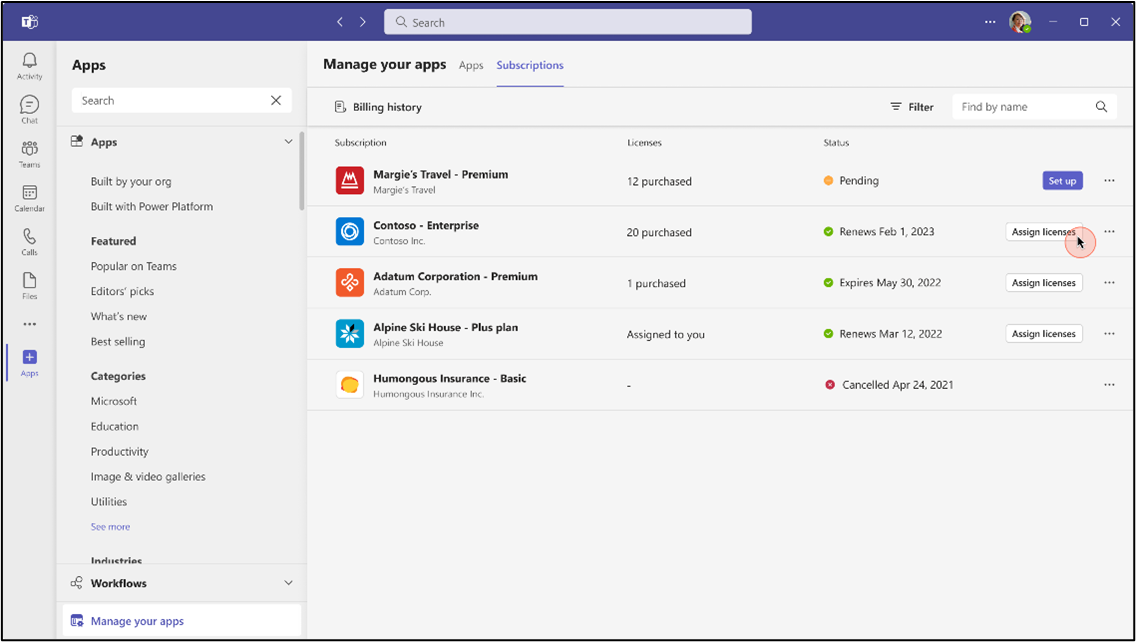
Figure 1.1 highlights the ability to manage a subscription of an ISV application and access licensing capabilities directly within the Teams app store.
 Figure 1.2 highlights the ability to assign and unassign licenses to users directly within the Teams app store.
Ready to get started?
Follow the existing steps to create and publish a monetizable Teams app. If you would like more information on how to publish a monetizable Teams offer, please review the documentation at the end of this post.
- Create a free Teams app.
- Integrate with SaaS fulfillment APIs.
- Create a transactable SaaS offer.
- Create a new transactable SaaS offer in Microsoft Partner Center
- NEW: To enable license management for your offer, click the checkbox “Yes, I would like Microsoft to manage customer licenses on my behalf”.

Figure 1.3 highlights the new capability in Partner Center to enable Microsoft License Management for Teams Apps
Note: This is a one-time setting for Teams apps only, and you cannot change it once your offer is published. This allows the customer to manage licenses for your app within Teams.
Note: Only one offer is supported in the App manifest. Please choose the license management solution that is right for all plans within your offer in the app. This selection cannot be edited.
- Specify offer details including description, pricing, and the webhooks & landing page from prior section
- Preview and test your transactable SaaS offer then publish the offer (not including app)
- Link SaaS offer to your Teams app
- Configure your app with the transactable SaaS offer
- Link your Teams app and SaaS offer via Partner Center
- NEW: To ensure user permissions at time of app launch, integrate with Microsoft Graph UsageRights API At the time of app launch by a customer who has a license, you will be required to determine the user’s permissions for the app with a Graph call to the Usage Rights API. For more information on how to call Graph UsageRights API to check user permissions, please see documentation links below. You can call Graph APIs to determine if the currently logged in user has access to your App (aka, they have a valid subscription of the plan). For more information on how to call Graph UsageRights API to check user permissions, please see documentation links below.
-
- Get user OBO token: Get access on behalf of a user – Microsoft Graph | Microsoft Docs
- Call Graph to get user’s object id: Use the Microsoft Graph API – Microsoft Graph | Microsoft Docs
- Call UsageRights API to determine the user has License to the plan. List user usageRights – Microsoft Graph beta | Microsoft DocsNotes:
-
-
- You will need to have minimum User.Read permissions to be able to call UsageRights.
- If the AAD app you use for SaaS fulfillment API is also used for usageRights API then please ensure that the tenant under which the add app is created is either the publishing tenant OR associated tenant in partner center.
-
- Submit your app for validation and publication.
- Submit the app via Partner Center (same process as with non-monetized apps)
- NEW: After your app is published and a user has purchased a subscription. After activation, redirect the customer from your landing page to Teams License Management Upon successful completion of subscription purchase, the customer will be redirected to your app landing page for subscription activation. Once the customer has activated their subscription purchase on your landing page, the customer should be redirected back to Teams. The URL to redirect the customer back to Teams subscriptions list view is: https://aka.ms/teamsapplicensemanagement
Want to learn more about publishing a monetizable app in Teams? Follow these steps to get your monetizable Teams app live in the app store published.
0 comments