

This article describes different options to implement the ChatGPT (gpt-35-turbo) model of Azure OpenAI in Microsoft Teams. Due to the limited availability of services – in public or gated previews – this content is meant for people that need to explore this technology, understand the use-cases and how to make it available to their users in a safe and secure way via Microsoft Teams. Even if access to those services may be limited at the time of writing, the concepts and design patterns documented here should guide the reader through different options.
What makes generative AI different from other technologies?
Artificial Intelligence (AI) and its large language models have been getting quite a lot of attention lately, and it’s easy to understand why. With the latest breakthroughs in AI, we are now seeing more accurate, adaptable, and intelligent AI systems that can solve more complex problems.
ChatGPT developed by OpenAI, specifically, has generated a lot of excitement and high expectation as it can generate human-like text responses based on given prompts, becoming increasingly popular in the corporate world as a tool for automating routine tasks or answering customer queries.
Based on this analysis from Statista and other observers, ChatGPT on OpenAI reached their first million users after only five days compared to 2.5 months for Instagram that was the service showing the fastest adoption before that. Source: Chart: ChatGPT Sprints to One Million Users | Statista
However, it is important to remember that with the many benefits that AI brings, there are also potential risks and challenges that must be taken into consideration, particularly potential data breaches and privacy violations. Some companies shared their concerns about employees posting sensitive information to chat-based AI services and issued guidelines on how to use these services.
As a Customer Success Manager, I’ve seen several enterprise customers exploring solutions to give their employees access to the conversational AI in a more controlled and safer environment for the company. This is how I designed this solution, called MyAssist, based on Microsoft services: Teams, Power Virtual Agent and Azure OpenAI. MyAssist is deployed to employees as an application for Microsoft Teams.
If you plan to deliver a bot service based on generative AI, I encourage the reader to review this page on responsible AI to understand how this technology works, what you can expect from this type of services, what are the limits and educate users on how to prompt practices and practice for responsible use.
How does this solution help mitigate the company’s concerns?
Microsoft Teams offers a variety of security and compliance services to protect your data and help you meet regulatory requirements. These services include data encryption, role-based access control, multi-factor authentication, and compliance with industry standards and regulations. All chat messages (questions and answers) between a user and a bot application queried from Teams are handled as any other chat messages between users in Teams. Companies that implemented Security & Compliance service like Microsoft Purview via eDiscovery, sensitive information types, retention policies, or other services like Teams Export APIs or Safe Links for Teams, and many others, can take advantage of these solutions for chat messages with bots in Teams.
Power Virtual Agents lets you create powerful AI-powered chatbots for a range of requests—from providing simple answers to common questions to resolve issues requiring complex conversations. It is by far the fastest path to delivering a chat bot with built-in integration and publishing in Teams, including enabling authentication and user SSO in a click of a button. Power Virtual Agent has a large compliance offer that includes HIPAA coverage, FedRamp, SOC, MTCS, CSA and more. PVA instances are deployed in your own Power Platform environment to satisfy your security, user access, governance, data-loss prevention rules, authorized connectors, data residency requirements and more. Last, you can download and view up to seven days of conversation transcript sessions in PVA from the past 30 days (by default) and configure the transcript retention to you needs.
Azure OpenAI Service gives customers advanced language AI with OpenAI GPT-4, GPT-3, Codex, and DALL-E models with the security and enterprise promise of Azure. Azure OpenAI co-develops the APIs with OpenAI, ensuring compatibility and a smooth transition from one to the other. With Azure OpenAI, customers get the security capabilities of Microsoft Azure while running the same models as OpenAI. Azure OpenAI offers private networking, regional availability, and responsible AI content filtering. With Azure OpenAI Service, customer can decide the location of the service, based on Azure regions and service availability, and review Microsoft data, privacy, and security statements on how data provided by you to the Azure OpenAI Service is processed, used, and stored.
By combining Microsoft Teams, Power Virtual Agent and Azure OpenAI Service, enterprises can provide a modern conversational AI experience, or any other generative AI model available on the Microsoft platform, that employees are so enthusiasts to use in a more controlled and secure way.
Technical requirements
All the services used in this article are still in (limited) public preview. It’s important to remind the readers that features in preview have limitations:
- Preview features aren’t meant for production use and may have restricted functionality.
- These features are available before an official release so that customers can get early access and provide feedback.
- These capabilities are in the process of rolling out and may not be available in your region yet.
- These capabilities may be subject to usage limits or capacity throttling.
For more information, go to our preview terms.
How to access these services:
- Microsoft Teams – You can sign-up for Microsoft Teams if you don’t have a subscription already. Please check known issues with custom apps installation if you’re using the new Teams.
- Power Virtual Agent (preview) – If you don’t plan to deploy your bot in production, we recommend using the preview version of PVA that supports the new unified authoring canvas and Adaptive Cards format – The preview version is not mandatory but provides a better user experience to build the dialogs. Supported language is English only. You can get a 30-days trial license for Power Virtual Agent if you don’t have a license already.
- AI Builder for Power Automate (preview) – This option provides a built-in connector for Power Automate to query ChatGPT on Azure OpenAI Service – This capability is in gated preview, and you’ll need to apply for consideration to take part in the trial. To apply, go to Limited preview request.
- Azure OpenAI Service (preview) – You need an Azure subscription as well as an access granted to the models gpt-35-turbo or gpt-4 – These models are currently available in limited US regions. Follow this link to review the prerequisites and request access. You can get an Azure subscription for free on this link.
Design patterns
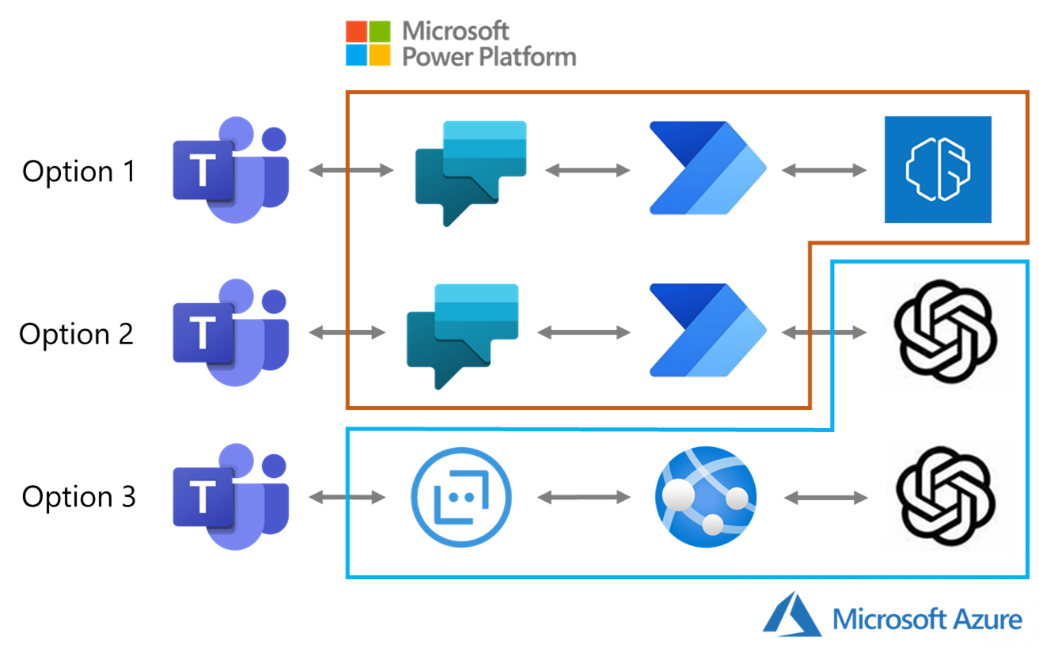
In this post, I document option #2 that combines PVA and Azure OpenAI Service. Option #2 provides a good trade-off between the simplicity to deploy a bot in Teams via PVA, as opposed to a full development using the Azure bot service, and better control over the AI generative models via Azure OpenAI Service, as opposed to the AI Builder connector for ChatGPT on Azure OpenAI Service.
- If you want to explore option #1, I recommend reading this documentation – Use your Azure OpenAI Service model in Power Automate (preview) | Microsoft Learn
- If you want to explore option #3, I recommend this GitHub repository from my colleague Freist Li – GitHub – freistli/rootbot: Bot App integrated with several LLMs services (ChatGPT, GPT-3, DALL-E) from OpenAI and Azure OpenAI.
Let’s make it!
Step 1 – Create your instance of Power Virtual Agent
- Login to https://powerva.microsoft.com
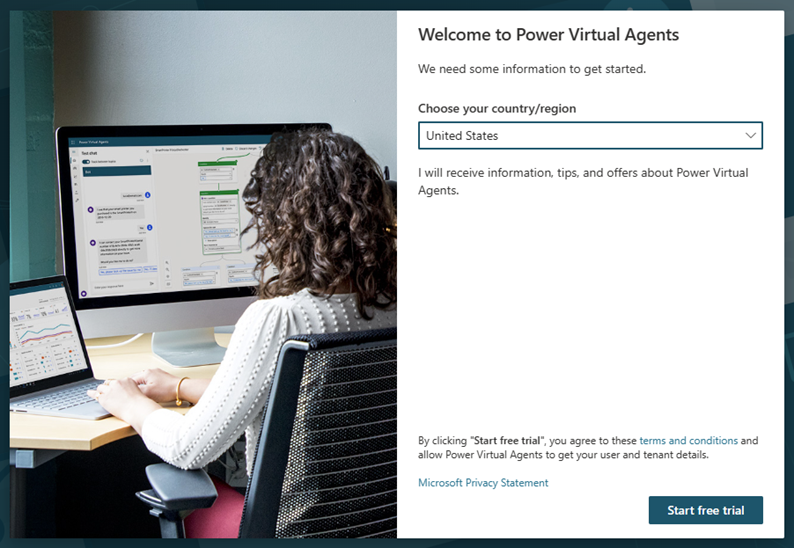
- If this is you first deployment of Power Virtual Agent, you’ll be asked to choose your country/region – Make sure you select a location that is compliant with your organization’s compliance and geographic boundaries – Regional settings and data locations – Power Virtual Agents | Microsoft Learn
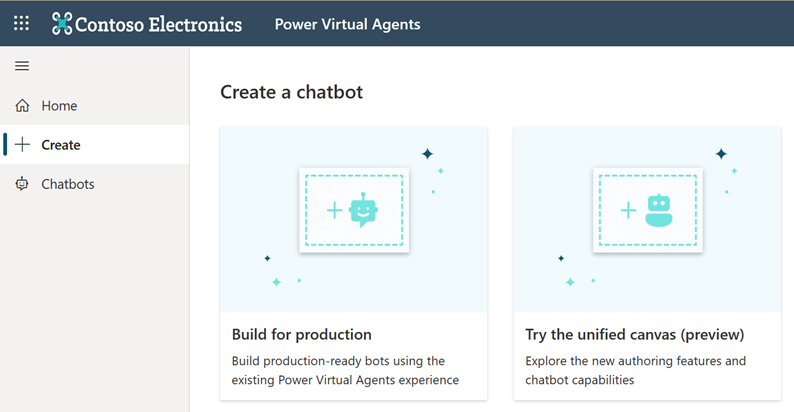
- Once you’ve accessed Power Virtual Agent portal, select “Create a chatbot” and then “Try the unified canvas (preview)” Note: please review the limitations of the PVA preview for more details. The preview version is recommended if you don’t intend to deploy the bot in production.
- Give your bot a name (ex: MyAssist) and select the spoken language (ex: English)
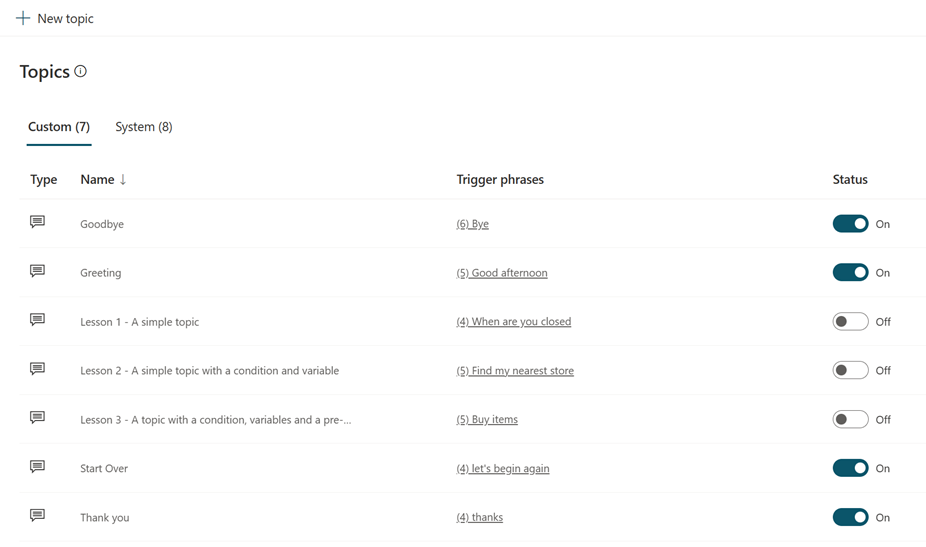
- (optional) Deactivate the default custom topics if you don’t intend to use them – They are named Lesson 1, 2 and 3.
- Under Settings > Channels, select “Microsoft Teams” and then click on “Turn on Teams” – This will enable your PVA bot to run inside Microsoft Teams.
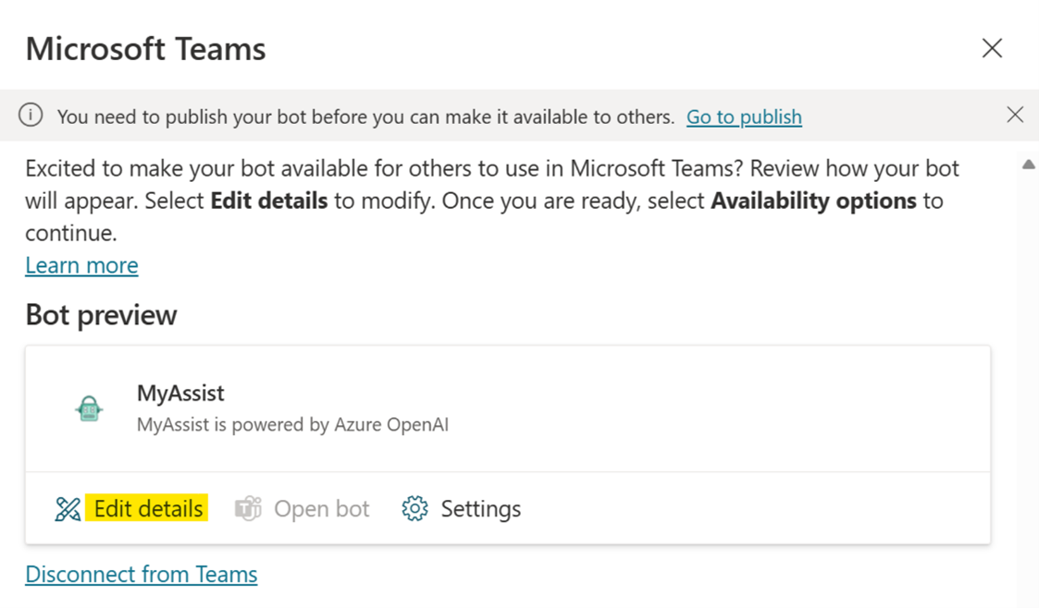
- (optional) Once Microsoft Teams is activated, select “Edit details” if you can change the logo of your bot, its name, description or more. You can also select “Allow your users to add this bot to a team” to be able to install it into a team. Click “Save” if you make changes.
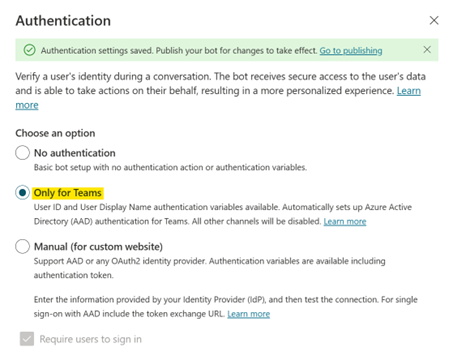
- Under Settings > Authentication, select “Only in Teams” and click “Save”. Doing so will enforce user authentication to the bot and access via Microsoft Teams only (all other channels will be deactivated)
- Go to “Publish”, then click on “Publish” and confirm. Your bot is now available for you only in Microsoft Teams.
- Under “Channels > Microsoft Teams” click on “Open bot” to install the bot in Teams.

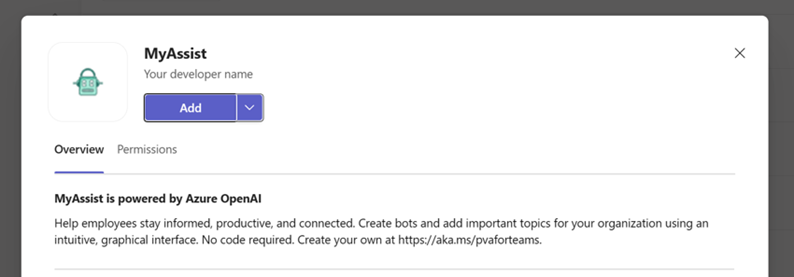
- You’ll be redirected to Microsoft Teams where you can “Add” the bot as a personal app. Click on Add to install the Power Virtual Agent bot.
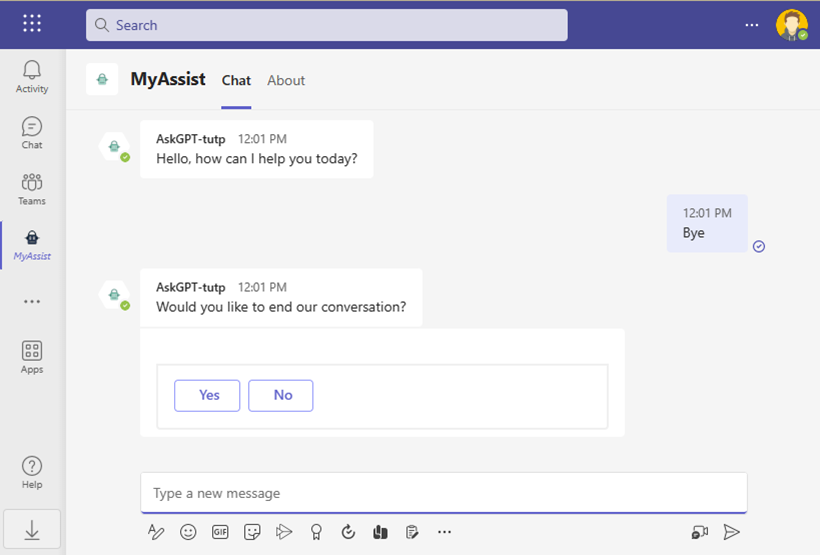
- Test your bot in Teams – Don’t expect too much for now, just send a message and confirm that you receive a message – If you get an answer, congrats, your bot is now running in Teams!
Step 2 – Deploy & configure Azure OpenAI Service
Please check that you meet all the technical requirements and have an Azure subscription enabled to use the model gpt-35-turbo or gpt-4.
- Login to https://portal.azure.com
- Search for Azure OpenAI and click on “Create” to start a new deployment.
- Select a region that supports the models gpt-35-turbo or gpt-4 (East US and South Central US regions) and click on “Create” – More details on this documentation.
- After the deployment, go to your instance of Azure OpenAI on the Azure portal and navigate to “Keys and Endpoint” under “Resource Management” – Copy / paste the Key value and Endpoint URL in a text file for later use.

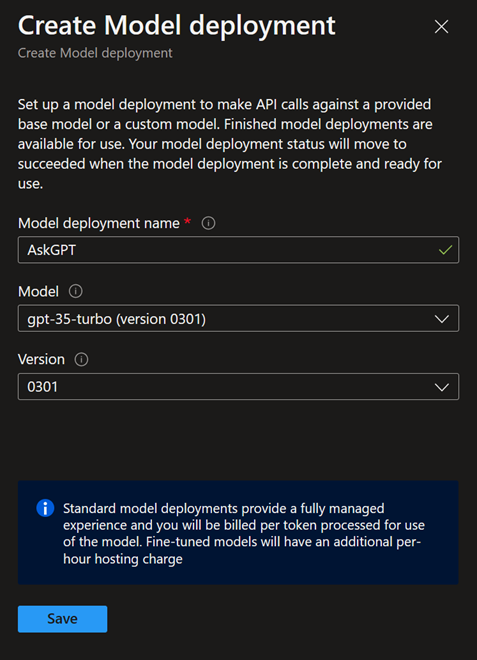
- Go to Model Deployments, click on “Create” and give a name to your deployment (ex: myassist-model) – Select the Model “gpt-35-turbo” and version 0301 or later (or gpt-4) and Save.
- Go to Azure OpenAI Studio at https://oai.azure.com/ and select “Chat playground (Preview”)
- From the Chat playground, select the Assistant setup “Shakespeare writing assistant” – this will automatically fill to “System message” and provide an example of question & answer. You can test the chat bot and configure different scenarios based on your requirements and what you expect from “MyAssist” bot. Read this documentation to know more about exploring the capabilities of the chat playground for ChatGPT.

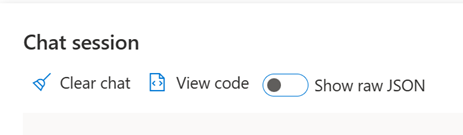
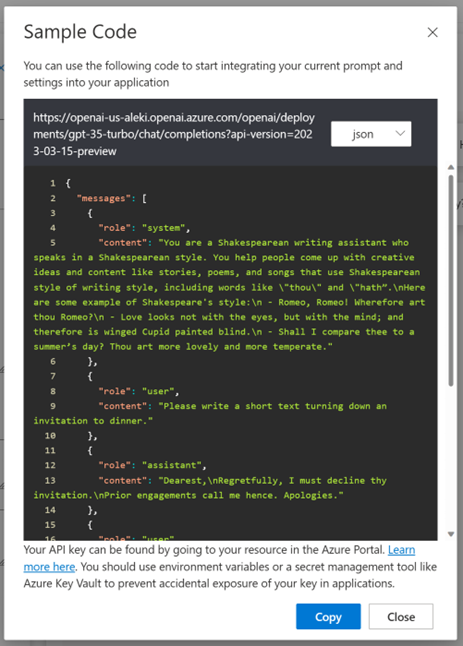
- Once you’re happy with the result of the conversation (you can come back on it later), click on “Clear Chat”, then “View code” and select “json” in the drop-down menu. Click on “Copy” and paste the JSON in a text file for later use.
Step 3 – Connect Power Virtual Agent to Azure OpenAI using Power Automate
- Go to https://powerva.microsoft.com
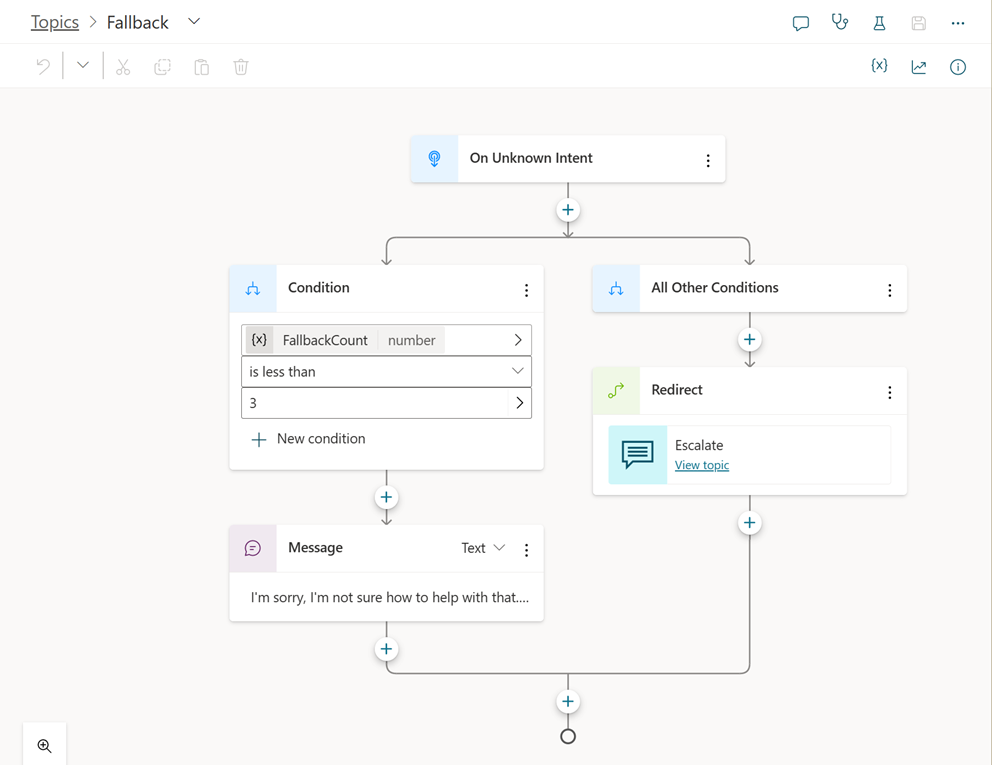
- Under Topics, select “System” and then click on “Fallback” – This will open the conversational flow of the Fallback topic – This topic is triggered if the bot can’t determine the user’s intent. This will be the default route in most cases as your bot has only basic custom topics configured.
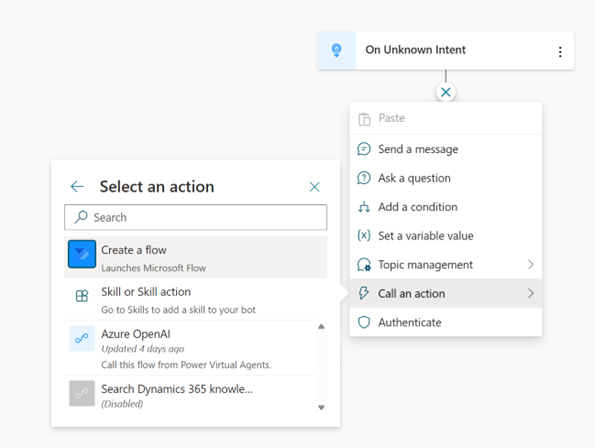
- Delete all the existing steps in this flow and add a new step – Select “Call an action > Create a flow” – This will open your Power Automate authoring canvas.
- From Power Automate, add a “Text” input to the trigger name it “request”

- Add an action “Initialize variable” of type JSON and paste the JSON saved from the Azure OpenAI chat playground in step 2. Name the variable “OAI_Request” like the screenshot below.

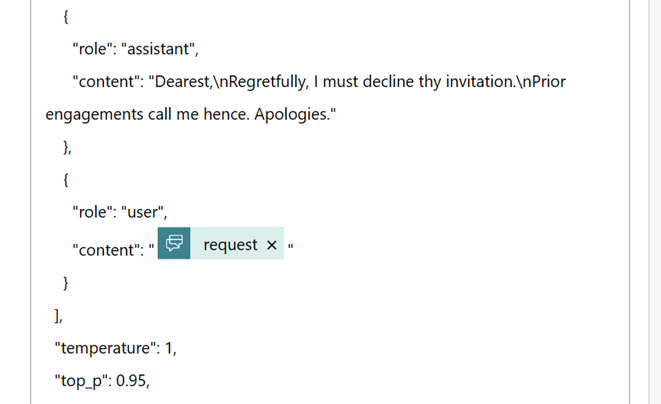
- Update the JSON definition to include the user request from Power Virtual Agent. Pay attention to the structure and position in the JSON.
Here is the JSON definition from the Shakespeare example on Azure OpenAI studio:
{
“messages”: [
{
“role”: “system”,
“content”: “You are a Shakespearean writing assistant who speaks in a Shakespearean style. You help people come up with creative ideas and content like stories, poems, and songs that use Shakespearean style of writing style, including words like \”thou\” and \”hath”.\nHere are some examples of Shakespeare’s style:\n – Romeo, Romeo! Wherefore art thou Romeo?\n – Love looks not with the eyes, but with the mind; and therefore, is winged Cupid painted blind.\n – Shall I compare thee to a summer’s day? Thou art more lovely and more temperate.”
{
  "messages": [
    {
      "role": "system",
      "content": "You are a Shakespearean writing assistant who speaks in a Shakespearean style. You help people come up with creative ideas and content like stories, poems, and songs that use Shakespearean style of writing style, including words like \"thou\" and \"hath”.\nHere are some examples of Shakespeare's style:\n - Romeo, Romeo! Wherefore art thou Romeo?\n - Love looks not with the eyes, but with the mind; and therefore, is winged Cupid painted blind.\n - Shall I compare thee to a summer’s day? Thou art more lovely and more temperate."
    },
    {
      "role": "user",
      "content": "Please write a short text turning down an invitation to dinner."
    },
    {
      "role": "assistant",
      "content": "Dearest,\nRegretfully, I must decline thy invitation.\nPrior engagements call me hence. Apologies."
    },
    {
      "role": "user",
      "content": "@{triggerBody()['text']}"
    }
  ],
  "temperature": 1,
  "top_p": 0.95,
  "frequency_penalty": 0,
  "presence_penalty": 0,
  "max_tokens": 400,
  "stop": null
}
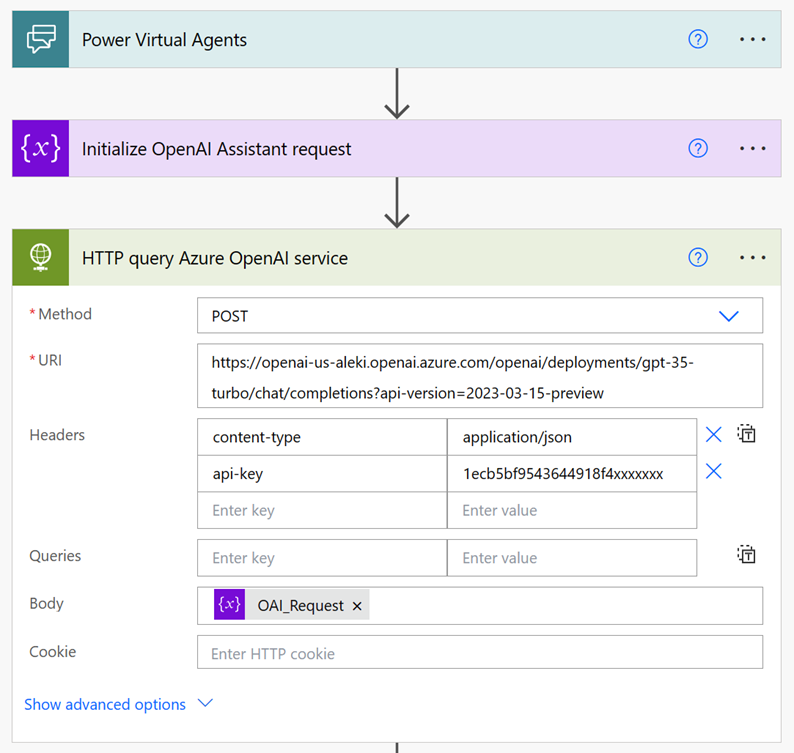
- Add an HTTP action after the trigger to query your Azure OpenAI Service endpoint. Use the following parameters in the HTTP connector:
- Method: POST
- URI: construct the URI following this pattern [OAI_ENDPOINT]/openai/deployments/[OAI_DEPLOYMENT_NAME]/chat/completions?api-version=2023-03-15-preview where [OAI_ENDPOINT] is the endpoint of your Azure OpenAI Service, saved from the previous configuration step 2 and [OAI_DEPLOYMENT_NAME] is the name of your OpenAI model (ex: myassist-model) example: https://myassist-bot.openai.azure.com/openai/deployments/MyAssist-model/chat/completions?api-version=2023-03-15-preview Mode info on Azure OpenAI Service REST API reference – Azure OpenAI | Microsoft Learn
-
- Headers:
- content-type: application/json
- api-key: [OAI_SECRET], the secret of your Azure OpenAI Service, saved from the previous configuration step 2.
- Body: select the variable OAI_Request from previous action of the flow.
- Headers:
-
- It is highly recommended and a best security practice to store your secret in Azure Key Vault – Please read this documentation to create an Azure Key Vault to store your Azure OpenAI Service key and access it from an environment variable in Power Automate.
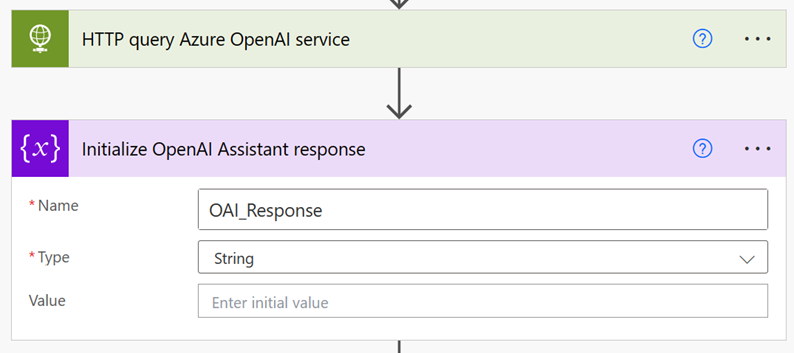
- Next, we initialize the variable “OAI_Response” to store the text response from Azure OpenAI and the content filter.
- Then, we check that ChatGPT response is OK (http code 200) – If not, set an error message in OAI_Response. The test is on the “Status code” of the previous HTTP action “HTTP query Azure OpenAI Service” and verifies that value is equal to 200.Error message value:
“Sorry, I couldn't generate an answer from your prompt.Can you rephrase your request?”
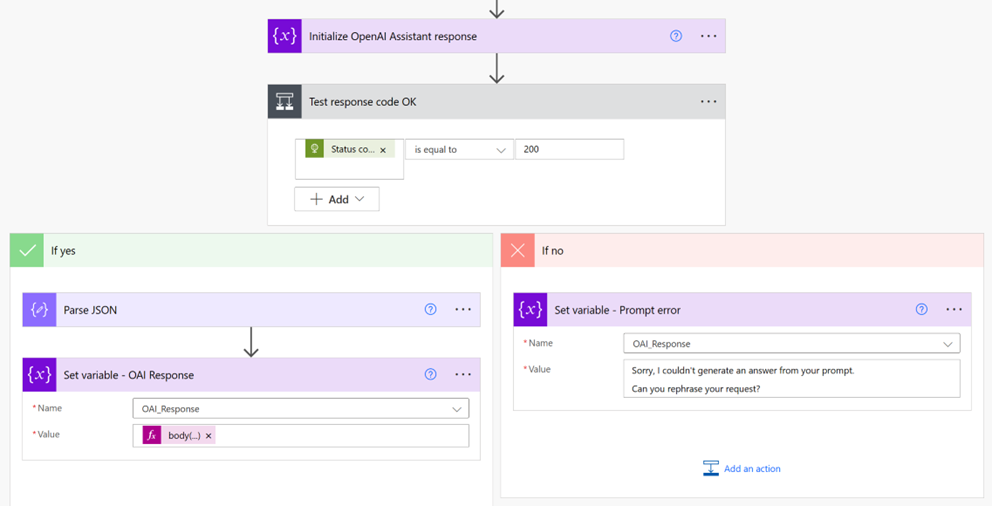
- If the condition is true (If YES path = http response code is 200), we configure the following actions:
- Parse the JSON of the HTTP response body based on the schema below.
- Set the value of OAI_Response with the text response from the Azure OpenAI Service. Use the following expression:
body('Parse_JSON')['choices'][0]['message']['content']Note: only the first answer generated by Azure OpenAI is extracted. Multiple responses are not supported in this pattern.

Schema definition for the Parse JSON action:
{
    "type": "object",
    "properties": {
        "choices": {
            "type": "array",
            "items": {
                "type": "object",
                "properties": {
                    "finish_reason": {},
                    "message": {
                        "type": "object",
                        "properties": {
                            "content": {
                                "type": "string"
                            }
                        }
                    }
                },
                "required": [
                    "finish_reason",
                    "message"
                ]
            }
        }
    }
}
- Configure Power Automate flow to send the response back to Power Virtual Agent. Add an output to the existing action and set the value to the variable “OAI_Response”.

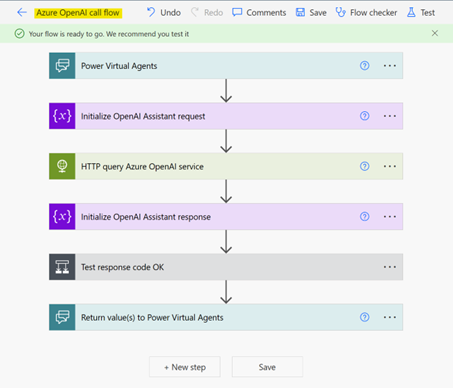
- Rename the flow as “Azure OpenAI call flow” and Save – Your Power Automate flow (wrapped) should look like this.
- Back in Power Virtual Agent, map your Power Virtual Agent variables to Power Automate input / output.
- Power Automate input “request” = PVA system variable “Activity.Text”
- Power Automate output “response” = PVA topic variable “response” (create a new one)
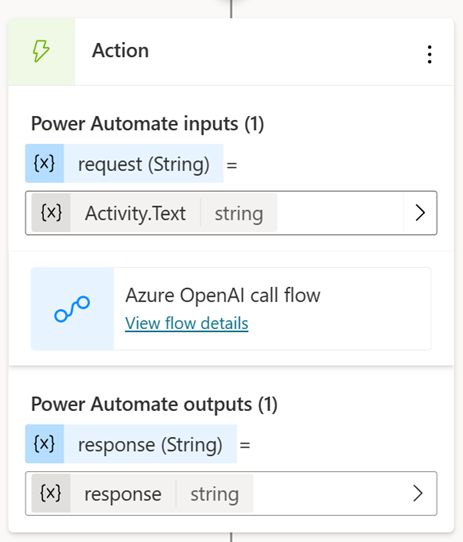
The result should look like this:
- Add a last action to send the response to Microsoft Teams using an Adaptive Card format. Select “+” and “Send a message” – Then “Add” > “Adaptive Card – In the editor, select “Edit formula” and paste the JSON definition below. Click on Save to validate the changes.
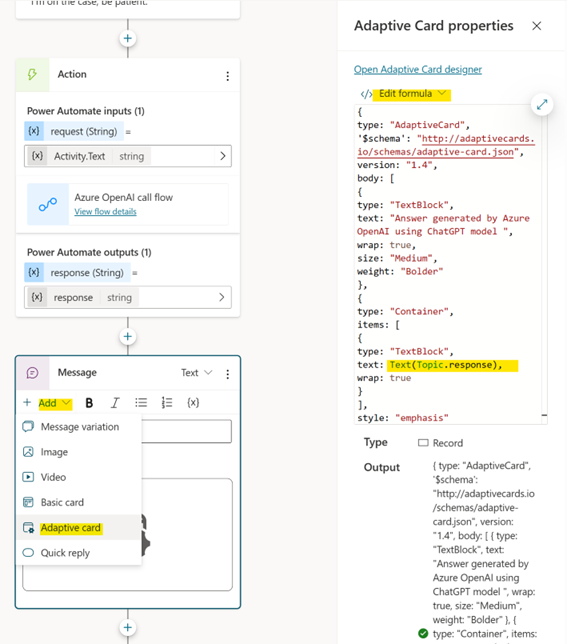
JSON to be added in the “Edit formula” section of Power Virtual Agent in the Adaptive Card editor.
{
    'type': "AdaptiveCard",
    '$schema': "http://adaptivecards.io/schemas/adaptive-card.json",
    'version': "1.3",
    'body': [
        {
            'type': "TextBlock",
            'text': "Answer generated by Azure OpenAI using ChatGPT model ",
            'wrap': true,
            'size': "Medium",
            'weight': "Bolder"
        },
        {
            'type': "Container",
            'items': [
                {
                    'type': "TextBlock",
                    'text': Text(Topic.response),
                    'wrap': true
                }
            ],
            'style': "emphasis"
        },
        {
            'type': "TextBlock",
            'text': "NOTE: This service is in preview version and model does not have context of previous messages.",
            'wrap': true,
            'color': "Accent",
            'size': "Small"
        }
    ]
}- Publish the new version of the bot.
Step 4 – Test and deploy to users
At this stage, you can test your bot in Power Virtual Agent and get its responses in an Adaptive card format. Once you’re happy with the tests, from Power Virtual Agent:
- Go to Settings > Channels > Microsoft Teams
- Click on “Availability options”
- Select “Show to my teammates and shared users” (or show to everyone in my org)
- Enter individual names, emails or security groups.
- Click on Share to make this app visible in “Built by your colleagues” in Teams app store.

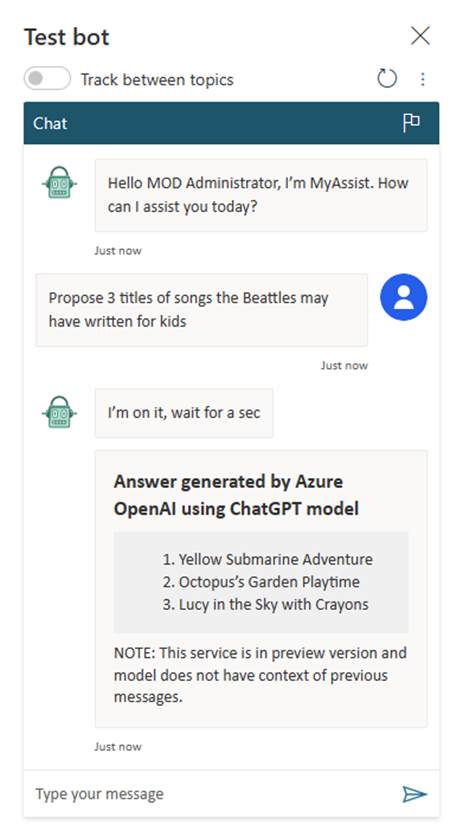
Your bot MyAssist running in Power Virtual Agent
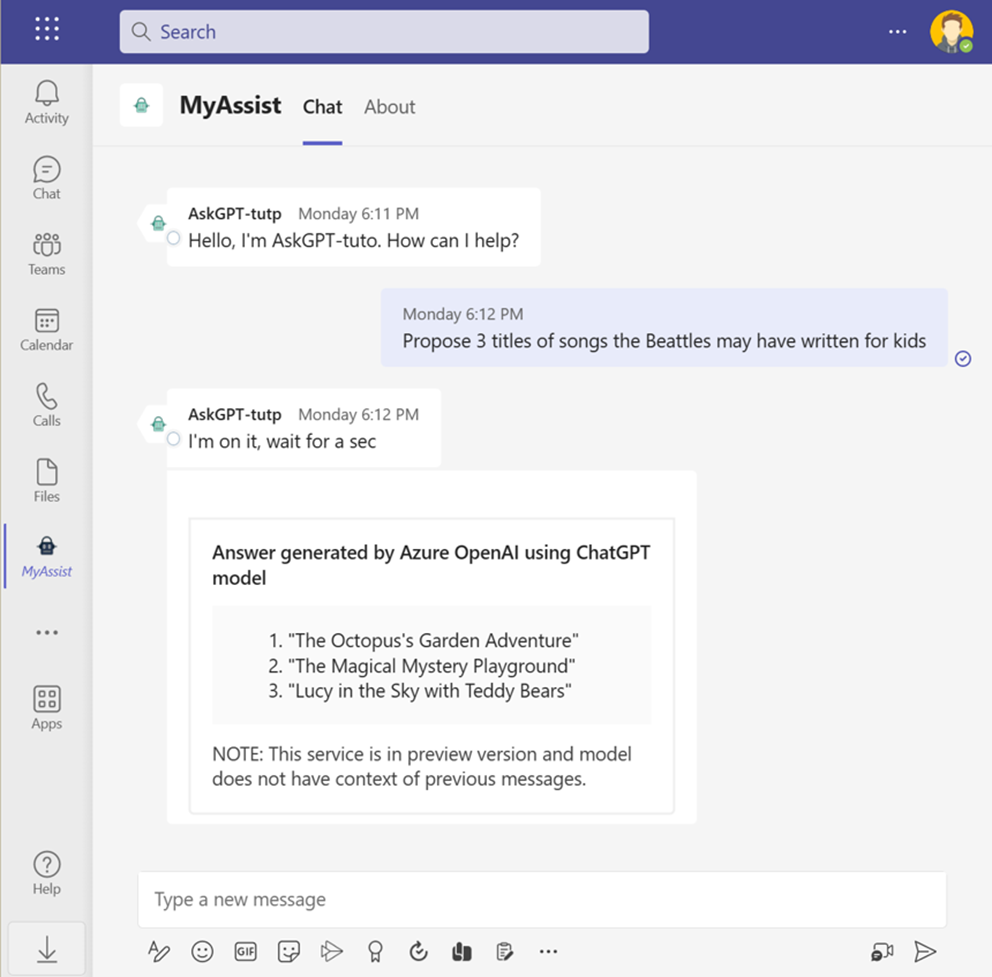
Your bot MyAssist running in Microsoft Teams
What’s next?
Now that you have your ChatGPT bot running in Teams, you can learn directly from users’ requests and better understand the questions, use-cases, and problems they are trying to solve with this new technology. All of that while keeping all these experiments in a safe and secure environment.
Microsoft Teams with Power Virtual Agent bring together an audit and analytics layer. With Azure OpenAI, you get all the flexibility of the technology combined with the playground to perfect the solution to the scenarios that are relevant at your company.
AI and Copilot are infused in all our services, providing full flexibility on your design and for everyone.
I hope you find this article interesting. Enjoy!
Hi Alexis,
How scalable is this solution i.e. if I wanted to role it out to 300 users? Where do you see postenatial issues and how to metage them?
Thanks,
Lazo
Hi,
I have changed the Adaptive Card to basic text response string. Is there a way to add “Typing…” to show while it is compiling an answer?
Great info thanks a lot. Question.
Using this method how can we further protect the open ai service. I would rather not have my openai URL open to the internet.
Is it possible to put the openai deployment in a secured vnet then only allow power automate access to the model?
I have tried but can’t find a reliable source of info on the service addresses of power va.
Hi Jonathan, if you want to secure your Azure OpenAI endpoint, my suggestion would be to deploy an Azure API Management service in front of it.
- Expose your Azure OpenAI service via Azure APIM
- Only APIM can access your Azure OpenAI API using service endpoints or private peering - https://learn.microsoft.com/en-us/azure/api-management/virtual-network-concepts
- Configure APIM to authorize only authenticated access to the exposed endpoints (using Azure AD integration) - https://learn.microsoft.com/en-us/azure/api-management/api-management-howto-protect-backend-with-aad
- Configure your Power Automate flow to use an Azure AD when querying your APIM endpoint - There are different options to do that - The one I prefer is...
Hi, thanks for your blog
when you say “Back in Power Automate, map your Power Virtual Agent variables to Power Automate input / output.”
I can’t find where is,
could you give me more information about this?
Typo issue – It’s “Back in Power Virtual Agent”
This blog post is concise and detailed! Thank you!
Was just wondering,
https://techcommunity.microsoft.com/t5/ai-applied-ai-blog/revolutionize-your-enterprise-data-with-chatgpt-next-gen-apps-w/ba-p/3762087
With this in mind, will we be able to also integrate Cognitive Search together with this so we could utilize indexing and searching through enterprise data?
If you want to index and “ground” your PVA bot to an existing data source (based on public content or content on SharePoint online), I’d recommend you to look at the feature called “conversation boost” in PVA – This way, you don’t have to implement Azure Search and your bot will be able to generate answers based on the content available on these pages – This can be combined with “topics” as described in this article.
Much needed blog post!
I have a question. it works fine when chat with PVA but with teams, it always gives “I’m sorry, I’m not sure how to help with that. Can you try rephrasing?”
do I need to change something in the flows or topics?
After adding it to teams and start to ask it, It’s struggling to answer me and always gives me this message “I’m sorry, I’m not sure how to help with that. Can you try rephrasing?”
This can happen if you deploy the bot to MS Teams, then make changes to PVA and publish the modifications of the bot.
My advice: remove the connection to MS Teams in PVA (and delete the bot on MS Teams side) – Configure your bot in PVA, test that everything is fine and publish – Last, activate MS Teams in PVA and deploy to Teams (this will generate a new appID and deployment in Teams)
Hope that helps
Issue resolved, thanks for the help.
Hi Mohammad,
Did you manage to complete step 13 as to me it is not clear very clear where I need to go?
Hi Alex,
This is very useful and thank you for the detailed instructions.
I am however struggling to identify step 13. All the other steps have been completed. Can anyone share more detailed steps and screenshots.
Thanks,
Lazo
There is a typo issue at step 13 – You should read “Back in Power Virtual Agent, map your Power Virtual Agent variables to Power Automate input / output.” and not “Back in Power Automate, ….”
Does that help?
Hi Alexis,
This was very helpful thank you. I have managed to complete step 13 now.
That was really awesome! Thank you so much!
I followed the instructions and managed to deploy my first Teams bot using ChatGPT!
Just a question: which should be the adjustments if the networking when I change the Network access of my OpenAI service to “Disabled – Private endpoint connections will be the exclusive way to access this resource“?
Which are the actions required to make to the HTTP Action to keep it working?
Or I can’t use the HTTP action and replace it with another action?
Thank you! 🙂
Glad you get it up and running!
If you enable private access to Azure OpenAI service, you’d need a private connection between PVA and this endpoint: we don’t have a solution to do that – PVA is hosted on our Power Platform, it’s a SaaS solution and can’t access private resources. If private connectivity to Azure OpenAI is a requirement, you’ll need to use a deployment on Azure instead of PVA – There is a link in my article for such a deployment on Azure app services.
Hey Alexis, I loved your blog saved us a bunch of time! I have a quick question regarding handling markdown for code snippets and tables. When Azure OpenAI returns JSON to Adaptive card it does not handle some markdown. Do you have any suggestions on how to tackle this issue?
The "textblock" element only supports some markdown format
https://learn.microsoft.com/en-us/adaptive-cards/authoring-cards/text-features
code snippets and tables are not supported.
My advice in this context would be asking Azure OpenAI explicitly to format code sample and/or tables into a format that you can easily identify and map into a property supported in Adaptive Cards. For code snippets, we don't have a good way to display code in AC for now (but we've announced better support for code snippets in Teams at //Build - https://devblogs.microsoft.com/microsoft365dev/build-2023-building-apps-that-bring-together-ai-and-collaboration/#markdown-improvements-and-code-blocking-formatting - nothing announced for AC yet)
For tables, there is a table object in AC that you could use - It's...
On step 3 — step 14 after adding adaptive card, getting error
Expected to have a String but received StartObject for a string expression.
Diagnostic Trace Id: Trace id not available. Headers: {“content-type”:”application/json”,”x-ms-activity-vector”:”00.00.00″,”x-ms-islandgateway”:”GA0000003″,”x-ms-service-request-id”:”guid”}
any idea
Can you retry? I remember having this error in the past and it was related to the service itself.