

Imagine the scenario that your organization wants to make it easier for employees to place orders at the company restaurant.
As your organization is already a heavy user of Microsoft Teams, it makes sense to build an app and surface it where your employees spend most of their working day.
Placing an order at a restaurant is a simple repetitive task. Typically, the process goes like this:
- Employee asks to make an order.
- Restaurant responds with the menu.
- Employee places their order based on the menu options.
- Restaurant confirms and works on the order.
Developing a bot for Microsoft Teams, rather than a traditional web application, is a great way to implement this type of workflow inside Microsoft Teams through a conversational interface.
In this tutorial, I walk you through the steps of how to use Teams Toolkit for Visual Studio Code to create a Microsoft Teams app that contains a bot employees can use to place orders with the restaurant.
If you want to see the finished version, checkout the sample in the gallery, or the final source code on the TeamsFx GitHub repository.
🎥 A recording from the weekly Microsoft 365 Platform Community call is available, Build your first Workflow bot for Microsoft Teams with Teams Toolkit for Visual Studio Code, which covers the steps discussed in this tutorial.
Table of contents
- Teams Toolkit for Visual Studio Code
- Prerequisites
- Install Teams Toolkit for Visual Studio Code
- Scaffold and run the project
- Clean the project
- Create the Adaptive Card templates
- Create the order command
- Create the order card action
- Place your order
- What next?
- Learn more
🛠 Teams Toolkit for Visual Studio Code
Teams Toolkit for Visual Studio Code enables you to create, debug and deploy Microsoft Teams apps to a Microsoft 365 tenant fast using a no configuration approach.
In a recent release of Teams Toolkit for Visual Studio Code, a new scenario-based app capability has been released called Initiate sequential workflows.
This new capability makes it easy for developers to respond to actions invoked from Adaptive Cards, which is ideal for our restaurant order scenario.
Using this new capability, we will create a bot that uses the below workflow.
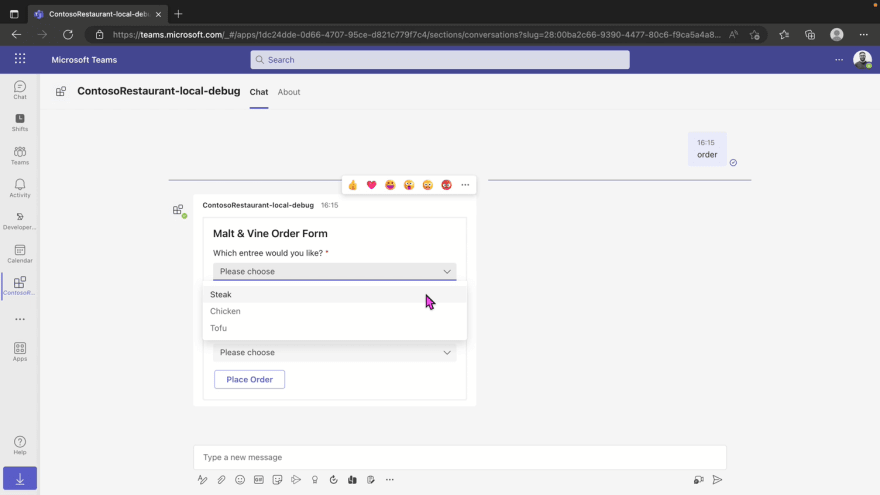
- The employee sends a message containing the word order to the bot chat.
- The bot returns an Adaptive Card containing a simple form.
- The employee submits the form.
- The bot captures the form data and replaces the form with a confirmation message.

🏁 Prerequisites
To follow this guide successfully you will need.
- Microsoft 365 Tenant, which has been enabled for developing custom applications with. If you do not have a tenant, I highly recommend that you use a Microsoft 365 Developer Tenant, which you can obtain for free by joining the Microsoft 365 Developer Program. It is pre-configured for Microsoft Teams app development right out of the box.
- Visual Studio Code, if you do not have it installed, download it for free!
With the prerequisites done, let’s begin!
🛠 Install Teams Toolkit for Visual Studio Code
Our first step is to install Teams Toolkit into Visual Studio Code, you can do this several ways, however the easiest is way is to search for and install the extension using the Extensions panel from the Side Bar within Visual Studio Code.
- Open Visual Studio Code.
- Open the Extensions panel from the Side Bar.
- Search for Teams Toolkit in the marketplace.
- Select Teams Toolkit in the search results.
- Click the Install button to install the extension.
Once the extension has been successfully installed, you will see a Microsoft Teams icon in the Side Bar.
👷 Scaffold and run the project
After installing the extension, let’s create our project.
- Open the Teams Toolkit extension by clicking on the Microsoft Teams icon in the Side Bar
- Click the Create a new Teams app button to start the project scaffolding wizard
- Select Create a new Teams app in the first step
- Select Initiate sequential workflows in the Capabilities step
- Select TypeScript in the Programming Language step
- Select a folder of your choice in the Workspace folder step, this is the location of where the project will be created.
- Enter ContosoRestaurant in the application name step.
When you complete the last step, Teams Toolkit will create a project in a folder with the same name in the Workspace folder location you selected in the previous step.
After the project scaffolding is complete, Teams Toolkit will re-open Visual Studio Code in the project folder and open a Readme file for the project.
The scaffolded project contains some boilerplate code which provides some basic workflow functionality, containing a command and action.
You can run the bot to see how it works by opening the debug side panel, select your browser of choice in the dropdown, and start debugging by either clicking the green play icon or by pressing F5 on your keyboard.
If this is the first time you have used Teams Toolkit for Visual Studio Code, when you first launch your app using Debug, you will be prompted to sign into your Microsoft 365 tenant.
Click the Sign In button in the prompt, this will open your primary browser and navigate you to a Microsoft 365 login screen. Enter your account details to complete the authentication flow, once successful you can close the browser window and return to Visual Studio Code.
Teams Toolkit will setup all the required resources and services for your bot to run locally inside Microsoft Teams, and also provide debugging and hot reload functionality.
The first time you run your app, Teams Toolkit will perform a npm install to install all the required packages, so it might take a few moments depending on your network and machine resources.
This would be a good time to grab a ☕️
When complete, a browser window will launch, and you will be navigated to the web version of Microsoft Teams. You may be prompted for authentication again. If you are, complete the steps using the same account as you signed in previously.
When Microsoft Teams loads, a dialog box will appear which enables you to side load your app. Click the Add button to add the app as a personal app and open the bot chat.
Type helloWorld into the chat box and send your message. This will invoke the bot command which returns an Adaptive Card with a button.
Selecting the button will update the Adaptive Card with confirmation of that action.
👷 Clean the project
This is entirely optional, but to help follow along with the rest of this tutorial, I recommend that you remove the default code, so it doesn’t get in the way and we can start from a clean slate.
Don’t worry about what we are removing for now, I’ll explain all this as we go through the steps.
If your debug session is still running, just close down the browser window or stop the debugging session in Visual Studio Code.
To remove the default code, you can use a script or do it manually.
To manually remove the code
- Delete all files in the following folders
bot\src\AdaptiveCardsbot\src\cardActionsbot\src\commands
- Clear contents of
bot\src\cardModels.ts - Update
/bot/src/internal/initialize.ts- Clear
commandsarray 👉commands: [] - Clear
actionsarray 👉actions: [] - Remove the unused
imports
- Clear
- Update
templates/appPackage/manifest.template.json- Clear the
commandsarray 👉commands: []
- Clear the
To use the script to remove the code
- Create a
scriptsfolder in the root - Download the file and add it to the
scriptsfolder - Open terminal prompt, change to root directory
- Execute
node scripts\ttk_workflowbot_clean.js
Now that we have a clean project, let’s start building out our scenario.
🧑💻 Create the Adaptive Card templates
The first thing we will do is implement Adaptive Cards templates, these cards represent our user interface that employees will interact with.
Adaptive Cards are an open card exchange format enabling developers to exchange UI content in a common and consistent way.
Templating enables the separation of data from the layout in an Adaptive Card, by using data binding syntax ${data} we can add placeholders into our templates that can be populated data when we use the Adaptive Card SDK to render the card.
The first template will be sent back to the employee when they request to make an order with menu options.
Let’s create a new file in the bot\src\AdaptiveCards folder called orderCommandResponse.json with the following contents.
{
    "type": "AdaptiveCard",
    "$schema": "http://adaptivecards.io/schemas/adaptive-card.json",
    "version": "1.4",
    "body": [
        {
            "type": "TextBlock",
            "text": "${FormInfo.title}",
            "size": "Large",
            "wrap": true,
            "weight": "Bolder"
        },
        {
            "type": "Input.ChoiceSet",
            "id": "EntreeSelectVal",
            "label": "${Order.questions[0].question}",
            "style": "filtered",
            "isRequired": true,
            "errorMessage": "This is a required input",
            "placeholder": "Please choose",
            "choices": [
                {
                    "$data": "${Order.questions[0].items}",
                    "title": "${choice}",
                    "value": "${value}"
                }
            ]
        },
        {
            "type": "Input.ChoiceSet",
            "id": "SideVal",
            "label": "${Order.questions[1].question}",
            "style": "filtered",
            "isRequired": true,
            "errorMessage": "This is a required input",
            "placeholder": "Please choose",
            "choices": [
                {
                    "$data": "${Order.questions[1].items}",
                    "title": "${choice}",
                    "value": "${value}"
                }
            ]
        },
        {
            "type": "Input.ChoiceSet",
            "id": "DrinkVal",
            "label": "${Order.questions[2].question}",
            "style": "filtered",
            "isRequired": true,
            "errorMessage": "This is a required input",
            "placeholder": "Please choose",
            "choices": [
                {
                    "$data": "${Order.questions[2].items}",
                    "title": "${choice}",
                    "value": "${value}"
                }
            ]
        }
    ],
    "actions": [
        {
            "type": "Action.Execute",
            "verb": "order",
            "title": "Place Order"
        }
    ]
}
When this card is rendered, it will display a mini form with three drop downs and an action button. When the action button is selected, the form data is sent to the bot along with a verb, which represents the action that was performed.
Note that the drop downs are given ID property values, when the form is submitted the data sent to bot as key/value pairs, e.g
{ "DrinkVal": "value" }.
The second template will be displayed to the employee when they have submitted their order to the restaurant.
Let’s create a new file in the bot\src\AdaptiveCards folder called orderActionResponse.json with the following contents.
{
  "type": "AdaptiveCard",
  "$schema": "http://adaptivecards.io/schemas/adaptive-card.json",
  "version": "1.4",
  "body": [
    {
      "type": "TextBlock",
      "text": "${title}",
      "wrap": true,
      "style": "heading"
    },
    {
      "type": "Container",
      "items": [
        {
          "type": "FactSet",
          "facts": [
            {
              "title": "Entree",
              "value": "${actionData.EntreeSelectVal}"
            },
            {
              "title": "Side",
              "value": "${actionData.SideVal}"
            },
            {
              "title": "Drink",
              "value": "${actionData.DrinkVal}"
            }
          ]
        }
      ]
    }
  ],
  "actions": [
    {
      "type": "Action.Execute",
      "title": "Edit Order",
      "verb": "order-edit"
    }
  ]
}
When this card is rendered, it will display the selected options submitted in the first card and an action button.

Now that we have our templates in place, let’s create the data models to define the correct data shape to use with our template when we render the card using the Adaptive Cards SDK.
Open the bot/src/cardModels.ts file.
Add the following interfaces which describes the data shape for the bot\src\AdaptiveCards\orderCommandResponse.json card.
export interface OrderData {
  FormInfo: FormInfo;
  Order: Order;
}

export interface FormInfo {
  title: string;
}

export interface Order {
  questions: Question[];
}

export interface Question {
  question: string;
  items: Item[];
}

export interface Item {
  choice: string;
  value: string;
}
Add the following interfaces which describes the data shape for the bot\src\AdaptiveCards\orderCommandResponse.json card.
export interface OrderResponseData {
  title: string;
  actionData: OrderActionData;
}

export interface OrderActionData {
  EntreeSelectVal: string;
  SideVal: string;
  DrinkVal: string;
}
The OrderActionData interface also provides the shape of the data which is returned to our bot when the first card is submitted.
Take a moment to look at the data binding syntax used in the templates and the shape of the data defined in the data models.
📝 Create the order command
To create a new command we need to perform three tasks
- Create the command handler
- Update the bot configuration
- Update the app manifest
Create the command handler
With our user interface defined, let’s create the order command which our employees will use to start the order process.
Let’s create a new file in the bot\src\commands folder called orderCommandHandler.ts with the following contents.
export class OrderCommandHandler implements TeamsFxBotCommandHandler { }
The OrderCommandHandler class will represent the handler for when the order command is sent in the bot chat.
We will use the TeamsFxBotCommandHandler interface from the @microsoft/teamsfx library to implement the handler functionality.
Let’s import the CommandMessage, TeamsFxBotCommandHandler and TriggerPatterns classes from the @microsoft/teamsfx library, the TurnContext class and Activity interface from botbuilder library, and implement the TeamsFxBotCommandHandler interface.
You can use the Quick Fix menu in Visual Studio Code to import packages and implement interfaces quickly
import { CommandMessage, TeamsFxBotCommandHandler, TriggerPatterns } from "@microsoft/teamsfx";
import { TurnContext, Activity } from "botbuilder";

export class OrderCommandHandler implements TeamsFxBotCommandHandler {

  triggerPatterns: TriggerPatterns;

  async handleCommandReceived(context: TurnContext, message: CommandMessage): Promise<string | void | Partial<Activity>> {
    throw new Error("Method not implemented.");
  }

}
Let’s update the triggerPatterns property with the value order. This property defines the keyword that the bot will listen out for when it is sent messages.
triggerPatterns: TriggerPatterns = "order";
Next, let’s add the logic to the handleCommandReceived method that will be executed when the handler is invoked.
First, add the async keyword to the method declaration as the method will return a Promise.
async handleCommandReceived(context: TurnContext, message: CommandMessage): Promise<string | void | Partial<Activity>> {
Next we will create a new object that we will use populate the template in the shape of the OrderData model that we defined earlier. This object will represent the menu options that the employee can choose from in the form.
Import the OrderData interface using an import statement at the top of the file.
import { OrderData } from "../cardModels";
Create a new constant called orderData using the OrderData interface as its type, replacing the throw statement.
const orderData: OrderData = {
      "FormInfo": {
        "title": "Malt & Vine Order Form"
      },
      "Order": {
        "questions": [
          {
            "question": "Which entree would you like?",
            "items": [
              {
                "choice": "Steak",
                "value": "Steak"
              },
              {
                "choice": "Chicken",
                "value": "Chicken"
              },
              {
                "choice": "Tofu",
                "value": "Tofu"
              }
            ]
          },
          {
            "question": "Which side would you like?",
            "items": [
              {
                "choice": "Baked Potato",
                "value": "Baked Potato"
              },
              {
                "choice": "Rice",
                "value": "Baked Potato"
              },
              {
                "choice": "Vegetables",
                "value": "Baked Potato"
              },
              {
                "choice": "Noodles",
                "value": "Baked Potato"
              },
              {
                "choice": "No Side",
                "value": "Baked Potato"
              }
            ]
          },
          {
            "question": "Which drink would you like?",
            "items": [
              {
                "choice": "Water",
                "value": "Water"
              },
              {
                "choice": "Soft Drink",
                "value": "Soft Drink"
              },
              {
                "choice": "Coffee",
                "value": "Coffee"
              },
              {
                "choice": "Natural Juice",
                "value": "Natural Juice"
              },
              {
                "choice": "No Drink",
                "value": "No Drink"
              }
            ]
          }
        ]
      }
    }
Now we have our data, we need to populate our template with orderData to render a card that we can then send to the bot chat as our response. To do this we need to import our template and the Adaptive Cards SDK.
Import the template and SDK by adding import statements at the top of the file.
import orderCard from "../adaptiveCards/orderCommandResponse.json";
import { AdaptiveCards } from "@microsoft/adaptivecards-tools";
Add the following line after you initialise the orderData constant, where we will use the Adaptive Cards SDK to parse the template and passing the data object to it to render the card.
const cardJson = AdaptiveCards
  .declare<OrderData>(orderCard)
  .render(orderData);
We now have a card populated with data and ready to be sent, so let’s do that.
Import the MessageFactory and CardFactory classes from the botbuilder library by updating the existing import statement.
import { TurnContext, Activity, MessageFactory, CardFactory } from "botbuilder";
Add the following line after you initialise the cardJson constant to send the populated Adaptive Card to the bot chat.
return MessageFactory.attachment(
  CardFactory.adaptiveCard(cardJson)
);
Update the bot configuration
After implementing the command handler, the next step is to update the bot configuration to tell our bot about our new handler.
Open the bot\src\internal\initialize.ts file which contains our bot configuration and import the OrderCommandHandler class at the top of the file.
import { OrderCommandHandler } from "../commands/orderCommandHandler";
Update the commands array, including a new instance of the OrderCommandHandler class in the array.
command: {
  enabled: true,
  commands: [new OrderCommandHandler()],
},
Update the app manifest
The final step is to add our order command to the list of suggestions that the bot can recommend to employees who use it.
Open the templates\manifest.template.json app manifest file, which describes how our app integrates into Microsoft Teams.
Update the commands array, including a new command object in the array.
"commands": [
  {
    "title": "order",
    "description": "Place an order"
  }
]

⚡️ Create the order card action
With our user interface and command handler defined, we now need to create an action handler which will be triggered when the employee submits the order.
To create a new action handler we need to perform two tasks
- Create the action handler
- Update the bot configuration
Create the action handler
Let’s create a new file in the bot\src\cardActions folder called orderActionHandler.ts with the following contents.
export class OrderActionHandler implements TeamsFxAdaptiveCardActionHandler { }
The OrderActionHandler class will represent the handler for when an Adaptive Card action that uses the Action.Execute type passing the order verb.
We will use the TeamsFxAdaptiveCardActionHandler interface from the @microsoft/teamsfx library to implement the handler functionality.
Let’s import the AdaptiveCardResponse enum and TeamsFxAdaptiveCardActionHandler class from the @microsoft/teamsfx library, the TurnContext class and InvokeResponse interface from botbuilder library, and implement the TeamsFxAdaptiveCardActionHandler interface.
import { AdaptiveCardResponse, TeamsFxAdaptiveCardActionHandler } from "@microsoft/teamsfx";
import { TurnContext, InvokeResponse } from "botbuilder";

export class OrderActionHandler implements TeamsFxAdaptiveCardActionHandler {

  triggerVerb: string;

  adaptiveCardResponse?: AdaptiveCardResponse;

  handleActionInvoked(context: TurnContext, actionData: any): Promise<InvokeResponse<any>> {
    throw new Error("Method not implemented.");
  }

}
Let’s update the triggerVerb property with the value order. This property defines the verb that the bot will listen out for when it is sent data as a result of an Action.Execute action invoked from an Adaptive Card.
triggerVerb: string = "order";
Next, let’s add the logic to the handleActionInvoked method that will be executed when the handler is invoked.
Add the async keyword to the method declaration as the method will return a Promise.
async handleActionInvoked(context: TurnContext, actionData: any): Promise<InvokeResponse<any>> {
You may have noticed that handleActionInvoked method returns an actionData parameter, this will contain the data submitted from our Adaptive Card.
As we have already defined the model for this data, let’s replace any with our own type.
Import the OrderActionData interface using an import statement at the top of the file.
import { OrderActionData } from "../cardModels";
Update actionData parameter type.
async handleActionInvoked(context: TurnContext, actionData: OrderActionData): Promise<InvokeResponse<any>> {
Next we will create a new object that we will use populate the template in the shape of the OrderResponseData model that we defined earlier. This object will represent the menu options selected by the employee and includes a title to display in the confirmation.
Import the OrderResponseData interface using an import statement at the top of the file.
import { OrderResponseData } from "../cardModels";
Create a new constant called orderResponseData using the OrderResponseData interface as its type, replacing the throw statement.
const orderResponseData: OrderResponseData = {
  title: "✅ [ACK] Order Placed",
  actionData
};
Now we have our data, we need to populate our template with orderResponseData to render a card that we can then replace the submitted Adaptive Card with. To do this we need to import our template and the Adaptive Cards SDK.
Import the template and SDK by adding import statements at the top of the file.
import orderActionResponseCard from "../adaptiveCards/orderActionResponse.json";
import { AdaptiveCards } from "@microsoft/adaptivecards-tools";
Add the following line after you initialise the orderResponseData constant, where we will use the Adaptive Cards SDK to parse the template and passing the data object to it to render the card.
const cardJson = AdaptiveCards
  .declare<OrderResponseData>(orderActionResponseCard)
  .render(orderResponseData);
We now have a card populated with data and ready to be sent, so let’s do that.
Import the InvokeResponseFactory class from the @microsoft/teamsfx library by updating the existing import statement.
import { AdaptiveCardResponse, InvokeResponseFactory, TeamsFxAdaptiveCardActionHandler } from "@microsoft/teamsfx";
Add the following line after you initialise the cardJson constant to send the populated Adaptive Card to the bot chat, replacing the existing Adaptive Card.
return InvokeResponseFactory.adaptiveCard(cardJson);
Update the bot configuration
After implementing the action handler, the next step is to update the bot configuration to tell our bot about our new handler.
Open the bot\src\internal\initialize.ts file which contains our bot configuration and import the OrderActionHandler class at the top of the file.
import { OrderCommandHandler } from "../commands/orderCommandHandler";
Update the actions array, including a new instance of the OrderActionHandler class in the array.
cardAction: {
  enabled: true,
  actions: [new OrderActionHandler()]
},
🙋 Place your order
Now it’s time to run our bot and test it out.
You can do this easily, either by opening the Debug panel and selecting the green play button or by pressing F5 on your keyboard.
Follow the steps to side load your application, when the bot chat is visible, submit order in the chat to start the workflow.
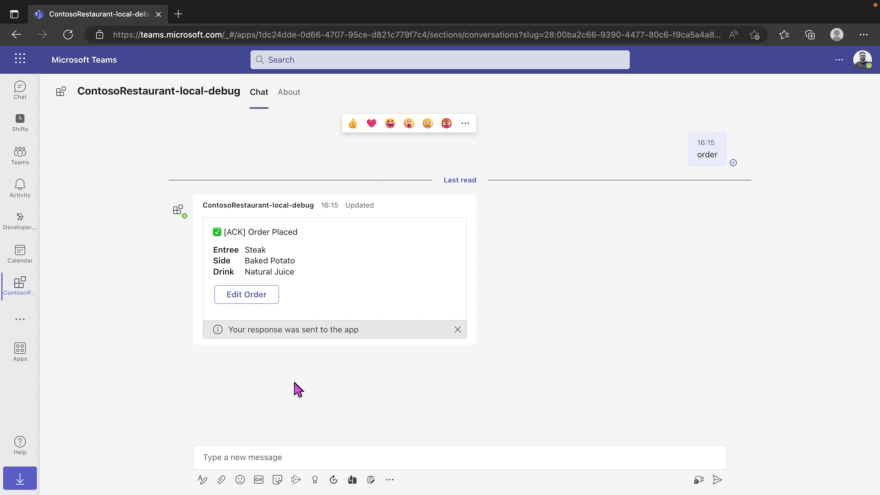
🎉 Congratulations! You’ve just created your first bot that implements a simple workflow to automate a repetitive task enabling an employee to place an order with the company restaurant.
⏭ What next?
Want to make more updates? Here are a few things you can try.
- Edit order, implement the Edit Order button that is displayed when the order is confirmed.
- Expand the menu, add more options to the order form.
- Update the app icons, currently the app uses stock icons, update the icons in the
templates/appPackage/resourcesdirectory with new, more relevant icons. - Restrict supported Teams scopes, by default the bot can be installed into a personal, chat or channel context, to restrict where the bot can be used, update the scopes array in the app manifest.
📚 Learn more
- Microsoft Teams Developer Center
- Teams Toolkit Documentation
- Teams Toolkit Overview
- Workflow bot in Teams
- Build workflow bot
👋 Happy coding!
Are there any plans for expanding this toolkit beyond Teams? It would be nice to have a shared codebase that doesn’t care whether the users are on Teams, Slack, Discord, Google Chat, or (gods forbid 😉 ) Facebook Messenger. Is the toolkit inherently and fundamentally tied to Teams only, or could it become something more generalized?