

Great news for .NET developers, Teams Toolkit for Visual Studio is now generally available! If you didn’t have a chance to review updates in Teams Toolkit for Visual Studio, please review the recent announcement published earlier this month.
In this post, I will show you the steps to get started with Teams Toolkit for Visual Studio and build your first Teams tab with ASP.NET Core to boost your productivity:
- Setup and install Teams Toolkit for Visual Studio
- Create your first Teams app with ASP.NET Core on Visual Studio
- Enhance your Teams app by accessing calendar events, to-do tasks and file folders
⚒️ Setup and install Teams Toolkit for Visual Studio
Before getting started building apps with Teams Toolkit for Visual Studio, you need to complete pre-requisites:
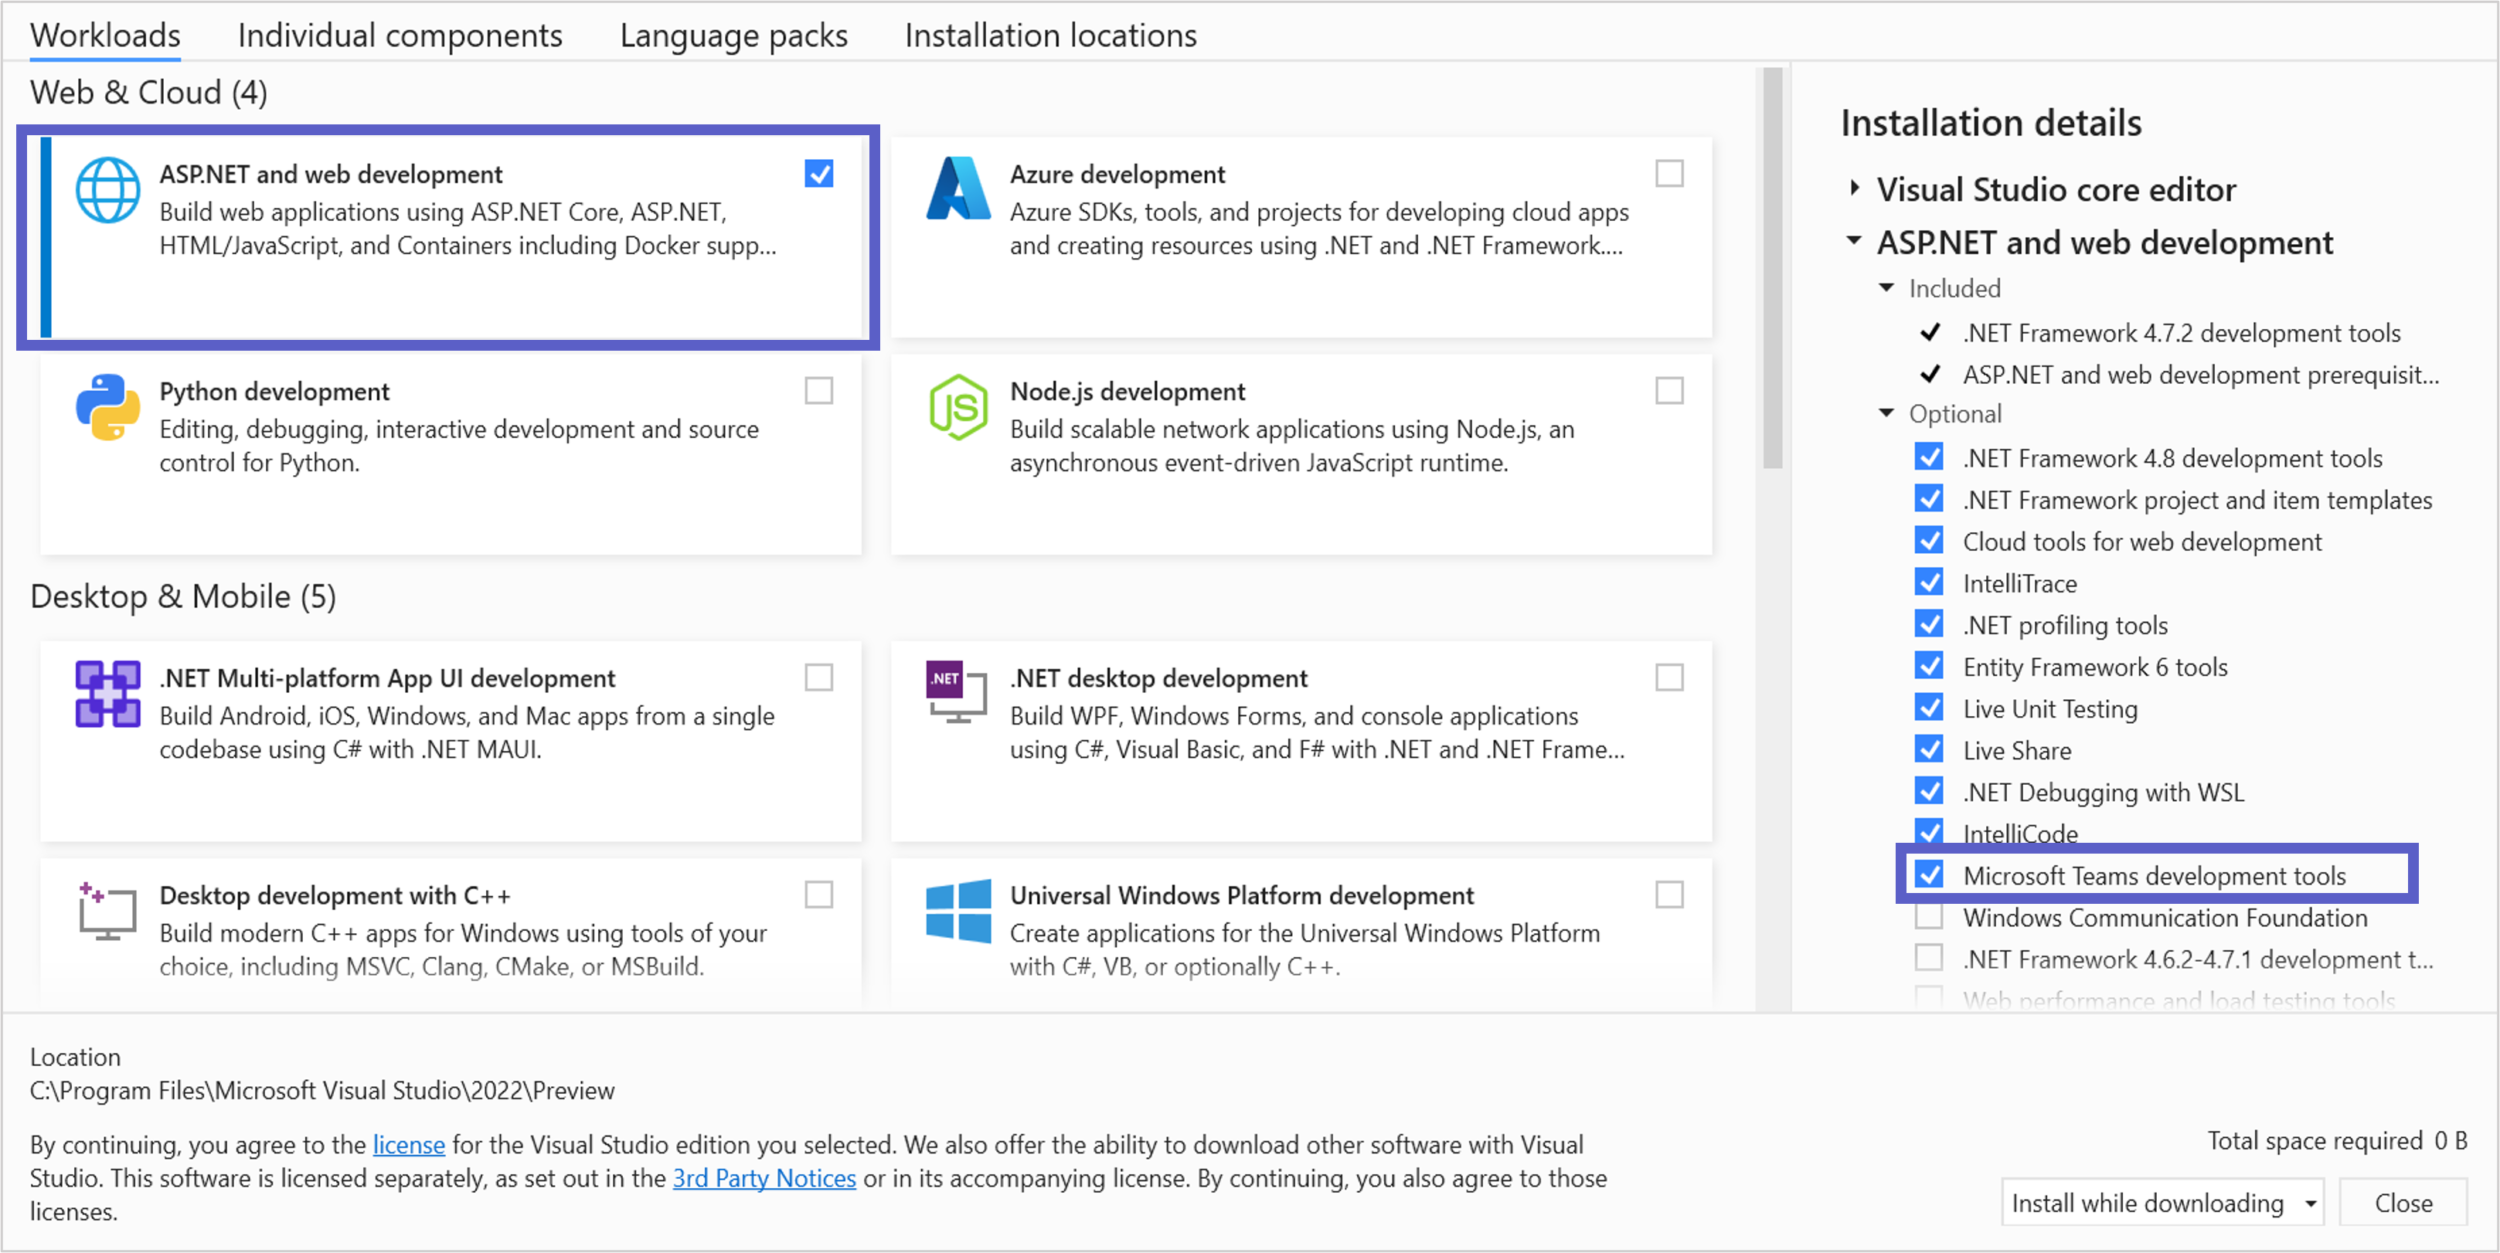
- Install Visual Studio 2022 version 17.3 or higher. In the Visual Studio Installer:
- Select ASP.NET and web development inside the Workloads.
- Select Microsoft Teams development tools inside the Installation details.
- When you are building Teams apps, you need sideloading permissions to install and debug your app. Be sure you have a Microsoft 365 account with permissions to test and debug your Teams app. You may find the setup instructions in the Prepare your Microsoft 365 tenant. If you don’t already have a Microsoft 365 account, you can register for a free one through the Microsoft 365 Developer Program.
🧵 Create your first Teams app with ASP.NET Core on Visual Studio
After successfully completing the setup, you are ready to build your first Teams app with Teams Toolkit for Visual Studio:
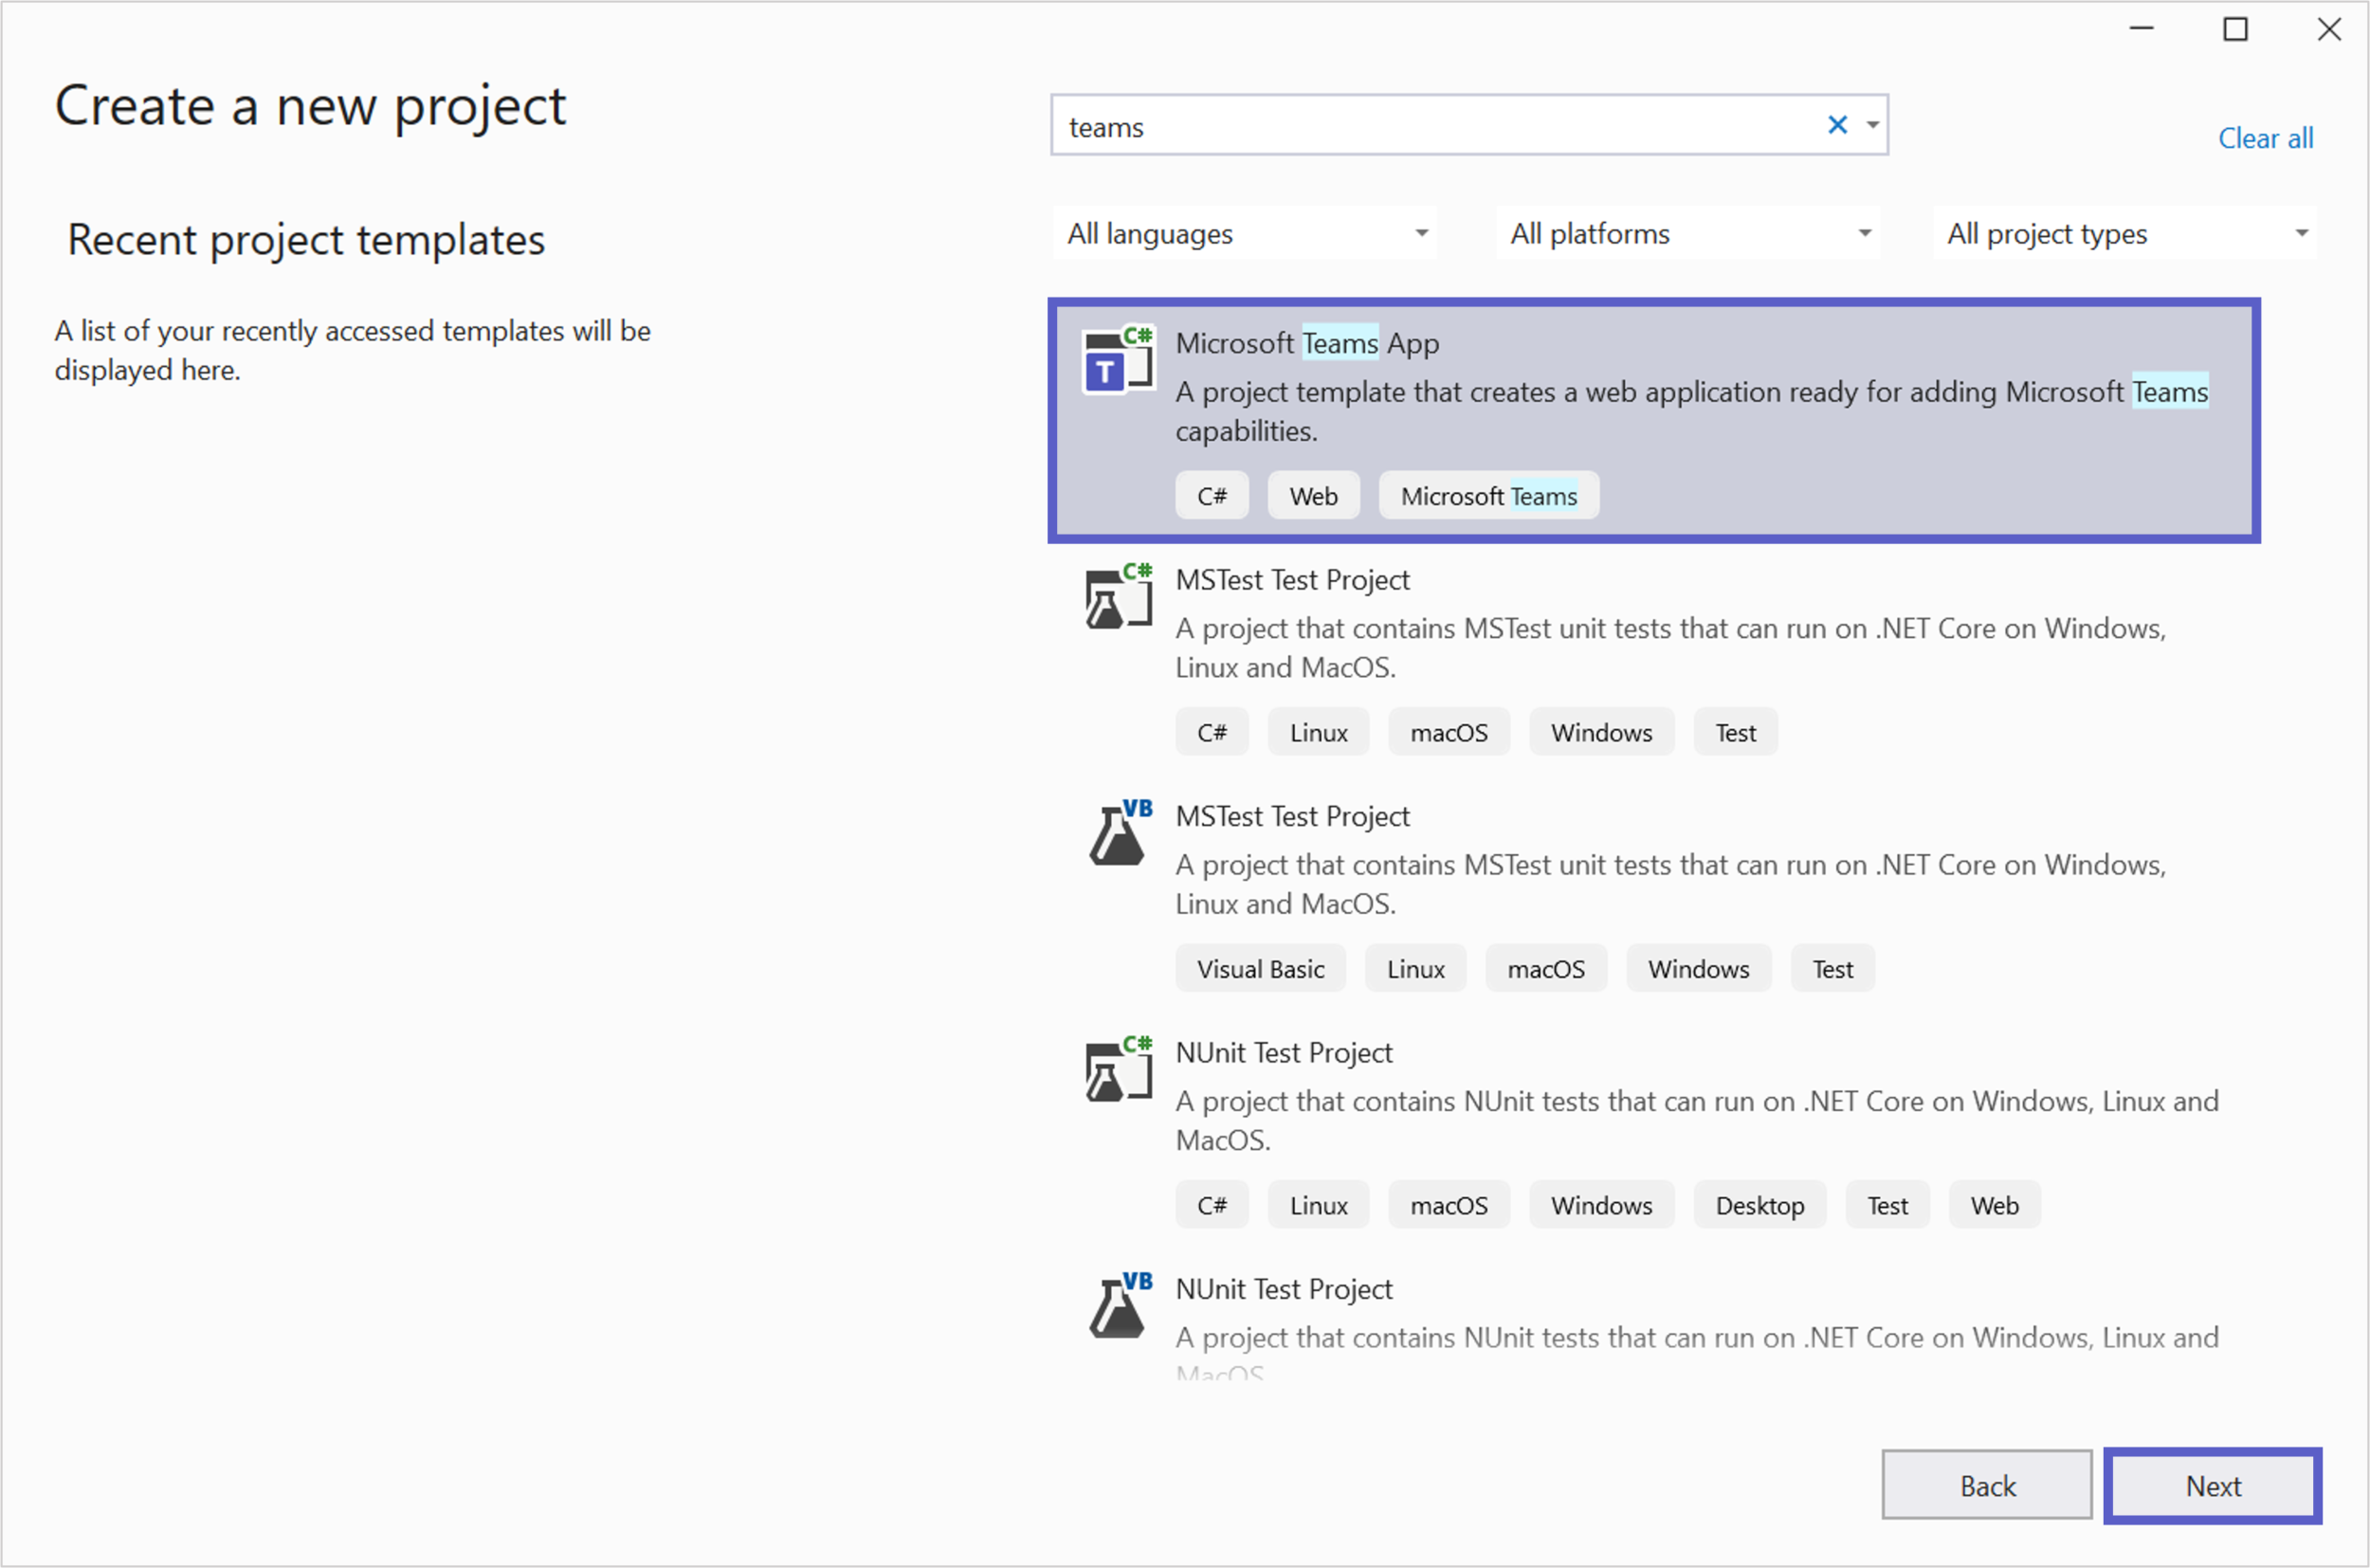
- Open Visual Studio and select Create a new project:

2. Search and select Microsoft Teams App, select Next:
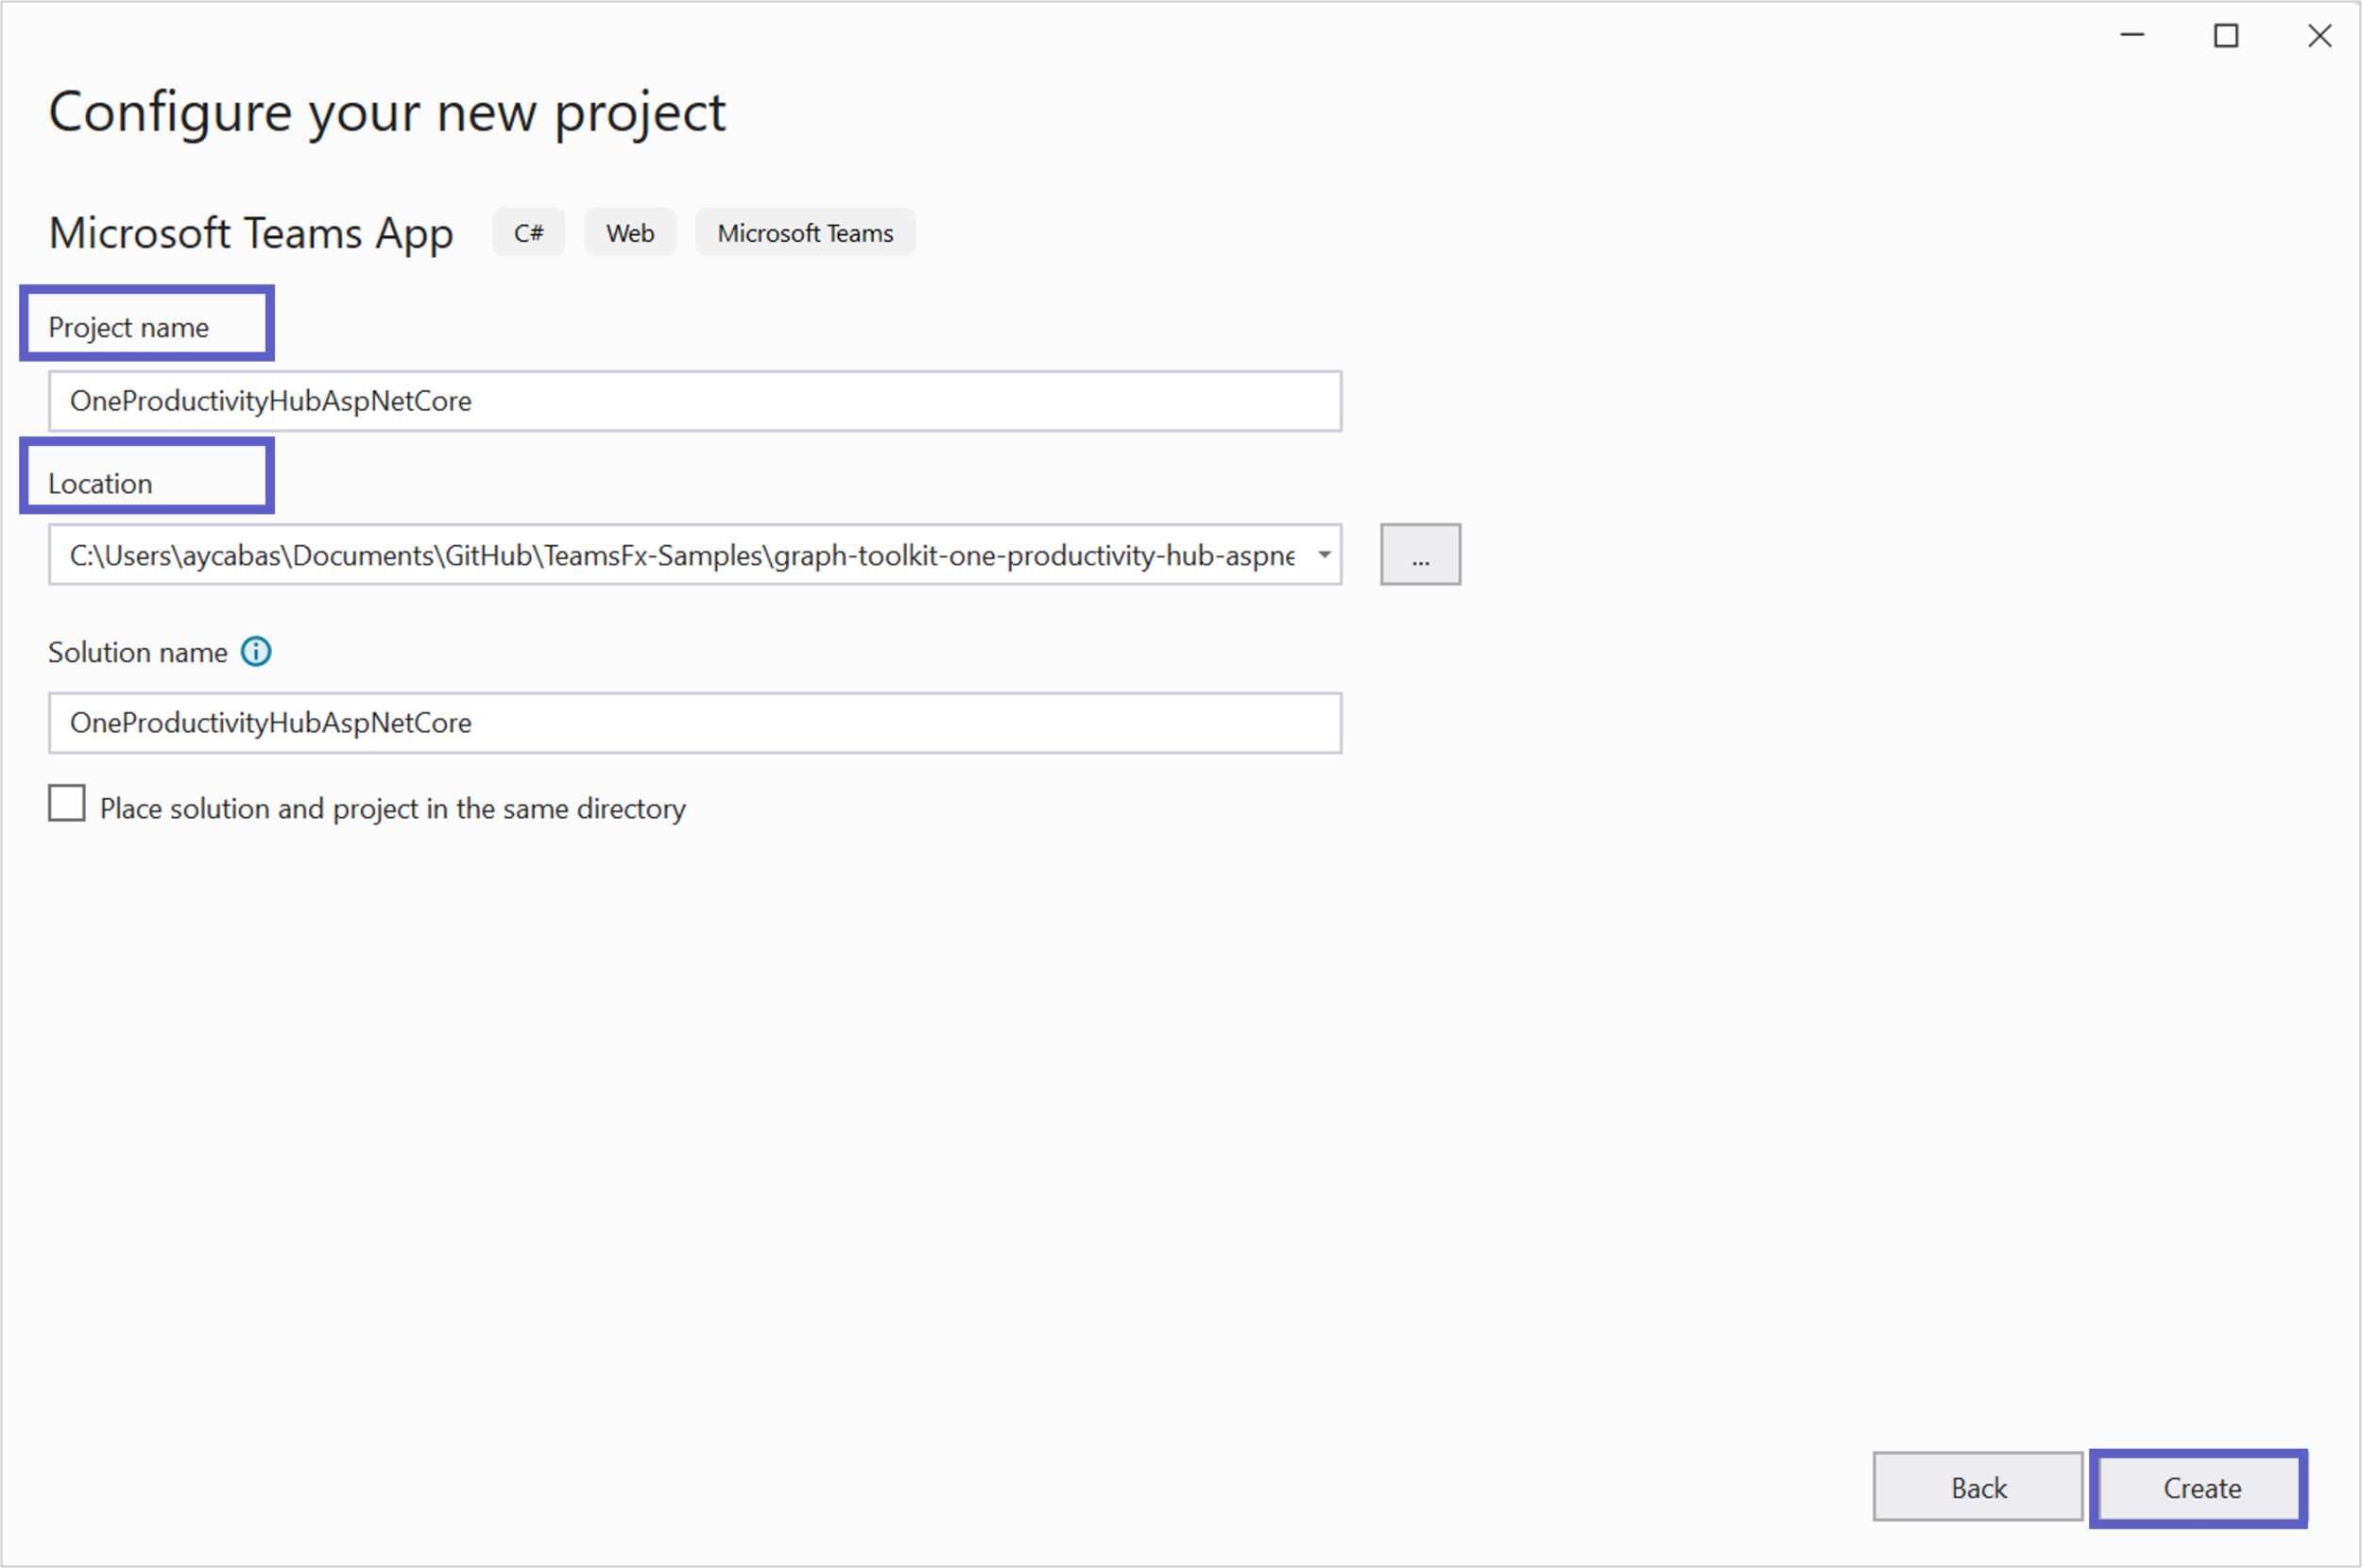
3. Define a project name and select the location you would like to save your project, select Create:
4. Select Tab as an application type and select Create:

5. Once your project is created, Right click to the project, select Teams Toolkit > Prepare Teams App Dependencies and make sure to login with your Microsoft 365 Developer Program.
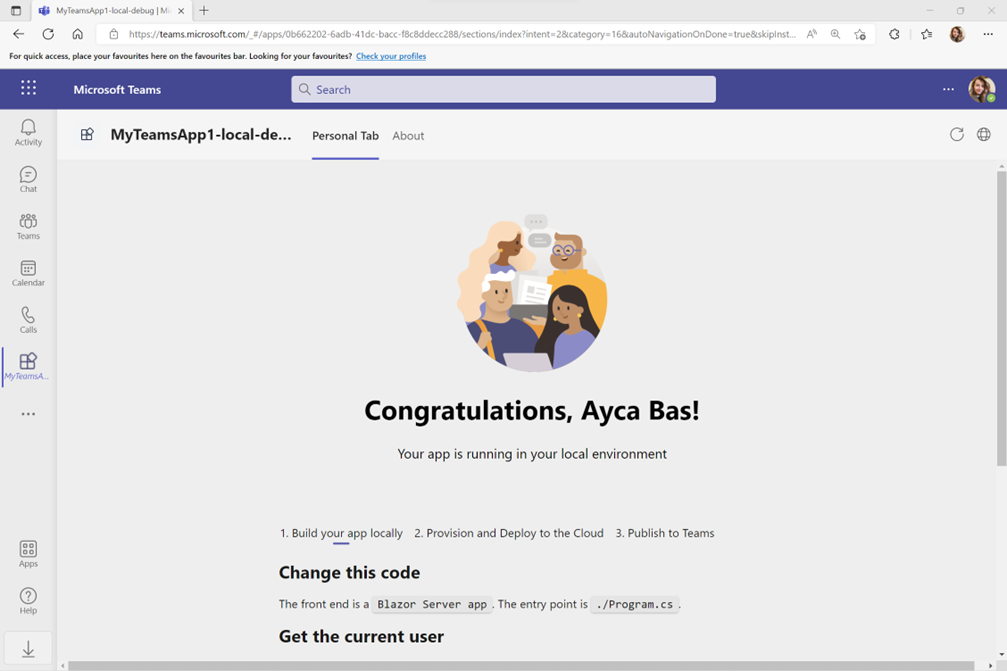
6. To run your app, press F5 key or select the Start Debugging button with Microsoft Teams (browser) on the top bar of Visual Studio.
After your app runs successfully for the first time, it will look like the below. You may realize that authentication and user profile details are already available in your Teams app:
🎨 Enhance your Teams app by accessing calendar events, to-do tasks and file folders
Once your Teams tab is created successfully, the next step is to enhance your tab with Microsoft 365 data, so you can view your calendar events, to-do tasks or file folders from your app. You will leverage from Microsoft Graph Toolkit (MGT) components and provider to design your productivity dashboard.
1️⃣ Use the MSAL2 Provider to enable Single Sign On
To use MGT components in the app, user should authenticate and get a user token for Microsoft Graph. You can avoid signing in twice by leveraging from Single Sign On (SSO) automatically sign in users via the current session. Teams Toolkit for Visual Studio handles Azure Active Directory app registration that will be consumed with MSAL2 Provider to enable SSO:
- In your project, go to Pages > _Host.cshtml and add the following references at the top of the page:
@using Microsoft.Extensions.Configuration
@inject IConfiguration Configuration
- In _Host.cshtml, add the following code snippet inside <body></body>:
<script src="https://unpkg.com/@@microsoft/mgt/dist/bundle/mgt-loader.js"></script>
<script>
        mgt.Providers.globalProvider = new mgt.Msal2Provider({
            clientId: "@Configuration["TeamsFx:Authentication:ClientId"]",
            loginHint: "@User.Claims.FirstOrDefault(c => c.Type == "preferred_username")?.Value",
            redirectUri: "/blank-auth-end.html",
            loginType: mgt.LoginType.Popup,
            authority: "@Configuration["TeamsFx:Authentication:OAuthAuthority"]",
            scopes: ["User.Read", "User.ReadBasic.All", "Calendars.Read", "Files.Read", "Files.Read.All", "Sites.Read.All", "Tasks.Read", "Tasks.ReadWrite", "People.Read"]
        });
</script>
Note: To enable SSO, you need to provide a loginHint (the email for the current signed in user). This will set the provider in SSO mode which will attempt to sign in the user if they are already signed in elsewhere.
- Redirect Uri of the AAD app is defined as blank-auth-end.html for Single Page App, so you need to create an empty redirect page for single sign on process. Right click to wwwroot, select “New item” and create blank-auth-end.html file.
2️⃣ Design your tab with Microsoft Graph Toolkit components
Let’s start building your productivity dashboard with Microsoft Graph Toolkit components and style with CSS:
- In Tab.razor page, add the following code inside <div></div> to initialize the Person component:
<div>
   <mgt-person person-query="me" view="oneline"></mgt-person>
</div>
- To structure your productivity dashboard, add the following code snippet right under the Person component inside <div></div>:
<div class="features"> <div class="header"> <div class="title"> <h2>One Productivity Hub</h2> <div class="row"> <div class="column"><h3>Calendar events</h3></div> <div class="column"><h3>To-do tasks</h3></div> <div class="column"><h3>Files</h3></div> </div> </div> </div> <div class="row" id="content"> <div class="column" id="mgt-col"></div> <div class="column" id="mgt-col"></div> <div class="column" id="mgt-col"></div> </div> </div> - Under div tagged with class=”row”, add the Agenda component inside the first column div:
<mgt-agenda></mgt-agenda> - Under div tagged with class=”row”, add the To-do component inside the second column div:
<mgt-todo></mgt-todo> - Under div tagged with class=”row”, add the File list component inside the third column div:
<mgt-file-list></mgt-file-list> - Inside Tab.razor.css page, remove the existing code and copy the following css to style your app:
body,
#root > div {
	background-color: #F3F2F1;
}
.features {
	min-height: 80vh;
	margin: 20px;
	background-color: #FFF;
	box-shadow: 0px 1.2px 3.6px rgba(0, 0, 0, 0.11), 0px 6.4px 14.4px rgba(0, 0, 0, 0.13);
	border-radius: 4px;
	font-family: 'Segoe UI', Tahoma, Geneva, Verdana, sans-serif;
}
.header {
	display: flex;
	background-color: #f0f0f0;
}
.title {
	margin-top: 20px;
	margin-left: 10px;
	width: 100%;
}
	.title h2 {
		font-size: 24px;
		padding-left: 5px;
		display: inline;
		font-weight: 600;
	}
	.title h3 {
		float: left;
		width: 33%;
		background: transparent;
		font-size: 16px;
		margin-bottom: 10px;
		padding-left: 10px;
		padding-top: 10px;
		color: #8A8886;
		font-weight: 600;
	}
mgt-person {
	margin-top: 20px;
	margin-left: 20px;
	--avatar-size: 60px;
	--font-family: 'Segoe UI';
	--font-size: 20px;
	--font-weight: 700;
	--color: black;
	--text-transform: none;
	--line2-font-size: 14px;
	--line2-font-weight: 400;
	--line2-color: #8A8886;
	--line2-text-transform: none;
}
#content, html, body {
	height: 98%;
}
#mgt-col {
	float: left;
	width: 33%;
	background: transparent;
	height: 60vh;
	overflow: hidden;
	padding: 5px;
	margin-top: 5px;
}
	#mgt-col:hover {
		overflow-y: auto;
	}
3️⃣ Test your app
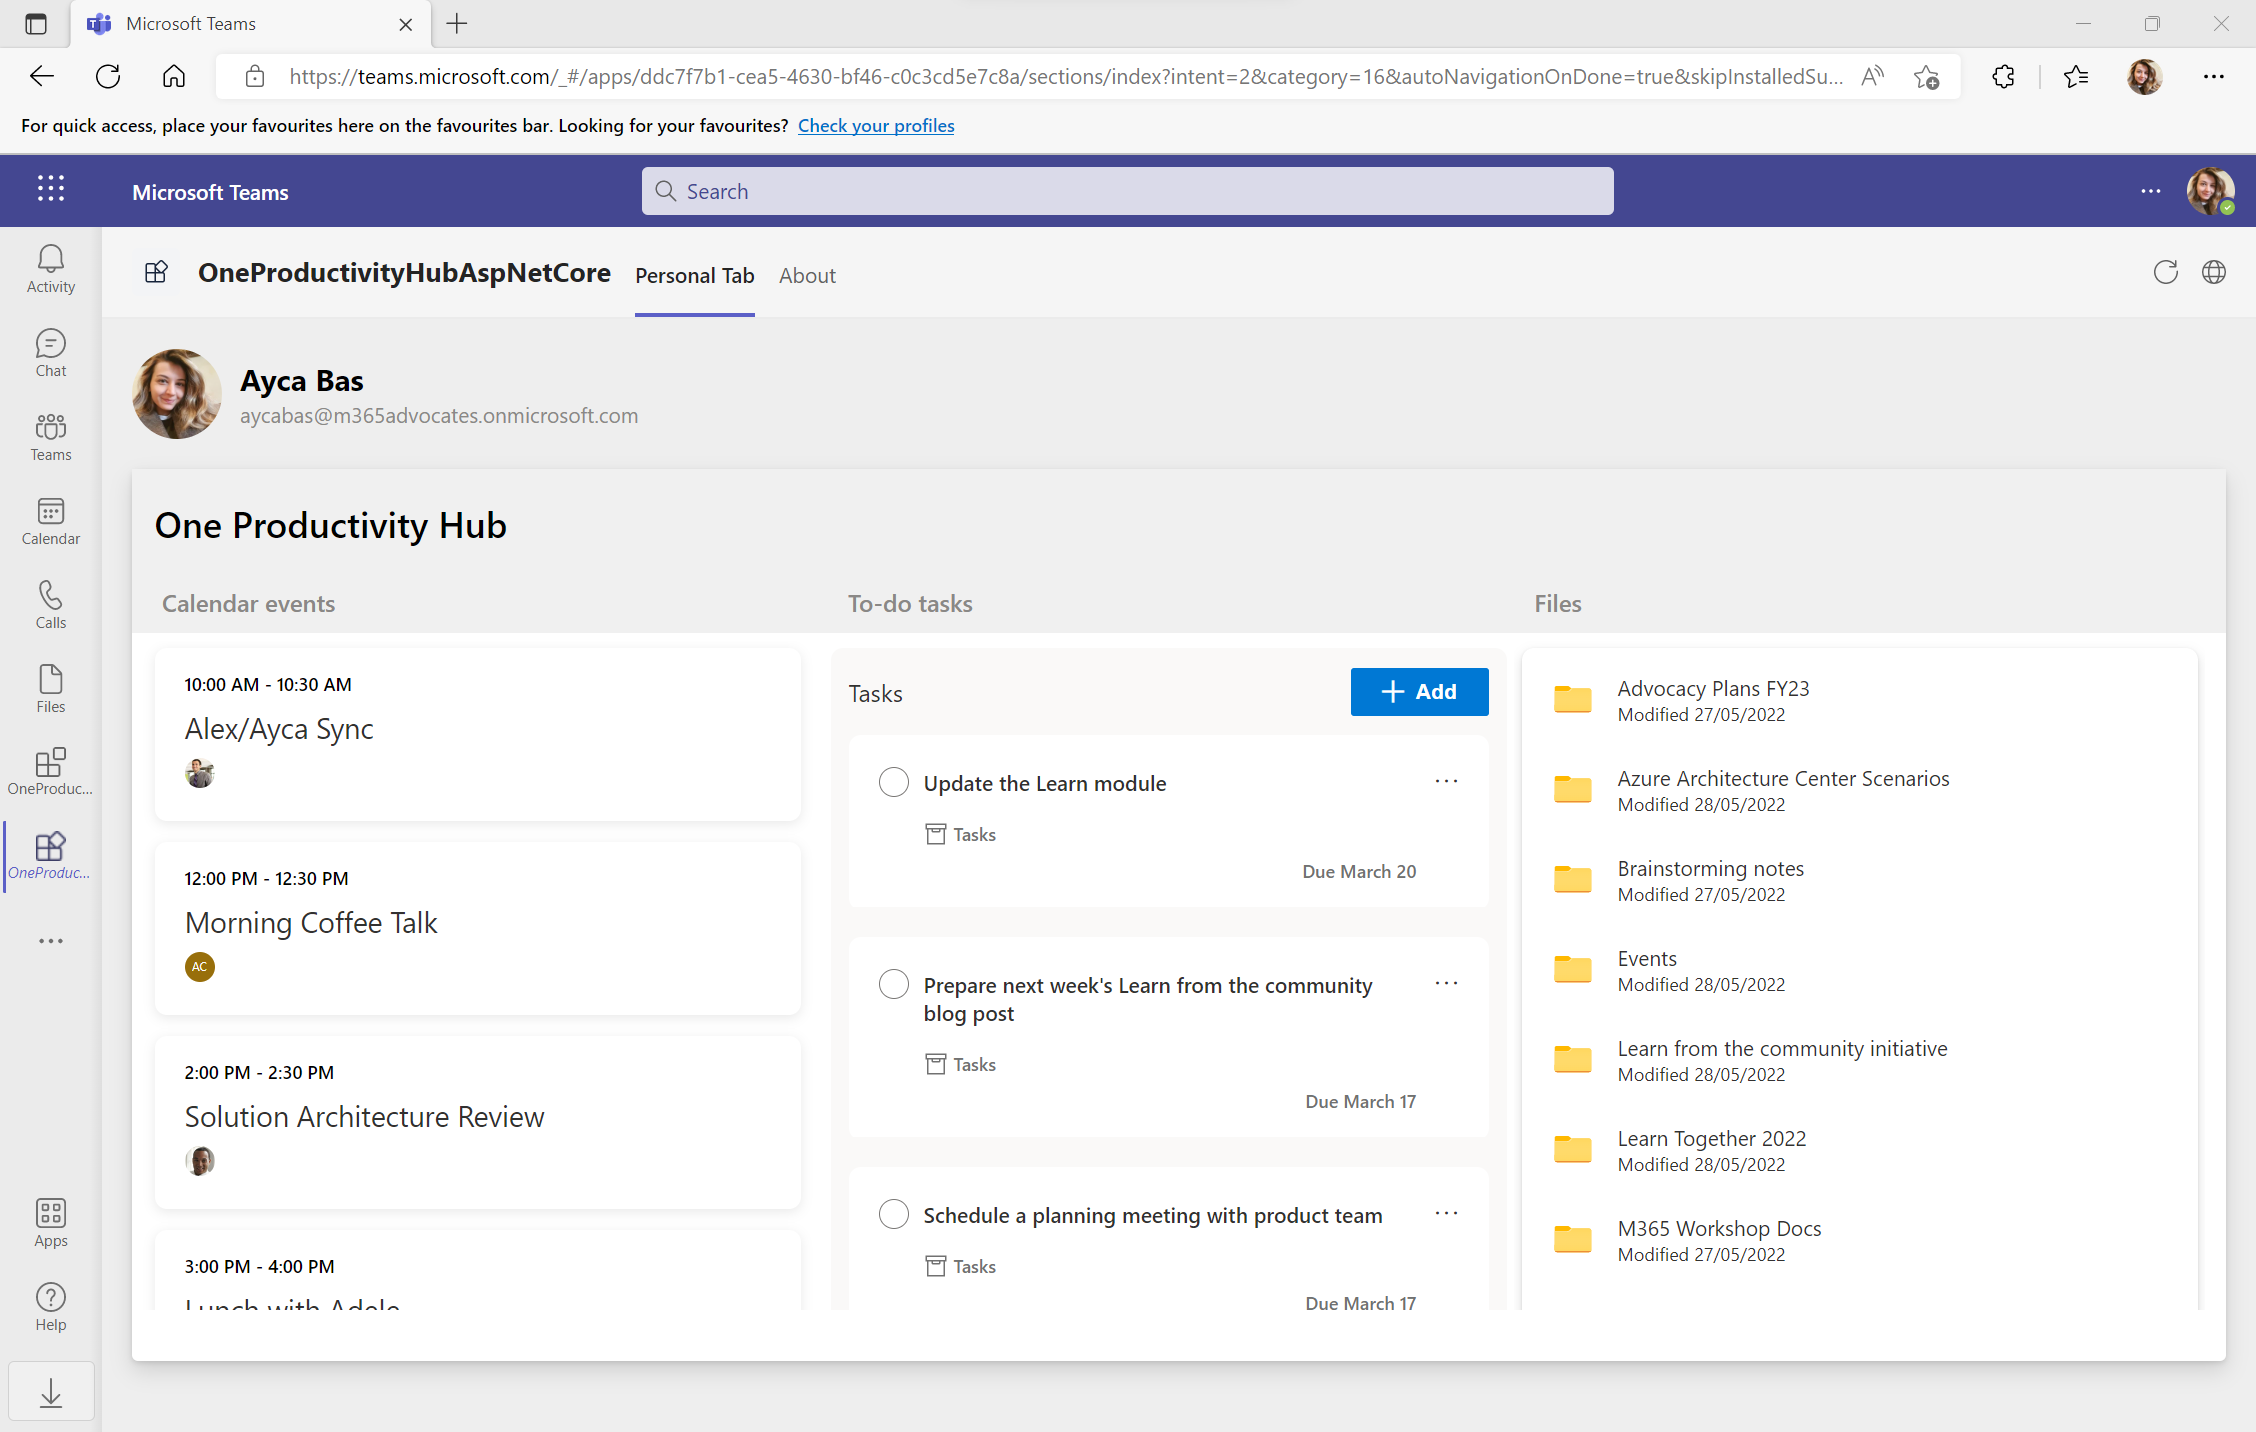
Press F5 or select the Start Debugging button with Microsoft Teams (browser) in the toolbar of Visual Studio to test your app. Your productivity dashboard is ready to use! 🥳 Add some calendar events, to-do tasks and file folders in your Microsoft 365 account to make your productivity dashboard look fabulous! ✨
I hope you enjoyed this tutorial and learning how to build your own productivity dashboard. Source code for this sample is available in the TeamsFX Samples GitHub Repository.
📚 Learn More
- Microsoft Teams Developer Center
- Teams Toolkit Documentation
- Teams Toolkit overview for Visual Studio
- Build your first Teams app using C#
- Microsoft Graph Toolkit Overview
Special thanks to John Miller, Tomomi Imura, Zhidi Shang, Yu Zhang, Renlong Tu, Ning Tang for helping me write this tutorial! 💜
Hello Ayca,
I did enjoy this tut and thanks for sharing it. As I have never used VS before I have a few questions on my dashboard post creation.
Since I had signed in as my Org’s MS365’s credentials it shows the day’s calendar at a glance, the To-Do’s and Files. Do you have another guide on showing all of the To-Do’s as it seems to be only showing the files from my email reminders and not the created lists.
Hello Ayca, Thanks for nice guide. Can I use this Tab application In-Meeting side panel application? If you give the right manifest for it, that will be helpful for me. TIA
Hi Ayca,
As I have mentioned in a message to you on LinkedIn that this blog is either incomplete ot there are some missing steps. I gave a number of hours from my precious time yesterday but, didn't get the MGT components to render on the Teams browser on my local machine.
This is the learning outcome 3 as per this blog "Enhance your Teams app by accessing calendar events, to-do tasks and file folders" which could not be achieved.
When the project failed as above, following the steps in the article and building it on VS 2022(17.3.2) fom scratch, I...
Use the below code in Tab.razor it will work for you
Hi Kaushik, can you please try using Login component instead of Person component. That should work with the rest of the solution, please update the Tab.razor with the login component and remove the Person component.
What a cool practical guide, I will share this in other language.