
Author: Cameron Dwyer, Microsoft Office Development MVP
camerondwyer.com | @camerondwyer | LinkedIn
Introduction
Welcome to Day 14 of the Microsoft Graph Toolkit blog series!
In the series so far, we have exercised the Microsoft Graph Toolkit capabilities using plain JavaScript/HTML/CSS which has shown that we are not dependent upon any specific JavaScript framework. In a real-world application however, you may be using a full–featured JavaScript framework such as React or Angular. In the previous article Fabio Franzini took us through using the Microsoft Graph Toolkit in a React application. Today I’m going to take you through constructing the same example using Angular.
Creating a web app using the Angular CLI
One of the great benefits of using a JavaScript framework like Angular is that you can scaffold a new application very quickly. This scaffolding includes not only the source code for a default app, but also an entire development, testing, and packaging toolchain. We make use of the Angular CLI to scaffold up our new application. If you have never used the Angular CLI before you can install it by executing the following command.
npm install -g @angular/cli
Angular CLI commands begin with ng, and we can create a new application with the command
ng new demo-mgt-angular

Opening the resulting folder in VS Code will reveal the default Angular project. The README.MD file provides instructions on how to work with this default project. To build and debug our new app locally, we can use the following command
ng serve
This will host the app on a local dev server at http://localhost:4200, when opened in a browser we are presented with the default Angular CLI app.

Adding the Microsoft Graph Toolkit
Time to make some changes to this default app and bring in the Microsoft Graph Toolkit. First, we need to allow Angular to use web components by adding the CUSTOM_ELEMENTS_SCHEMA to the app module. This is because the element names used by the web components are not the standard HTML element names and TypeScript will not be able to validate them.

Next, we need to get the Microsoft Graph Toolkit NPM package and add it to our app.
npm install @microsoft/mgt –save
The first component we will add is the MsalProvider since it is fundamental to enable the other toolkit components to function. We import Providers and MsalProvider, then when our app initializes set the MsalProvider in code, using the client id of our Azure App Registration (creation of App Registration is covered in Day 2 of this series).

Adding the mgt-login component to the navigation bar
Let’s create the Angular NavBar component that will sit along the top of our app and contain the mgt-login component. We can create the NavBar component using the Angular CLI
ng generate component NavBar
Replace the default app component HTML template to just show the NavBar component

Now we can simply add the mgt-login web component to the NavBar HTML template.

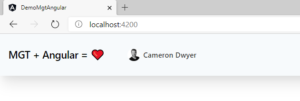
At this stage we have successfully integrated the Graph Toolkit into our Angular app and the mgt-login component is fully functional.
Adding the mgt-agenda component
Now let’s create a new Angular component called AngularAgenda using the CLI and bring the mgt-agenda component into it.
ng generate component AngularAgenda
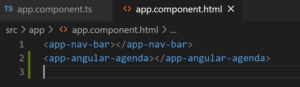
Then add AngularAgenda to our app component HTML template
Now we can simply add the mgt-agenda web component to the AngularAgenda HTML template

This is enough to have a fully functional mgt-agenda displayed for the current user

Implementing a custom template for mgt-agenda
Let’s take this a step further and see how we can provide a custom template for rendering each of the agenda items.
If we look at the documentation for the Microsoft Graph Toolkit and custom templating we discover that the syntax for referring to the property data for each of the returned items is to use double braces as shown below.
This conflicts with Angular as double braces is the exact syntax that Angular databinding uses! The Angular compiler will not be happy.

Luckily, the Graph Toolkit is flexible with its syntax and we can change the characters it uses for binding using the TemplateHelper.
We will do this once in our top-level App component so that it applies globally.

Now we can use our custom binding syntax to avoid the conflict and Angular is happy again.

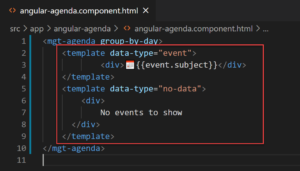
We will implement the same custom template as used in the React sample (taken from the post: A Lap around Microsoft Graph Toolkit Day 5 – Customizing Components using Templates)
Firstly we will specify the custom template, using data-props and data-if attributes to bind to mgt-agenda event data. You’ll also notice we are calling custom methods (openWebLink, getTime, getDate) within the custom template. We need to define those methods and make them available to the mgt-agenda component, to do this we will need to get a handle directly on the instance of the mgt-agenda element after it is created in the DOM. Using the #myagenda template reference variable will allow us to easily make that connection.

In our code for the AngularAgenda component we can now use the @ViewChild property decorator to return a handle on the mgt-agenda element after it has been created in the DOM and add our custom methods to the template context (agendaElement.nativeElement.templateContext). Note we must specify the @ViewChild metadata property static with value true to make Angular return the handle to #myagenda in the ngOnInit lifecycle hook (by default it is not available until ngAfterViewInit which is too late to apply the templateContext).

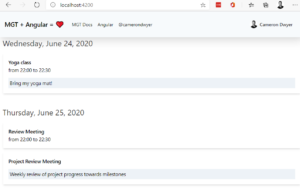
With a little bit of styling added our demo app is now complete!
The source code for this Angular sample is available in GitHub.
To Summarize
We have seen how we can take our learnings so far in this series with the Microsoft Graph Toolkit and then apply it to a real-world Angular application by:
- Creating an Angular application using the Angular CLI
- Adding the Microsoft Graph Toolkit NPM package
- Configuring the MsalProvider
- Using mgt-login and mgt-agenda web component within Angular components
- Specifying custom templates for the mgt-agenda component including property and event binding
We have almost completed our lap, and as we round the final bend, I hope you have progressed with us from zero to hero️. Stay tuned for our final article as we wrap it all up!
0 comments