

Introduction
Every successful AI search begins with one core requirement – searchable data. For most businesses, especially when implementing AI search on a customer’s knowledge base, the challenge starts with data migration or data ingestion into the search service.
In this article we will show efficient alternatives for ingesting data into Azure AI Search. Specifically, we’ll compare two popular approaches:
- Using Azure Functions a more independent, flexible option.
- Leveraging Pre-built Indexers as part of AI Search.
We will walk through the first approach in details. By the end of this guide, you’ll have a clear understanding of when to use Azure Functions and how to implement a scalable ingestion pipeline.
Key Steps in the Data Ingestion Process
Before diving into the comparison, let’s outline the essential steps involved in setting up a successful ingestion pipeline:
- Set Up Azure Blob Storage: Configure a storage account and container to hold the data.
- Prepare the Data: Ensure your data is clean, consistent and ready for ingestion.
- Describe the File Structure: Common formats include JSON, CSV, PDF, or plain text.
- Set Up Azure AI Search: Create and configure your Azure AI (Cognitive) Search service.
- Create an Ingestion Mechanism: You can implement this using Azure Functions or a pre-built Indexer.
Pros and Cons: Azure Functions vs. Pre-Built Indexers
Let’s compare the two options based on flexibility, ease of use, scalability, and maintenance:
| Criteria | Azure Functions | Pre-Built Indexers (Azure AI Search) |
|---|---|---|
| Flexibility | Highly flexible, allowing custom logic and advanced workflows. | Limited flexibility with predefined workflows and configurations. |
| Control | Full control over data transformation, validation, and ingestion processes. | Less control as it handles data ingestion out-of-the-box with minimal customization. |
| Scalability | Easily scalable through Azure Function configurations. | Scalable, but customization is limited for large, complex data sets. |
| Ease of Use | Requires setup and custom coding (e.g., Python, C#). | Easier to set up; less coding required. |
| Monitoring | Custom monitoring setup required. | Built-in monitoring options available. |
| Cost | Pay-as-you-go model, with charges based on Function executions. | Typically more cost-efficient with built-in capabilities for basic scenarios. |
| Maintenance | Requires ongoing maintenance of custom code. | Less maintenance due to managed services. |
| Search Engine Agnostic | Functions allow you to keep flexibility if you’re unsure whether to use Azure AI Search alone or in combination with other search engines. | Indexers are tightly coupled with Azure AI Search, limiting cross-platform usage. |
For those looking to get started with Indexers, you can find a comprehensive guide here: https://learn.microsoft.com/en-us/azure/search/search-indexer-overview
Deep Dive with Azure Function Approach
Overview
Azure Functions provide a more powerful and customizable alternative in comparison to pre-built Indexers. With Azure Functions, you can control how data is processed, apply custom logic, and ensure that the ingestion meets your specific needs. It is easier to integrate any specific log/data analytics tools in comparison to pre-build indexers.
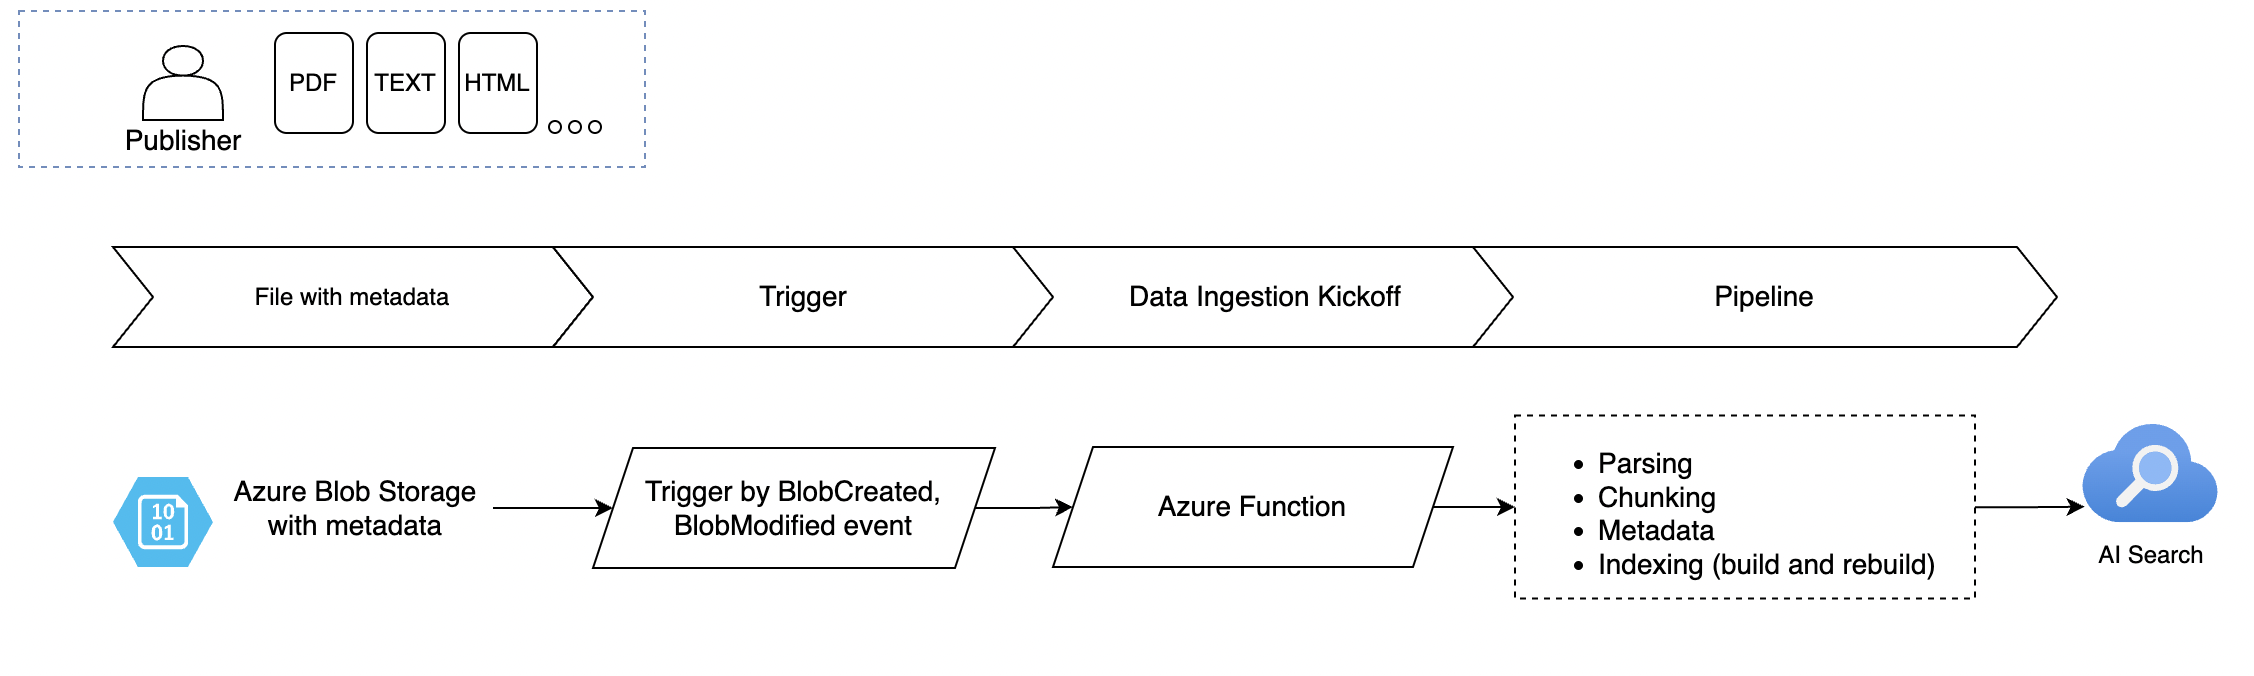
Architecture
- Azure Blob Storage: Stores the data (e.g., PDFs).
- Azure Function: Acts as a trigger(add new/ or change file, metadata change) that processes the data and sends it to Azure AI Search.
- Azure AI Search: Indexes the processed data, making it searchable.
This architecture offers flexibility and scalability, especially when dealing with complex data structures or custom ingestion logic.
Data Ingestion Pipeline
Let’s build a data ingestion pipeline using Azure Functions. For this example, we’ll demonstrate ingesting PDF documents from Azure Blob Storage into Azure AI Search using Python.
Prepare folder structure
Here’s a breakdown of the folder structure for your Azure Function setup:
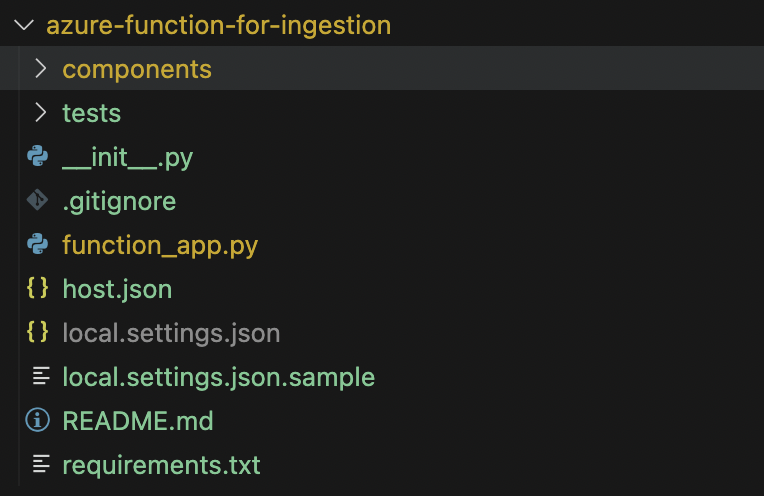
components/: This folder contains all ingestion-related components, such as modules or classes, that your Azure Function will use.function_app.py: This is the main entry point for the Azure Function. It contains the logic that triggers the ingestion process and orchestrates data flow from Blob Storage to Azure AI Search.host.json: This file defines the configuration settings for the Azure Function. You can customize it based on your business requirements.watchDirectories: Specifies which directories should be monitored for changes (in this case, thecomponentsfolder).logLevel: Defines the logging level, so you can control the verbosity of logs. Here, all logs are set toInformationlevel, except forAzure.Core, which is set toError.applicationInsights: Enables logging for Application Insights, with sampling settings to exclude certain log types.extensionBundle: Configures the extension bundle for the Azure Function runtime.
Here’s a sample configuration:
{ "version": "2.0", "watchDirectories": [ "components" ], "logging": { "logLevel": { "default": "Information", "Azure.Core": "Error" }, "applicationInsights": { "samplingSettings": { "isEnabled": true, "excludedTypes": "Request" } } }, "extensionBundle": { "id": "Microsoft.Azure.Functions.ExtensionBundle", "version": "[4.*, 5.0.0)" } }tests/: This folder contains automated tests for your function, ensuring that your ingestion logic works as expected.requirements.txt: Lists all the dependencies (e.g., libraries and packages) required by the Azure Function. The function runtime uses this file to install the necessary dependencies during deployment.
Required Environment Variables Setup
To ensure your ingestion pipeline functions properly, you need to configure several environment variables both locally (in a .env file) and in the cloud (for the Azure Function). These variables provide access to essential services like Azure Blob Storage and Azure AI Search.
The following environment variables are required:
APPLICATION_INSIGHTS_CONNECTION_STRING: Connection string for sending telemetry data to Application Insights.AZURE_STORAGE_CONNECTION_STRING: Connection string to access Azure Blob Storage.AZURE_SEARCH_SERVICE_NAME: The name of the Azure AI Search service.AZURE_SEARCH_ADMIN_KEY: Admin key for managing the Azure Search service.AZURE_SEARCH_SERVICE_ENDPOINT: The endpoint URL of the Azure AI Search service.AZURE_SEARCH_INDEX_NAME: The name of the search index where the data will be ingested.BLOB_STORAGE_DATA_CONNECTION_STRING: Connection string to the Azure Blob Storage that contains the data to be ingested.BLOB_STORAGE_DATA_CONTAINER_NAME: The name of the Blob Storage container where the documents (e.g., PDFs) are stored.AZURE_OPENAI_API_VERSION: The version of the Azure OpenAI API being used.AZURE_OPENAI_ENDPOINT: The endpoint URL for the Azure OpenAI service.AZURE_OPENAI_KEY: The API key for accessing the Azure OpenAI service.
These environment variables will be accessed within the Azure Function to automate the connection and interaction with the respective services.
Step-by-Step Guide to Azure Function Implementation
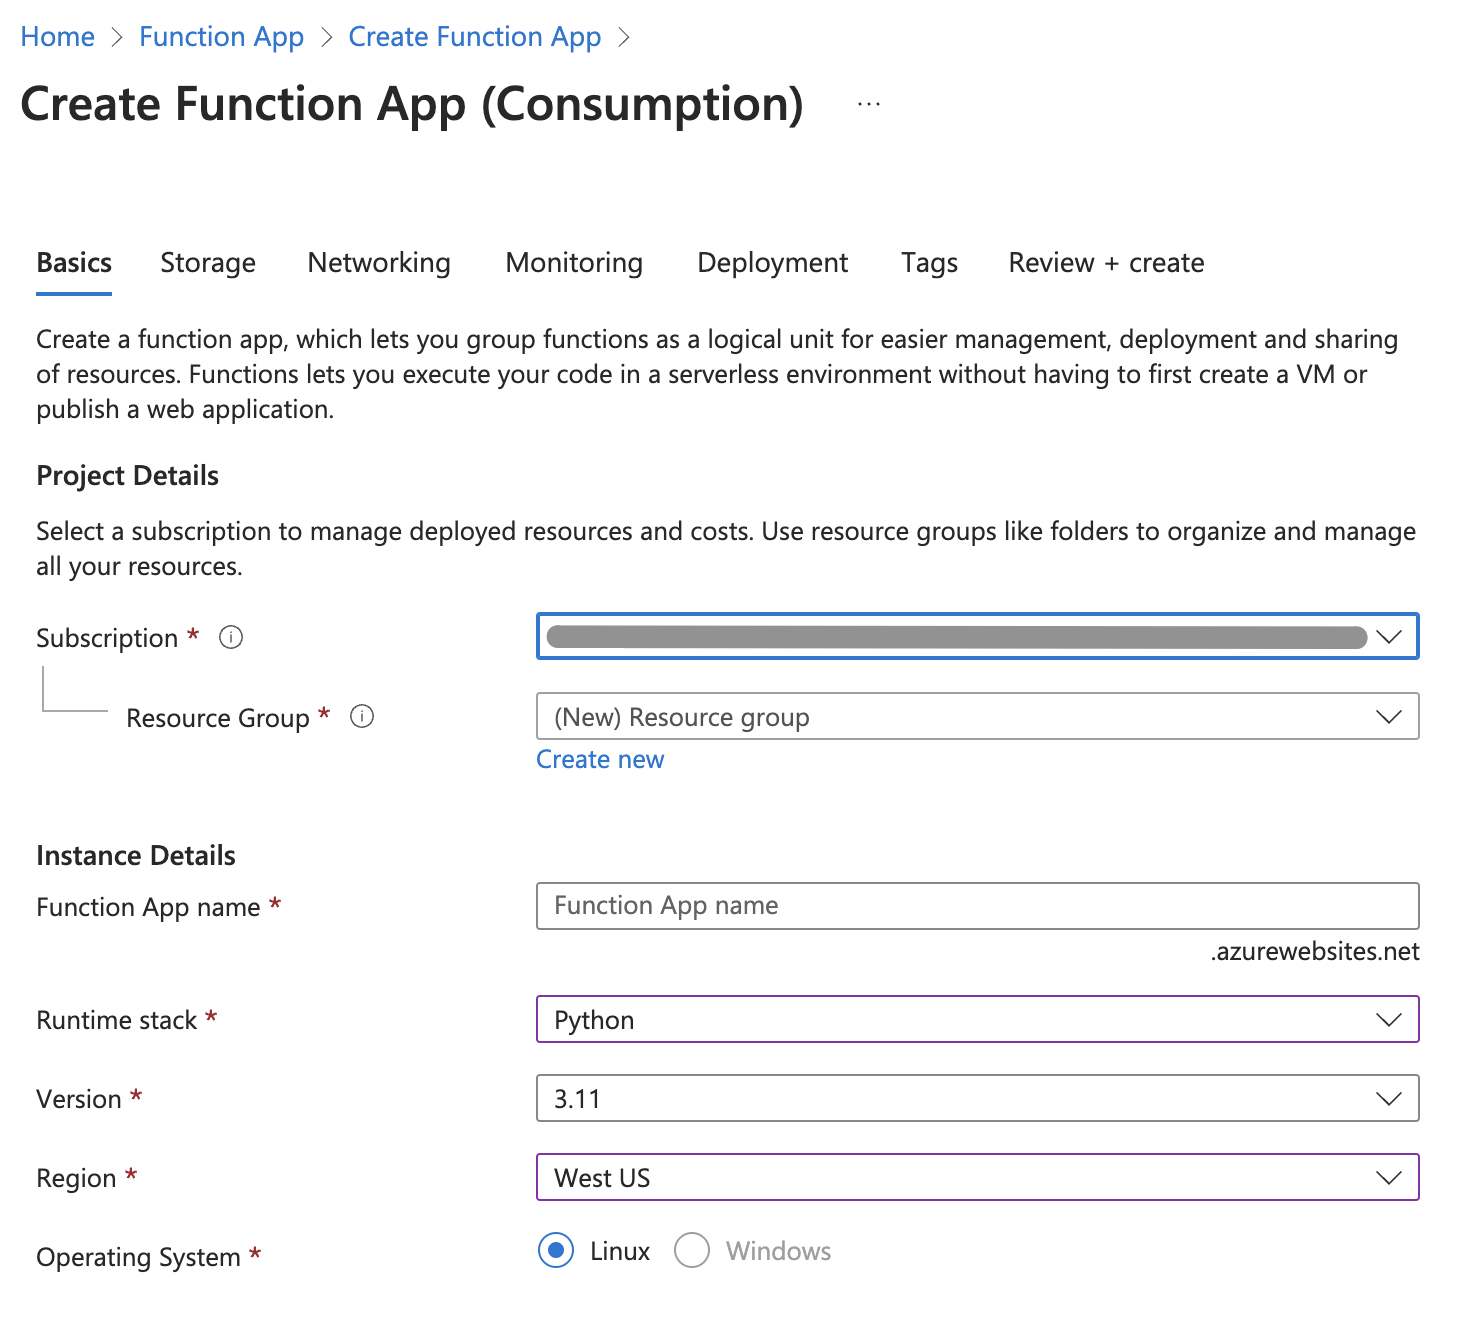
Step 1: Setting Up the Azure Function in Azure Cloud
Step 2: Define the Context for Your Function App
At this stage, we created an independent PDFIngestionsService, which serves as a dedicated service for handling PDF ingestion. This modular approach allows for easy future extension to support other file types, such as text, Excel, HTML, and more.
By structuring the service in this way, you can easily add additional ingestion logic for other formats, ensuring flexibility and scalability in your data ingestion pipeline.
    import logging
    import os
    import pathlib

    import azure.functions as func

    DOCUMENT_CONTAINER_NAME = os.environ["BLOB_STORAGE_CONTAINER_NAME"]
    app = func.FunctionApp()

    @app.blob_trigger(arg_name="blob", path=f"{DOCUMENT_CONTAINER_NAME}", connection="BLOB_STORAGE_DOCS_CONNECTION_STRING")
    async def handle_blob_change_function(blob: func.InputStream):
        # Load our code during execution to prevent host startup failures
        from components import logging
        from components.ingest_service import PDFIngestionsService

        configure_logging()
        logger = logging.getLogger(__name__)
        data_file_name = blob.name.lower()
        ingestion_service = None

        try:
            # Determine the file type and select the appropriate ingestion service
            file_extension = pathlib.Path(data_file_name).suffix[1:].lower()
            if file_extension in ["pdf"]:
                ingestion_service = PDFIngestionsService()
            else:
                raise ValueError("Unsupported file type")

            # Ingest the blob using the selected service
            if ingestion_service:
                await ingestion_service.ingest(blob)

        except Exception as e:
            logger.exception(f"An error occurred while processing data {data_file_name}: {e}")
            raise
Step 3: Create a Helper for Setting Up Application Insights Logging
To ensure proper logging and monitoring within your Azure Function app, we created a helper script that configures logging and integrates with Azure Application Insights. This allows you to capture logs, errors, and telemetry data in Application Insights for better observability and troubleshooting.
Suggested path: ./components/logging.py
    import logging
    import os
    from opencensus.ext.azure.log_exporter import AzureLogHandler

    def configure_logging():
        # Configure the logger
        LOG_LEVEL = os.getenv("LOG_LEVEL", "INFO").upper()
        LOG_FORMAT = os.getenv("LOG_FORMAT", "%(asctime)s - %(name)s - %(levelname)s - %(message)s")
        logging.basicConfig(level=LOG_LEVEL, format=LOG_FORMAT)

        # Silence noisy loggers
        logging.getLogger("azure.core.pipeline.policies.http_logging_policy").setLevel(logging.WARNING)
        logging.getLogger("httpx").setLevel(logging.WARNING)

        # Add Azure Application Insights handler to root logger
        root_logger = logging.getLogger()
        appinsights_connection_string = os.getenv("APPLICATION_INSIGHTS_CONNECTION_STRING")
        if appinsights_connection_string and not any(isinstance(handler, AzureLogHandler) for handler in root_logger.handlers):
            azure_handler = AzureLogHandler(connection_string=appinsights_connection_string)
            root_logger.addHandler(azure_handler)
Step 4: Configure Your File Ingestion Service Interface and Its Implementation
Now is the ideal time to set up the interface for your file ingestion service and implement it. This will allow you to streamline how different file types are processed, starting with PDFs, but leaving room for future extensions (e.g., text, Excel, HTML).
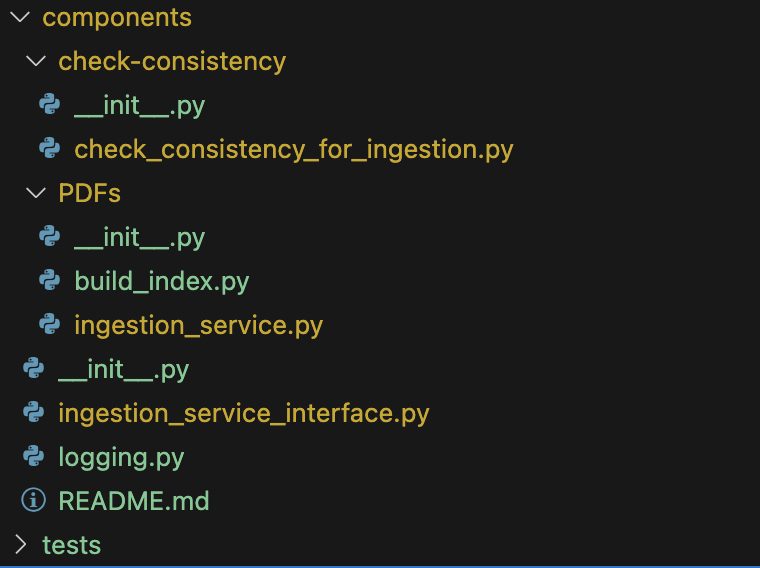
Suggested folder structure for components and PDF ingestion service:
Ingestion service interface (ingestion_service_interface.py):
In this interface, we define the base structure for any ingestion service, enabling flexibility for handling different file types. The FileProcessor class is also defined to process file streams and handle temporary file storage.
import io
import logging
import os
import tempfile
from abc import ABC, abstractmethod

import azure.functions as func

class IngestionServiceInterface(ABC):
    @abstractmethod
    async def ingest(blob: func.InputStream):
        pass

class FileProcessor(ABC):
    async def process_stream(self, blob: func.InputStream) -> str:
        """
        Process a file stream by saving it to a temporary file and returning the file path.
        """
        logger = logging.getLogger(__name__)

        try:
            # Extract the original filename from the blob metadata
            original_filename = os.path.basename(blob.name)
            input_stream = io.BytesIO(blob.read())

            # Read data from the stream
            file_data = input_stream.read()

            # Create a temporary file with the original filename and write the data to it
            temp_dir = tempfile.gettempdir()
            temporary_file_path = os.path.join(temp_dir, original_filename)

            with open(temporary_file_path, "wb") as temporary_file:
                temporary_file.write(file_data)

            # Return the path to the temporary file
            return temporary_file_path
        except Exception as error:
            logger.error(f"An error occurred in process_stream: {str(error)}", exc_info=True)
            raise

    @abstractmethod
    async def process_file(self, *, file_path: str, index_name: str):
        """
        Process a file path by passing it to process_input.
        """
passIngestionServiceInterface: Defines an abstract interface that any ingestion service (e.g., PDF, Excel) must implement. This provides flexibility for adding new file types in the future.
FileProcessor: Provides methods for processing file streams and saving them to a temporary directory. It also abstracts away the logic for file path handling, which will be reused in different implementations.
PDF ingestion service (./components/PDFs/ingest_service.py):
This is a concrete implementation of the IngestionServiceInterface for processing PDF files. It uses the PDFFileProcessor to handle the file processing and ingestion.
Step 5: Next Steps: Logging and Local Deployment
import logging

import azure.functions as func
from components.ingestion_service_interface import IngestionServiceInterface
from components.PDF.build_pdf_index import PDFFileProcessor

logger = logging.getLogger(__name__)

class PDFIngestionsService(IngestionServiceInterface):
    async def ingest(self, myblob: func.InputStream):
        blob_name = myblob.name.lower()

        try:
            # Process the blob stream
            await self.process_blob(myblob)
        except Exception as e:
            logger.error(f"Error ingesting PDF file '{blob_name}': {e}", exc_info=True)
            raise

    async def process_blob(self, blob: func.InputStream):
        fileProcessor = PDFFileProcessor()

        try:
            file_path = await fileProcessor.process_stream(blob)
            await fileProcessor.process_file(file_path=file_path, index_name="ada002-sample-index")
        except Exception as e:
            logger.error(f"Error during data file processing: {e}", exc_info=True)
raisePDFIngestionsService: This class implements the IngestionServiceInterface for PDF files. It handles blob ingestion and error logging.
process_blob: This method calls the PDFFileProcessor to process the file stream and then processes the file using a specified index in Azure AI Search.
At this point, the main focus is setting up logging capabilities within the process_blob() method. This ensures that errors are properly logged during ingestion, making it easier to debug issues during file processing.
To deploy, you can use the VSCode Azure Functions plugin to deploy the function from your local machine. This plugin provides a simple interface for deploying directly to Azure without needing additional scripts. Follow these steps:
- Install the Azure Functions Extension for VSCode.
- Open the project in VSCode and click on the Azure Functions icon in the sidebar.
- Log in to your Azure account if needed.
- Right-click on your Azure Function in the Functions Explorer and select Deploy to Function App.
- Choose your subscription and an existing or new function app for deployment.
Once deployed, you can monitor the logs via Azure Portal or within VSCode’s Output window to ensure the function behaves as expected.
An automated deployment script will be provided later in this guide to streamline the deployment process for CI/CD pipelines.
Step 6: Deployment to Cloud
There are many ways to automate the deployment of your Azure Function app, and in this article, I’ll demonstrate a sample deployment process using GitHub Actions.
GitHub Actions allows you to automate the deployment pipeline, ensuring your Azure Function app is continuously delivered to the cloud whenever changes are made.
Below is a sample GitHub Actions workflow for deploying your function app:
# Documentation for the Azure Web Apps Deploy action: https://github.com/azure/functions-action
# Continuous delivery using GitHub Actions: https://learn.microsoft.com/en-us/azure/azure-functions/functions-how-to-github-actions?tabs=linux%2Cpython&pivots=method-manual

name: Deploy document blob trigger

on:
  workflow_dispatch: # Allows triggering the workflow manually

env:
  PYTHON_VERSION: "3.11" # Set the Python version for the function app
  FUNCTION_APP_DIR: "data-ingestion-function" # Directory where the function app is located
  FUNCTION_ZIP_NAME: "data-ingestion-function.zip" # Name of the zip package for deployment

jobs:
  deploy:
    runs-on: ubuntu-latest

    steps:
      - name: Checkout repository
        uses: actions/checkout@v4

      - name: Setup Python ${{ env.PYTHON_VERSION }} environment
        uses: actions/setup-python@v5
        with:
          python-version: ${{ env.PYTHON_VERSION }}

      - name: Install project dependencies
        working-directory: ./${{ env.FUNCTION_APP_DIR }}
        run: |
          python -m pip install --upgrade pip
          pip install -r requirements.txt --target=".python_packages/lib/site-packages"

      - name: Az CLI login
        uses: azure/login@v2
        with:
          creds: ${{ secrets.AZURE_CREDENTIALS }}

      # Make environment variables dynamically or statically (Skipped in this example)
      # INTENTIONALLY SKIPPED STEP

      - name: AzFunctions deployment
        uses: Azure/functions-action@v1
        with:
          app-name: ${{ env.FUNCTION_APP_DIR }} # Azure Function App name
          package: ${{ env.FUNCTION_APP_DIR }} # Directory containing the function code
          scm-do-build-during-deployment: true # Enable build on deployment
          enable-oryx-build: true # Enable Oryx build engine for deployment

      - name: Set function configuration
        run: |
          az functionapp config appsettings set \
            --name "${{ env.FUNCTION_APP_DIR }}" \
            --resource-group "SOME_RESOURCE_GROUP" \
            --settings \
              "APPLICATION_INSIGHTS_CONNECTION_STRING=SOME" \
              "AZURE_OPENAI_API_VERSION=SOME" \
              "AZURE_OPENAI_ENDPOINT=SOME" \
              "AZURE_OPENAI_KEY=SOME" \
              "AZURE_SEARCH_ADMIN_KEY=SOME" \
              "AZURE_SEARCH_SERVICE_ENDPOINT=SOME" \
              "BLOB_STORAGE_DOCS_CONNECTION_STRING=SOME" \
"BLOB_STORAGE_DATA_CONTAINER_NAME=SOME"- Checkout the repository: The workflow starts by checking out the repository to access the code.
- Set up Python: The specified Python version (
3.11in this case) is set up usingsetup-python. - Install project dependencies: The workflow installs the required dependencies listed in the
requirements.txtfile into a.python_packagesdirectory to be packaged with the function. - Login to Azure CLI: The
azure/login@v2action logs in to Azure using credentials stored in GitHub secrets (AZURE_CREDENTIALS). - Azure Functions deployment: The
Azure/functions-action@v1action deploys the function app to Azure. The workflow enables build during deployment by settingscm-do-build-during-deploymenttotrue. - Set environment variables: The workflow configures environment variables for the function app using
az functionapp config appsettings set.
You can manage the environment variables either dynamically or statically, so this part was skipped:
- Dynamic setup: Use Azure Key Vault to securely pull secrets at runtime.
- Static setup: Set the environment variables manually within the workflow.
For simplicity, this example skips the environment setup step. You can choose the method that best fits your workflow.
An actual deployment for this workflow will:
- Set up the Python environment.
- Install dependencies.
- Deploy the function app.
- Configure the function app’s environment settings.
With this setup, your Azure Function will be automatically deployed whenever you manually trigger the workflow or add it to trigger on code pushes to the repository.
Step 7: Verify Your Deployed Azure Function
Now that your Azure Function is deployed, it’s time to test it to ensure everything is working correctly.
- Upload a Test PDF: Upload a PDF file into the configured Azure Blob Storage container. This should trigger the Azure Function if everything is set up correctly.
- Check Function Logs
- Navigate to the Azure Portal.
- Open your Function App and go to the Logs tab under the Monitoring section.
- Monitor the logs to verify that the function has been triggered and processed the PDF successfully.
- Troubleshooting:
- If you don’t see any logs or if the function isn’t triggered, it might indicate an issue with the deployment or configuration.
- Double-check your deployed files, environment variables, and ensure that the correct blob storage connection string is set.
- You can also use Application Insights (if configured) to further analyze any errors or performance issues.
Testing your function with a real PDF upload ensures that the entire pipeline—from blob storage ingestion to logging—functions as expected.
Step 8: Building the Index
To enable full-text search on the ingested PDF documents, you’ll need to build an index in Azure AI Search. The index defines the structure and schema of the data, making it searchable. This is a critical step in enabling efficient searches through the content of your documents.
We recommend using Azure Document Intelligence (formerly known as Form Recognizer) to extract and structure the content of your PDF documents, such as the title, author, and text content. Document Intelligence can parse complex document layouts, allowing you to extract key-value pairs, tables, and paragraphs for indexing.
Here’s a sample index structure for PDF documents, which can be customized based on the specific fields you want to extract:
- Id: A unique identifier for each document (used as a primary key).
- Title:
Edm.String– The title of the document. - Author:
Edm.String– The author of the document. - Content:
Edm.String– The main searchable text content of the document. - File Size:
Edm.Int64– The size of the file, useful for filtering or sorting large documents.
Here’s a code sample for the ./components/PDFs/build_index.py file, which defines the index structure for your Azure AI Search service:
import asyncio
import base64
import logging
import os
from dataclasses import asdict, dataclass
from typing import List

from azure.core.credentials import AzureKeyCredential
from azure.search.documents.aio import SearchClient as AsyncSearchClient
from azure.search.documents.indexes import SearchIndexClient
from azure.search.documents.indexes.models import (
    SearchIndex,
    SearchableField,
    VectorSearchProfile,
    SearchFieldDataType,
    SimpleField
)

import pymupdf
from components.logging import configure_logging
from components.ingestion_service_interface import FileProcessor

# Configure logging
logger = logging.getLogger(__name__)

# Define constants for sleep times
CHUNK_SLEEP_TIME = 2  # in seconds
BATCH_SLEEP_TIME = 7  # in seconds

class AISearchHelper:
    @classmethod
    def create_from_env(cls, ai_search_index_name: str) -> "AISearchHelper":
        search_endpoint = os.environ["AZURE_SEARCH_SERVICE_ENDPOINT"]
        search_api_key = os.environ["AZURE_SEARCH_ADMIN_KEY"]
        ai_search_credential = AzureKeyCredential(search_api_key)

        return cls(
            ai_search_index_name=ai_search_index_name,
            ai_search_endpoint=search_endpoint,
            ai_search_credential=ai_search_credential,
        )

    def __init__(self, ai_search_index_name: str, ai_search_endpoint: str, ai_search_credential: AzureKeyCredential) -> None:
        self.ai_search_index_name = ai_search_index_name
        self.ai_search_endpoint = ai_search_endpoint
        self.ai_search_credential = ai_search_credential

    def create_or_update_index(self, index_fields: List[any]):
        index_client = SearchIndexClient(endpoint=self.ai_search_endpoint, credential=self.ai_search_credential)

        # Define the fields for the search index
        index_fields = [
            SearchableField(name="id", type=SearchFieldDataType.String, key=True, searchable=True, analyzer_name="keyword"),
            SimpleField(name="content", type=SearchFieldDataType.String, searchable=True)
        ]

        # Create a simple search index with vector search
        search_index = SearchIndex(
            name=self.ai_search_index_name,
            fields=index_fields,
            vector_search=VectorSearchProfile(name="simple_vector")
        )

        index_client.create_or_update_index(search_index)
        index_client.close()

    async def upload_content_to_index_async(self, content: List[dict]):
        search_client = AsyncSearchClient(endpoint=self.ai_search_endpoint, index_name=self.ai_search_index_name, credential=self.ai_search_credential)
        result = await search_client.upload_documents(documents=content)
        await search_client.close()
        return result

@dataclass
class IndexData:
    id: str
    content: str

# Subclass for PDF processing
class PDFFileProcessor(FileProcessor):

        async def process_file(self, file_path: str, index_name: str):
            configure_logging()

            # Create search index
            ai_search = AISearchHelper.create_from_env(ai_search_index_name=index_name)
            ai_search.create_or_update_index()

            # Load the PDF and process pages
            doc = pymupdf.open(file_path)
            tasks = []
            for page in doc.pages():
                page_content = page.get_text(sort=True)
                page_id = base64.b64encode(f"{file_path}{page.number}".encode()).decode()
                index_data = asdict(IndexData(id=page_id, content=page_content))

                tasks.append(asyncio.create_task(ai_search.upload_content_to_index_async(content=[index_data])))

                # Chunk-level control: Sleep for a defined period between uploads
                await asyncio.sleep(CHUNK_SLEEP_TIME)

                # Run tasks in batches to avoid memory overload
                if len(tasks) >= 10:  # BATCH_SIZE can be configured
                    await self._execute_tasks(tasks)
                    tasks = []  # Clear the task list after executing the batch

                    # Batch-level control: Sleep between batch runs
                    await asyncio.sleep(BATCH_SLEEP_TIME)

            # Process any remaining tasks
            if tasks:
                await self._execute_tasks(tasks)

        async def _execute_tasks(self, tasks: List[asyncio.Task]):
            """
            Helper method to execute a list of asyncio tasks and handle errors.
            """
            try:
                await asyncio.gather(*tasks)
            except Exception as e:
                logger.error(f"An error occurred during task execution: {e}", exc_info=True)

# Usage example in the Azure function
async def main():
    processor = PDFFileProcessor()
    await processor.process_file(file_path="example.pdf", index_name="my-index")
Here is key elements of the code:
- SearchableField and SimpleField:
SearchableFieldis used for fields that will be searched (e.g.,content,title).SimpleFieldis used for fields that are filterable or sortable but not necessarily searchable (e.g.,file_size).
- Id Field:
- The
idfield is marked as a key and is essential for uniquely identifying each document. It is searchable, filterable, and key-based.
- The
- Content Field:
- The
contentfield is the main body of the document and is marked as searchable with a Lucene analyzer (standard.lucene) to support full-text search capabilities.
- The
- File Size Field:
- The
file_sizefield is useful for filtering or sorting documents based on their size.
- The
Once you’ve defined and created the index, you can:
- Use Azure Document Intelligence to extract text and metadata from your PDF documents.
- Ingest the extracted content into Azure AI Search using the defined index structure.
- Run searches across the ingested documents, leveraging full-text search, filters, and sorting.
This index will enable efficient document retrieval, allowing users to search for specific content or metadata (such as title or author) in a large collection of documents.
Continuous Document Consistency and Monitoring
To ensure data consistency and continuously check whether all documents have been ingested properly (including modified or newly uploaded ones), you can create a Python script. This script will:
- Check for missing documents.
- Trigger re-ingestion [Optionally] if any updates are detected.
- Automate the process to run at regular intervals using Azure Functions or Azure Logic Apps, or any crontab tools.
Example of a Python script for checking document consistency:
import logging
import os
import requests
from azure.storage.blob import BlobServiceClient
from components.logging import configure_logging

logger = logging.getLogger(__name__)

PDF_FOLDER = "PDF"
EXPECTED_DOCUMENTS_AMOUNT = 50000

# Folder to index and search field mapping
folder_to_index = {
    PDF_FOLDER: {"index_name": "Some", "search_field": "id"},
}

# Get blob names in a specific folder
def get_blob_names(folder_path, blob_connection_string, container_name):
    blob_service_client = BlobServiceClient.from_connection_string(blob_connection_string)
    container_client = blob_service_client.get_container_client(container_name)
    blob_list = container_client.list_blobs(name_starts_with=folder_path)
    return {blob.name[len(folder_path) + 1:] for blob in blob_list}

# Get document names from Azure AI Search
def get_document_names(index_name, search_field, service_endpoint, api_key):
    search_url = f"{service_endpoint}/indexes/{index_name}/docs/search?api-version=2021-04-30-Preview"
    headers = {"Content-Type": "application/json", "api-key": api_key}
    query = {"searchFields": search_field, "select": search_field, "top": EXPECTED_DOCUMENTS_AMOUNT}

    response = requests.post(search_url, headers=headers, json=query)
    response.raise_for_status()
    results = response.json()
    return {doc[search_field] for doc in results.get("value", [])}

def run_check():
    # Load environment variables
    service_endpoint = os.getenv("AZURE_SEARCH_SERVICE_ENDPOINT")
    api_key = os.getenv("AZURE_SEARCH_ADMIN_KEY")
    blob_connection_string = os.getenv("BLOB_STORAGE_CONNECTION_STRING")
    container_name = os.getenv("BLOB_STORAGE_DOCS_CONTAINER_NAME")

    if not all([service_endpoint, api_key, blob_connection_string, container_name]):
        raise ValueError("Please ensure all required environment variables are set.")

    for folder, settings in folder_to_index.items():
        # Get blobs and document names
        blob_names = get_blob_names(folder, blob_connection_string, container_name)
        document_names = get_document_names(settings["index_name"], settings["search_field"], service_endpoint, api_key)

        # Compare counts and find missing files
        if len(blob_names) != len(document_names):
            logger.warning(f"Mismatch in {folder}: Blobs ({len(blob_names)}) vs. Documents ({len(document_names)})")

        missing_files = blob_names - document_names
        if missing_files:
            logger.warning(f"Missing in AI Search for {folder}: {missing_files}")
        else:
            logger.info(f"All files in {folder} are indexed correctly.")

if __name__ == "__main__":
    configure_logging()
    run_check()
Local and Automated Document Ingestion
You can ingest documents both manually and automatically:
- Manual Ingestion: Use a script or function trigger to push specific documents into the AI Search service.
- Automated Ingestion: Set up an automated pipeline that checks for new/modified documents and triggers the ingestion process.
Conclusion
In this article, we’ve explored the crucial role that data ingestion plays in unlocking the full potential of AI-powered search, specifically in the context of Azure AI Search. We’ve compared two approaches: the flexibility and independence of using Azure Functions for custom ingestion pipelines, versus the simplicity of pre-built Indexers. While Indexers offer a quick, out-of-the-box solution, Azure Functions provide greater control, scalability, and the ability to customize your pipeline to handle complex, real-time scenarios.
For businesses dealing with diverse data sources, Azure Functions empower teams to integrate different types of content (PDFs, Excel files, HTML documents, etc.) into a searchable format, offering a tailored solution for advanced AI search. Coupled with tools like GitHub Actions for deployment automation and the consistency checks provided by the ingestion pipeline, this approach ensures that your search service is not only comprehensive but also robust and scalable.
Whether you’re looking for simplicity or need a more advanced and customizable ingestion framework, Azure AI Search, combined with the right ingestion strategy, opens up new possibilities for transforming your data into actionable insights. Now it’s up to you to choose the best fit for your organization’s needs and take full advantage of AI search capabilities.
Interesting Links
Here are a few useful resources to further explore: