Background
By the nature of our engagements with customers, we sometimes need to dive into an existing infrastructure, understand its structure and build on top of that, while other times, we need to be the ones to build it from scratch. In both cases, we need to quickly get up to speed with the codebase and start delivering value. Additionally, when building a product with quality in mind, we must ensure that the codebase is both maintainable and extendable.
As a result of a previous engagement, we have created a boilerplate that we can use to kickstart our projects. In this article, we will take a look at the architecture of the boilerplate and how it helps expedite our projects.
The Architecture
Clean Architecture in a Nutshell
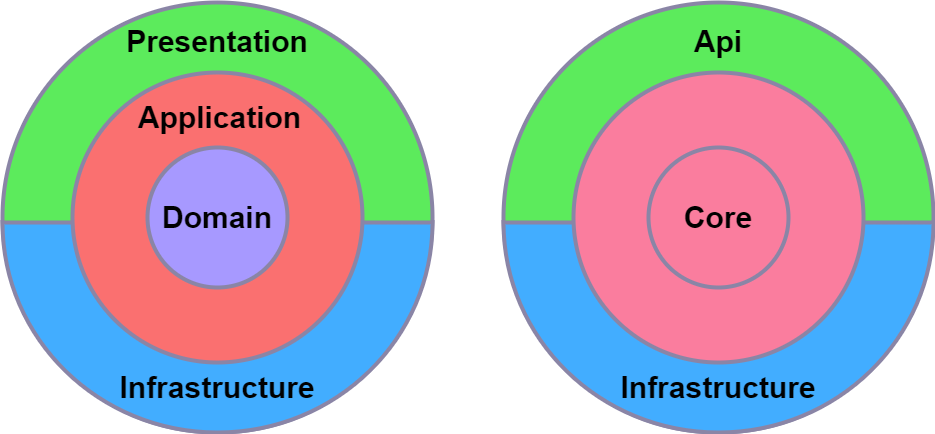
Clean architecture is a widely adopted opinionated way to structure your code and to separate the concerns of the application into layers. The main idea is to separate the business logic from the infrastructure and presentation layers. This way, the core domain business logic and rules are at the core layer of the application, external services are implemented at the infrastructure layer, and the presentation layer is the entry point of the application. Although clean architecture is not a new concept, it has been popularized by Robert C. Martin in his book “Clean Architecture: A Craftsman’s Guide to Software Structure and Design”, and there are many spinoff implementations of this type of architecture.
Some of the most common templates and clean architecture implementations are by Steve Smith and Jason Taylor. In our case, we went for an even more minimalistic approach, and we have created our own version of the clean architecture.
By following clean architecture principles, we can achieve maintainability, testability, and extendability of the application, loose coupling between the layers, and providing the ability to change the implementation of the infrastructure without affecting the core business logic.
To achieve a clean architecture, we need to follow a couple of design principles, such as separation of concerns, encapsulation, dependency inversion, and single responsibility principle. The dependency flows inwards, so that the inner layers define interfaces. Let’s take an example of a Patient service that needs to integrate with a FHIR service on Azure. You will create an abstraction or an interface in the core layer, which defines the contract of the service, and then the implementation of this interface is going to live in the outer layer, in this case, the infrastructure layer, and we will provide the implementation at runtime using dependency injection.
Clean architecture is ideal for complex, medium-scale to large-scale applications where long-term maintainability and scalability are expected. It values to most in scenarios with significant business logic, high testability needs and frequent changes. This architecture is especially beneficial for development teams and projects anticipating regular updates, ensuring that core business logic remains consistent and isolated from changes in infrastructure.
There are lots of resources around clean architecture, and we recommend you to read more about it if you are interested in learning more about it.
Our Clean Architecture
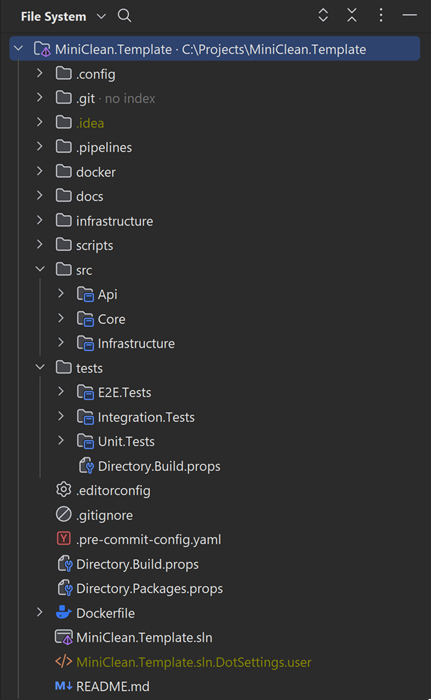
Our use case involved implementing a FHIR facade service, and we opted for a more minimalistic approach due to the heavy dependence of our domain on the FHIR domain, primarily handled by the Hl7.Fhir.R4 nuget package. In a typical clean architecture structure, the application layer is used to orchestrate into the domain layer. However, we chose to streamline our architecture with just three layers: core, API, and infrastructure, instead of the common four layers (core [also known as domain], application, infrastructure, and presentation), merging core and application together.
In this approach, the core layer should have no references to the other layers, while the API and infrastructure layers can reference the core layer.
Our repository comprises multiple projects, including the source projects: Core, API, and Infrastructure. Additionally, we’ve included a couple of test projects: Unit.Tests, which contains unit tests for all of the source projects, and Integration.Tests, responsible for tests against a real external service. For the sake of the boilerplate, we’ve maintained a FHIR Service running using docker compose, testing the client against it, along with some module tests. Finally, we have an E2E.Tests project responsible for testing the entire application end-to-end.
We aimed for the customer to feel “at home” in their repository. Given the client’s familiarity with Domain-Driven Design (DDD), we adopted a DDD-like approach to make it easy for them to integrate and quickly get up to speed. Ensuring a high-quality product from the outset was crucial, so the customer could focus on delivering value and new functionalities with their product. Therefore, we opted for clean architecture, as it provides a highly testable modular structure that allows us to maintain the desired level of quality without cutting corners.
Additionally, we prioritized maintainability and extendability throughout the codebase, making it easy to add new features.
The Core Layer
The core layer acts as the heart of the application, consisting of the business logic services, exception classes, abstraction interfaces, validators using FluentValidation, enums, and any other domain-related classes.
To maintain a more functional behavior in our application we utilized the Result pattern. The purpose of the Result provide a functional way of delivering results between the core layer to the other layers. Drawing inspiration from the LanguageExt.Core Result class, we opted not to add a reference to LanguageExt.Core. Instead, we created our own Result class and added a couple of extension methods to tailor it to our needs.
The Result Pattern enables us to avoid throwing exceptions. Instead, we return a Result object, which can be either a success or a failure. This approach allows us to exert better control over the flow of the application and handle errors in a more functional manner.
Within our Result class object, we defined implicit conversion operators to facilitate conversion from any Type to a Result object. Additionally, we incorporated several extension methods to streamline working with the Result object.
public readonly struct Result<T>
{
    private enum ResultState
    {
        Null,
        Failure,
        Success
    }

    private readonly ResultState _state;

    public T Value { get; }
    public Exception Exception { get; }

    public bool IsSuccess => _state == ResultState.Success;
    public bool IsFailure => _state == ResultState.Failure;
    public bool IsNull => _state == ResultState.Null;

    public Result(T value)
    {
        Value = value;
        Exception = null!;
        _state = ResultState.Success;
    }

    public Result(Exception exception)
    {
        Value = default!;
        Exception = exception;
        _state = ResultState.Failure;
    }

    [Pure]
    public TR Match<TR>(Func<T, TR> onSuccess, Func<Exception, TR> onFailure, Func<TR>? onNull = null) =>
        IsSuccess ? onSuccess(Value) :
        IsFailure ? onFailure(Exception) :
        onNull is not null
            ? onNull()
            : throw new InvalidOperationException("Result is null, but no onNull function was provided.");

    public static implicit operator Result<T>(T? value) => value is not null ? new Result<T>(value) : new Result<T>();
    public static implicit operator Result<T>(Exception exception) => new(exception);
}
This approach ultimately yields much more readable business logic methods; we simply return the desired object, and the Result object is created implicitly, offering the feel and utility of a discriminated union as a result type.
Here’s a simplified example:
public async Task<Result<Patient> GetPatient(string resourceId)
{
    try
    {
        var response = await patientsRepository.GetAsync(resourceId);
        return response; // implicit conversion to Result<Patient> with a successful status and book as a Value
    }
    catch (Exception ex)
    {
        return ex; // implicit conversion to Result<Patient> with an exception so we have a failure status
    }
}
Each layer includes its own DependencyInjection.cs extension class, which provides a fluent way to register its services to the DI (Dependency Injection) container.
public static class DependencyInjection
{
    public static IServiceCollection AddCore(this IServiceCollection services)
        => services
            .AddFluentValidators()
            .AddServices();

    private static IServiceCollection AddFluentValidators(this IServiceCollection services)
        => services
            .AddValidatorsFromAssemblyContaining<PatientIdValidator>();

    private static IServiceCollection AddServices(this IServiceCollection services)
        => services
            .AddScoped<IPatientsService, PatientsService>();
}
Consideration: Since our
corelayer began in a minimalistic manner, we’ve structured it in a traditional way, with a singleAbstraction,Models,Services, andValidatorsfolders. However, as the project grows, it might be beneficial to split these folders into a more use-case or feature-based approach.
The Infrastructure Layer
The infrastructure layer is responsible for the implementation of the abstractions defined in the core layer, and it is the layer that is responsible for the communication with the external services such as a database, a message broker, or a third party service. In our case, we have implemented a FHIR client to be able to communicate with an Azure FHIR service.
Given our application was dependent on multiple data sources, it was important to have a proper way to determine the health status of the application for observability. Therefore, we have implemented an abstract BaseHealthCheck class to be able to reuse that for checking the status of the external services.
public abstract class BaseHealthCheck(IHttpClientFactory clientFactory) : IHealthCheck
{
    protected abstract string ClientName { get; }
    protected abstract string HealthCheckEndpoint { get; }

    public async Task<HealthCheckResult> CheckHealthAsync(HealthCheckContext context, CancellationToken cancellationToken = default)
    {
        var client = clientFactory.CreateClient(ClientName);
        var response = await client.GetAsync(HealthCheckEndpoint, cancellationToken);

        return response.IsSuccessStatusCode
            ? HealthCheckResult.Healthy()
            : HealthCheckResult.Unhealthy($"Health Check failed. Status code: {response.StatusCode}");
    }
}
For example, a FHIR “DataHub” health check implementation would look like this:
public class DataHubFhirHealthCheck(IHttpClientFactory clientFactory) : BaseHealthCheck(clientFactory)
{
    protected override string ClientName => "DataHubFhirClient";
    protected override string HealthCheckEndpoint => "/health/check";
}
Calling the /health/check endpoint with the predefined DataHubFhirClient client would result in a 200 status code if the service is healthy and a 500 status code if the service is unhealthy.
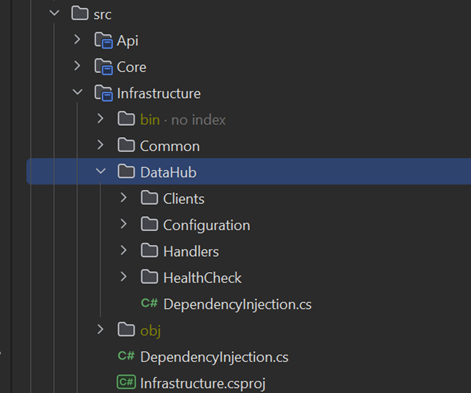
As our infrastructure layer is expected to consist of numerous data source clients that our application should integrate with, and considering that some of these clients might be open-sourced or reused in other applications later on, it made sense to structure the project into vertical slices for each data source. In this structure, each data source client has its own folder, and within each folder and namespace, there’s a DependencyInjection.cs extension class, configuration model, and health check class. This organization makes it easier to extract into a future repository.
The API Layer
Each app or service needs a way for the external world to interact with it. The API layer accomplishes this by exposing a RESTful API using .NET 8’s new minimal API.
In order to achieve easy extension of new modules we used Carter, which has automatic DI registration of new routes.
Simply defining a class that extends CarterModule and specifying the routes in the constructor, and the routes will be automatically registered to the DI container.
NOTE: There’s also a way to automatically register the routes without an external Nuget package, you can read more about it in the following blog post by Milan Jovanović.
public class PatientModule : CarterModule
{
    public override void AddRoutes(IEndpointRouteBuilder app)
    {
        var patientsGroup = app.MapGroup("Patient");
        patientsGroup.MapGet("/{id}", GetPatientById).WithName("GetPatientById");
    }
}
The MiniClean boilerplate template consists of a simple
Patientmodule that provides a simple GET operation on patient by ID, connecting all layers together.
In addition to the modules, we needed to map a health check endpoint to determine the status of our app. The /_health route was introduced using the newly added app.MapHealthChecks() method, a built-in feature in .NET 8 minimal API. This method provides details about the duration of each health check and the status of each health check.
curl -s http://localhost:8000/_health | jq
{
  "status": "Healthy",
  "totalDuration": "00:00:00.0160192",
  "entries": {
    "DataHub FHIR Health Check": {
      "data": {},
      "duration": "00:00:00.0155345",
      "status": "Healthy",
      "tags": [
        "FHIR",
        "DataHub",
        "Api"
      ]
    }
  }
}
To ensure testing of all endpoints locally with a simple UI, we’ve maintained the use of the built-in Swagger UI in our local environment. However, an alternative approach could involve leveraging the new .http files as well.
The final piece of our API layer is a global Exception handler, which is responsible for catching any unhandled exceptions and returning a proper response to the client, and logging the exception to the logger.
In .NET 8 IExceptionHandler was introduced. It acts as middleware that can catch the exception, enabling us to augment it with details such as trace ID, log the exception, and return a proper response to the client, like the ProblemDetails class.
public class GlobalExceptionHandler(ILogger<GlobalExceptionHandler> logger, IHostEnvironment environment) : IExceptionHandler
{
    private const bool IsLastStopInPipeline = true;

    public async ValueTask<bool> TryHandleAsync(HttpContext httpContext,
        Exception exception, CancellationToken cancellationToken)
    {
        var traceId = Activity.Current?.Id ?? httpContext.TraceIdentifier;
        logger.LogError(exception, "Could not process a request on machine {MachineName} with trace id {TraceId}",
            Environment.MachineName, traceId);

        (int statusCode, string title) = MapException(exception);

        var problemDetails = new ProblemDetails
        {
            Status = statusCode,
            Title = title,
            Extensions = { ["traceId"] = traceId },
            Instance = $"{httpContext.Request.Method} {httpContext.Request.Path}"
        };
        if (!environment.IsProduction())
        {
            problemDetails.Detail = exception.Message;
        }

        await httpContext.Response
            .WriteAsJsonAsync(problemDetails, cancellationToken);
        return IsLastStopInPipeline;
    }
}
Since every layer has its own DependencyInjection.cs extension class, we can easily register the services to the DI container, and create a very clean and minimal Program.cs file. This file is responsible for creating the host and configuring the services, which, of course, is the first place a developer goes to when ramping up on a project.
var builder = WebApplication.CreateBuilder(args);
var configuration = builder.Configuration;

builder.Services
    .AddApi(configuration)
    .AddInfrastructure(configuration)
    .AddCore();

var app = builder.Build();
app.UseExceptionHandler();

if (app.Environment.IsEnvironment("Local"))
{
    app.UseSwagger();
    app.UseSwaggerUI(c =>
    {
        string openApiVersion = configuration.GetValue<string>("OpenApi:Version")!;
        c.SwaggerEndpoint($"/swagger/{openApiVersion}/swagger.json", openApiVersion);
    });
}

app.MapHealthChecks("/_health", new HealthCheckOptions { ResponseWriter = UIResponseWriter.WriteHealthCheckUIResponse });
app.UseHttpsRedirection();
app.MapCarter();
app.Run();
Lastly, we’ve created an appsettings.json file which serves as the common configuration setting needed for the app to function. We can override these settings by setting the ASPNETCORE_ENVIRONMENT environment variable. Consequently, we can read a different appsettings.<Environment>.json file based on the environment in which we’re running the app.
NOTE: by default, the environment is set to
Production
Testing
Testing is one of the most crucial part of the development process, and we’ve added a couple of tests projects to the solution: the Unit.Tests, Integration.Tests, and E2E.Tests projects.
All of our testing projects use the xUnit testing framework, the NSubstitute mocking library, and the Shouldly library for assertions.
While achieving high coverage is valuable, it’s not the primary objective of our test projects. Rather, they’re designed to define the behavior of our application and verify that it functions as intended.
Our E2E tests are integrated into our CI pipeline, which we’ll discuss in the next section, and rely on a healthy running container of our application. For a smoother testing experience, we’ve included some NuGet packages:
- RestSharp for calling the endpoints of the application
- HttpTracer to view the full request and response payloads in the test output
- Polly for easy retries of failed requests
[Fact]
public async Task WhenCallingHealthCheck_ThenServiceAndAllDependentServicesShouldBeHealthy()
{
    var response = await RetryUntilSuccessful(
        action: () => ApiClient.Execute(Get("/_health")),
        maxRetryAttempts: 6,
        secondsBetweenFailures: 10
    );

    response.StatusCode.ShouldBe(HttpStatusCode.OK);

    var content = JToken.Parse(response.Content!);
    content.Value<string>("status").ShouldBe("Healthy");
    content.SelectTokens("entries.*.status").All(s => s.Value<string>() == "Healthy").ShouldBeTrue();
}
Continuous Integration
Ensuring the application works flawlessly in a production environment is absolutely necessary. We must avoid deploying any faulty code into production. Continuous Integration (CI) takes charge of verifying that the application functions correctly in a simulated environment, tests pass without issues, code meets coding standards, and deployment to production is feasible.
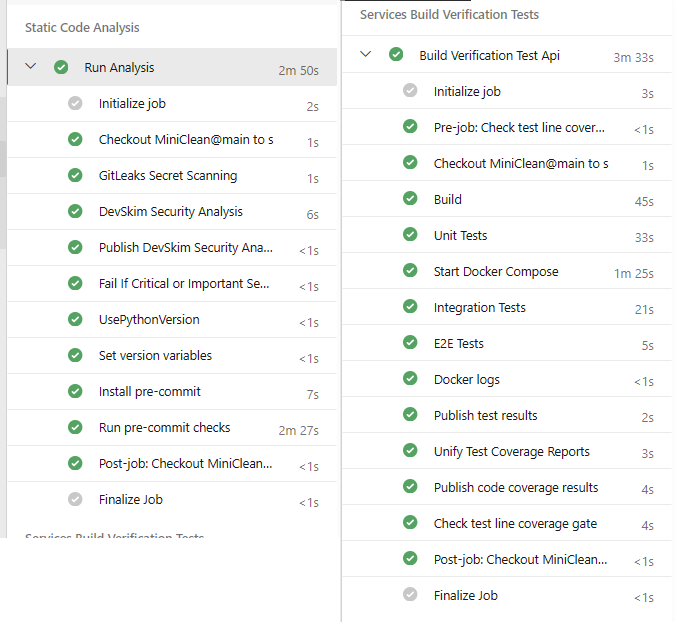
Our CI pipeline has two stages:
-
Static Code Analysis: This stage includes tasks like secret scanning, security linting, and running all of our pre-commit hooks for linting and formatting.
-
Build Verification Test: Here, we build and run our Docker image, execute all tests, and collect results. Additionally, we simulate the production environment as closely as possible to ensure that our application behaves predictably. We maintain a minimum test coverage of 95% to guarantee thorough testing.
Infrastructure and Continuous Deployment
Terraform
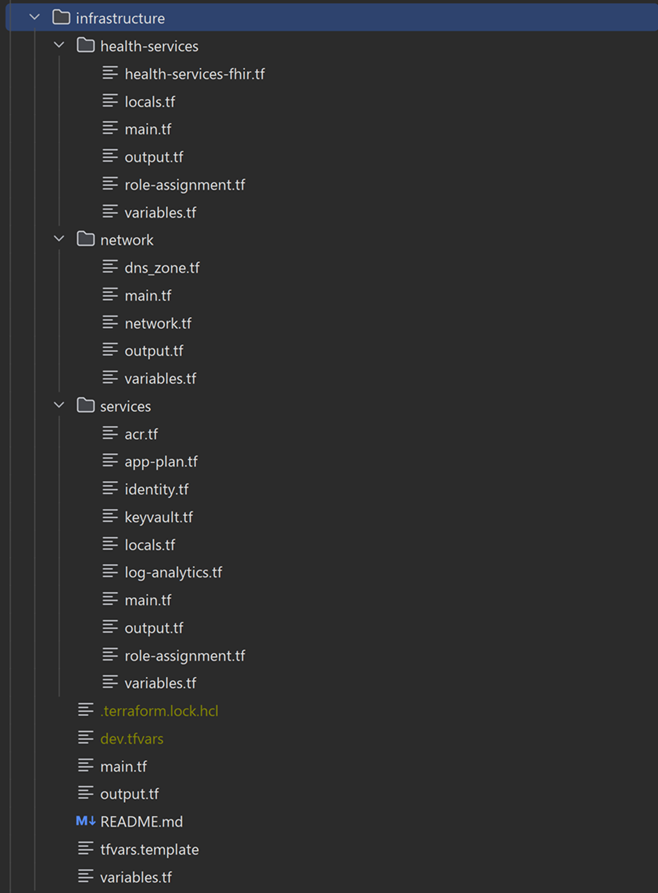
While many boilerplates focus solely on code and architecture, we’ve taken a step further by providing a comprehensive infrastructure as code (IaC) solution. We’ve added an Infrastructure folder to the repository, which is responsible for creating the necessary infrastructure for the application to run. This includes components such as the Azure Container Registry, Azure Key Vault, Linux Web App, Azure FHIR service, networking setup, and more.
This way, when you use the boilerplate, you can easily deploy the application to Azure, and have a working application in a matter of minutes, with the effort of minimal setup as described in the readme file.
Terraform was our chosen tool for IaC, as it is a widely adopted tool for managing infrastructure as code, and it is easy to use.
The folder structure is designed for clarity and simplicity: a main.tf file in the root folder serves as the entry point for the Terraform configuration, and outputs.tf contains the outputs of the infrastructure that we want to use in the CD pipeline (such as web app host url).
Additionally, we’ve organized the network and services modules to include common services and virtual networks typically used in applications.
The health-services module was added separately since it might not be the use case for every application, so it would be easier to replace.
The deployed infrastructure covers all aspects essential for application operation, including networking, services provisioning, monitoring, observability, security, and secrets management. We’ve kept the setup minimal, knowing that it might need to change to use a different type of Database, networking solution, or deployment strategy.
Continuous Deployment Pipeline
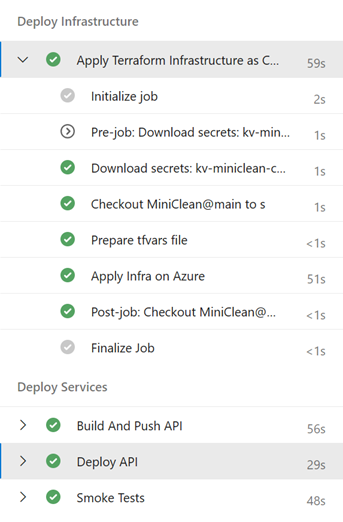
In addition to the CI pipeline set up in Azure DevOps, we’ve established a straightforward CD pipeline. This pipeline has several key responsibilities:
- Initializing Terraform State: It initiates the Terraform state from a storage account in Azure.
- Creating tfvars File: A tfvars file is generated from a variable group configured in Azure DevOps.
- Deploying Infrastructure: The pipeline executes the
terraform applycommand to deploy the infrastructure to Azure. - Building and Pushing Docker Image: Once the infrastructure is successfully deployed, the pipeline builds and pushes the image to the new Azure Container Registry.
- Deploying Image to Azure Web App: The Docker image is then deployed to the Azure Web App.
- Running Smoke Tests: Finally, the pipeline runs the Smoke test suite in the E2E project against the deployed application. At present, this suite only includes health checks tests.
Summary
Wrapping up, our boilerplate is designed to kickstart your project with a clean architecture, ensuring maintainability, testability, and extendability. We’ve provided a minimalistic approach to the clean architecture, focusing on the core, API, and infrastructure layers.
Our template didn’t stop at the code level, we’ve included a Terraform infrastructure as code solution to deploy the application to Azure, and a CI/CD pipeline to ensure the application is working as expected in a production-like environment.
If you have a medium to large-scale application with significant business logic, high testability needs, frequent changes and a requirement for infrastructure as code with a CI/CD pipeline, then our boilerplate is the right choice for you.
I hope this article has provided you with a solid understanding of our clean architecture boilerplate and how it can help you shrink a 4-5 sprints of work into a sprint or two. Thank you for reading, and happy coding!


