What’s new with identity in .NET 8

Jeremy Likness

In April 2023, I wrote about the commitment by the ASP.NET Core team to improve authentication, authorization, and identity management in .NET 8. The plan we presented included three key deliverables:

  • New APIs to simplify login and identity management for client apps like Single Page Apps (SPA) and Blazor WebAssembly.
  • Enablement of token-based authentication and authorization in ASP.NET Core Identity for clients that can’t use cookies.
  • Improvements to documentation.

All three deliverables will ship with .NET 8. In addition, we were able to add a new identity UI for Blazor web apps that works with both of the new rendering modes, server and WebAssembly.

Let’s look at a few scenarios that are enabled by the new changes in .NET 8. In this blog post we’ll cover:

Let’s look at the simplest scenario for using the new identity features.

Basic Web API backend

An easy way to use the new authorization is to enable it in a basic Web API app. The same app may also be used as the backend for Blazor WebAssembly, Angular, React, and other Single Page Web apps (SPA). Assuming you’re starting with an ASP.NET Core Web API project in .NET 8 that includes OpenAPI, you can add authentication with a few steps.

Identity is “opt-in,” so there are a few packages to add:

  • Microsoft.AspNetCore.Identity.EntityFrameworkCore – the package that enables EF Core integration
  • A package for the database you wish to use, such as Microsoft.EntityFrameworkCore.SqlServer (we’ll use the in-memory database for this example)

You can add these packages using the NuGet package manager or the command line. For example, to add the packages using the command line, navigate to the project folder and run the following dotnet commands:

dotnet add package Microsoft.AspNetCore.Identity.EntityFrameworkCore
dotnet add package Microsoft.EntityFrameworkCore.InMemory

Identity allows you to customize both the user information and the user database in case you have requirements beyond what is provided in the .NET Core framework. For our basic example, we’ll just use the default user information and database. To do that, we’ll add a new class to the project called MyUser that inherits from IdentityUser:

class MyUser : IdentityUser {}

Add a new class called AppDbContext that inherits from IdentityDbContext<MyUser>:

class AppDbContext(DbContextOptions<AppDbContext> options) : 
        IdentityDbContext<MyUser>(options)
{
}

Providing the special constructor makes it possible to configure the database for different environments.

To set up identity for an app, open the Program.cs file. Configure identity to use cookie-based authentication and to enable authorization checks by adding the following code after the call to WebApplication.CreateBuilder(args):

builder.Services.AddAuthentication(IdentityConstants.ApplicationScheme)
    .AddIdentityCookies();
builder.Services.AddAuthorizationBuilder();

Configure the EF Core database. Here we’ll use the in-memory database and name it “AppDb.” It’s usedhere for the demo so it is easy to restart the application and test the flow to register and login (each run will start with a fresh database). Changing to SQLite will save users between sessions but requires the database to be properly created through migrations as shown in this EF Core getting started tutorial. You can use other relational providers such as SQL Server for your production code.

builder.Services.AddDbContext<AppDbContext>(
    options => options.UseInMemoryDatabase("AppDb"));

Configure identity to use the EF Core database and expose the identity endpoints:

builder.Services.AddIdentityCore<MyUser>()
    .AddEntityFrameworkStores<AppDbContext>()
    .AddApiEndpoints();

Map the routes for the identity endpoints. This code should be placed after the call to builder.Build():

app.MapIdentityApi<MyUser>();

The app is now ready for authentication and authorization! To secure an endpoint, use the .RequireAuthorization() extension method where you define the auth route. If you are using a controller-based solution, you can add the [Authorize] attribute to the controller or action.

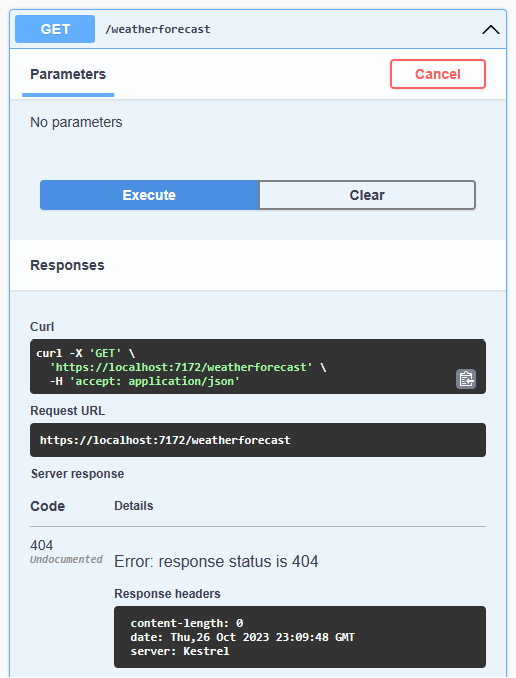
To test the app, run it and navigate to the Swagger UI. Expand the secured endpoint, select try it out, and select execute. The endpoint is reported as 404 - not found, which is arguably more secure than reporting a 401 - not authorized because it doesn’t reveal that the endpoint exists.

Swagger UI with 404

Now expand /register and fill in your credentials. If you enter an invalid email address or a bad password, the result includes the validation errors.

Swagger UI with validation errors

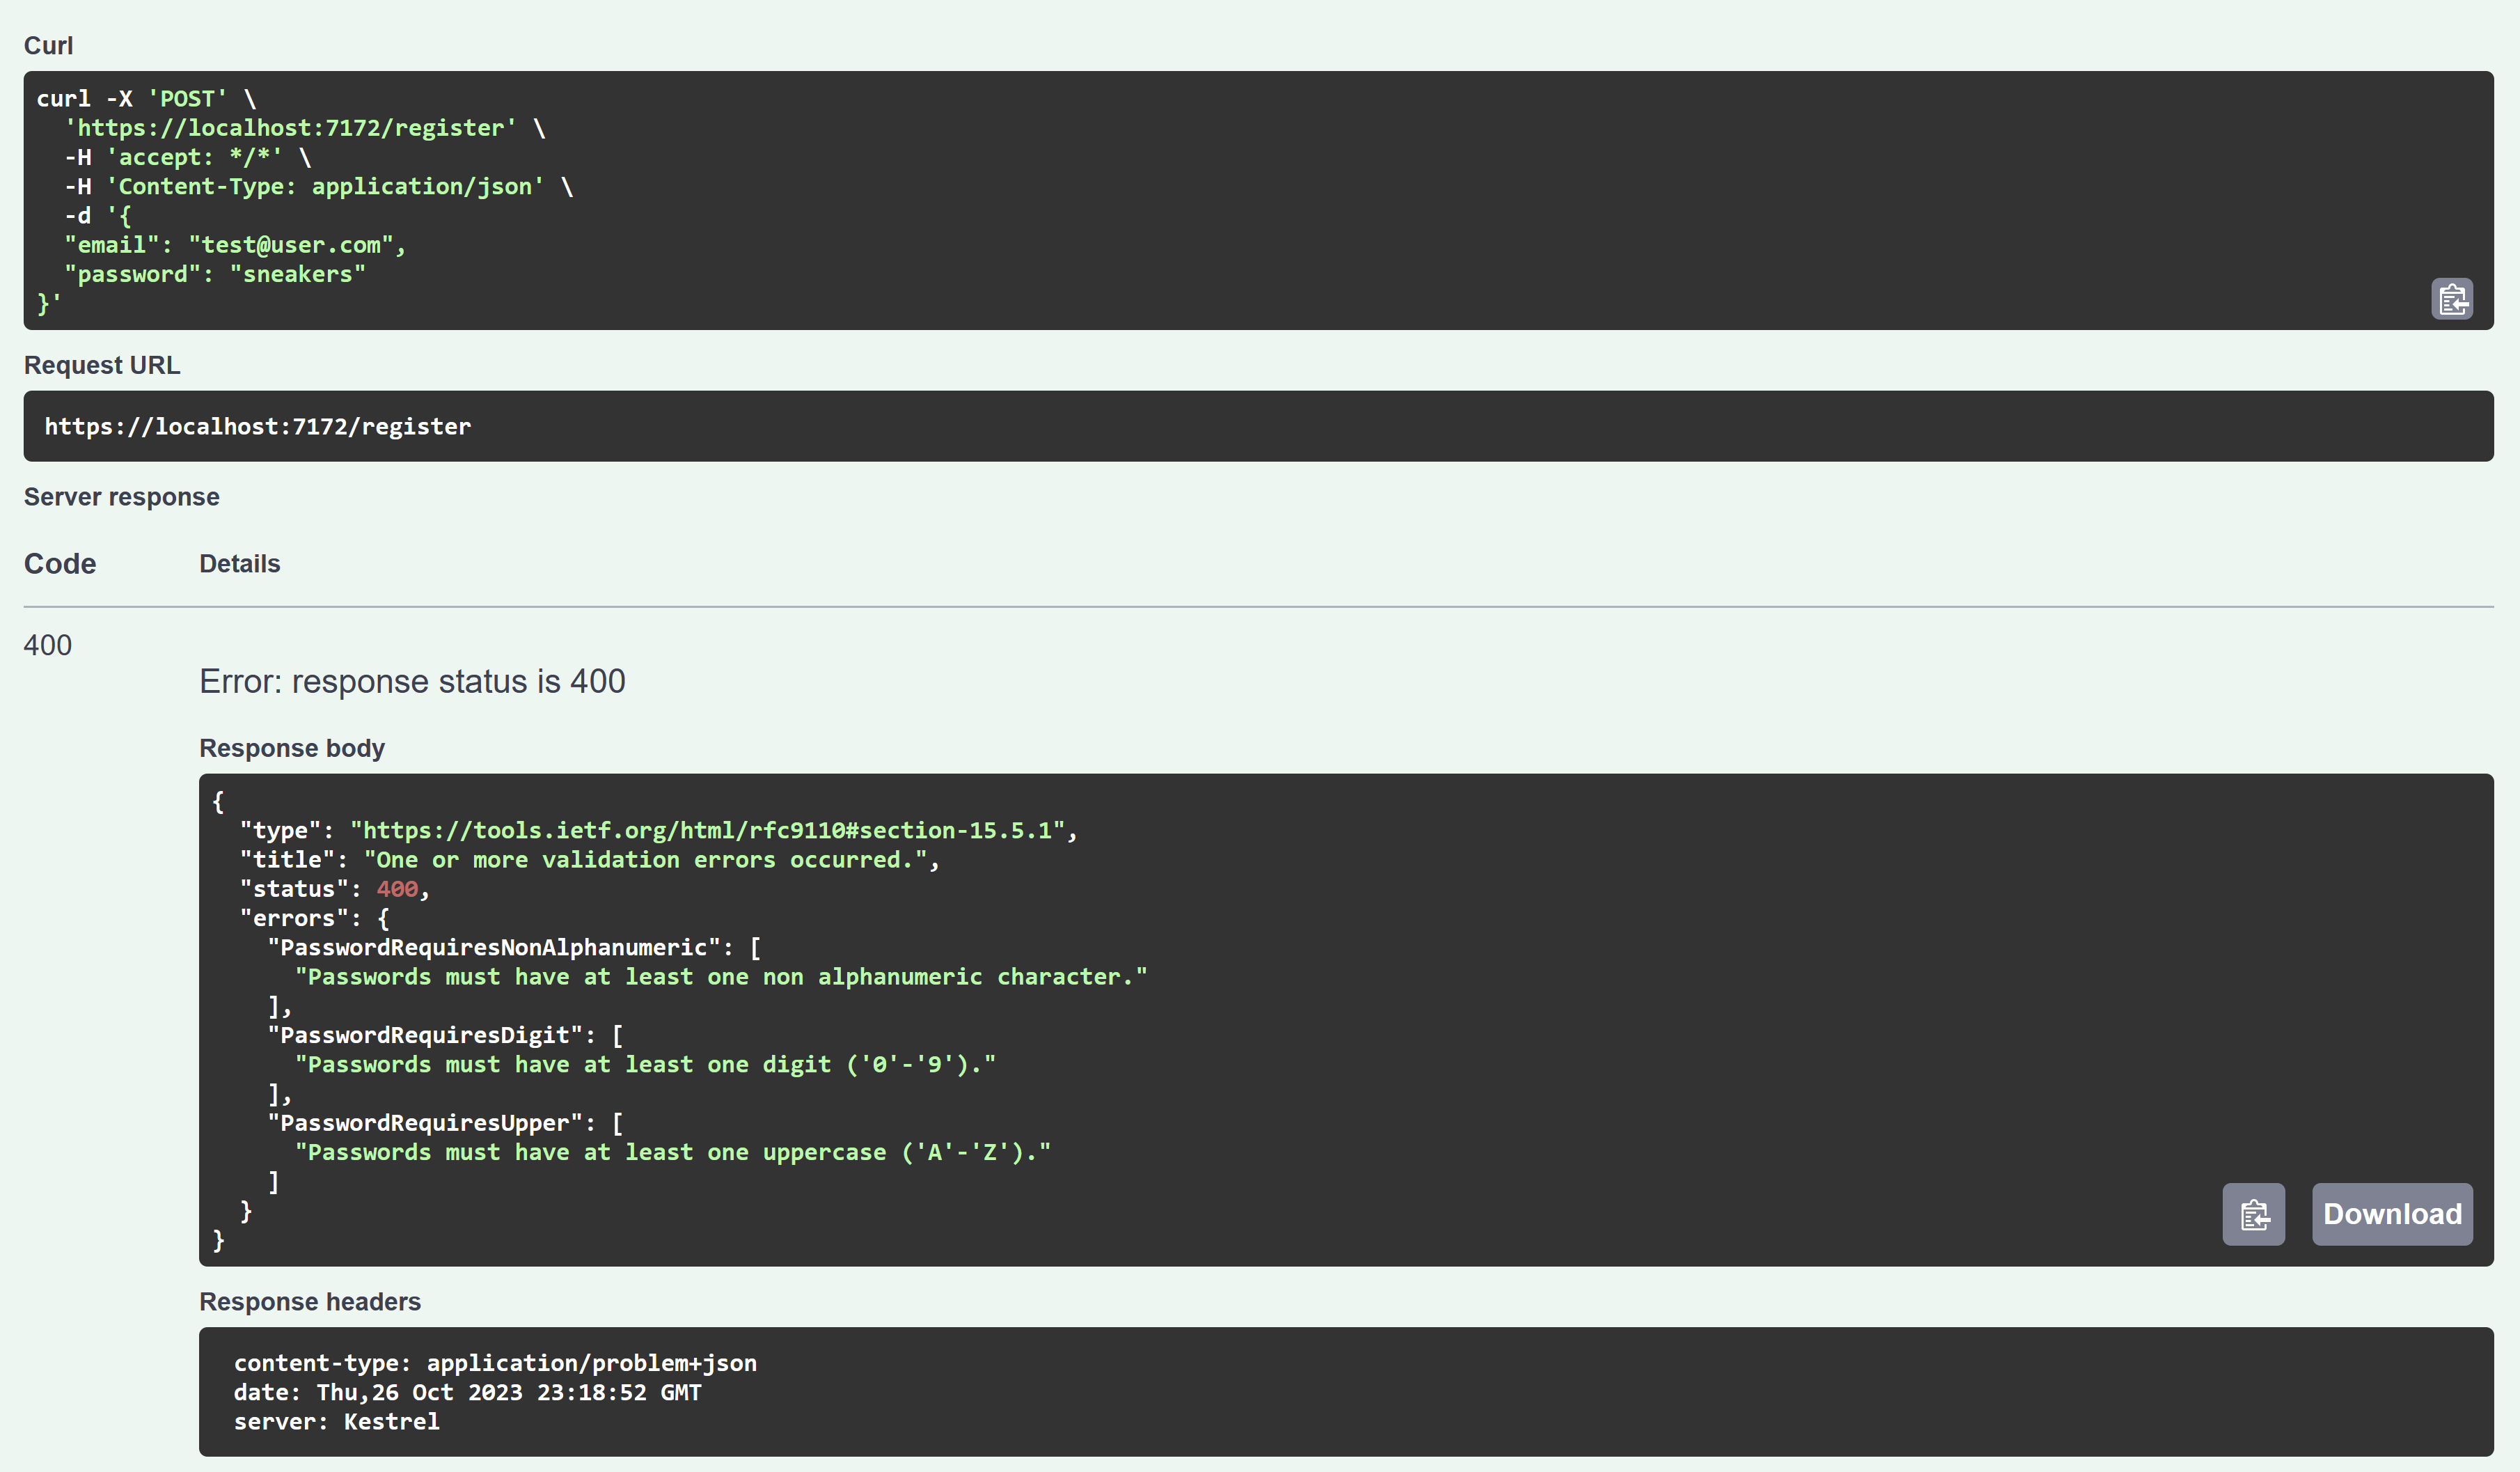
The errors in this example are returned in the ProblemDetails format so your client can easily parse them and display validation errors as needed. I’ll show an example of that in the standalone Blazor WebAssembly app.

A successful registration results in a 200 - OK response. You can now expand /login and enter the same credentials. Note, there are additional parameters that aren’t needed for this example and can be deleted. Be sure to set useCookies to true. A successful login results in a 200 - OK response with a cookie in the response header.

Now you can rerun the secured endpoint and it should return a valid result. This is because cookie-based authentication is securely built-in to your browser and “just works.” You’ve just secured your first endpoint with identity!

Some web clients may not include cookies in the header by default. If you are using a tool for testing APIs, you may need to enable cookies in the settings. The JavaScript fetch API does not include cookies by default. You can enable them by setting credentials to the value include in the options. Similarly, an HttpClient running in a Blazor WebAssembly app needs the HttpRequestMessage to include credentials, like the following:

request.SetBrowserRequestCredential(BrowserRequestCredentials.Include);

Next, let’s jump into a Blazor web app.

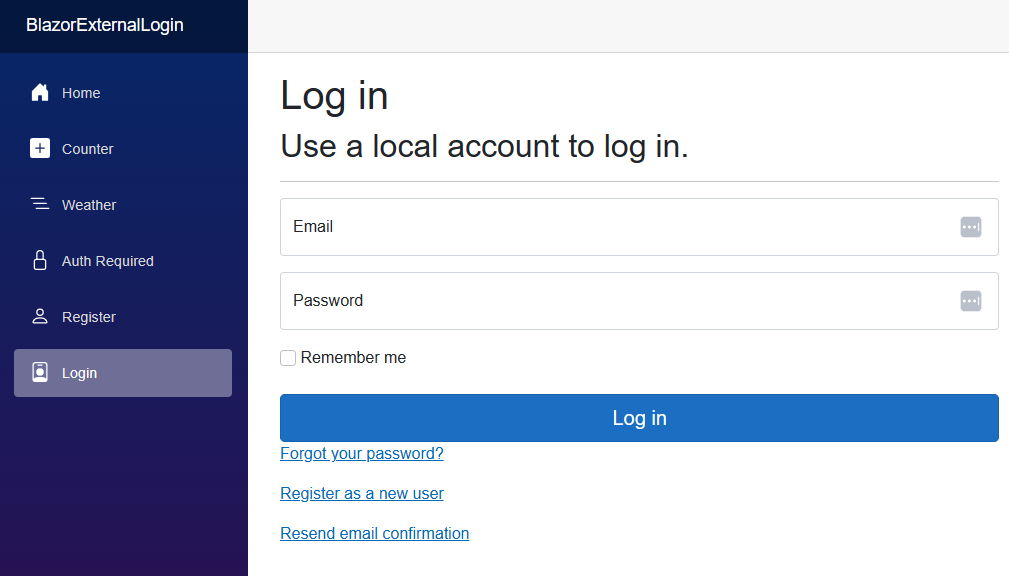
The Blazor identity UI

A stretch goal of our team that we were able to achieve was to implement the identity UI, which includes options to register, log in, and configure multi-factor authentication, in Blazor. The UI is built into the template when you select the “Individual accounts” option for authentication. Unlike the previous version of the identity UI, which was hidden unless you wanted to customize it, the template generates all of the source code so you can modify it as needed. The new version is built with Razor components and works with both server-side and WebAssembly Blazor apps.

Blazor login page

The new Blazor web model allows you to configure whether the UI is rendered server-side or from a client running in WebAssembly. When you choose the WebAssembly mode, the server will still handle all authentication and authorization requests. It will also generate the code for a custom implementation of AuthenticationStateProvider that tracks the authentication state. The provider uses the PersistentComponentState class to pre-render the authentication state and persist it to the page. The PersistentAuthenticationStateProvider in the client WebAssembly app uses the component to synchronize the authentication state between the server and browser. The state provider might also be named PersistingRevalidatingAuthenticationStateProvider when running with auto interactivity or IdentityRevalidatingAuthenticationStateProvider for server interactivity.

Although the examples in this blog post are focused on a simple username and password login scenario, ASP.NET Identity has support for email-based interactions like account confirmation and password recovery. It is also possible to configure multifactor authentication. The components for all of these features are included in the UI.

Add an external login

A common question we are asked is how to integrate external logins through social websites with ASP.NET Core Identity. Starting from the Blazor web app default project, you can add an external login with a few steps.

First, you’ll need to register your app with the social website. For example, to add a Twitter login, go to the Twitter developer portal and create a new app. You’ll need to provide some basic information to obtain your client credentials. After creating your app, navigate to the app settings and click “edit” on authentication. Specify “native app” for the application type for the flow to work correctly and turn on “request email from users.” You’ll need to provide a callback URL. For this example, we’ll use https://localhost:5001/signin-twitter which is the default callback URL for the Blazor web app template. You can change this to match your app’s URL (i.e. replace 5001 with your own port). Also note the API key and secret.

Next, add the appropriate authentication package to your app. There is a community-maintained list of OAuth 2.0 social authentication providers for ASP.NET Core with many options to choose from. You can mix multiple external logins as needed. For Twitter, I’ll add the AspNet.Security.OAuth.Twitter package.

From a command prompt in the root directory of the server project, run this command to store your API Key (client ID) and secret.

dotnet user-secrets set "Twitter:ApiKey" "<your-api-key>"
dotnet user-secrets set "TWitter:ApiSecret" "<your-api-secret>"

Finally, configure the login in Program.cs by replacing this code:

builder.Services.AddAuthentication(IdentityConstants.ApplicationScheme)
    .AddIdentityCookies();

with this code:

builder.Services.AddAuthentication(IdentityConstants.ApplicationScheme)
    .AddTwitter(opt =>
        {
            opt.ClientId = builder.Configuration["Twitter:ApiKey"]!;
            opt.ClientSecret = builder.Configuration["Twitter:ApiSecret"]!;
        })
    .AddIdentityCookies();

Cookies are the preferred and most secure approach for implementing ASP.NET Core Identity. Tokens are supported if needed and require the IdentityConstants.BearerScheme to be configured. The tokens are proprietary and the token-based flow is intended for simple scenarios so it does not implement the OAuth 2.0 or OIDC standards.

What’s next? Believe it or not, you’re done. This time when you run the app, the login page will automatically detect the external login and provide a button to use it.

Blazor login page with Twitter

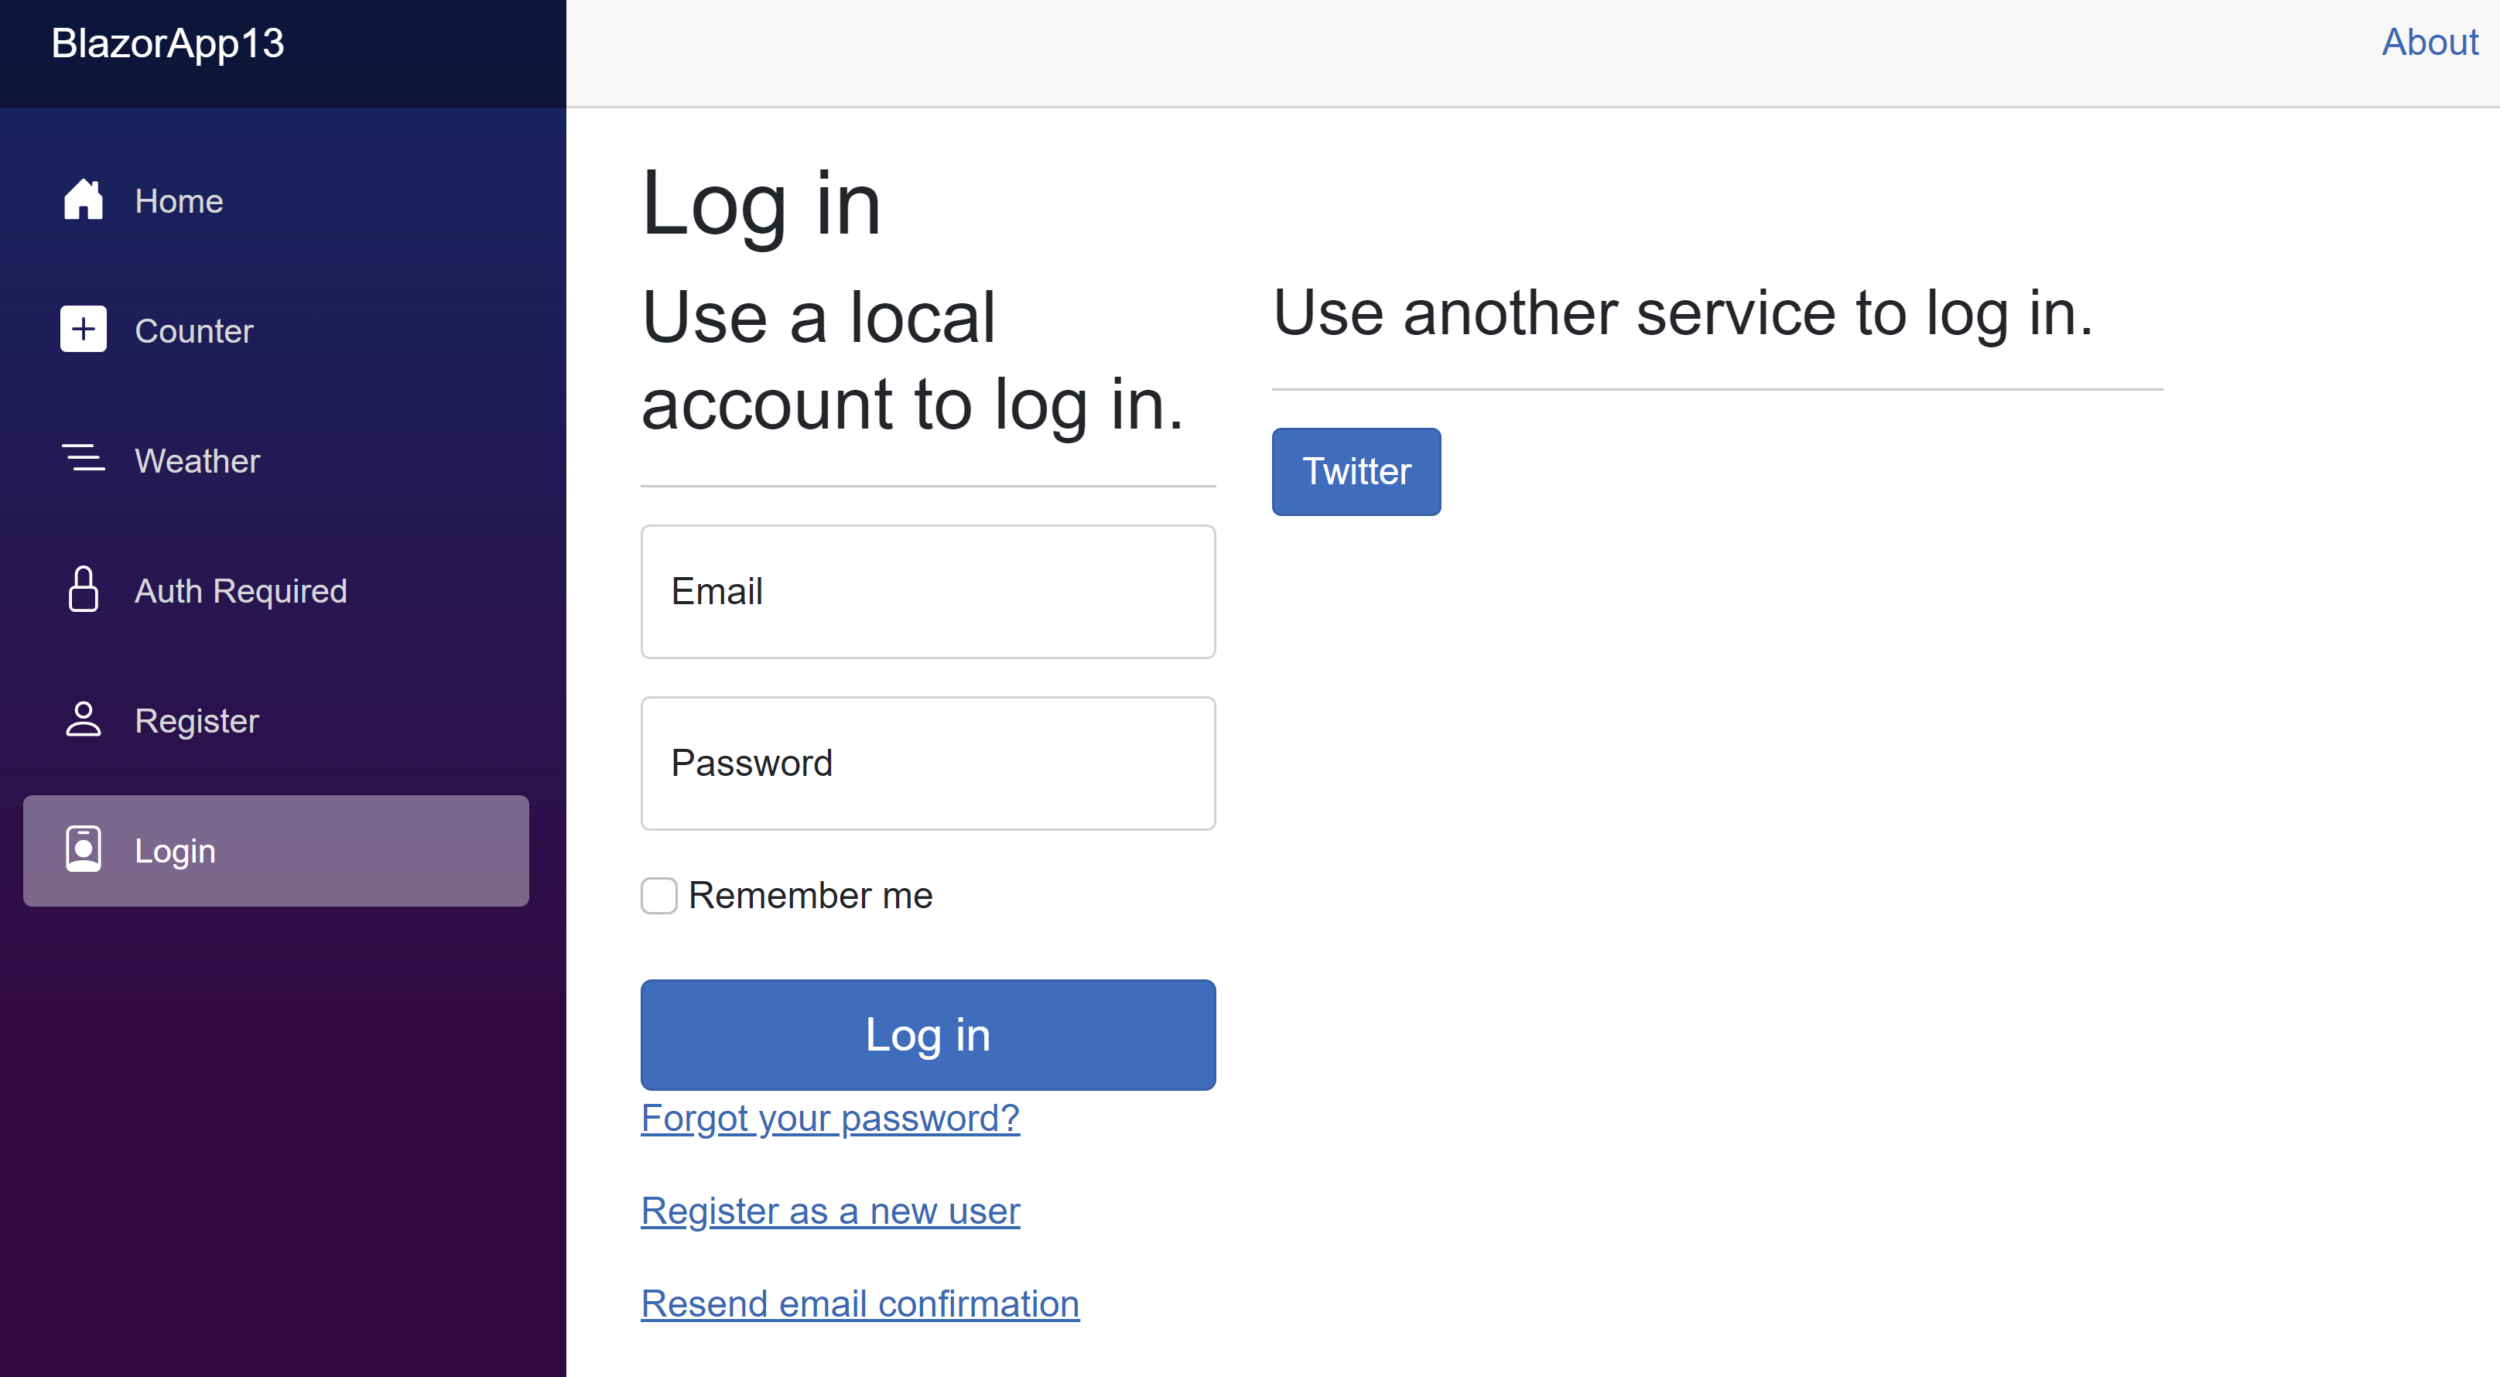
When you log in and authorize the app, you will be redirected back and authenticated.

Securing Blazor WebAssembly apps

A major motivation for adding the new identity APIs was to make it easier for developers to secure their browser-based apps including Single Page Apps (SPA) and Blazor WebAssembly. It doesn’t matter if you use the built-in identity provider, a custom login or a cloud-based service like Microsoft Entra, the end result is an identity that is either authenticated with claims and roles, or not authenticated. In Blazor, you can secure a razor component by adding the [Authorize] attribute to the component or to the page that hosts the component. You can also secure a route by adding the .RequireAuthorization() extension method to the route definition.

The full source code for this example is available in the Blazor samples repo.

The AuthorizeView tag provides a simple way to handle content the user has access to. The authentication state can be accessed via the context property. Consider the following:

<p>Welcome to my page!</p>
<AuthorizeView>
    <Authorizing>
        <div class="alert alert-info">We're checking your credentials...</div>
    </Authorizing>
    <Authorized>
        <div class="alert alert-success">You are authenticated @context.User.Identity?.Name</div>
    </Authorized>
    <NotAuthorized>
        <div class="alert alert-warning">You are not authenticated!</div>
    </NotAuthorized>
</AuthorizeView>

The greeting will be shown to everyone. In the case of Blazor WebAssembly, when the client might need to authenticate asynchronously over API calls, the Authorizing content will be shown while the authentication state is queried and resolved. Then, based on whether or not you’ve authenticated, you’ll either see your name or a message that you’re not authenticated. How exactly does the client know if you’re authenticated? That’s where the AuthenticationStateProvider comes in.

The App.razor page is wrapped in a CascadingAuthenticationState provider. This provider is responsible for tracking the authentication state and making it available to the rest of the app. The AuthenticationStateProvider is injected into the provider and used to track the state. The AuthenticationStateProvider is also injected into the AuthorizeView component. When the authentication state changes, the provider notifies the AuthorizeView component and the content is updated accordingly.

First, we want to make sure that API calls are persisting credentials accordingly. To do that, I created a handler named CookieHandler.

public class CookieHandler : DelegatingHandler
{
    protected override Task<HttpResponseMessage> SendAsync(
        HttpRequestMessage request, CancellationToken cancellationToken)
    {
        request.SetBrowserRequestCredentials(BrowserRequestCredentials.Include);
        return base.SendAsync(request, cancellationToken);
    }
}

In Program.cs I added the handler to the HttpClient and used the client factory to configure a special client for authentication purposes.

builder.Services.AddTransient<CookieHandler>();
builder.Services.AddHttpClient(
    "Auth",
    opt => opt.BaseAddress = new Uri(builder.Configuration["AuthUrl"]!))
    .AddHttpMessageHandler<CookieHandler>();

Note: the authentication components are opt-in and available via the Microsoft.AspNetCore.Components.WebAssembly.Authentication package. The client factory and extension methods come from Microsoft.Extensions.Http.

The AuthUrl is the URL of the ASP.NET Core server that exposes the identity APIs. Next, I created a CookieAuthenticationStateProvider that inherits from AuthenticationStateProvider and overrides the GetAuthenticationStateAsync method. The main logic looks like this:

var unauthenticated = new ClaimsPrincipal(new ClaimsIdentity());
var userResponse = await _httpClient.GetAsync("manage/info");
if (userResponse.IsSuccessStatusCode) 
{
    var userJson = await userResponse.Content.ReadAsStringAsync();
    var userInfo = JsonSerializer.Deserialize<UserInfo>(userJson, jsonSerializerOptions);
    if (userInfo != null)
    {
        var claims = new List<Claim>
        {
            new(ClaimTypes.Name, userInfo.Email),
            new(ClaimTypes.Email, userInfo.Email)
        };
        var id = new ClaimsIdentity(claims, nameof(CookieAuthenticationStateProvider));
        user = new ClaimsPrincipal(id);
    }
}

return new AuthenticationState(user);

The user info endpoint is secure, so if the user is not authenticated the request will fail and the method will return an unauthenticated state. Otherwise, it builds the appropriate identity and claims and returns the authenticated state.

How does the app know when the state has changed? Here is what a login looks like from Blazor WebAssembly using the identity API:

async Task<AuthenticationState> LoginAndGetAuthenticationState()
{
    var result = await _httpClient.PostAsJsonAsync(
        "login?useCookies=true", new
        {
            email,
            password
        });

        return await GetAuthenticationStateAsync();
}

NotifyAuthenticationStateChanged(LoginAndGetAuthenticationState());

When the login is successful, the NotifyAuthenticationStateChanged method on the base AuthenticationStateProvider class is called to notify the provider that the state has changed. It is passed the result of the request for a new authentication state so that it can verify the cookie is present. The provider will then update the AuthorizeView component and the user will see the authenticated content.

Tokens

In the rare event your client doesn’t support cookies, the login API provides a parameter to request tokens. An custom token (one that is proprietary to the ASP.NET Core identity platform) is issued that can be used to authenticate subsequent requests. The token is passed in the Authorization header as a bearer token. A refresh token is also provided. This allows your application to request a new token when the old one expires without forcing the user to log in again. The tokens are not standard JSON Web Tokens (JWT). The decision behind this was intentional, as the built-in identity is meant primarily for simple scenarios. The token option is not intended to be a fully-featured identity service provider or token server, but instead an alternative to the cookie option for clients that can’t use cookies.

Not sure whether you need a token server or not? Read a document to help you choose the right ASP.NET Core identity solution. Looking for a more advanced identity solution? Read our list of identity management solutions for ASP.NET Core.

Docs and samples

The third deliverable is documentation and samples. We have already introduced new documentation and will be adding new articles and samples as we approach the release of .NET 8. Follow Issue #29452 – documentation and samples for identity in .NET 8 to track the progress. Please use the issue to communicate additional documentation or samples you are looking for. You can also link to the specific issues for various documents and provide your feedback there.

Conclusion

The new identity features in .NET 8 make it easier than ever to secure your applications. If your requirements are simple, you can now add authentication and authorization to your app with a few lines of code. The new APIs make it possible to secure your Web API endpoints with cookie-based authentication and authorization. There is also a token-based option for clients that can’t use cookies.

Learn more about the new identity features in the ASP.NET Core documentation.

42 comments

Discussion is closed. Login to edit/delete existing comments.

  • Niclas Rothman 1

    HI Jeremey,
    Im kind of struggling to find information or event better an example how to use Azure B2C with Blazor .NET 8.
    We are today on .NET 7 with Blazor Server but would like to benefit of the autorendering feature of .NET 8.
    I dont have the full picture how to handle authentication / authorization when using autorendering. I only see examples that are using local user accounts, no examples of external IDPs.
    Could you help us out?

    NIclas

    • Jeremy LiknessMicrosoft employee 0

      Hi, Niclas.

      This is an important scenario and we are working on guidance via samples until we can get it back into the templates.

      You can see the work in progress in this pull request.

  • Ahmed Mohamed Abdel-Razek 0

    i straggle with decoding the new access token in blazor with c# or javascript even jwt dot io gives me signature error
    my setup

    also i don’t know how to add my signing secret key

    services.AddAuthentication(options =>
    {
        options.DefaultScheme = IdentityConstants.BearerScheme;
        options.DefaultSignInScheme = IdentityConstants.BearerScheme;
        options.DefaultAuthenticateScheme = IdentityConstants.BearerScheme;
    }).AddBearerToken(IdentityConstants.BearerScheme, options =>
    {
        options.ClaimsIssuer = jwtSettings.GetSection("validIssuer").Value;
        options.BearerTokenExpiration = TimeSpan.FromMinutes(Convert.ToInt32(expiryInMinutesString));
        options.RefreshTokenExpiration = TimeSpan.FromDays(Convert.ToInt32(refreshTokenValidForDaysString));
    });
    var defaultPolicy =
            new AuthorizationPolicyBuilder()
                .RequireAuthenticatedUser()
                .Build();
    
    services.AddAuthorizationBuilder()
        .AddDefaultPolicy("defaultPolicy", defaultPolicy)
        .AddPolicy(Policies.HasAdminPrivileges, bu => bu
                .RequireRole("Administrator", "Owner")
                .Combine(defaultPolicy))
        .AddPolicy(Policies.ActiveSubscriptionPolicy, bu => bu
            .AddRequirements(new ActiveSubscriptionRequirment())
            .Combine(defaultPolicy));
    services.AddIdentityCore()
    .AddRoles()
    .AddUserManager<UserManager>()
    .AddSignInManager<SignInManager>()
    .AddRoleManager<RoleManager>()
    .AddEntityFrameworkStores()
    .AddApiEndpoints();
    public async Task<Results<Ok, EmptyHttpResult, BadRequest>> Auth(LoginModel model)
    {
        model.IsPersistent = false;
        var user = await _userManager.FindByNameAsync(model.Username);
    
        if (user is null)
        {
            return TypedResults.BadRequest("Wrong Username or Password");
        }
    
        var result = await _signInManager.CheckPasswordSignInAsync(user, model.Password, false);
    
        if (!result.Succeeded)
        {
            return TypedResults.BadRequest("Wrong Username or Password");
        }
    
        _signInManager.AuthenticationScheme = IdentityConstants.BearerScheme;
    
        if (result.RequiresTwoFactor)
        {
            if (!string.IsNullOrEmpty(model.TwoFactorCode))
            {
                result = await _signInManager.TwoFactorAuthenticatorSignInAsync(model.TwoFactorCode, model.IsPersistent, rememberClient: model.IsPersistent);
            }
            else if (!string.IsNullOrEmpty(model.TwoFactorRecoveryCode))
            {
                result = await _signInManager.TwoFactorRecoveryCodeSignInAsync(model.TwoFactorRecoveryCode);
            }
        }
    
        if (!result.Succeeded)
        {
            return TypedResults.BadRequest(result.ToString());
        }
    
        var audience = HttpContext.Request.Host.Value;
    
        var userRole = await _userManager.GetRolesAsync(user);
    
        if (userRole is null || !userRole.Any())
        {
            return TypedResults.BadRequest("User does not have a role for the tenant");
        }
    
        var claimsIdentity = await SetClaimsIdentityAsync(user, userRole.First(), _tenantProvider.GetTenantId());
    
        await _signInManager.SignInWithClaimsAsync(user, model.IsPersistent, claimsIdentity.Claims);
    
        // The signInManager already produced the needed response in the form of a cookie or bearer token.
        return TypedResults.Empty;
    }
    {
      "tokenType": "Bearer",
      "accessToken": "CfDJ8NmarrhT4vpMpTrqGch3MuAX-tLNFXjwBC27fIwhrgQwxtX_2Bo014ZtszsYBEr2QMSEKEVAiT97c3ChVnl3ys58PGT-HV7eXzFaw8ON_nmeKvdvuGeWIJvc62cpxkI7n4ywQHOwpr4oZJadNToi1ErAgr8CeKY5AHkIcBTbKIJYWeeJKD02syv4Hv9KQgx7wqEgqsXz9pZAZJ524Zg0oRDf0cb-KX2Ym4BBXZj0oyYuhEYAv6v8Bt-pT2z3CUU4i3CsJBTEwkXaLXFpwTJBPL087nw2dTcl2QIolKtGBQihVZZP77KYovDJ9UEwrInk989pjl690eZgKAU4Z8y6U-NcTD8QX72v2DOtIVChtO2YmKr9a_ivqHq3XlJVn_GFJpXL-jRZ_o-9Ds6pM4B5gdCm7vy1-q4_HjKdlKoNFFM-frQ_ohQBJsq2L3YSdh7q6TjCh5mAImZxX2Q5sP-B_VDnXiXry-FGlAarWTJPDdin_Hu5gLtDRZ7brLHAWGej4ZqGHv4ZrH8gBtv2ykU12XNORmETa9iNE8aNOozEzZPtF4IF_F_1Hl7sAAV8cHHKkcTU3G_a7IbZOhFjKbl-2606XHnbIUvrLOWrtYeqaA_HpJOo9acHWT5ClShEdNoH-9Hah3kl_Nnzr7nRNjh46hvs0pJRQaWIrdanaZYjQfFkFvhV50e4KeMziq4jOOiODvMrhzFhTMRRKCX2g2Bu92-zD2EnQc6et2xD2IhbYUJxHuKAU9lBo7xS4d85sHg0aRtGE2RoNA4_xHEcG1WqeMKIU9I8sTFug4cIayVkb6JOz3gmpTpdYlVpzLWDrcmZ5UGqVSdUMjhDzVSeqmp2LGxXCfP4xBKnw7-I9suXugvTKQzsF-zrjoOcbdALpg1K-Dht-pnQb-lhSxiLqBSNiuQM1qS6-FT7-YtFyhn14C8ROdzSNoiArZIvHGi0XBA3O4xm463703f6pOZt0yV2USOZSWqf1J5PRlctiIKelFEXFO5DmV3bFELsEcoxp_ayp76uic_GzF_uuf3Wu8f7Npy5XkvPuEw-epSQ9jYkrHhLEZPpqsjpcAUb3M6V981uB9RJlywfPJVsQFgFbkjUMFTZb584gyx0QHQ86IrEEdDGIDRaLFVNI7P86Usa2DAiQcwZjxo6Yh06_I6Rh2GOuhilfihN4VqsdHptYoBO3PBahD6XpoG1O-Oj-JjqD82tMbSFaXXlLMN5724HzbIcDO9f6mh_Byw-xMGnp70bYtZy0rj1MZJZu6BvByNN_Jdjtyv23zUZGWf_v9VcPLeEghcCjeUsQtRY00Y2ywqBCRGdwo1Ym2xyN8NNA3rCLJIhQBJTPlWywuUllu8GhDbGI7tTlfWbhVS7UENCqZkku5lFD6nrJtyNC37zXL_3dLoS8AvysHHl6zrnkuCySd9ypDISg49up8bIzB5ckubdzzKH",
      "expiresIn": 7200,
      "refreshToken": "CfDJ8NmarrhT4vpMpTrqGch3MuCtAiVbqSOXgWeMEwHPqu91DjW6uTimLH37a31VuT4-Cd4xvk6XOqggts7QJqN9GoCvTr2-uY1qI5EzDESUbiU6dRAL8PYNAB2x2x2_f5Gz13BmvckzAw9adeXkuy1aNtTm9NixsOg41hMSfRyDqsbUsxvmEmsPUjDN-QNfvLw33eZ4KXu9FJn48bl1u5HnUVn58LaQqTEawvSr5k8VavhB3euxoxszZacs0SeGp4Mjamo8niKA72HNJ4txAfybDwLAUtnp9wIXupBWz8hucaaEWwZyB5qbXTjGIlmxPdRvww_teJy_bJ6ZrIslgxoScqADgyQGG9uEhyI2NqSVBHkx_OW-19CqGmsuatGGndx57HdOcYVQ25PBgRI2zFVcRZWBIyGMuO5R4_l8Vx9OPQf2PgnpRY8TsXdBllue2aj9991yUOacngilT4cNCysoH-jfdwpX7-4U2cHDL-Iu8AAVdYnURZ3qqZhqiV0jk3dxAnjIKsAt_hEp70l2IC23GAeF52LFSpuHd3PSYngek1Zi_z65nm7uLmGlYI29lGYAj6KpY5NN6cD58zljG54H8K7pWR_D40jJecAUtE2oSTr49v45ywDv7eY7JNp74Ni_XJZmIeBpcTr3HjhOH55h969O2vT0mRdtHPJPhLwfiT68CKQ46I330R2J4dxCURcMz92Yrh9B5C-V73qjk-WadjPgoml2xpx28Q2zjccuXWPa5iWHeA-i-aKN4BsytEzrWoosg-jwPulz44ywXjWiW49_oharD38jhGc7RnN8LUXF0S3CaaF6wd0K4tBT-QjDinS3ngfRaRoax9WVcEmuacc2LGiNs_TjN7StscC862IqZytflRCp1newItW1UF-THhAOJG_Lnt4VYdSok1pb4ZmrOfisru7lfHYX5Y7KZIKsJ5SeJDueLEI_mwiyjwthOi1XFjPEPVnp1M7N9LpxQfY80qwTgxCMV6LR1JjInTPL-Vozg-c0wAYqcceC8Ef7AcjSU6EcYCpOZmTb8XaJzHU1DWlxovJWB2yX5F3Oqi-WEPMkMUhj3RqOcsS_2luE9syt8wKvgq84xLU2hJyFbV1TL1LbEHhHVEc_84lJaVOZNEkapYWUvKBeiH1lfo_RswSjsTLS8YasIsMykL2CMPNEMZTlHbC25uP42S9DJ9Up6PF4uX7lZeBh6iFX-9IF4H-9f8-VetIiRZdzL8kRMcV91hTQ4a2QHslB8LlU8GOdMSAV5_lw7RsaTfq8-wiq_3nPuV4AghKvEFRCpCKkGE0tzQ2cU5WaJZFQnndHgMAl7smSnDVkpmuix1tNs37_tbsEFa8d7Q16miaNEHyPVuWYq-8meiyOrOse6Vxd5TO522fu6luaVCCAvhccBxNJl0V2ynRcNfldFoTvz4N6VTw-CWrq2j1J3xRtbdRkvuip"
    }

    also is there a way to make the refresh token shorter like way shorter to fit in url?

    • Jeremy LiknessMicrosoft employee 0

      The new tokens are not JWT tokens. They are custom and are intended to be securely passed in API requests and not as part of the URL.

      • Ahmed Mohamed Abdel-Razek 0

        1- i want to be able to decode and read my ‘Access Token’ in the front end like ‘JWTs’
        i know it’s “protected” but is there a way to “unprotect” it and make it readable from the front like ‘JWTs’
        if not is there any plans to support that in the future?

        2- i don’t want to use the refresh token as part of url to pass it around webpages i want to be able to send it to desktop/mobile apps via ‘Protocol Handler’ but right now it keeps complaining about something i assumed it was the token length because the old short custom one i made was working but i will look into it again it might be something in my apps and not the token

        and thanks

  • Steven Archibald 0

    IIRC, some recent versions of Identity relied on Duende Identity Server. If you wanted to use Identity in your business, you had to purchase a license from Duende to use their Identity server that is packaged up as part of Identity.

    Is this still the case?

    • Ahmed Mohamed Abdel-Razek 0

      no, all of this updates to remove Duende dependencies
      it’s all microsoft libraries by default now

  • Paul Astramowicz 0

    I’m developing a new .net 8 MAUI app which uses the new .NET SPA Identity Bearer token API ends. Is it possible to maybe add a RATE LIMITER on top of the /REGISTER endpoint somehow? I would like to prevent DDOS attacks on the /REGISTER endpoint API.

    This:
    https://devblogs.microsoft.com/dotnet/announcing-rate-limiting-for-dotnet/

    thanks,

    Paul Astramaowicz

    • Jeremy LiknessMicrosoft employee 0

      Can you submit this request in our repo so we can consider it for .NET 9 planning?

  • Preet Ranjan 0

    faced a very new issue while trying out new api end points with SQLite provider. This is while calling the register endpoint

    Microsoft.EntityFrameworkCore.DbUpdateException: An error occurred while saving the entity changes. See the inner exception for details.
     ---> Microsoft.Data.Sqlite.SqliteException (0x80004005): SQLite Error 19: 'NOT NULL constraint failed: AspNetUsers.UserName'.
       at Microsoft.Data.Sqlite.SqliteException.ThrowExceptionForRC(Int32 rc, sqlite3 db)
       at Microsoft.Data.Sqlite.SqliteDataReader.NextResult()
       at Microsoft.Data.Sqlite.SqliteCommand.ExecuteReader(CommandBehavior behavior)
       at Microsoft.Data.Sqlite.SqliteCommand.ExecuteReaderAsync(CommandBehavior behavior, CancellationToken cancellationToken)
       at Microsoft.Data.Sqlite.SqliteCommand.ExecuteDbDataReaderAsync(CommandBehavior behavior, CancellationToken cancellationToken)
       at Microsoft.EntityFrameworkCore.Storage.RelationalCommand.ExecuteReaderAsync(RelationalCommandParameterObject parameterObject, CancellationToken cancellationToken)
       at Microsoft.EntityFrameworkCore.Storage.RelationalCommand.ExecuteReaderAsync(RelationalCommandParameterObject parameterObject, CancellationToken cancellationToken)
       at Microsoft.EntityFrameworkCore.Update.ReaderModificationCommandBatch.ExecuteAsync(IRelationalConnection connection, CancellationToken cancellationToken)
       --- End of inner exception stack trace ---
       at Microsoft.EntityFrameworkCore.Update.ReaderModificationCommandBatch.ExecuteAsync(IRelationalConnection connection, CancellationToken cancellationToken)
       at Microsoft.EntityFrameworkCore.Update.Internal.BatchExecutor.ExecuteAsync(IEnumerable`1 commandBatches, IRelationalConnection connection, CancellationToken cancellationToken)
       at Microsoft.EntityFrameworkCore.Update.Internal.BatchExecutor.ExecuteAsync(IEnumerable`1 commandBatches, IRelationalConnection connection, CancellationToken cancellationToken)
       at Microsoft.EntityFrameworkCore.Update.Internal.BatchExecutor.ExecuteAsync(IEnumerable`1 

    Is there a way to add scaffolded item just like identity scaffold in MVC.

    • Jeremy LiknessMicrosoft employee 0

      Can you please file an issue for the bug you encountered so the engineering team can take a look? We are working on providing scaffolding in future release of Visual Studio.

      Jeremy

  • Liu, Nianwei 0

    I noticed the “Microsoft Identity Platform” option is removed from the Visual Studio Blazor template, now you can only do “none” or “individual accounts”. In NET6 you can generate Blazor code based on Microsoft Identity Platform from project creation. What’s the rationale behind that move? Is that something that maybe adding back?

    • Jeremy LiknessMicrosoft employee 0

      The new Blazor Web model is completely different and there was no way to just migrate the code. We had to remove it until we could recreate it for the new app model. We are working on samples now that will eventually be worked back into templates.

      • Liu, Nianwei 0

        Thanks, looking forward to the updates

  • Jim Braun 0

    Hi Jeremy,
    For entrepreneurs that rely on open source, free, community options to build something, It’s been a tough few years with Dotnet and authentication since Duende decided to pull the plug on Open Source Identity Server. It seems that the Microsoft strategy has been to get everyone onboard with paying for Entra instead of reaching an agreement with Duende or committing to support the Identity Server 4 project. For the masses who are not developing corporate funded line of business applications, and still rely on Identity Server, we’ve been left playing our violins on the deck of the Titanic.

    So, I was excited to hear that there is something at all going on with Identity at the DotnetConf.net 2023, but disappointed with the results. Andrew Lock explains it best in his blog post that everyone should read. https://andrewlock.net/should-you-use-the-dotnet-8-identity-api-endpoints/ He’s a lot smarter than me, about Identity for sure.

    The message has been “Identity is too tough, you shouldn’t do it, you’re not smart enough, pay us to do it for you”. In your session https://youtu.be/c__Sf9j_Q2Y?si=kCEzTU63kSJ0roQE&t=36 Auth was the most upvoted issue, but a new Identity Server is such a large undertaking. Well, we did have a pretty good solution and we could make a secure enough web application fairly easily until budgets or profit could afford us other options. If you’re really committed to bringing back a free, reliable, hosted identity solution, I’m sorry, but this isn’t it. We’ve got legacy applications that have to stay on board with the Titanic and will keep fiddling and hope that this pre-beta effort turns into something before we all drown. Either that or we’ll all have to spend a lot of time treading water while we implement our own Oauth2 OIDC solutions.

    Jim Braun

  • Pramod Lawate 0

    It’s a pleasure to come across this article. However, considering that we are in 2023, it would be greatly appreciated if a comprehensive YouTube video could be created for the same content. This would significantly enhance the user experience and accessibility of the information. Thank you.

  • Pranto Das 0
    @attribute [StreamRendering]

    When the login button is clicked on the Blazor Identity UI Login page, it produces errors if StreamRendering is enabled. I have searched for the cause of the issue, but I couldn’t find any.

    Note: We have used Blazor Server

    System.InvalidOperationException: Headers are read-only, response has already started.
       at Microsoft.AspNetCore.Server.Kestrel.Core.Internal.Http.HttpHeaders.ThrowHeadersReadOnlyException()
       at Microsoft.AspNetCore.Server.Kestrel.Core.Internal.Http.HttpResponseHeaders.Microsoft.AspNetCore.Http.IHeaderDictionary.set_SetCookie(StringValues value)
       at Microsoft.AspNetCore.Http.ResponseCookies.Append(String key, String value, CookieOptions options)
       at Microsoft.AspNetCore.Authentication.Cookies.ChunkingCookieManager.AppendResponseCookie(HttpContext context, String key, String value, CookieOptions options)
       at Microsoft.AspNetCore.Authentication.Cookies.CookieAuthenticationHandler.HandleSignInAsync(ClaimsPrincipal user, AuthenticationProperties properties)
       at Microsoft.AspNetCore.Authentication.AuthenticationService.SignInAsync(HttpContext context, String scheme, ClaimsPrincipal principal, AuthenticationProperties properties)
       at Microsoft.AspNetCore.Identity.SignInManager`1.SignInWithClaimsAsync(TUser user, AuthenticationProperties authenticationProperties, IEnumerable`1 additionalClaims)
       at Microsoft.AspNetCore.Identity.SignInManager`1.SignInOrTwoFactorAsync(TUser user, Boolean isPersistent, String loginProvider, Boolean bypassTwoFactor)
       at Microsoft.AspNetCore.Identity.SignInManager`1.PasswordSignInAsync(TUser user, String password, Boolean isPersistent, Boolean lockoutOnFailure)
       at Microsoft.AspNetCore.Identity.SignInManager`1.PasswordSignInAsync(String userName, String password, Boolean isPersistent, Boolean lockoutOnFailure)
       at TastyEatsBD.WebApp.Components.Account.Pages.Login.LoginUser()
       at Microsoft.AspNetCore.Components.ComponentBase.CallStateHasChangedOnAsyncCompletion(Task task)
       at Microsoft.AspNetCore.Components.Forms.EditForm.HandleSubmitAsync()
       at Microsoft.AspNetCore.Components.ComponentBase.CallStateHasChangedOnAsyncCompletion(Task task)
       at Microsoft.AspNetCore.Components.RenderTree.Renderer.GetErrorHandledTask(Task taskToHandle, ComponentState owningComponentState)
       at Microsoft.AspNetCore.Components.RenderTree.Renderer.GetErrorHandledTask(Task taskToHandle, ComponentState owningComponentState)
       at Microsoft.AspNetCore.Components.RenderTree.Renderer.<WaitForQuiescence>g__ProcessAsynchronousWork|54_0()
       at Microsoft.AspNetCore.Components.RenderTree.Renderer.WaitForQuiescence()
       at Microsoft.AspNetCore.Components.Endpoints.EndpointHtmlRenderer.SendStreamingUpdatesAsync(HttpContext httpContext, Task untilTaskCompleted, TextWriter writer)

Feedback usabilla icon