Publishing using MSDeploy In-Process Deployment or Remote Agent
Through the Beta 2 release, VS 2010 had only supported publishing to servers using MSDeploy’s IIS deployment handler technology integrated with the “Web Management Service”, a.k.a. WMSVC. As long as you had an account on a hosting server using WMSVC, you could use MSDeploy to update your web content. This is the msdeploy technology most people will use when publishing to a hosted site and, therefore, was released first. (In case you are interested in how the server should be configured, check out the link: http://technet.microsoft.com/en-us/library/dd722796(WS.10).aspx)
In the RC release of VS 2010, We added support for two more msdeploy technologies that target specific deployment situations where WMSVC is not available. (By the way, the publish method “msdeploy” has been renamed to “Web Deploy”, to help provide a consistent brand across the different team using this technology.)
Publish locally via In-Process Deployment
You can now publish to your local development machine using the local msdeploy command instead of WMSVC, this is known as “In-Process Deployment”.
For example, if you signed up for an account from a hosting server company supporting msdeploy; but wanted to test your site locally first, this option provides you with this ability (even on a machine running XP) as long as IIS is installed. While running Visual Studio in admin mode, follow these steps:
- Create a publish profile.
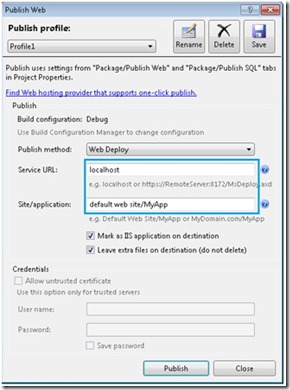
- In the Publish Web dialog, enter one of the following in the “Service URL” textbox: “localhost” or the local machine’s name.
- Fill in the “Site/Application” field with the desired destination name and invoke publishing.
Publish remotely via MSDeploy Remote Agent Service
The Remote Agent Service is relatively easy to set up and is supported on IIS 6 boxes in addition to IIS 7. This is a good option for remote deployments on an intranet, and is especially useful in a team development environment where members need to routinely deploy builds during testing. When deploying to the Remote Agent Service you must provide administrator credentials on the destination machine to successfully publish.
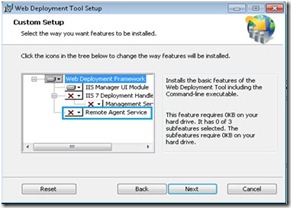
- The Remote Agent Service is not installed by default during the ‘typical’ Web Deployment installation. If it is not installed on the destination machine, you will need to add it by changing the installed components for the Web Deployment Tool entry in Add/Remove Programs or perform a custom install if installing for the first time.

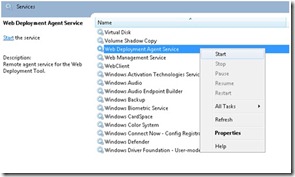
- Start the Web Deployment Agent Service on the destination machine. Unless the service is set to auto start, you will need to perform this step everytime you deploy after the destination machine has restarted.

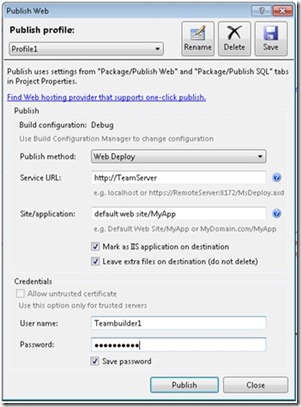
- In the publish dialog, the Service URL should be set to: http://<server name> (see the figure below for an example)
- Fill in administrative credentials for the destination server and start the publish

UI polishing to improve usability
With more deployment options squeezed onto the existing publish dialog, we thought that developers new to deployment might be overwhelmed. On the other hand, we didn’t want to flood the UI with controls and explanatory text designed solely for beginners, as this would become less useful once the knowledge was gained. With these opposing needs in mind, we made some strategic changes to the Publish dialog UI.
Dynamically disabling and enabling appropriate controls for the current publish method.
Depending on the publish method chosen, we now dynamically enable and disable controls. When you choose “Web Deploy” and utilize the “in-process deployment” method, we disable the entire Credentials section. If you utilize the “remote agent” method, we disable the “Allow untrusted certificate” checkbox in the Credentials section.
Hint button to help you understand Service URL and Site/Application.
If you select the “Web deploy” publish method there are now many ways to specify the Service URL and Site / Application. To increase the amount of information available to users while simplifying the Publish Web UI, we added 2 information buttons that provide a more complete set of explanations and examples. To see these explanations and examples, simply hover over these information buttons.
The Publish dialog has been through a lot of changes back and forth. If you have additional suggestions, please do let us know. Hope you will like the deployment feature and use it to take your webs live.
Yugang Wang
Microsoft Visual Web Development Team


0 comments