


In this post we will build we will build a TODO app from start to finish using Aspire and React. We will do this using the CLI and C# Dev Kit. The todo items will be stored in a SQLite database. The React front-end will use a Web API to handle all the interactions with the data. I’m going to be showing this with the dotnet CLI, Aspire CLI and C# Dev Kit, but you can follow along with any IDE, or editor, of your choice. The resulting app can be published to any web host which supports ASP.NET Core – including Linux containers. First let’s start with the prerequisites to ensure you have all the components needed to follow along this tutorial.
Source Code
All the code from this post can be found at sayedihashimi/todojsaspire.Prerequisites
In this tutorial, we will walk through installing Aspire, but you should have these dependencies installed. You can learn more at Aspire Prerequisites Installing these items will not be covered in this post.
- .NET 9.0
- nodejs
- VS Code with C# Dev Kit
- Container runtime
Install Aspire
For detailed instructions on getting Aspire, and its dependencies, installed visit
Aspire setup and tooling. We will go through the basics here.
After installing .NET 9 and the other dependencies we will install the project templates using dotnet new.
Workload Migration
As of version 9, Aspire no longer requires a separate workload installation. Usedotnet workload list to check installed workloads and dotnet workload uninstall to remove the Aspire workload.Install the new Aspire CLI. The command below will install the tool globally and the dotnet new templates.
On Windows:
iex "& { $(irm https://aspire.dev/install.ps1) }"On Linux, or macOS:
curl -sSL https://aspire.dev/install.sh | bash -sAfter installing this tool, you can run it by executing aspire on the command line. You can explore the usage of this tool with aspire -–help. Now that we have the tools installed, let’s move on and create the Aspire app.
Create the Aspire app
Now that the machine is ready with all the prerequisites we can get started.
Open an empty folder in VS Code and add a new directory named src for the source files.
Let’s create the Aspire app to start with. In VS Code open the command palette
CTRL/CMD-SHIFT-P and type in New Project. See the following image.
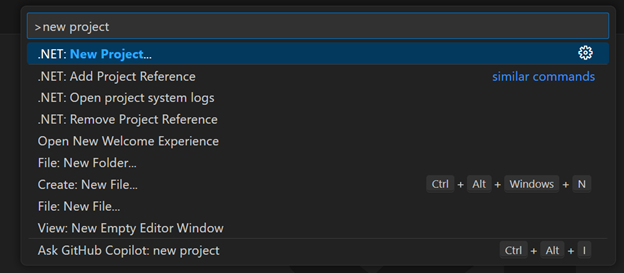
Select the Aspire Starter App template and hit enter.
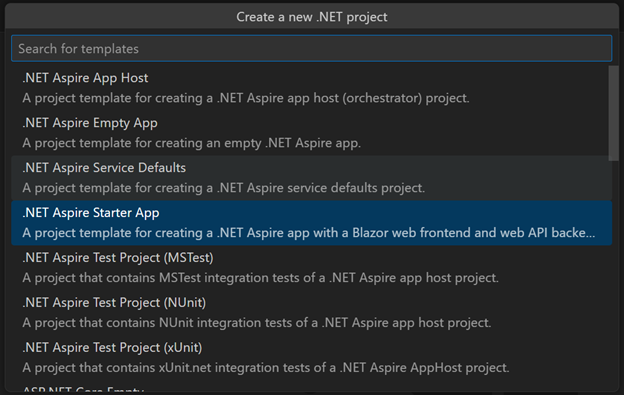
When prompted for the project name use “TodojsAspire” and select “src” as the destination folder to follow along.
I will walk you through using New Project to create the Aspire app in the video below. Alternatively, you can use dotnet new aspire-starter or aspire new aspire-starter
in a terminal for the same result.
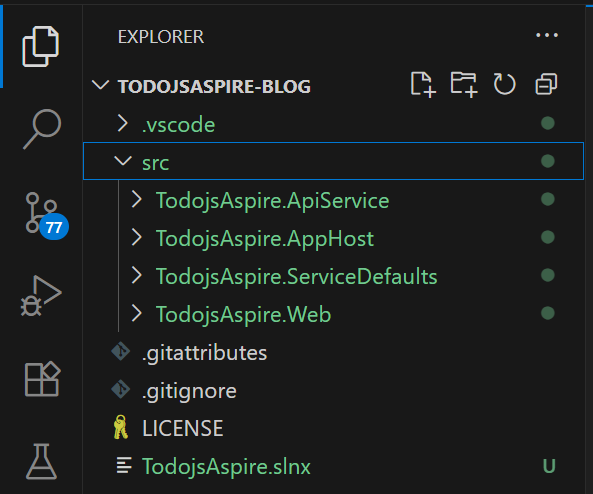
Now that the starter app has been created you should see the following in the Explorer in VS Code. In this case I added the following files before creating the project .gitattributes, .gitignore and LICENSE.
Now would be a good time to execute a build to ensure that there are no build issues.
Open the command palette with CTRL/CMD-SHIFT-P and select “.NET: Build”. You can also use the Solution Explorer to perform the build if you prefer that method.
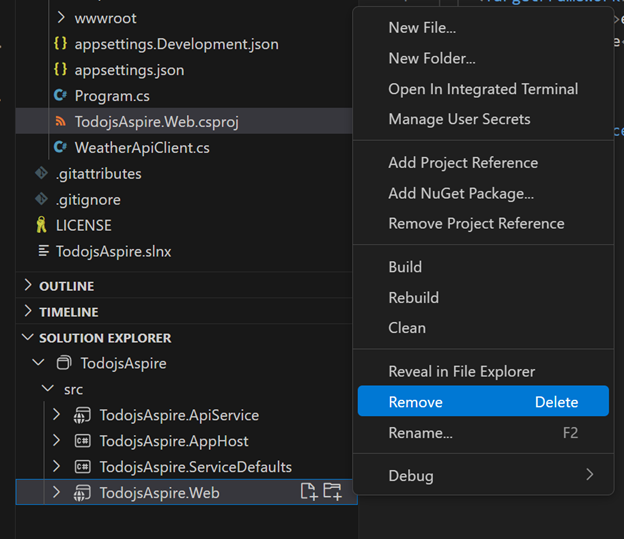
When using the Aspire Starter App template it will create a few projects including a front-end with ASP.NET Core. Since we are going to use React for the front-end, we can delete the TodojsAspire.Web project and remove any references to it in the remaining files. The easiest way to do this project is to use the Solution Explorer which comes with C# Dev Kit. After opening the Solution Explorer, right click on the TodojsAspire.Web project and select Remove. See the following image.
After deleting the project we need to remove any references to it. The things that need to be removed include.
- Project reference in TodojsAspire.AppHost
- Update AppHost in TodojsAspire.AppHost
In the command palette you can use .NET: Remove Project Reference to delete the reference in TodojsAspire.AppHost. Then delete the following code from the AppHost.cs file in the same project.
builder.AddProject<Projects.TodojsAspire_Web>("webfrontend")
    .WithExternalHttpEndpoints()
    .WithHttpHealthCheck("/health")
    .WithReference(apiService)
    .WaitFor(apiService);
Soon we will replace these lines with what is needed to integrate the React app.
You should also delete the TodojsAspire.Web folder from the src directory.
After making those changes, you should do a build to ensure that nothing was missed. To start a
build, open the command palette and select Task: Run Build Task and then select dotnet: build.
Now that we have cleaned up the solution, we will move on to start updating the API project to expose endpoints to manage
the TODO items.
Configure the Web API
To get the API project going, we will first add a model class for the TODO items, and then use dotnet scaffold to generate the initial API endpoints.
Add the Todo class (Todo.cs) below to the TodojsAspire.ApiService project.
using System.ComponentModel.DataAnnotations;
namespace TodojsAspire.ApiService;

public class Todo
{
    public int Id { get; set; }
    [Required]
    public string Title { get; set; } = default!;
    public bool IsComplete { get; set; } = false;
    // The position of the todo in the list, used for ordering.
    // When updating this, make sure to not duplicate values.
    // To move an item up/down, swap the values of the position
    [Required]
    public int Position { get; set; } = 0;
}
Now that we have added the model class, we will scaffold the API endpoints with dotnet scaffold.
We can use dotnet scaffold to generate API endpoints for the Todo model. To install this tool, execute the following command.
dotnet tool install --global Microsoft.dotnet-scaffoldWhen using dotnet scaffold it’s easiest to cd into the project directory and then execute it from there. This tool is interactive by default, to get started execute dotnet scaffold. Make the following selections.
- Category = API
- Command = Minimal API
- Project = TodojsAspire.ApiService
- Model = Todo
- Endpoints file name = TodoEndpoints
- Open API Enabled = No
- Data context class = TodoDbContext
- Database provider = sqlite-efcore
- Include prerelease = No
You can see the entire interaction in the following animation.
The following changes were made to the TodojsAspire.ApiService project.
- TodoEndpoints.cs file was created with the Minimal API endpoints.
- Program.cs was modified to; initialize the SQLite database, get the connection string from appsettings.json and to a call to map the endpoints in TodoEndpoints.
- The project file was modified to add needed NuGet packages.
- appsettings.json was modified to add the connection to the local db file.
Kick off another build to ensure that scaffolding has worked successfully. If you get any build errors regarding missing packages, ensure that the following packages have been installed.
- Microsoft.EntityFrameworkCore
- Microsoft.EntityFrameworkCore.Design
- Microsoft.EntityFrameworkCore.Sqlite
- Microsoft.EntityFrameworkCore.Tools
- System.ComponentModel.Annotations
You can install packages using dotnet add package [PACKAGE NAME].
Open the new file TodoEndpoints.cs so that we can take a look.
Since this is a simple app, we can simplify the URL to the API. When you have the TodoEndpoints.cs class open in VS Code, use Replace all to replace /api/ with /.
The resulting class, TodoEndpoints.cs, is below.
using Microsoft.AspNetCore.Http.HttpResults;
using Microsoft.EntityFrameworkCore;
using TodojsAspire.ApiService;

public static class TodoEndpoints
{
    public static void MapTodoEndpoints(this IEndpointRouteBuilder routes)
    {
        var group = routes.MapGroup("/Todo");

        group.MapGet("/", async (TodoDbContext db) =>
        {
            return await db.Todo.ToListAsync();
        })
        .WithName("GetAllTodos");

        group.MapGet("/{id}", async Task<Results<Ok<Todo>, NotFound>> (int id, TodoDbContext db) =>
        {
            return await db.Todo.AsNoTracking()
                .FirstOrDefaultAsync(model => model.Id == id)
                is Todo model
                    ? TypedResults.Ok(model)
                    : TypedResults.NotFound();
        })
        .WithName("GetTodoById");

        group.MapPut("/{id}", async Task<Results<Ok, NotFound>> (int id, Todo todo, TodoDbContext db) =>
        {
            var affected = await db.Todo
                .Where(model => model.Id == id)
                .ExecuteUpdateAsync(setters => setters
                .SetProperty(m => m.Title, todo.Title)
                .SetProperty(m => m.IsComplete, todo.IsComplete)
                .SetProperty(m => m.Position, todo.Position)
        );

            return affected == 1 ? TypedResults.Ok() : TypedResults.NotFound();
        })
        .WithName("UpdateTodo");

        group.MapPost("/", async (Todo todo, TodoDbContext db) =>
        {
            db.Todo.Add(todo);
            await db.SaveChangesAsync();
            return TypedResults.Created($"/Todo/{todo.Id}",todo);
        })
        .WithName("CreateTodo");

        group.MapDelete("/{id}", async Task<Results<Ok, NotFound>> (int id, TodoDbContext db) =>
        {
            var affected = await db.Todo
                .Where(model => model.Id == id)
                .ExecuteDeleteAsync();

            return affected == 1 ? TypedResults.Ok() : TypedResults.NotFound();
        })
        .WithName("DeleteTodo");
    }
}
This file contains the CRUD methods which are needed to support reading/writing the content from the database.
In the front-end that we will create soon, we want to give the user the ability to move tasks up/down in the list. There are lots of different ways to implement this. Since this is
a simple todo app for a single user, we don’t need to worry about having a large number of items. To keep it simple, we will add two new endpoints; MoveTaskUp and MoveTaskDown.
The code for these endpoints are below, add it below the last endpoint in the TodoEndpoints class.
// Endpoint to move a task up in the list
group.MapPost("/move-up/{id:int}", async Task<Results<Ok, NotFound>> (int id, TodoDbContext db) =>
{
    var todo = await db.Todo.FirstOrDefaultAsync(t => t.Id == id);
    if (todo is null)
    { return TypedResults.NotFound(); }

    // Find the todo with the largest position less than the current todo
    var prevTodo = await db.Todo
        .Where(t => t.Position < todo.Position)
        .OrderByDescending(t => t.Position)
        .FirstOrDefaultAsync();

    if (prevTodo is null)
    { return TypedResults.Ok(); }

    // Swap positions
    (todo.Position, prevTodo.Position) = (prevTodo.Position, todo.Position);
    await db.SaveChangesAsync();
    return TypedResults.Ok();
})
.WithName("MoveTaskUp");

// Endpoint to move a task down in the list
group.MapPost("/move-down/{id:int}", async Task<Results<Ok, NotFound>> (int id, TodoDbContext db) =>
{
    var todo = await db.Todo.FirstOrDefaultAsync(t => t.Id == id);
    if (todo is null)
    { return TypedResults.NotFound(); }

    // Find the todo with the smallest position greater than the current todo
    var nextTodo = await db.Todo
        .Where(t => t.Position > todo.Position)
        .OrderBy(t => t.Position)
        .FirstOrDefaultAsync();

    if (nextTodo is null)
    { return TypedResults.Ok(); } // Already at the bottom or no next todo

    // Swap positions values
    (todo.Position, nextTodo.Position) = (nextTodo.Position, todo.Position);
    await db.SaveChangesAsync();
    return TypedResults.Ok();
})
.WithName("MoveTaskDown");
MoveTaskUp will find the task with a next lower position, and then swaps the position values. This line of code
(todo.Position, prevTodo.Position) = (prevTodo.Position, todo.Position); uses tuple assignment to swap the position values in a single line of code.
Configure the database
Now that we have all the database related code ready, we need to create an EF migration. After we create the migration we will integrate the database with the Aspire dashboard.
To create the EF migration, open the terminal in VS Code,
cd into the TodojsAspire.ApiService project directory (src/TodojsAspire.ApiService). Then execute the following command.
dotnet ef migrations add TodoEndpointsInitialCreate
The migrations command will generate a new migration named TodoEndpointsInitialCreate and add it to the project. At this time you would typically also run dotnet ef database update but that isn’t needed in this case.
We will configure the project to run migrations when it is started by the AppHost.
Let’s configure the database in the AppHost now.
For SQLite support in the AppHost, we will need to use the Aspire Community Toolkit. Execute the command below in the “src” folder to install SQLite support in the AppHost.
aspire add sqliteFollow the prompts to add the package. This will add a PackageReference to the AppHost and make other APIs available for the builder.
Open the AppHost.cs file in the TodojsAspire.AppHost project. Replace the contents with the code below.
var builder = DistributedApplication.CreateBuilder(args);

var db = builder.AddSqlite("db")
    .WithSqliteWeb();

var apiService = builder.AddProject<Projects.TodojsAspire_ApiService>("apiservice")
    .WithReference(db)
    .WithHttpHealthCheck("/health");

builder.Build().Run();
In AppHost.cs we have added a SQLite database and registered the API service. We called WithReference(db) on the API so that it gets the connection
string to the database.
To configure the ApiService we will need to add the package CommunityToolkit.Aspire.Microsoft.EntityFrameworkCore.Sqlite and update the connection
to the database. In a terminal first cd into the ApiService project and execute the command below.
dotnet add package CommunityToolkit.Aspire.Microsoft.EntityFrameworkCore.SqliteModify the Program.cs in the Api project to have the following contents.
using Microsoft.EntityFrameworkCore;

var builder = WebApplication.CreateBuilder(args);

builder.AddSqliteDbContext<TodoDbContext>("db");

// Add service defaults & Aspire client integrations.
builder.AddServiceDefaults();

// Add services to the container.
builder.Services.AddProblemDetails();

// Learn more about configuring OpenAPI at https://aka.ms/aspnet/openapi
builder.Services.AddOpenApi();

var app = builder.Build();

// Configure the HTTP request pipeline.
app.UseExceptionHandler();

if (app.Environment.IsDevelopment())
{
    app.MapOpenApi();
}

app.MapDefaultEndpoints();

app.MapTodoEndpoints();

using var scope = app.Services.CreateScope();
var dbContext = scope.ServiceProvider.GetRequiredService<TodoDbContext>();
await dbContext.Database.MigrateAsync();

app.Run();
The most important changes here are that we changed how the database is being initalized. Previously the connection string was coming from the
appsettings.json file from the API project, it’s now being injected with builder.AddSqliteDbContext<TodoDbContext>("db"). You should remove the
connection string from the appsettings.json file now.
At the bottom of Program.cs we have added await dbContext.Database.MigrateAsync() to ensure that the database is up-to-date when
the AppHost starts the API project. We will now move on to try out the Web API to ensure there are no issues.
Exercise the API to ensure it’s working as expected
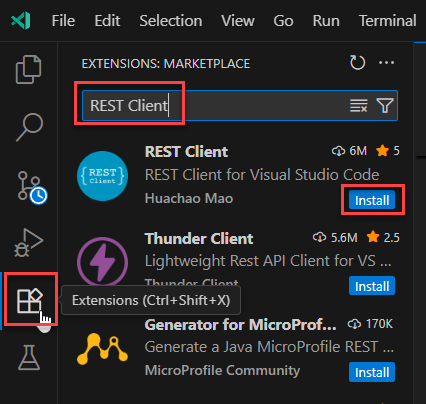
Now that we have all the endpoints that we need, it’s time to test this out. To test this we will add an HTTP file. For HTTP file support in VS Code, you’ll need to add an extension. There are several that you can pick from, including REST Client and httpYac. Either of those will work for our needs. For this tutorial, I’ll show it with the REST Client, but the experience with httpYac is very similar and you should be able to follow along. To install that use the Extensions tab in VS Code and type in “REST Client” in the search box, then click Install. See the next image.
In the TodojsAspire.ApiService project open the file named TodojsAspire.ApiService.http. If your project doesn’t have a file with that name, create a new one.
The name of the HTTP file doesn’t matter; you can name it whatever you like.
Before we start writing any requests in the HTTP file, run the app. To start the app, you have a few options when using C# Dev Kit. You can use the Run and Debug tab in VS Code;
you can use Start Debugging (F5) or Start without Debugging (CTRL-F5). In this case we don’t need to debug so we can use the keyboard shortcut CTRL-F5 to Start without Debugging and
choose App Host [default configuration].
You should have a .cs file opened in the VS Code editor when invoking that gesture. That will ensure that you get the right options from VS Code. When you are prompted to select
the launch configuration, choose the AppHost project. This will start the Aspire Dashboard and it will automatically startup the ApiService as well.
For detailed info on the dashboard, see this article Aspire dashboard overview – Aspire | Microsoft Learn. We will go over the basics here. In the Aspire dashboard. Below I’ve copied the key features from the dashboard article.
Key features of the dashboard include:
- Real-time tracking of logs, traces, and environment configurations.
- User interface to stop, start, and restart resources.
- Collects and displays logs and telemetry; view structured logs, traces, and metrics in an intuitive UI.
- Enhanced debugging with GitHub Copilot, your AI-powered assistant built into the dashboard.
The dashboard will show the projects which have been configured and their status. You can easily navigate to the app, view logs and other important info. This dashboard currently shows the ApiService project, the SQLite database and a web interface to interact with the database. Later when we add the React app, it will appear in the dashboard as well. See the screenshot below.
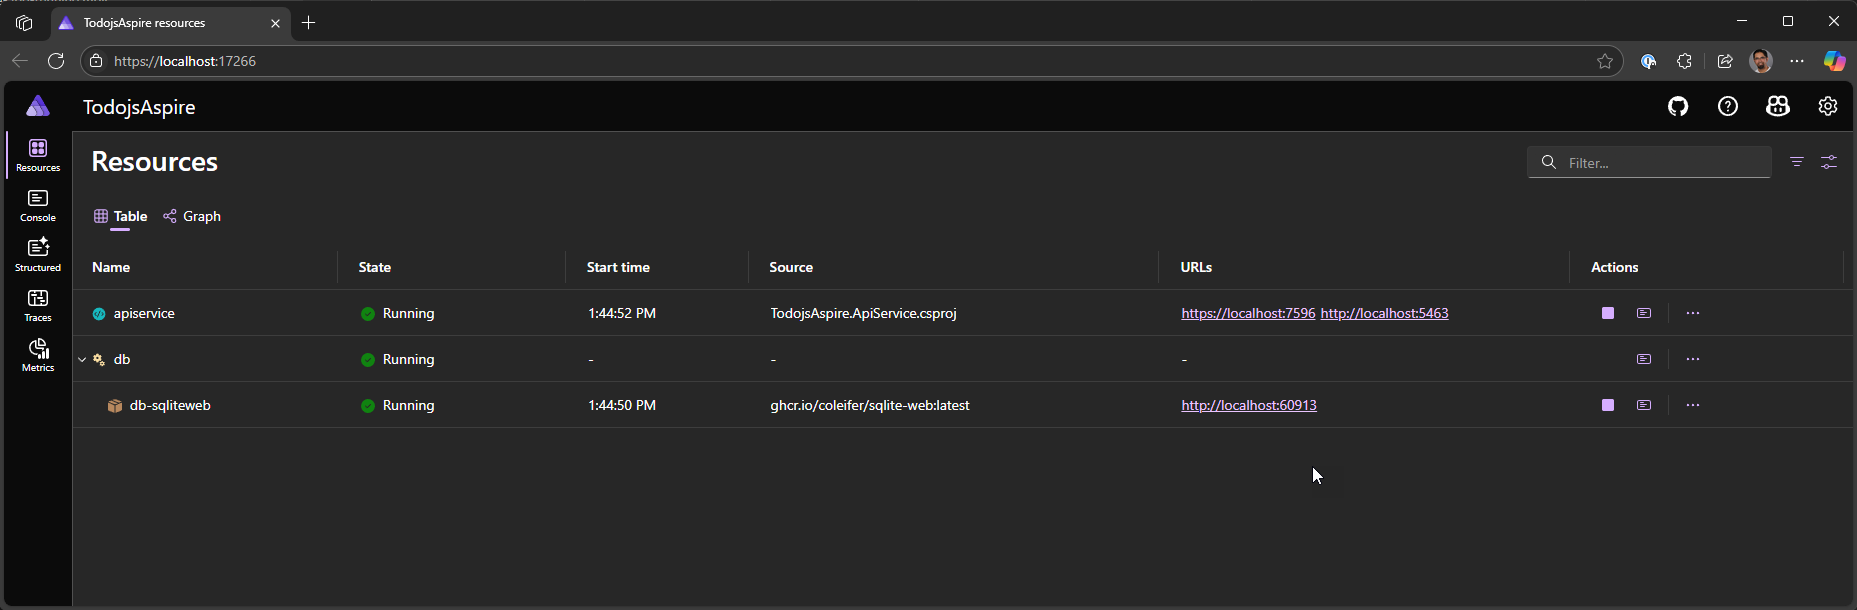
In the screenshot above, you can see the URLs for the ApiService project. Copy one of the URLs for the ApiService project, we will need that to exercise the app. You can click on the URL for db-sqliteweb to open a web interface to interact with the database, but that isn’t needed for this tutorial.
By default, when you start the AppHost, you will get a new database and the migration(s) will automatically be applied to the database to update it. If you want your local data to persist you can override this in AppHost by specifying a specific connection string to be used. Now let’s move on to create an HTTP file to ensure that the endpoints work as expected.
Below is the HTTP file, you may need to update the base url variable on the first line to match your project. For more info on HTTP file see the REST Client documentation or Use .http files in Visual Studio 2022 | Microsoft Learn (note: some of the features described aren’t supported outside of Visual Studio 2022).
@todoapibaseurl = https://localhost:7473

GET {{todoapibaseurl}}/Todo/

###

# Create a new todo
POST {{todoapibaseurl}}/Todo/
Content-Type: application/json

{
  "title": "Sample Todo2",
  "isComplete": false,
  "position": 1
}

###
POST {{todoapibaseurl}}/Todo/
Content-Type: application/json

{
  "title": "Sample Todo2",
  "isComplete": false,
  "position": 2
}
###
POST {{todoapibaseurl}}/Todo/
Content-Type: application/json

{
  "title": "Sample Todo3",
  "isComplete": false,
  "position": 3
}

###
PUT {{todoapibaseurl}}/Todo/1
Content-Type: application/json

{
  "id": 1,
  "title": "Updated Todo",
  "isComplete": true,
  "position": 20
}

###

POST {{todoapibaseurl}}/Todo/
Content-Type: application/json

{
  "title": "Sample Todo no position",
  "isComplete": false
}
###

# Delete a todo
DELETE {{todoapibaseurl}}/Todo/1

###

POST {{todoapibaseurl}}/Todo/move-up/3
###
When you paste the value for the API URL make sure to remove the trailing slash.
With this HTTP file we can exercise the app. It includes requests for most endpoints in the TodoEndpoints class. You can execute the requests with Send Request above the URL line.
You can also use Rest Client: Send Request in the command palette.
Try out the different requests to make sure things are working correctly.
Remember that the database will be wiped out when the app is restarted, so you
don’t need to worry about adding this data. When working with this file I noticed
two issues what should be addressed.
- When Todo items are returned, they are not sorted by Position.
- When a Todo item is POSTed without a position, the value for position will be assigned to 0.
To fix the first issue, specifically group.MapGet("/",, update the get endpoint to have the following code.
group.MapGet("/", async (TodoDbContext db) =>
{
    return await db.Todo.OrderBy(t => t.Position).ToListAsync();
})
.WithName("GetAllTodos");
To fix the issue regarding the missing position value, update the POST method to have the following code.
group.MapPost("/", async (Todo todo, TodoDbContext db) =>
{
    if (todo.Position <= 0)
    {
        // If position is not set, assign it to the next available position
        todo.Position = await db.Todo.AnyAsync()
            ? await db.Todo.MaxAsync(t => t.Position) + 1
            : 1; // Start at position 1 if no todos exist
    }
    db.Todo.Add(todo);
    await db.SaveChangesAsync();
    return TypedResults.Created($"/Todo/{todo.Id}", todo);
})
.WithName("CreateTodo");
With this change, when a Todo item is submitted without a value for Position, the value for Position will be set to the max value of Position in the database + 1. Now we have everything that we need for the API, we will move on to start the JS front-end.
Build the React front-end
To create the React project we will use the npm command which is installed with node. Visit Node.js — Download Node.js® to get it installed.
We will use vite as the front-end build tool.
Open a terminal, cd into the src directory and then execute the command below.
npm create vite@latest todo-frontend -- --template reactWhen prompted specify the following values.
- Framework = React
- Variant = JavaScript
This will create a new folder named todo-frontend in the src directory and then scaffold the React app into that folder. After the app has been scaffolded, npm will tell you to execute the following commands to initialize the app.
- cd todo-frontend
- npm install
- npm run dev
These commands will install the dependencies and run the app to ensure that there are no issues. If you encounter and error, delete the todo-frontend folder and try again. You can
use CTRL-C to exit the app after you execute npm run dev. Now that we have a working front-end, let’s integrate it with the AppHost. We will do that with the Aspire CLI.
We will use the Aspire CLI to help us integrate the front-end with the AppHost. We will install the node integration package in the
AppHost project.
Aspire integrations are NuGet packages that bootstrap config for you, and the Aspire CLI streamlines acquisition of them.
Execute the commands below in the src directory.
This will add the package Aspire.Hosting.NodeJs into the AppHost project. It will enable some new extensions methods. Open up the AppHost.cs file in the TodojsAspire.AppHost.
aspire add nodejsFollow the prompts to add the package.
We will add a Community Toolkit package to add Vite support. Execute the command below.
aspire add ct-extensionsWhen prompted select ct-extensions (CommunityToolkit.Aspire.Hosting.NodeJS.Extensions).
project. Add the following to that file before builder.Build().Run();.
builder.AddViteApp(name: "todo-frontend", workingDirectory: "../todo-frontend")
    .WithReference(apiService)
    .WaitFor(apiService)
    .WithNpmPackageInstallation();
This will add the front-end as an app in AppHost project and add integration with the dashboard. Now we need to configure the front-end to consume the port that the
AppHost selects for the app. Open the vite.config.js file in the todo-frontend folder. Replace the existing content with the following.
import { defineConfig, loadEnv } from 'vite'
import react from '@vitejs/plugin-react'

export default defineConfig(({ mode }) => {
  const env = loadEnv(mode, process.cwd(), '');

  return {
    plugins: [react()],
    server:{
      port: parseInt(env.VITE_PORT),
      proxy: {
        // "apiservice" is the name of the API in AppHost.cs.
        '/api': {
          target: process.env.services__apiservice__https__0 || process.env.services__apiservice__http__0,
          changeOrigin: true,
          secure: false,
          rewrite: (path) => path.replace(/^\/api/, '')
        }
      }
    },
    build:{
      outDir: 'dist',
      rollupOptions: {
        input: './index.html'
      }
    }
  }
})
This will configure a proxy so that all commands are routed through the same origin, and it injects the URL for the ApiService. That’s all the changes that are needed to integrate the front-end with the AppHost. You can start the AppHost and you should see the front-end, along with the ApiService, in the dashboard.
Troubleshooting Vite.config.js load failure
If you see an error that the vite.config.js file failed to load, runnpm install in the todo-frontend folder, then press the play button next to the front-end in the Aspire Dashboard. You shouldn’t need to restart the AppHost.The dashboard should look like the following.
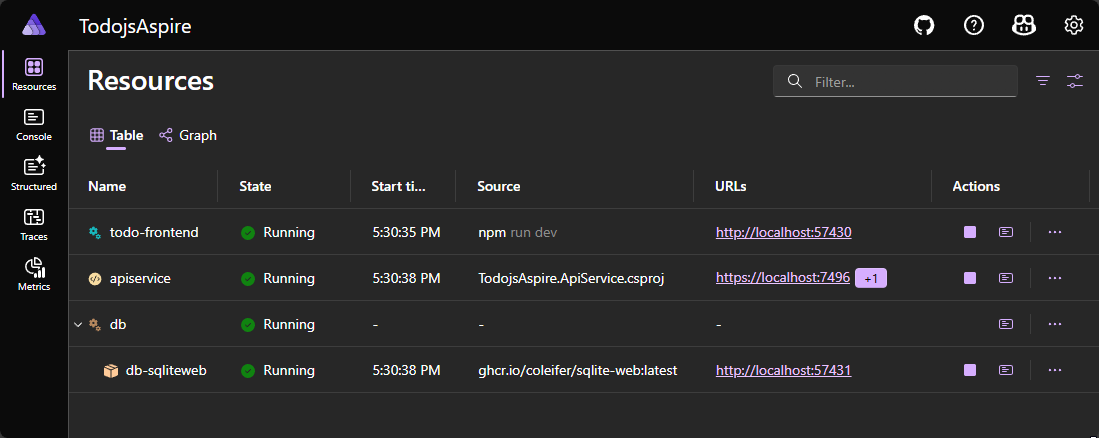
If you click on the todo-frontend URL, you’ll see the default Vite React template in the browser. Now we can start building our front-end. I’ll walk you through all the steps needed to get this app working.
First let’s add the components that we need for the todo app, and then we will update the files needed to use those components. In the todo-frontend/src folder, add a components folder. We will start with the component for a todo item, create an empty file in that folder named TodoItem.jsx. Paste in the contents below into that file.
/**
 * TodoItem component represents a single task in the TODO list.
 * It displays the task text and provides buttons to delete the task,
 * move the task up, and move the task down in the list.
 *
 * @param {Object} props - The properties passed to the component.
 * @param {string} props.task - The text of the task.
 * @param {function} props.deleteTaskCallback - Callback function to delete the task.
 * @param {function} props.moveTaskUpCallback - Callback function to move the task up in the list.
 * @param {function} props.moveTaskDownCallback - Callback function to move the task down in the list.
 */
function TodoItem({ task, deleteTaskCallback, moveTaskUpCallback, moveTaskDownCallback }) {
  return (
      <li aria-label="task">
          <span className="text">{task}</span>
          <button
              type="button"
              aria-label="Delete task"
              className="delete-button"
              onClick={() => deleteTaskCallback()}>
              🗑️
          </button>
          <button
              type="button"
              aria-label="Move task up"
              className="up-button"
              onClick={() => moveTaskUpCallback()}>
              ⇧
          </button>
          <button
              type="button"
              aria-label="Move task down"
              className="down-button"
              onClick={() => moveTaskDownCallback()}>
              ⇩
          </button>
      </li>
  );
}

export default TodoItem;
This is a basic component that will be used to display the todo item as well as elements for the actions; move up, move down and delete. We will use this component in the TodoList component that we add next. We will wire up the buttons to actions in the list component. Add a new file named TodoList.jsx in the components folder and add the following content.
import { useState, useEffect } from 'react';
import './TodoList.css';
import TodoItem from './TodoItem';

/**
 * Todo component represents the main TODO list application.
 * It allows users to add new todos, delete todos, and move todos up or down in the list.
 * The component maintains the state of the todo list and the new todo input.
 */
function TodoList() {
    const [tasks, setTasks] = useState([]);
    const [newTaskText, setNewTaskText] = useState('');
    const [todos, setTodo] = useState([]);

    const getTodo = async ()=>{
        fetch("/api/Todo")
        .then(response => response.json())
        .then(json => setTodo(json))
        .catch(error => console.error('Error fetching todos:', error));
    }

    useEffect(() => {
        getTodo();
    },[]);

    function handleInputChange(event) {
        setNewTaskText(event.target.value);
    }

    async function addTask(event) {
        event.preventDefault();
        if (newTaskText.trim()) {
            // call the API to add the new task
            const result = await fetch("/api/Todo", {
                method: "POST",
                headers: {
                    "Content-Type": "application/json"
                },
                body: JSON.stringify({ title: newTaskText, isCompleted: false })
            })
            if(result.ok){
                await getTodo();
            }
            // TODO: Add some error handling here, inform the user if there was a problem saving the TODO item.

            setNewTaskText('');
        }
    }

    async function deleteTask(id) {
        console.log(`deleting todo ${id}`);
        const result = await fetch(`/api/Todo/${id}`, {
            method: "DELETE"
        });

        if(result.ok){
            await getTodo();
        }
        // TODO: Add some error handling here, inform the user if there was a problem saving the TODO item.
    }

    async function moveTaskUp(index) {
        console.log(`moving todo ${index} up`);
        const todo = todos[index];
        const result = await fetch(`/api/Todo/move-up/${todo.id}`,{
            method: "POST"
        });

        if(result.ok){
            await getTodo();
        }
        else{
            console.error('Error moving task up:', result.statusText);
        }
    }

    async function moveTaskDown(index) {
        const todo = todos[index];
        const result = await fetch(`/api/Todo/move-down/${todo.id}`,{
            method: "POST"
        });

        if(result.ok) {
            await getTodo();
        } else {
            console.error('Error moving task down:', result.statusText);
        }
    }

    return (
    <article
        className="todo-list"
        aria-label="task list manager">
        <header>
            <h1>TODO</h1>
                <form
                    className="todo-input"
                    onSubmit={addTask}
                    aria-controls="todo-list">
                <input
                    type="text"
                    required
                    autoFocus
                    placeholder="Enter a task"
                    value={newTaskText}
                    aria-label="Task text"
                    onChange={handleInputChange} />
                <button
                    className="add-button"
                    aria-label="Add task">
                    Add
                </button>
            </form>
        </header>
        <ol id="todo-list" aria-live="polite" aria-label="task list">
            {todos.map((task, index) =>
                <TodoItem
                    key={task.id}
                    task={task.title}
                    deleteTaskCallback={() => deleteTask(task.id)}
                    moveTaskUpCallback={() => moveTaskUp(index)}
                    moveTaskDownCallback={() => moveTaskDown(index)}
                />
            )}
        </ol>
    </article>
    );
}

export default TodoList;
This component will display the list of todo items in our front-end. It fetches the todo items from the ApiService app, and all actions will be sent to that API for persistence.
Notice that the fetch calls prefix the route with /api, this comes from the configuration of the proxy in vite.config.js. The moveTaskDown and moveTaskUp functions call the related endpoint in the API project. Next add a new file named TodoList.css in the components folder with the following content.
The code from above already references this css file.
.todo-list {
    background-color: #1e1e1e;
    padding: 1.25rem;
    border-radius: 0.5rem;
    box-shadow: 0 0.25rem 0.5rem rgba(0, 0, 0, 0.3);
    width: 100%;
    max-width: 25rem;
}

.todo-list h1 {
    text-align: center;
    color: #e0e0e0;
}

.todo-input {
    display: flex;
    justify-content: space-between;
    margin-bottom: 1.25rem;
}

.todo-input input {
    flex: 1;
    padding: 0.625rem;
    border: 0.0625rem solid #333;
    border-radius: 0.25rem;
    margin-right: 0.625rem;
    background-color: #2c2c2c;
    color: #e0e0e0;
}

.todo-input .add-button {
    padding: 0.625rem 1.25rem;
    background-color: #007bff;
    color: #fff;
    border: none;
    border-radius: 0.25rem;
    cursor: pointer;
}

.todo-input .add-button:hover {
    background-color: #0056b3;
}

.todo-list ol {
    list-style-type: none;
    padding: 0;
}

.todo-list li {
    display: flex;
    justify-content: space-between;
    align-items: center;
    padding: 0.625rem;
    border-bottom: 0.0625rem solid #333;
}

.todo-list li:last-child {
    border-bottom: none;
}

.todo-list .text {
    flex: 1;
}

.todo-list li button {
    background: none;
    border: none;
    cursor: pointer;
    font-size: 1rem;
    margin-left: 0.625rem;
    color: #e0e0e0;
}

.todo-list li button:hover {
    color: #007bff;
}

.todo-list li button.delete-button {
    color: #ff4d4d;
}

.todo-list li button.up-button,
.todo-list li button.down-button {
    color: #4caf50;
}
This file is straightforward CSS and doesn’t need much explanation for front-end developers. Now that we have added the components, we need to update the app to work with these components. Open up the main.jsx file in the root of the todo-frontend folder. In createRoot replace “root” with main. The code should look like the following.
Update the contents of src/main.jsx in todo-frontend to the code below.
import { StrictMode } from 'react'
import { createRoot } from 'react-dom/client'
import './index.css'
import App from './App.jsx'

createRoot(document.querySelector('main')).render(
  <StrictMode>
    <App />
  </StrictMode>,
)
Open App.jsx and replace the content with the following.
import TodoList from "./components/TodoList"

function App() {
    return (
        <TodoList />
    )
}

export default App
Open index.css and replace the contents with the CSS below.
:root {
  font-family: Inter, system-ui, Avenir, Helvetica, Arial, sans-serif;
  line-height: 1.5;
  font-weight: 400;

  color-scheme: light dark;
  color: rgba(255, 255, 255, 0.87);
  background-color: #242424;
}
body {
    font-family: Inter, system-ui, Avenir, Helvetica, Arial, sans-serif;
    background-color: #121212;
    color: #e0e0e0;
    margin: 0;
    padding: 0;
    display: flex;
    justify-content: center;
    align-items: center;
    height: 100vh;
}
Finally, update the content of index.html to have the content below
<!doctype html>
<html lang="en">
  <head>
    <meta charset="UTF-8" />
    <link rel="icon" type="image/svg+xml" href="/checkmark-square.svg" />
    <meta name="viewport" content="width=device-width, initial-scale=1.0" />
    <title>TODO app</title>
    <link href="https://fonts.googleapis.com/css?family=Inter" rel="stylesheet">
    <script defer type="module" src="/src/main.jsx"></script>
  </head>
    <body>
      <main></main>
    </body>
</html>
Now we have updated the app and it should be working. Start the AppHost project and then click on the URL for the front-end in the dashboard. Below is a video of the app running.
Our app is now working. You can use the dashboard to view telemetry flowing automatically between the database, .NET Web API backend, and React front-end. I didn’t go into much detail on the React code here. I wrote a similar blog post for Visual Studio users which covers the React parts in more details Creating a React TODO app in Visual Studio 2022. I’ll now move on to wrap up this post.
Looking forward
Now that we have the app running locally, the next step would be to deploy this to production. You can deploy this to any web host that supports ASP.NET Core. We won’t go through that here, but we may revisit that in a future post.
Recap
In this post, we built a new Aspire app with an ASP.NET Core Web API and connected it to a React front end using JavaScript. We worked entirely from the command line and C# Dev Kit, leveraging the new Aspire CLI and dotnet scaffold to add database support with SQLite.
Feedback
For feedback on Aspire please file an issue in this repo dotnet/aspire. For feedback related to dotnet scaffold, the correct repo for issues is dotnet/Scaffolding. Feedback related to C# Dev Kit can go to microsoft/vscode-dotnettools. You can comment below as well. If you enjoy this type of content, please leave a comment below expressing your support. This will enable us to produce more posts of a similar nature.
Hi, thank you for your great post!
I wanted to use TypeScript and create some Docker images, so I changed and added some files.
Here is the repository:
https://github.com/takashiuesaka/TodoTsAspire
Thanks a lot for sharing a link to the repo!
Thanks for this. I not only learned more about Aspire but about some features I haven't been exposed to before - C# tuple swap, dotnet scaffold, and EF ExecuteUpdateAsync and ExecuteDeleteAsync.
I was curious if Aspire was going to handle publishing an SPA and web app, but I see it doesn't out of the box. If we wanted to publish the api and spa as the same web project, something would have to build the SPA, copy the dist folder to the wwwroot folder of the API project, and there would need to be a routing rule to route all requests...
Thanks for the comment, I’m happy you found some value in the post. Regarding publishing; I don’t have any info, but I’ve asked some others to comment here who are more informed.
Hi Philip,
It’s actually quite straightforward to publish these with the Aspire AppHost. We have a sample that brings together an ASP.NET Core Minimal API backend and multiple SPA frontends (Angular, React, Vue, and Vite):
* **Sample walkthrough:** [https://learn.microsoft.com/samples/dotnet/aspire-samples/aspire-angular-react-vue/](https://learn.microsoft.com/samples/dotnet/aspire-samples/aspire-angular-react-vue/)
* **Source code:** [https://github.com/dotnet/aspire-samples/tree/main/samples/AspireWithJavaScript](https://github.com/dotnet/aspire-samples/tree/main/samples/AspireWithJavaScript)
One key point — Aspire doesn't get in the way of your usual publishing flow. Instead, it builds on existing concepts. For example, it's common to publish SPAs as containers and serve their static content with something like `nginx`.
Here's an example `Dockerfile` for a Node-based SPA:
```dockerfile
FROM node:20 as build
WORKDIR /app
COPY package.json package.json
COPY package-lock.json package-lock.json
RUN npm install
COPY . .
RUN...
Love it, thanks for sharing, any blog posts on how to deploy on IIS (own server)?
I don’t have any info on publishing, but I’ve asked some others to comment here who are more informed.
Great post, Sayed and just in time for 9.4 Will definitely try out dotnet scaffold when adding the next API to our projects
Thank you, please share any feedback once you have had a chance to try it.