
This is a guest post by Mike Rousos
One of the benefits of containers is their small size, which allows them to be more quickly deployed and more efficiently packed onto a host than virtual machines could be. This post highlights some recent advances in Windows container technology and .NET Core technology that allow ASP.NET Core Windows Docker images to be reduced in size dramatically.
Before we dive in, it’s worth reflecting on whether Docker image size even matters. Remember, Docker images are built by a series of read-only layers. When using multiple images on a single host, common layers will be shared, so multiple images/containers using a base image (a particular Nano Server or Server Core image, for example) will only need that base image present once on the machine. Even when containers are instantiated, they use the shared image layers and only take up additional disk space with their writable top layer. These efficiencies in Docker mean that image size doesn’t matter as much as someone just learning about containerization might guess.
All that said, Docker image size does make some difference. Every time a VM is added to your Docker host cluster in a scale-out operation, the images need to be populated. Smaller images will get the new host node up and serving requests faster. Also, despite image layer sharing, it’s not unusual for Docker hosts to have dozens of different images (or more). Even if some of those share common layers, there will be differences between them and the disk space needed can begin to add up.
If you’re new to using Docker with ASP.NET Core and want to read-up on the basics, you can learn all about containerizing ASP.NET Core applications in the documentation.
A Starting Point
You can create an ASP.NET Core Docker image for Windows containers by checking the ‘Enable Docker Support’ box while creating a new ASP.NET Core project in Visual Studio 2017 (or by right-clicking an existing .NET Core project and choosing ‘Add -> Docker Support’).
To build the app’s Docker image from Visual Studio, follow these steps:
- Make sure the docker-compose project is selected as the solution’s startup project.
- Change the project’s Configuration to ‘Release’ instead of ‘Debug’.
- It’s important to use Release configuration because, in Debug configuration, Visual Studio doesn’t copy your application’s binaries into the Docker image. Instead, it creates a volume mount that allows the application binaries to be used from outside the container (so that they can be easily updated without rebuilding the image). This is great for a code-debug-fix cycle, but will give us incorrect data for what the Docker image size will be in production.
- Push F5 to build (and start) the Docker image.
Alternatively, the same image can be created from a command prompt by publishing the application (dotnet publish -c Release) and building the Docker image (docker build -t samplewebapi --build-arg source=bin/Release/netcoreapp2.0/publish .).
The resulting Docker image has a size of 1.24 GB (you can see this with the docker images or docker history commands). That’s a lot smaller than a Windows VM and even considerably smaller than Windows Server Core containers or VMs, but it’s still large for a Docker image. Let’s see how we can make it smaller.

Windows Nano Server, Version 1709
The first (and by far the greatest) improvement we can make to this image size has to do with the base OS image we’re using. If you look at the docker images output above, you will see that although the total image is 1.24 GB, the majority of that (more than 1 GB) comes from the underlying Windows Nano Server image.
The Windows team recently released Windows Server, version 1709. One of the great features in 1709 is an optimized Nano Server base image that is nearly 80% smaller than previous Nano Server images. The Nano Server, version 1709 image is only about 235 MB on disk (~93 MB compressed).
The first thing we should do to optimize our ASP.NET Core application’s image is to use that new Nano Server base. You can do that by navigating to the app’s Dockerfile and replacing FROM microsoft/aspnetcore:2.0 with FROM microsoft/aspnetcore:2.0-nanoserver-1709.
Be aware that in order to use Nano Server, version 1709 Docker images, the Docker host must be running either Windows Server, version 1709 or Windows 10 with the Fall Creators Update, which is rolling out worldwide right now. If your computer hasn’t received the Fall Creators Update yet, don’t worry. It is possible to create Windows Server, version 1709 virtual machines in Azure to try out these new features.
After switching to use the Nano Server, version 1709 base image, we can re-build our Docker image and see that its size is now 357 MB. That’s a big improvement over the original image!
If you’re building your Docker image by launching the docker-compose project from within Visual Studio, make sure Visual Studio is up-to-date (15.4 or later) since recent updates are needed to launch Docker containers based on Nano Server, version 1709 from Visual Studio.

That Might be Small Enough
Before we make the image any smaller, I want to pause to point out that for most scenarios, using the Nano Server, version 1709 base image is enough of an optimization and further “improvements” might actually make things worse. To understand why, take a look at the sizes of the component layers of the Docker image created in the last step.
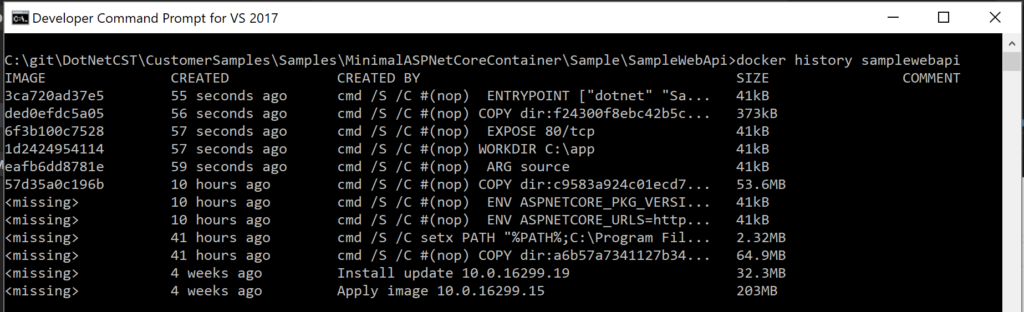
The largest layers are still the OS (the bottom two layers) and, at the moment, that’s as small as Windows images get. Our app, on the other hand is the 373 kB towards the top of the layer history. That’s already quite small.
The only good places left to optimize are the .NET Core layer (64.9 MB) or the ASP.NET Core layer (53.6 MB). We can (and will) optimize those, but in many cases it’s counter-productive to do so because Docker shares layers between images (and containers) with common bases. In other words, the ASP.NET Core and .NET Core layers shown in this image will be shared with all other containers on the host that use microsoft/aspnetcore:2.0-nanoserver-1709 as their base image. The only additional space that other images consume will be the ~500 kB that our application added on top of the layers common to all ASP.NET Core images. Once we start making changes to those base layers, they won’t be sharable anymore (since we’ll be pulling out things that our app doesn’t need but that others might). So, we might reduce this application’s image size but cause others on the host to increase!
So, bottom line: if your Docker host will be hosting containers based on several different ASP.NET Core application images, then it’s probably best to just have them all derive from microsoft/aspnetcore:2.0-nanoserver-1709 and let the magic of Docker layer sharing save you space. If, on the other hand, your ASP.NET Core image is likely to be used alongside other non-.NET Core images which are unlikely to be able to share much with it anyhow, then read on to see how we can further optimize our image size.
Reducing ASP.NET Core Dependencies
The majority of the ~54 MB contributed by the ASP.NET Core layer of our image is a centralized store of ASP.NET Core components that’s installed by the aspnetcore Dockerfile. As mentioned above, this is useful because it allows ASP.NET Core dependencies to be shared between different ASP.NET Core application Docker images. If you have a small ASP.NET Core app (and don’t need the sharing), it’s possible to just bundle the parts of the ASP.NET Core web stack you need with your application and skip the rest.
To remove unused portions of the ASP.NET Core stack, we can take the following steps:
- Update the Dockerfile to use
microsoft/dotnet:2.0.0-runtime-nanoserver-1709as its base image instead ofmicrosoft/aspnetcore:2.0-nanoserver-1709. - Add the line
ENV ASPNETCORE_URLS http://+:80to the Dockerfile after theFROMstatement (this was previously done in the aspnetcore base image for us). - In the app’s project file, replace the
Microsoft.AspNetCore.Allmetapackage dependency with dependencies on just the ASP.NET Core components the app requires. In this case, my app is a trivial ‘Hello World’ web API, so I only need the following (larger apps would, of course, need more ASP.NET Core packages):Microsoft.AspNetCoreMicrosoft.AspNetCore.Mvc.CoreMicrosoft.AspNetCore.Mvc.Formatters.Json
- Update the app’s Startup.cs file to call
services.AddMvcCore().AddJsonFormatters()instead ofservices.AddMvc()(since theAddMvcextension method isn’t in the packages we’ve referenced).- This works because our sample project is a Web API project. An MVC project would need more MVC services.
- Update the app’s controllers to derive from
ControllerBaseinstead ofController- Again, since this is a Web API controller instead of an MVC controller, it doesn’t use the additional functionality
Controlleradds).
- Again, since this is a Web API controller instead of an MVC controller, it doesn’t use the additional functionality
Now when we build the Docker image, we can see we’ve shaved a little more than 40 MB by only including the ASP.NET Core dependencies we need. The total size is now 315 MB.
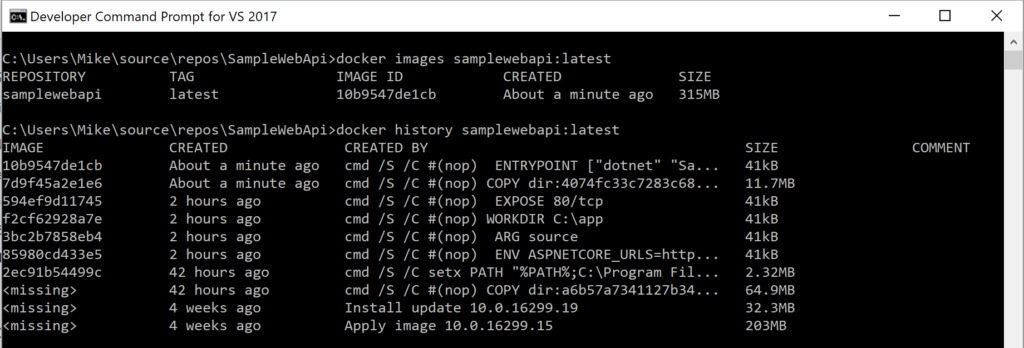
Bear in mind that this is a trivial sample app and a real-world application would not be able to cut as much of the ASP.NET Core framework.
Also, notice that while we eliminated the 54 MB intermediate ASP.NET Core layer (which could have been shared), we’ve increased the size of our application layer (which cannot be shared) by about 11 MB.
Trimming Unused Assemblies
The next place to consider saving space will be from the .NET Core/CoreFX layer (which is consuming ~65 MB at the moment). Like the ASP.NET Core optimizations, this is only useful if that layer wasn’t going to be shared with other images. It’s also a little trickier to improve because unlike ASP.NET Core, .NET Core’s framework is delived as a single package (Microsoft.NetCore.App).
To reduce the size of .NET Core/CoreFX files in our image, we need to take two steps:
- Include the .NET Core files as part of our application (instead of in a base layer).
- Use a preview tool to trim unused assemblies from our application.
The result of those steps will be the removal of any .NET Framework (or remaining ASP.NET Core framework) assemblies that aren’t actually used by our application.
First, we need to make our application self-contained. To do that, add a <RuntimeIdentifiers>win10-x64</RuntimeIdentifiers> property to the project’s csproj file.
We also need to update our Dockerfile to use microsoft/nanoserver:1709 as its base image (so that we don’t end up with two copies of .NET Core) and useSampleWebApi.exe as our image’s entrypoint instead of dotnet SampleWebApi.dll.
Up until now, it was possible to build the Docker image either from Visual Studio or the command line. But Visual Studio doesn’t currently support building Docker images for self-contained .NET Core applications (which are not typically used for development-time debugging). So, to build our Docker image from here on out, we will use the following command line interface commands (notice that they’re a little different from those shown previously since we are now publishing a runtime-specific build of the application). Also, you may need to delete (or update) the .dockerignore file generated as part of the project’s template because we’re now copying binaries into the Docker image from a different publish location.
dotnet publish -c Release -r win10-x64
docker build -t samplewebapi --build-arg
   source=bin/Release/netcoreapp2.0/win10-x64/publish .
These changes will cause the .NET Core assemblies to be deployed with our application instead of in a shared location, but the included files will be about the same. To remove unneeded assemblies, we can use Microsoft.Packaging.Tools.Trimming, a preview package that removes unused assemblies from a project’s output and publish folders. To do that, add a package reference to Microsoft.Packaging.Tools.Trimming and a <TrimUnusedDependencies>true</TrimUnusedDependencies> property to the application’s project file.
After making those additions, re-publishing, and re-building the Docker image (using the CLI commands shown above), the total image size is down to 288 MB.
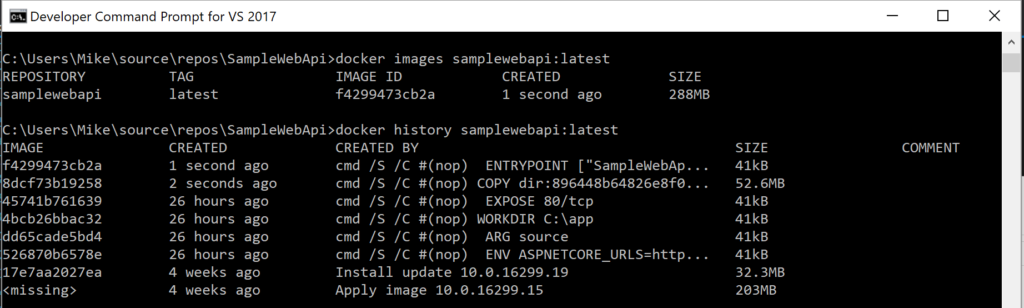
As before, this reduction in total image size does come at the expense of a larger top layer (up to 53 MB).
One More Round of Trimming
We’re nearly done now, but there’s one more optimization we can make.Microsoft.Packaging.Tools.Trimming removed some unused assemblies, but others still remain because it isn’t clear whether dependencies to those ones assemblies are actually exercised or not. And that’s not to mention all the IL in an assembly that may be unused if our application calls just one or two methods from it.
There’s another preview trimming tool, the .NET IL Linker, which is based on the Mono linker and can remove unused IL from assemblies.
This tool is still experimental, so to reference it we need to add a NuGet.config to our solution and include https://dotnet.myget.org/F/dotnet-core/api/v3/index.json as a package source. Then, we add a dependency to the latest preview version of ILLink.Tasks(currently, the latest version is 0.1.4-preview-981901).
ILLink.Tasks will trim IL automatically, but we can get a report on what it has done by passing /p:ShowLinkerSizeComparison=true to our dotnet publish command.
After one more publish and Docker image build, the final size for our Windows ASP.NET Core Web API container image comes to 271 MB!
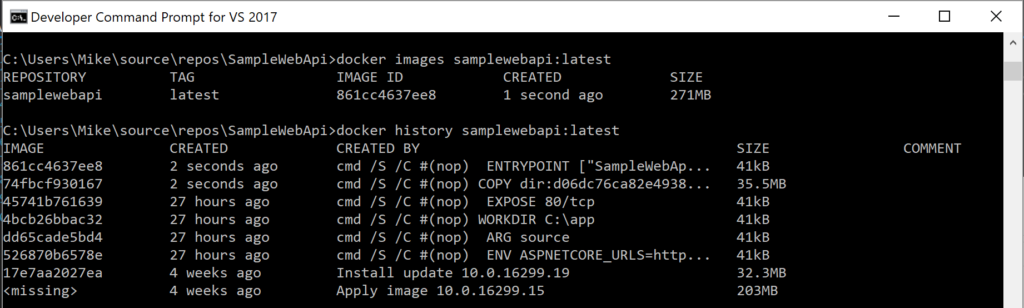
Even though trimming ASP.NET Core and .NET Core Framework assemblies isn’t common for most containerized projects, the preview trimming tools shown here can be very useful for reducing the size of large applications since they can remove application-local assemblies (pulled in from NuGet, for example) and IL code paths that aren’t used.
Wrap-Up
This post has shown a series of optimizations that can help to reduce ASP.NET Core Docker image size. In most cases, all that’s needed is to be sure to use new Nano Server, version 1709 base images and, if your app is large, to consider some preview dependency trimming options like Microsoft.Packaging.Tools.Trimming or the .NET IL Linker.
Less commonly, you might also consider using app-local versions of the ASP.NET Core or .NET Core Frameworks (as opposed to shared ones) so that you can trim unused dependencies from them. Just be careful to keep common base image layers unchanged if they’re likely to be shared between multiple images. Although this article presented the different trimming and minimizing options as a series of steps, you should feel free to pick and choose the techniques that make sense for your particular scenario.
In the end, a simple ASP.NET Core web API sample can be packaged into a < 360 MB Windows Docker image without sacrificing any ability to share ASP.NET Core and .NET Core base layers with other Docker images on the host and, potentially, into an even smaller image (271 MB) if that sharing is not required.
0 comments