

UPDATE 9/25/25: This feature is now supported in retail as of the 1.618 Agility SDK.
We’re pleased to announce that we have a new preview Agility SDK out today, letting developers try out the new Tight Alignment feature! You can find the NuGet package here.
Background
When placed resources were introduced in D3D12, there was an intentional decision to simplify alignment restrictions and take the greatest common denominator across the hardware ecosystem. There was a desire to migrate to tighter alignment across the ecosystem over time, but this hadn’t happened yet. Since D3D12’s launch, developers have noticed that it is actually pretty common to have numerous tiny resources (meaningfully smaller than the alignment requirements), and they must now make a tradeoff:
- Eat the memory cost required to allocate tiny resources and end up with an underutilized heap, but still have tooling support
- Allocate a large parent resource and then sub-allocate their tiny resources without having the ability to track things like resource name, out-of-bounds accesses, etc. This also requires more effort to set up.
Tight Alignment of Resources
It has been over 10 years (!) since the alignment choices were made, and, after reviewing the current state of the ecosystem, we decided that now is a good time to move towards tighter alignment restrictions. In particular, Tight Alignment Tier 1 focusses on drastically reducing the alignment requirements for buffers as this is both a frequent request from developers and also the resource type most notorious for wasted padding due to alignment. Depending on the driver and resource desc, placed buffers can now be aligned as tightly as 8B (max of 256B). Committed buffers have also had alignment restrictions reduced to 4KiB.
Tight alignment is opted into using a new Resource flag at creation time: D3D12_RESOURCE_FLAG_USE_TIGHT_ALIGNMENT. This gives you control over how your resources are allocated and won’t cause any surprises in existing code bases. Note that, when using Tight Alignment with placed resources, you’ll have to call ID3D12Device::GetResourceAllocationInfo in order to determine proper offsets and sizing. Check out the full spec here.
Example Usage
#include <d3d12x.h>
// Check if Tight alignment is supported
CD3DX12FeatureSupport featureSupport;
featureSupport.Init(pDevice);
if(featureSupport.TightAlignmentSupportTier() < D3D12_TIGHT_ALIGNMENT_TIER_1)
{
    // Tight alignment unsupported, choose a fallback approach from the background section
    return;
}

// Get tight aligned buffer allocation info. Note that the alignment
// parameter should be set to 0 when using Tight Alignment (defaults to 0 here)
const CD3DX12_RESOURCE_DESC bufferDesc =
    CD3DX12_RESOURCE_DESC::Buffer(buffSize, D3D12_RESOURCE_FLAG_USE_TIGHT_ALIGNMENT);
D3D12_RESOURCE_ALLOCATION_INFO info =
    pDevice->GetResourceAllocationInfo(0, 1, &bufferDesc);

// Create a heap and place the buffer one alignment increment from the start
ID3D12Resource* pBuffer;
ID3D12Heap* pHeap;
UINT heapSize = info.SizeInBytes + info.Alignment;
CD3DX12_HEAP_DESC heapDesc = CD3DX12_HEAP_DESC(heapSize, D3D12_HEAP_TYPE_DEFAULT);
pDevice->CreateHeap(&heapDesc, IID_PPV_ARGS(&pHeap));
pDevice->CreatePlacedResource1(
    pHeap,
    info.Alignment,
    &bufferDesc,
    D3D12_RESOURCE_STATE_COMMON,
    nullptr,
    IID_PPV_ARGS(&pBuffer));
GitHub Sample
For a more thorough example that compares memory usage with Tight Alignment on/off for different configurations of number of buffers, size of buffers, and committed vs placed resources, check out the Sample. Note that you will need a driver that supports tight alignment from the list at the end of the blog. If you don’t have access to hardware that supports the feature just yet, get started using this Warp NuGet. The charts below summarize the results of running the sample on various hardware I have in my office (as well as Warp), filtered to some of the more interesting permutations.
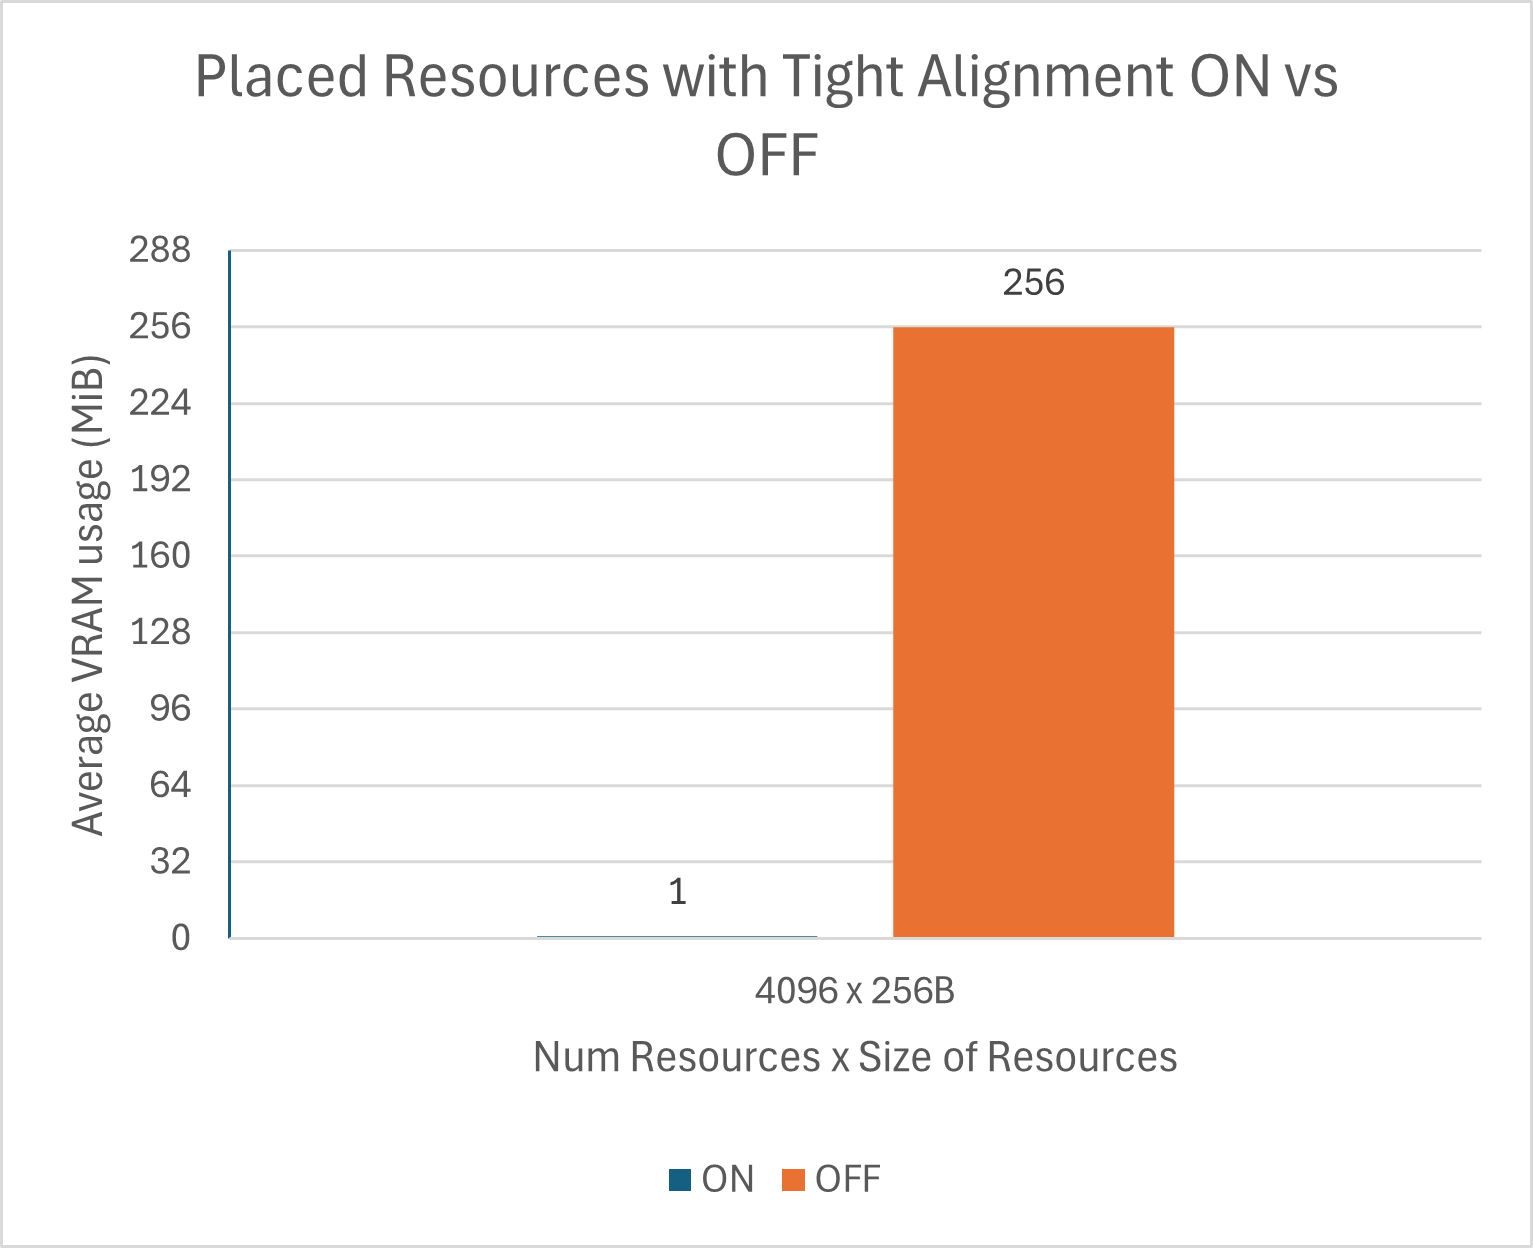
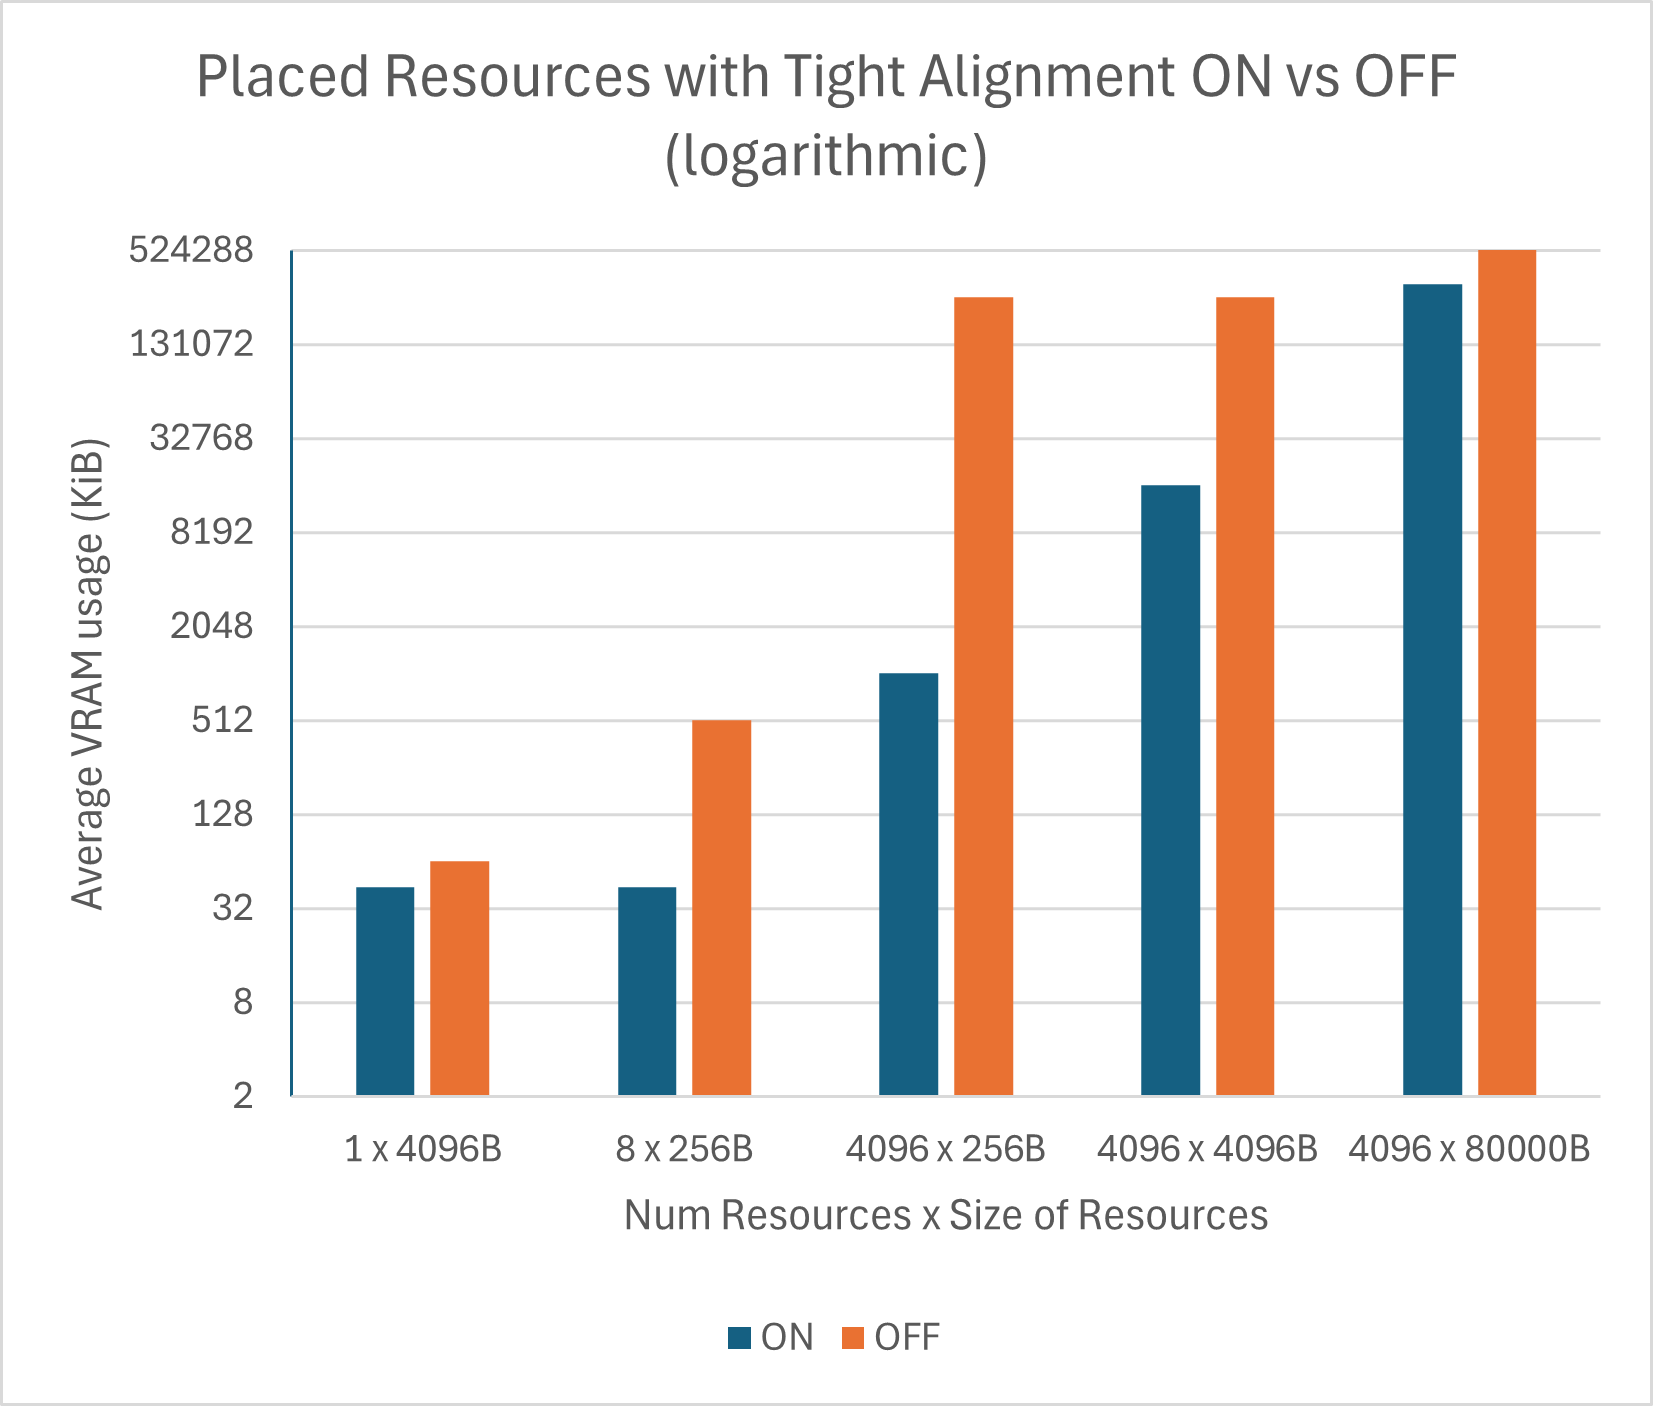
Placed Resources results
First are placed resources, where we can see such a stark contrast in results that the bar for Tight Alignment ON is barely visible in the first chart. The chart using logarithmic scale on the right is more useful for showing how the feature fares in different scenarios. A single resource is generally constrained by the heap minimum size being 64KiB, though at least one driver was trying to work around that limitation as you can see in the entries for 1 x 4096 and 8 x 256B. Tight Alignment fares best when there are a large number of small resources, but even sizes approaching the 64KiB-128KiB range compare quite well (25-50% savings), as long as they aren’t an exact multiple of 64KiB. As a resource gets large enough that the ratio of padding to data shrinks the impact is less noticeable.
 |
 |
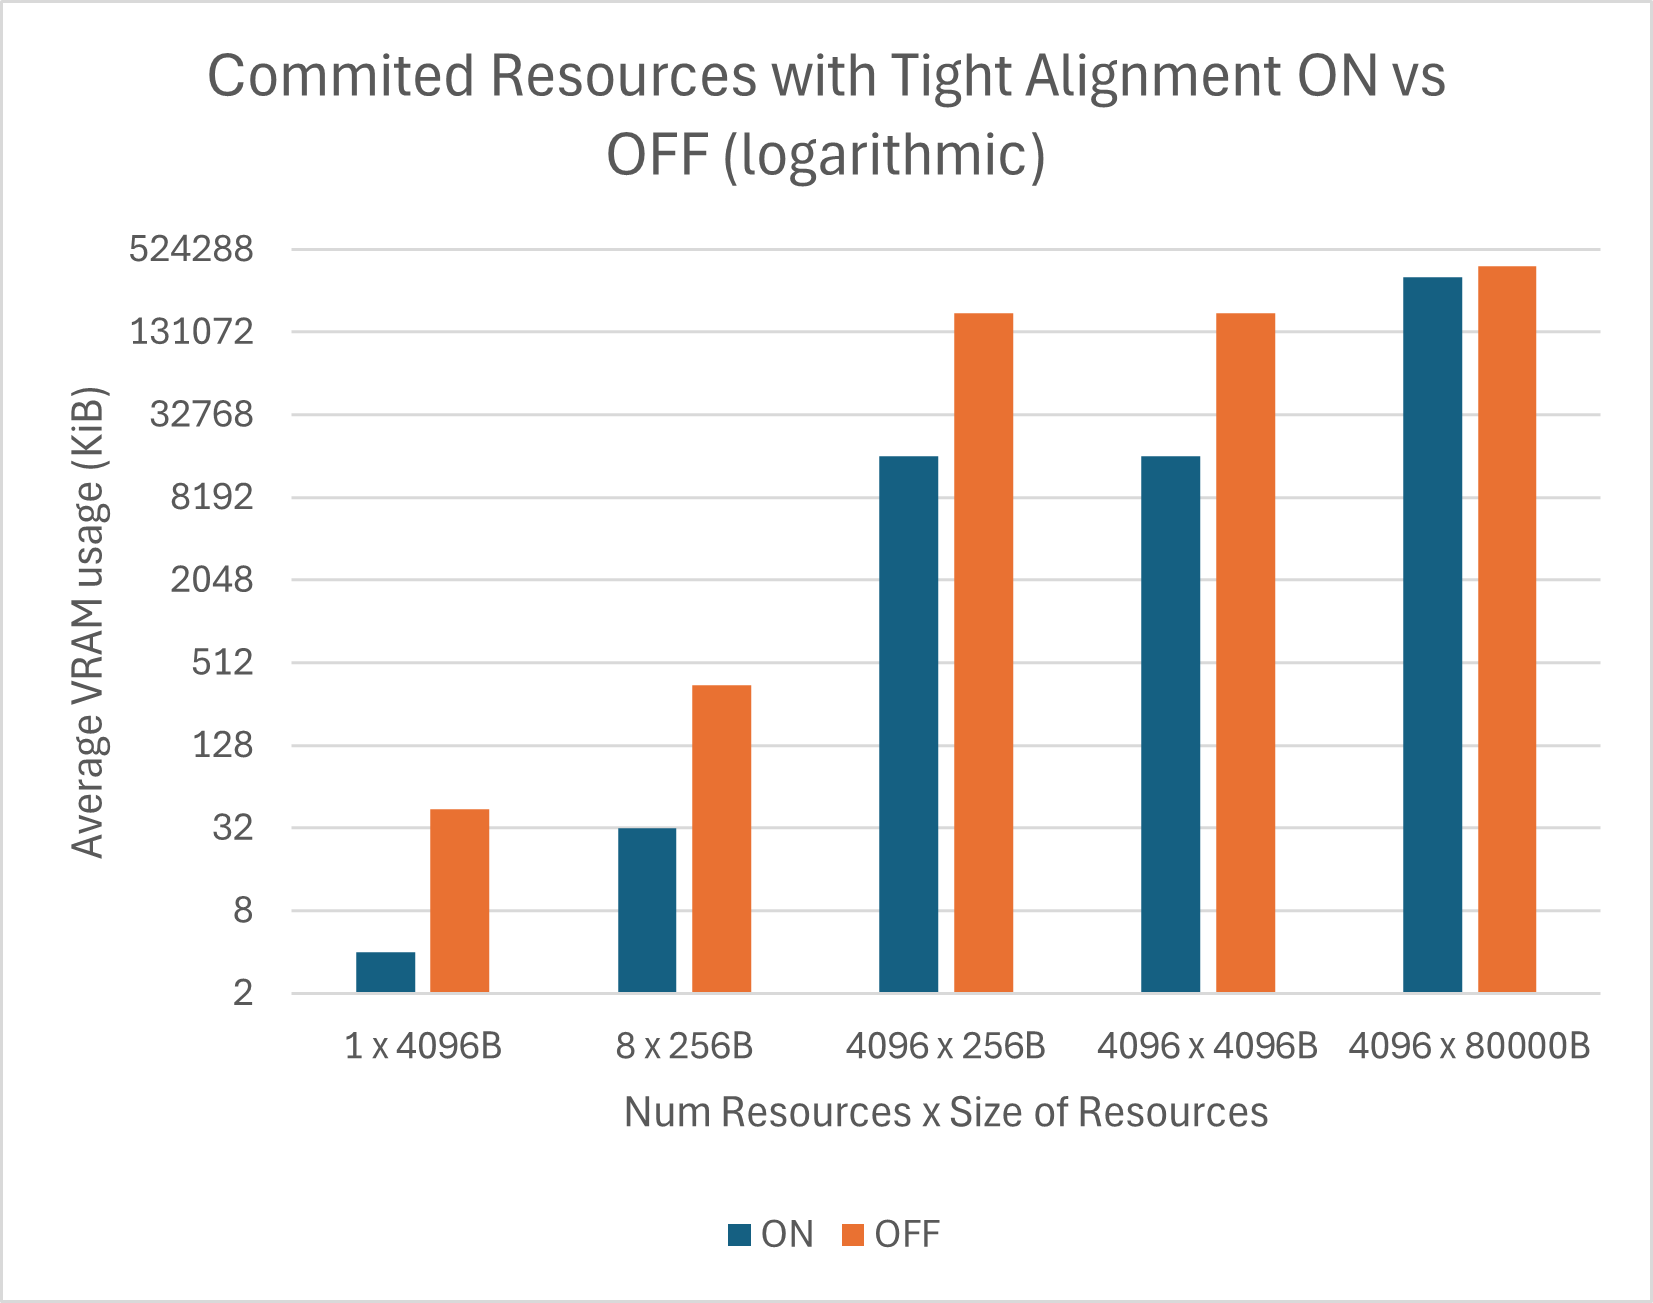
Committed Resources results
Results for committed resources are less drastic but generally follow the same pattern as placed resources. The main difference is at the small end of the spectrum. As part of a DDI update in 1.716, drivers can opt in to receiving hints about when an allocation is for an implicit heap. They can then use that information to request to allocate memory for the heap at 4KiB granularity. This is why the 1 x 4096B and 8 x 256B entries below required less VRAM than their placed resource counterparts. This is the primary way that we see gains for tight committed resources. Since committed buffers can’t be packed closer than that, we see the same results for the 4096 x 256B and 4096 x 4096B entries.
You may notice that the Tight Alignment OFF bars have different results than you’d expect. This is because at least one driver was applying the hint even when Tight Alignment wasn’t manually enabled for that committed buffer by the app, so in some cases you may see wins just by upgrading to newer drivers.
 |
 |
Driver Availability
AMD
AMD driver support for Tight Alignment can be found in the following driver: Adrenalin 25.9.1.
Intel
Tight placement resolves some long-standing alignment requirements which added complexity and increased memory usage. Intel support for this feature is now available for Intel® Arc™ B-Series Graphics and Intel® Core™ Ultra Processors (Series 2) with Intel® Arc™ Graphics in current drivers available here.
Nvidia
NVIDIA will fully support this SDK release, please contact your developer relations representative for specifics.
Qualcomm
Feature enabled in driver for all Adreno GPU families and to be available soon.
0 comments