(Editors Note: One of the most popular series of blog posts on the ALM Blog was Terje’s posts on Unit Testing. So when he asked to republish his Norwegian post on the ALM blog the answer was of course an enthusiastic YES!. A little off topic this post also highlights we need a post on executing parallel test runs with the new “Run Functional Test Task” as that paradigm is different using separate machines and “test containers” (think assemblies))
Visual studio 2015 Update 1 : Parallel and Context Sensitive Test Execution
Visual Studio 2015 Update 1 contains a bunch of improvements and bug fixes. In this post we will have a look at two of the performance improvements, that may give a significant impact on your overall development performance.
Parallel test execution
In Visual Studio 2015 Update 1 the test engine can execute test assemblies in parallel. This can improve your test performance significantly. This is off by default, so you need to enable it.
The system runs the test assemblies in parallel on as many cores as you specify, and of course, up to the maximum number of cores on your machine. If you only have a single test project you will of course have no benefit of this. This is a solution for the slightly larger projects.
It is independent of the type of test framework you use, and therefore works with both MSTest, NUnit 2, NUnit 3 and XUnit.
This mechanism is completely independent on whether the underlying framework supports parallelism or not.
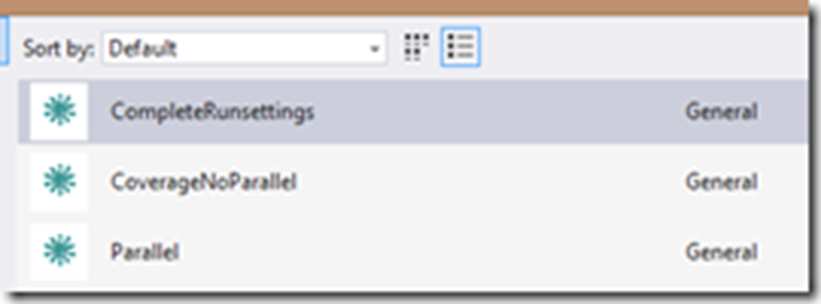
To turn on the feature, you must use a runsettings file, which you must enable in Visual Studio. The easy way to get a correct runsettings file in, is to use one of these templates, note that you need at least version 3.1 of these. When you have this item extension installed, you have 3 templates, and if you’re just after the parallelism, use the one named Parallel.
Do as follow:
Select Solution, Right click and choose Add/New item
You will now see a list like the one below:
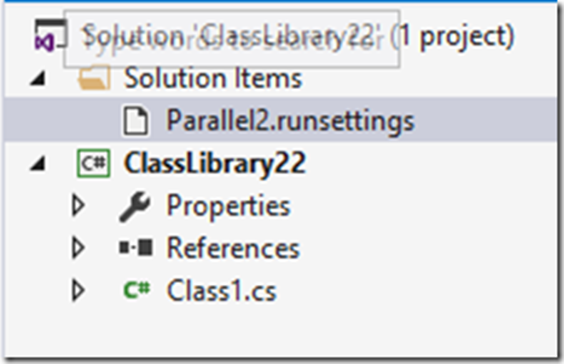
Select Parallel and you will see an instance of it under Solution Items in your solution.
That’s all it takes to enable parallel execution !
Just remember to activate it under the Visual Studio Test menu, do like this:
(1) Go to Select Test Settings file from the top menu Test/Test settings.
(2) Then select the wanted Runsettings file, in this case I named it Parallel2.runsettings.
(3) Verify on the same menu that it is selected and checked.
The parameters:
Looking at the content of the runsettings file, we see this:
There is only one item here we can change, the MaxCpuCount value. It controls how many parallel processes we can run. The value 0 means “run as much as you can, limited by availability of cores on your machine”. The value 1 means it will run sequentially, that is the same as the default with only one process activated. Any other number will limit at that number, or the number of available cores on your machine.
Why don’t we include Code Coverage?
You might have noticed that in the description for Parallel it says code coverage is not included. This means that when you activate this runsetting, you will not active code coverage during the same run. The other two templates do exactly that, it doesn’t really give you any benefits.
If you activate the Code Coverage the performance will be reduced, because code coverage also needs to run, and it runs sequentially after the test runs, and will therefore increase the overall time significantly. And, it will not give you anything you really need.
The fact that you don’t active Code Coverage does not imply that you can’t run code coverage from Team Explorer – you can! Further, the results from this code coverage run is not used in the Test Explorer – strangely enough. The activation done in the two other templates just activate a background code coverage run, which results are just stored in a code coverage result file under the Test Results folder.
This file doesn’t really give you any benefits in Visual Studio, but is useful if you want these coverage data into another program , one good example is NDepend.
One benefit is that this coverage section not only enables the background run of code coverage, but also sets up the filtering of the code coverage data, and this might be interesting for you. These filters will also take effect when you run the Test Explorer “Analyze code coverage from selected tests”
In the linked article above there is a bunch of settings for code coverage, instead of using these, just use the template CompleteRunSettings, which includes this, plus the other settings. The XML in the linked article is not up to date.
The templaten CompleteRunsettings has the MaxCpuCount set to 0, it will then run as parallel as possible.
The templaten CoverageNoParallel is nearly identical, with exactly the same fields and settings, except the MaxCpuCount which is set to 1, thus sequential test running.
There is also an MSDN artikkel about configuration of unit tests which are more correct,m but it doesn’t contain bthe same detailed information as the link above. In this however, all fields are explained.
Test project for parallel runs
I have made a simple test project for parallel runs. It has 4 test projects, with one test each, and each test runs for 5 seconds. You can download the source code from here, and then run the tests yourself.
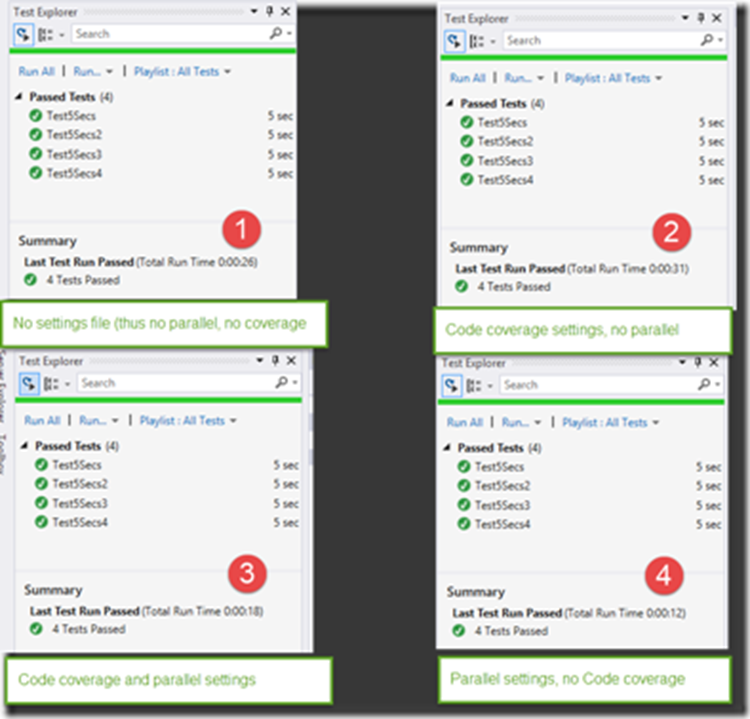
(1) Running without settings at all. It is then runs sequentially, and we see the total time is 26 seconds. Since each test uses 5 seconds we have a 6 seconds overhead.
(2) Running with CodeCoverageNoParallel, which is identical to the old runsettings file, we will, get code coverage run in addition, but no parallel runs. The total time increases to 31 seconds.
(3) We then uses the complete settings, using both CodeCoverage and Parallel. The total time then decreases to 18 seconds.
(4) And finally using only Parallel without code coverage, we’re down in 12 seconds.
So from (4) to (1), we gain more than a 2:1 in performance. That is pretty good!
The machine this was tested on has more cores – 8 in all, but it also runs a bunch of other programs, so not all cores can be made available for the testing processes. You will gain some, but not equal to the number of cores – in practice. Anyway, a gain of 2:1 is pretty good and pretty significant in your daily work.
Parallel on build server
Does this work on a build server? The answer is Yes, in a build definition you can define which runsettingfile to run, so this will also have an effect on the build server run. But, do you really want that? That all depends on how you many build servers you have, how they are configured, and how many check-ins/commits you have. That si, how loaded your build servers are. Normally you set up a build agent to run one per core on the machine. If you have many build definitions and many commits/Checkins happening continuously during the day, the build agents will be pretty busy., then there will be little benefit in setting up the tests to run in parallel in addition, as they will “steal” cores from the other builds. There can also be an overhead that eat up all your gain.
If you, on the other hand, have a builds machine that is not that much loaded, and not so many commits continuously, then by all means – why not? Grab the extra performance by running your tests in parallel.
There are also other ways to run in parallel, see this article for a different approach.
Context sensitive test execution
Context sensitive test execution is new in Update 1 – so what is that? Under given circumstances, the new Test Explorer will only test the assemblies that it detects tests code that you have changed.
This means that if you work with a certain piece of code in a given module of your system, and your code is distributed over multiple modules, then for each build, only the code that you changes is being build. That is the normal incremental build which is by default. New is that also only the tests touching this code is being run, and then not the tests for code that has not been touched. It is pretty obvious that for larger systems this can mean a pretty dramatic speedup in the test run performance.
There is one condition for this to work: You must activate “Run tests after build”.
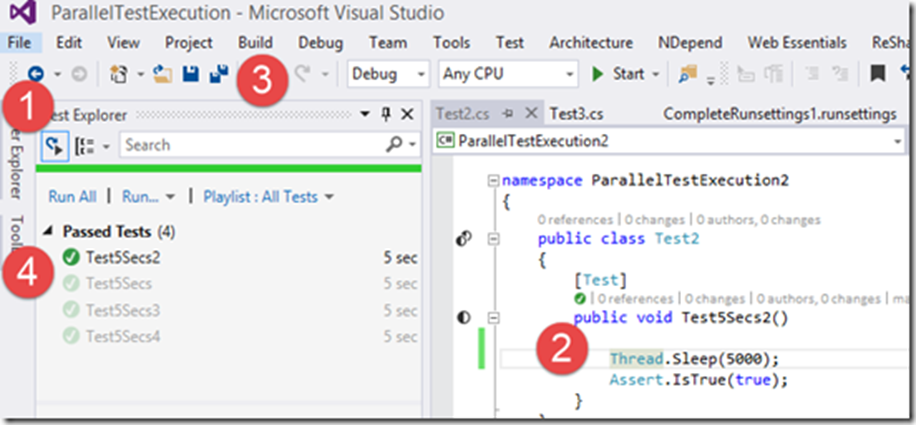
You do this either in the Test Explorer (1) or from the top menu Test/Test Settings/Run Tests after Build (2).
The effect of this can be seen in the screenshots below:
(1) Activate “Run tests after build”
(2) Do some code changes
(3) Just select Build, or use the keyboard shortcut
(4) Just the touched test are being run, the other ones are shown dimmed green. They ran green the last time they were run, but they were not run this time, because no code what changed that affected them. .
If you have larger projects this can give a significant gain in performance, and make your turn around from build through test back to edit mode much faster – and that is what is important during development, right?


0 comments