
Welcome to the second in a series on moving your applications from on-premises to the cloud. Last time, Abel Wang joined Steven Murawski to discuss what goes into getting started with your migration. You learned about the problem our team has been facing to help get Mercury Health’s current IT solution moved away from their on-prem solution and into Azure. One of Steven’s keys to beginning a migration is by starting small, we’ll do that by lifting and shifting Mercury Health into their new Azure deployment.
I’ve had to move house a few times in my life. It always entailed me spending countless hours taking down everything I own, repackaging items that are already open, discarding things I no longer need, and not to mention throwing away items that simply are not needed anymore. Once I did this, I needed to move all the individual things I had boxed up and take them to our new home, many times with assistance from a moving company. The problem of this, much like moving an application with many parts, is the time and effort put into taking everything apart and putting it back together again so you have a place to get back to your normal life.
What if there was a way for me to just simply disconnect everything from power, gas, and water and just throw it on a truck? The truck can take me to my new plot of land and drop it off where I could reconnect all of my essential services in order to get my home back in working order. In my flatbed truck home move scenario, we’re never considering taking things down or throwing parts away. We’re just sort of unplugging and plugging back in so we get back to our expected way of life. While that’s not really reasonable for our home, it does seem pretty reasonable for our application’s hosting environment. When reviewing compute options, it may be determined for your business case that the best path to take in moving into the cloud is taking the least bumpy road there.
What is lift and shift?
Lift and shift is a migration strategy that chooses the path of least resistance by allowing you to “re-host” your existing workload without modifications to the application or redesigning how it is hosted. Like our “put it on a truck” idea, we’re going to be picking up what we currently have in the Mercury Health datacenter and moving it along to the cloud. But unlike the truck-based home migration, there is no need to unrack and pull the servers from the racks.
A lift and shift migration moves an existing server from its current host to its cloud host using tools to replicate what was running in our on-prem solution. That means our Mercury Health SQL database, IIS configuration, registry settings, and OS configuration are all part of the new deployment on Azure without having to re-write portions of the application to a specific Platform as a Service. In this case, we’ll move into Azure Virtual Machines and reduce our total amount of work and time we put into the effort.
Considerations for migrating
Migrating requires you to make a number of decisions to execute once you’ve chosen a particular strategy.
Why are we moving? – I have been asked this question many times. The main reason I’ve given is that “we need less responsibility.” Managing networks, rack configurations, backup systems, load balancing appliances, and the rest of our infrastructure puts us at additional risk. We take on having to be experts on all of our equipment along with understanding how each part is interconnected. It’s difficult to do that with just our software development and documentation process. Throwing all the gear to manage is just another headache we can push to the side and allow our new host to handle. I certainly do not want to spend my time working on a SAS 70 audit or working on physical security. Let’s let Azure handle all of these things while we just work on our application.
Cash Rules Everything Around My App – What are you paying to host all of that gear? You may counter with “doesn’t everything cost more in the cloud? ” It can if you don’t take into consideration what resources you’re creating in the cloud. Are you using the full capacity of the server you’ve launched? By making determinations of what exactly is needed, how much is needed, and when it’s needed you can best predict costs and deliver the most value to your customers.
Who will be doing the lifting and shifting? – Who’s handling the process? Who’s going to oversee the execution of each step we take along the migration process? Who’s updating DNS? These are just a few questions you’re team needs to work together on. This core principle of DevOps, communication, remains just as important in migrating our apps as it does to deliver features.
Azure Migrate
Azure Migrate is a suite of tools within Azure that help with your lift and shift process. Azure Migrate provides you with the ability to discover and determine exactly what your current application deployment looks like. Utilize a central repository for your items to move such as backups of your server and databases.
Azure Migrate can assess and prepare for the migration of servers, databases web applications, virtual desktops, and even large unstructured data you may be storing. It also ties into popular ISV offerings if you’re looking for some extra hands to help you move your application.
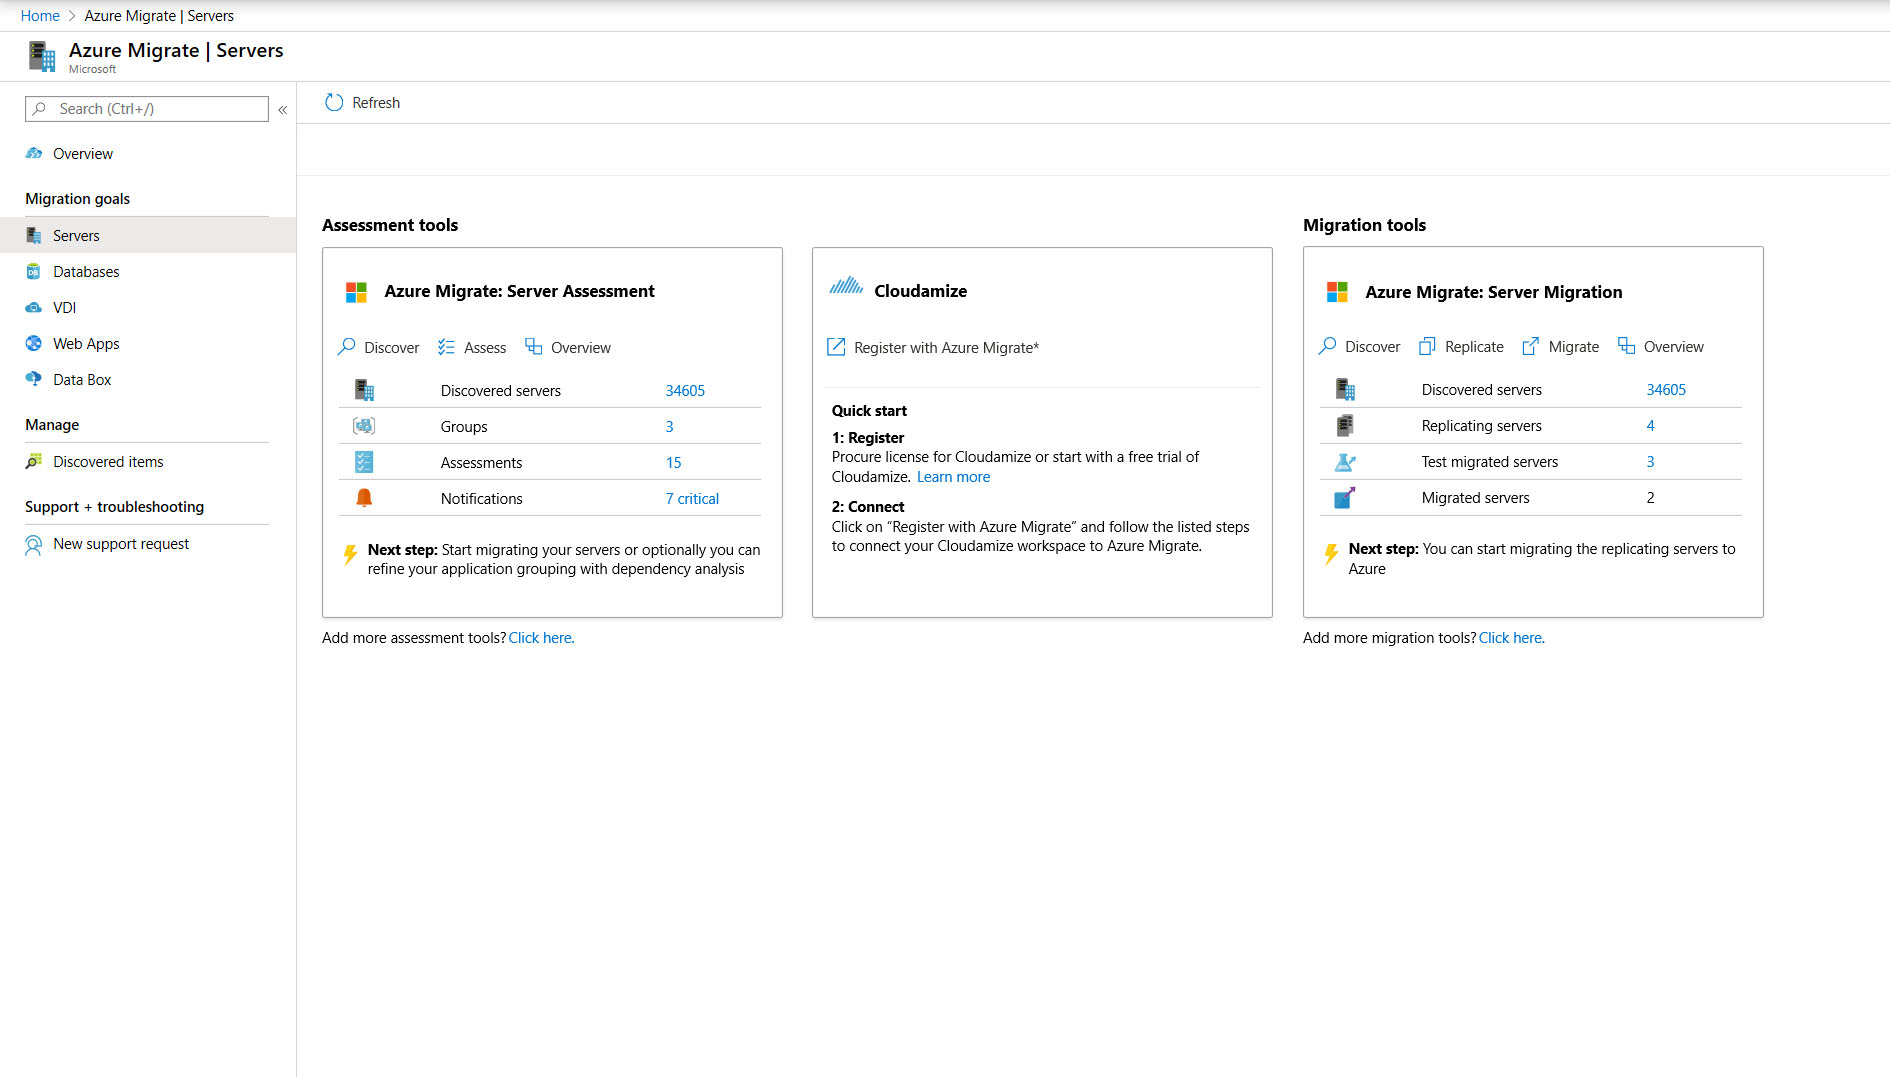
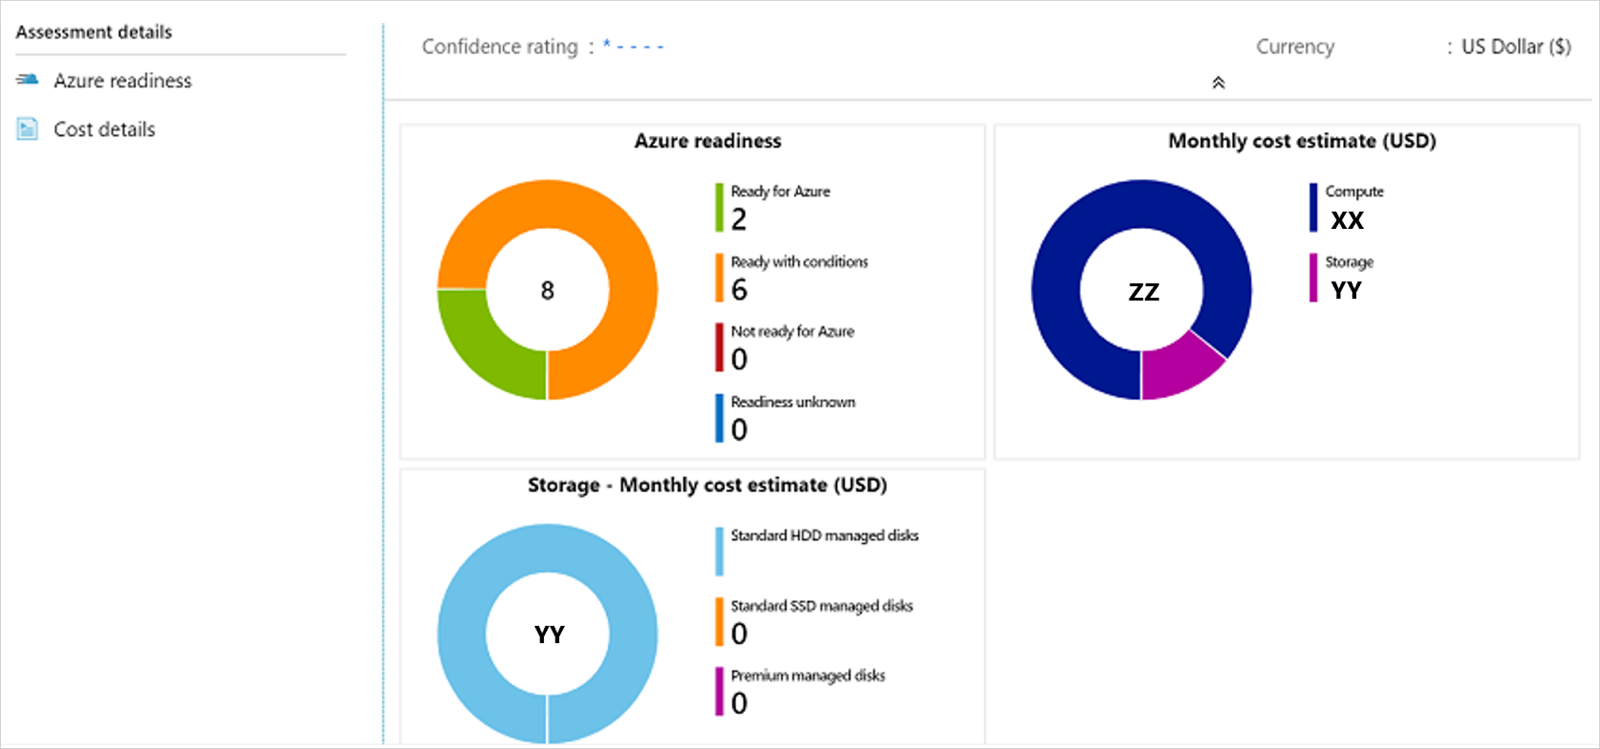
Azure Migrate allows you to run an assessment on your existing deployment to determine how ready you are for your on-prem to cloud migration. Discover existing VMWare, Hyper-V, Xen, or even servers from another cloud hosting company. Key parts of your assessment include determining where exactly you want to migrate to, what size VM’s you may need, the utilization, and the performance of your servers. Once completed you will receive a confidence rating from Azure Migrate on the success of your migration. You’ll know how ready you are to move into the cloud BEFORE you actually execute the process.
Moving Ahead
Once you’ve determined what exactly it is that you need, you can then replicate your servers using the Azure Migrate appliance that you install on a virtualized Windows server. The appliance can be deployed to a VMware or Hyper-V solution using OVA or VHD templates. The replication appliance will coordinate all communication, security, and data migration process for your apps.
Once your server replication is completed you’ll then make a determination on the best time to finalize this migration to cut over to your new host at Azure. You may need to make some final changes to DNS or simply tell your team to start using a new location when they log into to certain apps. That continues the communication process mentioned earlier.
Wrapping up
I have summarized a lot of this process because there is a ton of great information available on how to kick this process of lifting and shifting off. One of the best ways to begin learning how this process looks in practice is by taking the “Design your migration to Azure” Microsoft Learn module. Along with the module, you’ll find lots of great information on the Microsoft Docs site along with How-tos. You’ll also have the Azure support team getting your back if something goes wrong. I know I always love having a safety net for tough times.
We’ll be back soon for another episode of On-Prem To The Cloud where we’ll continue to work with Abel to get you through your migration to the cloud. Here are a number of links I recommend checking out for migration and lift and shift information.
Azure Migrate
Migrate to the Cloud with Azure Migrate
Server assessment overview (migrate to Azure VMs)
About Azure Migrate
0 comments