
And we are back! Now that Abel and Damian have shown us how to build a Continuous Integration/Continuous Delivery (CI/CD) pipeline for the application and database, we’ve gained a bit of time back in our calendar (those manual deploys were taking a lot of time since our dev team got all Agile on us…).
Jay helped Abel migrate the application environment into Azure and it’s time to start taking advantage of the flexibility of cloud provisioning. One of the greatest advantages of working in the cloud is that so many physical tasks have become API calls – which makes Infrastructure as Code very powerful.
A Practice with Many Names
You may have heard of Infrastructure as Code or Configuration as Code or Compliance as Code before. They are similar but distinct practices that share the idea of being defined and treated as code.
Infrastructure as Code is the definition of an environment’s structure in a textual form that can be supplied to a tool or API which is responsible for creating or verifying that the environment exists as desired. Configuration as Code tends to refer to tools that manage the configuration of a (virtual or physical) computer. And Compliance as Code focuses on defining rules and expectations for an environment, service, or (virtual) machine.
The “as Code” practices are often referred to as idempotent – which means that performing the same operation multiple times should give you the same result. Many of the tools in this space meet that expectation, but not all.
The definitions created for these tools and APIs are in text, usually expressed in a domain-specific language. We can use software development methodologies for managing and deploying these files – hence the “as Code”. This tends to bring operations and development teams into closer collaboration, sharing tools and workflows. We can also keep the appropriate definitions closer to the code that they support – helping ensure that our environments stay current and truly represent what is needed to create and run our software.
Guardrails on Your Subscription
The first aspect we’ll dig into when looking at the “as Code” practices is Compliance as Code. Moving to the cloud opens up a number of concerns, with security, cost, and hygiene (or how we care for our environments) at the top of the list. Compliance as Code tooling can help us place some guardrails around our subscription – giving us feedback on what’s allowed, reporting on possible problems, and automatically correcting or updating API requests to ensure that they meet our organizational requirements.
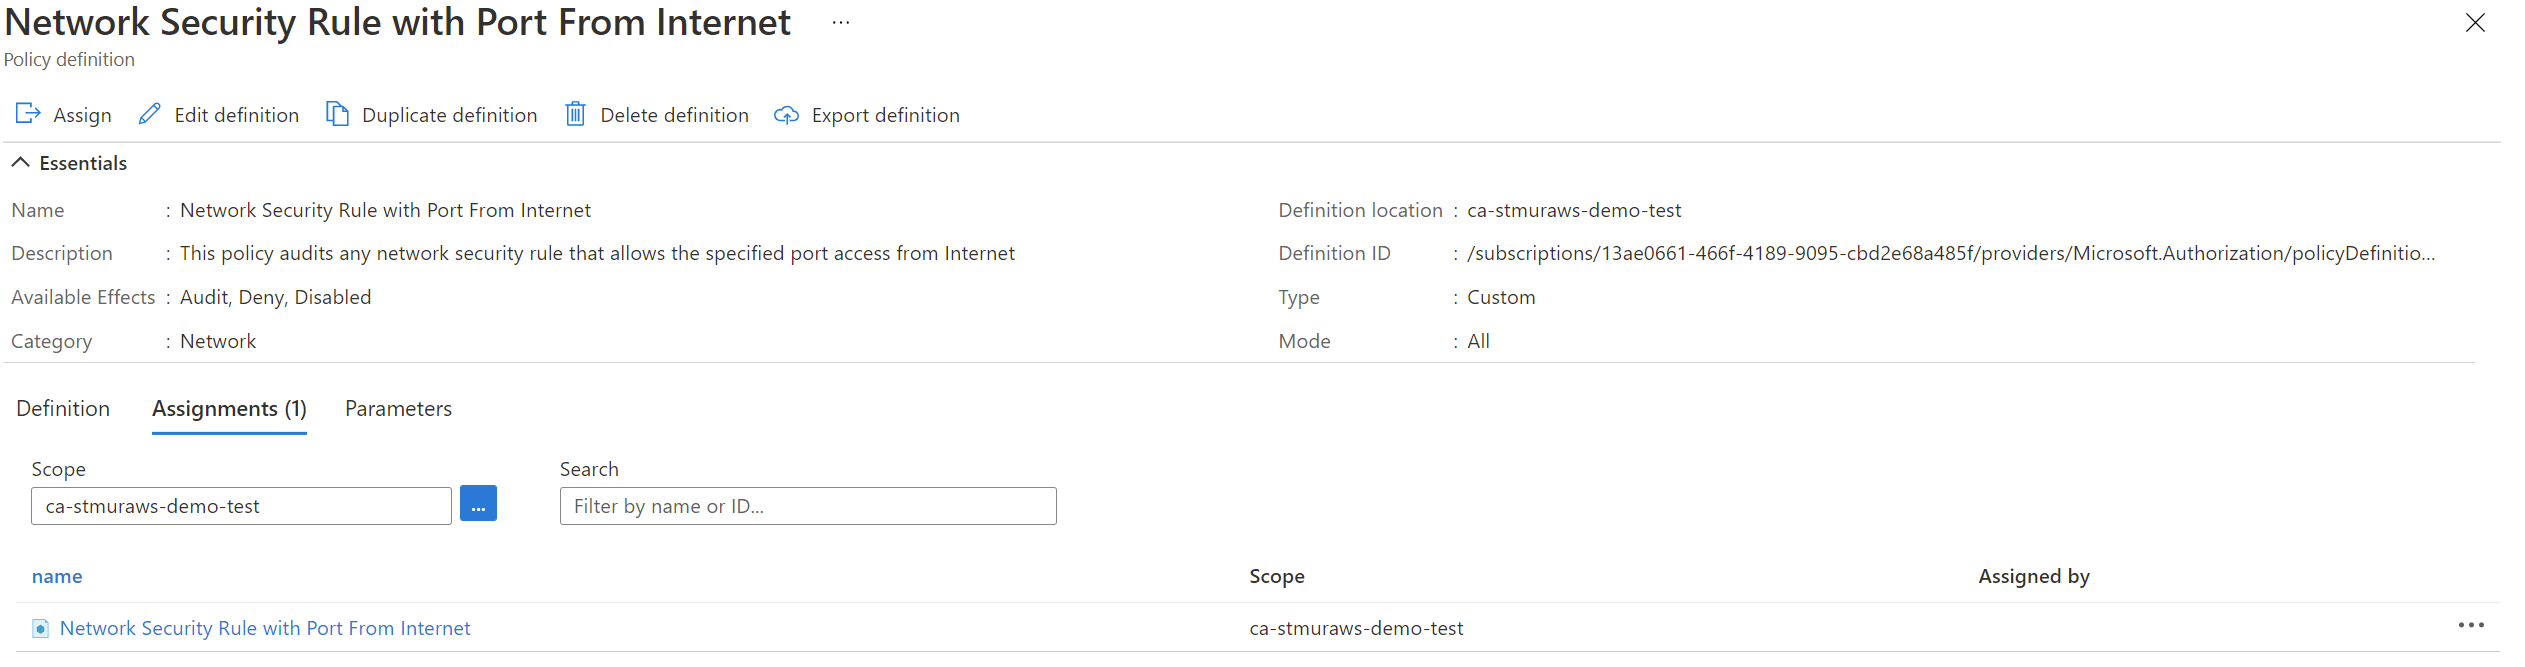
For our Mercury Health team, we need to ensure that remote management access isn’t open to the internet (among other things). Our team decided to use Azure Policy to ensure that none of the Virtual Machine resources leave port 3389 open to the internet as a starting point in defining our compliance as code.
Azure Policy
Fortunately, Azure has a service in place to aid us in creating these guardrails. Azure Policy provides us a way to audit, modify, or deny actions taken in Azure regardless of how you request the change. Azure Policy can also include remediation tasks to provide self-service corrective actions that can be used to bring resources back into compliance.
There are three central concepts in Azure Policy, definitions, initiatives, and assignments.
Azure Policy Definitions
The cornerstone of Azure Policy is the definition. The policy definition consists of the condition to validate and the enforcement action to take. Azure Policy definitions are in JSON and may feel similar to ARM templates (in fact, you can include some ARM inside of them for remediation tasks), but Azure Policy documents describe the policy to create. There are a number of built in policies and they are all on GitHub for you to use as examples or starting places.
Azure Policy Initiatives
Policy can get complex, especially if there are a variety of conditions you need to check for. Initiatives are a way to group policy definitions together to be applied as a unit. Initiatives make it easy to have one setting per policy (which is the recommended practice), but still express a wider scope of control. You’ll be able to see the overall initiative compliance as well as each that of each policy defined in the initiative.
Azure Policy Assignments
Creating policy definitions and initiatives is a great start, but they don’t do anything on their own. Policies (or initiatives) need to be assigned to be useful. The assignment takes a policy (or initiative) and applies it at a scope – usually at the subscription level.
Implementing Our Policy
To create the policy, I started with some of the samples on GitHub and tweaked them to be what I need. Then, I used Az PowerShell to deploy and assign my policy. Policy doesn’t have any built-in concepts around versioning, so I wrote my PowerShell to look for a version number in the metadata of the policy and compare that to the metadata of the policy that has been published.
{
  "properties": {
    "displayName": "Network Security Rule with Port From Internet",
    "policyType": "Custom",
    "mode": "All",
    "description": "This policy audits any network security rule that allows the specified port access from Internet",
    "metadata": {
      "version": "3.0.0",
    ...
$PolicyDefinitionPath = './network-security-rule-with-port.json'
$PolicyJson = Get-Content $PolicyDefinitionPath -Raw | ConvertFrom-Json

Write-Host "Checking Azure Policy status"
$Policy = Get-AzPolicyDefinition -Name $PolicyJson.displayName -ErrorAction SilentlyContinue -WarningAction SilentlyContinue
if ($Policy) {
    if ($PolicyJson.metadata.version -eq $Policy.Properties.metadata.version) {
        Write-Host "Policy $($PolicyJson.displayName) is up to date."
    }
    else {
         Write-Host "Updating Policy Definition $($PolicyJson.displayName)."
        $Policy = Set-AzPolicyDefinition -Id $Policy.ResourceId -Policy $PolicyDefinitionPath -ErrorAction SilentlyContinue -WarningAction SilentlyContinue
    }
}
else {
    Write-Host "Creating New Policy Definition $($PolicyJson.displayName)."
    $Policy = New-AzPolicyDefinition -Name $PolicyJson.displayName -Policy $PolicyDefinitionPath -ErrorAction SilentlyContinue -WarningAction SilentlyContinue
}

$PolicyName = $PolicyJson.displayName.tolower() -replace '\s+', '-'
$PolicyAssignment = Get-AzPolicyAssignment -Name $PolicyName -ErrorAction SilentlyContinue -WarningAction SilentlyContinue
if (-not $PolicyAssignment) {
    Write-Host "Assigning the policy to block opening 3389 to the internet."
    New-AzPolicyAssignment -Name $PolicyName -DisplayName $PolicyJson.displayName -PolicyDefinition $Policy -PolicyParameterObject @{port = '3389' } | Out-Null
}
else {
    Write-Host "Policy already assigned."
}
Define Your Environment
Once we have some constraints in place around our cloud environment, we are free to start building the Infrastructure as Code portion of our environment.
ARM Templates
We have several choices for tools in the infrastructure as code space, but we have decided to use Azure Resource Manager (ARM) templates – we’ve had some exposure to them previously, and the tooling in Visual Studio Code (the Azure Resource Manager (ARM) Tools extension) is great and well understood.
ARM templates help us to define the configuration and composition of our cloud resources. They model the infrastructure we’ll need to deliver our application. We’ll build a definition for the contents of a resource group that contains all the services needed to run our Mercury Health application (and stand up dev and test environments that match production).
Starting Fresh
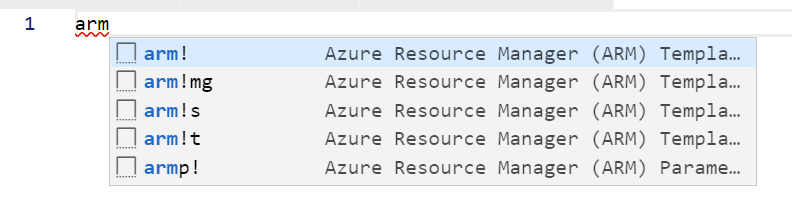
I like to start fresh when I build my infrastructure as code definitions. I want to understand that relationship of the resources and configuration elements. This will help me as I troubleshoot the deployment.
Fortunately, the Azure Resource Manager (ARM) Tools extension for VS Code makes that really easy. Just open an empty JSON document, start typing arm! and let the snippets help you get started.
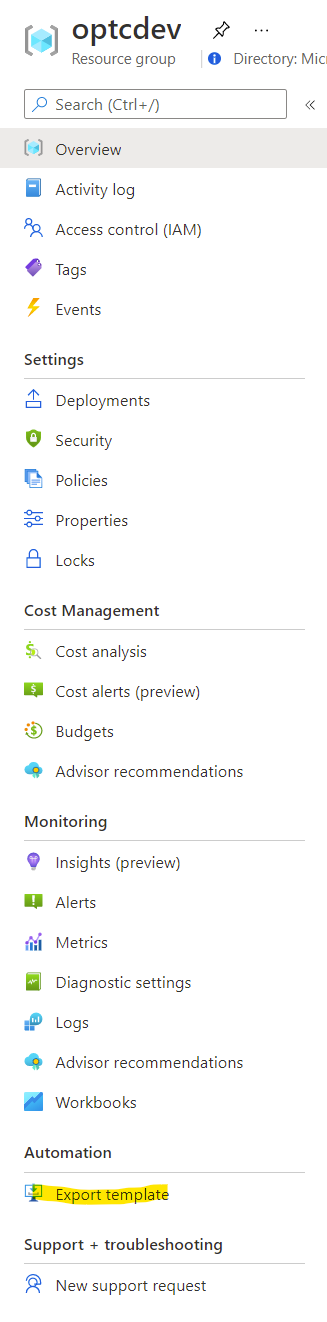
Using Existing Deployments as a Reference
We don’t have to start completely from scratch. We can use the Export Template feature to extract a model of our existing environment. It’s an autogenerated template, so the parameters and variables it configures and the naming used may not be optimal for our use case, but it provides a great reference for what resources and properties are used to build our environment.
I started by exploring the existing template for resources that didn’t have any dependencies. Those would be my starting points. From there, I built on the environment with one minimal change at a time, periodically deploying and heavily using the what-if operation to ensure the changes to the environment would be what I would expect.
{
            "name": "[variables('vmDiskStorageName')]",
            "type": "Microsoft.Storage/storageAccounts",
            "apiVersion": "2019-06-01",
            "tags": {
                "displayName": "[variables('vmDiskStorageName')]"
            },
            "location": "[parameters('location')]",
            "kind": "StorageV2",
            "sku": {
                "name": "Premium_LRS",
                "tier": "Premium"
            }
        },
As I went, I could use the existing resources as dependencies for later resources. My virtual machine would require my storage account (for the virtual disks) and virtual NIC for network access.
For my virtual machine, I knew I needed a SQL Server based on the application and the SQL Management VM extension enabled on the reference application server. This helped me pick my base image to make for a easier start (there are a variety of images with SQL Server pre-installed and ready to go).
{
    "type": "Microsoft.Compute/virtualMachines",
    "apiVersion": "2019-07-01",
    "name": "[parameters('vmname')]",
    "location": "[parameters('location')]",
    "dependsOn": [
        "[resourceId('Microsoft.Network/networkInterfaces', 'vmNic')]",
        "[resourceId('Microsoft.Storage/storageAccounts', variables('vmDiskStorageName'))]"
    ],
    "properties": {
        "hardwareProfile": {
            "vmSize": "Standard_D4s_v3"
        },
        "osProfile": {
            "computerName": "[take(parameters('vmname'), 15)]",
            "adminUsername": "[parameters('username')]",
            "adminPassword": "[parameters('password')]"
        },
        "storageProfile": {
            "imageReference": {
                "publisher": "MicrosoftSQLServer",
                "offer": "SQL2017-WS2016",
                "sku": "SQLDEV",
                "version": "latest"
            },
            "osDisk": {
                "createOption": "FromImage",
                "managedDisk": {
                    "storageAccountType": "Premium_LRS"
                }
            }
        },
        "networkProfile": {
            "networkInterfaces": [
                {
                    "id": "[resourceId('Microsoft.Network/networkInterfaces', 'vmNic')]"
                }
            ]
        },
        "diagnosticsProfile": {
            "bootDiagnostics": {
                "enabled": false
            }
        }
    }
},
Eventually, my template grew to be able to replicate all the resources needed for the Azure environment.
Extract Parameters For Flexibility
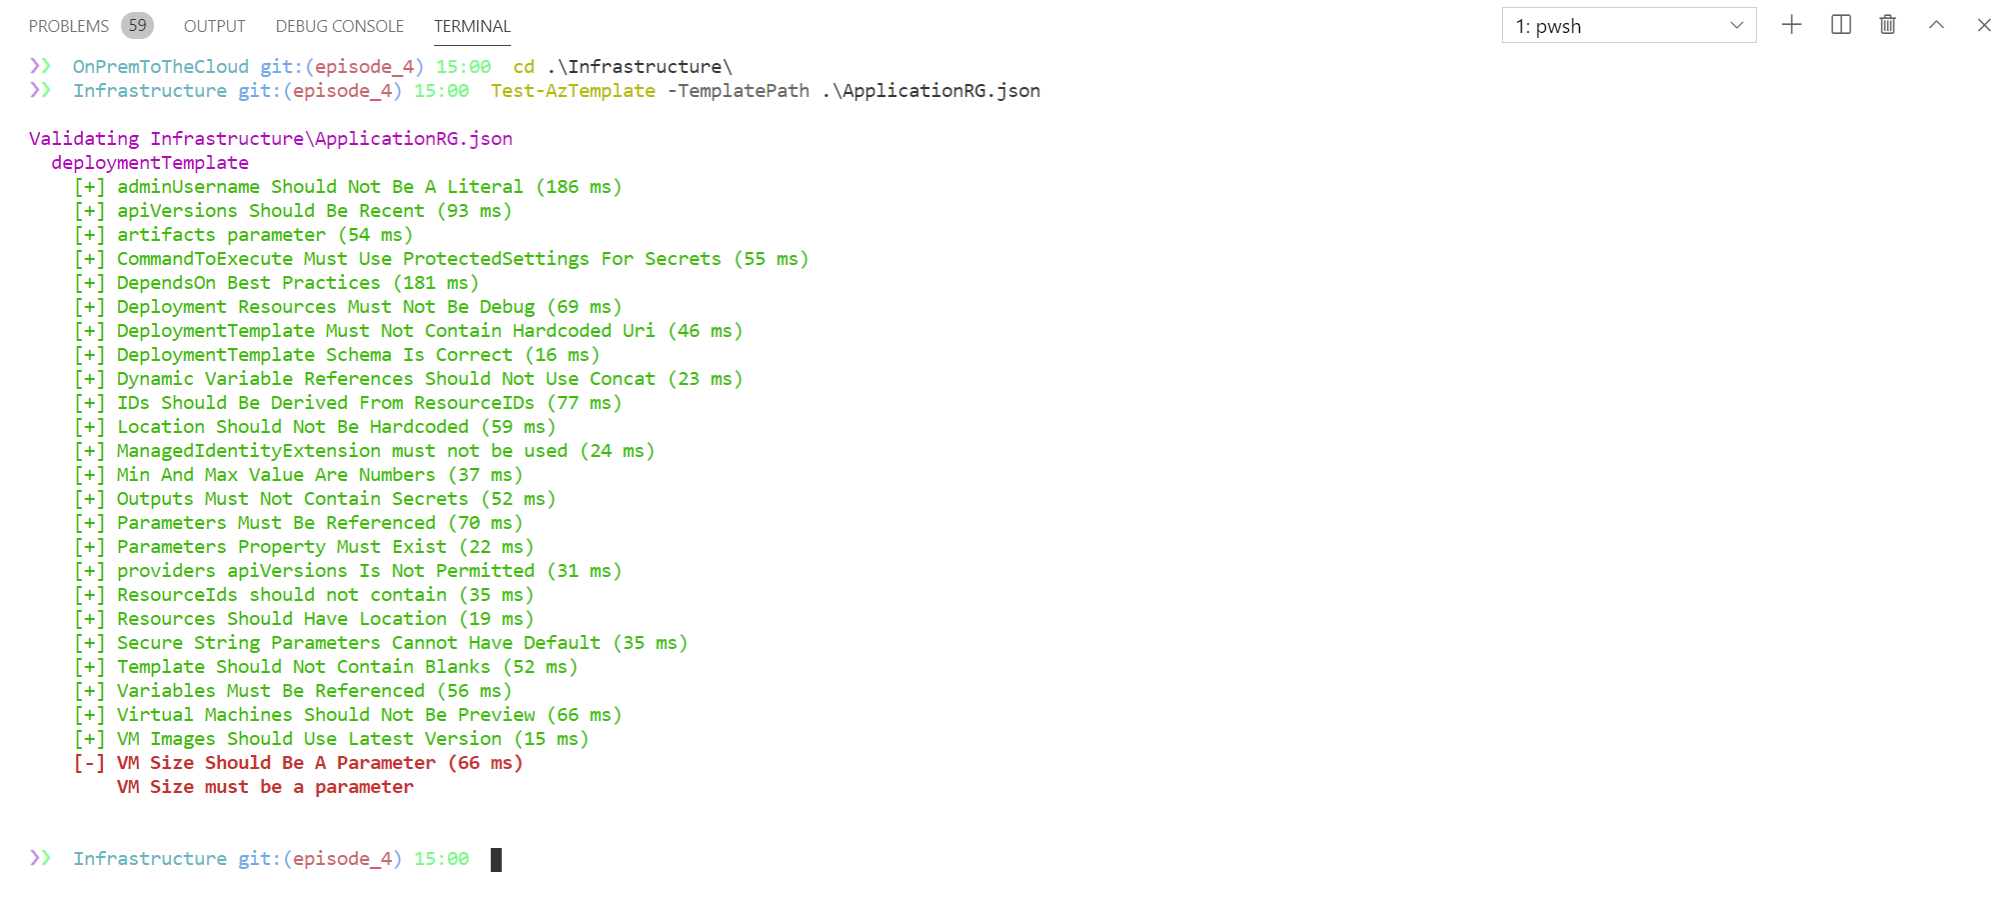
Once my template was able to create the resources for my existing environment, I began to extract parameters – those values that I may want to change from deployment to deployment. This allows me to separate the structure of my environment from the details of what environment it belongs with. I also used the ARM Template Test Toolkit to show me suggestions on what to extract as a parameter.
Covering the Last Mile – VM Configuration
Once we have the cloud resources in place, we can focus on the configuration of the virtual machine. I settled on using PowerShell Desired State Configuration(DSC) to manage our Configuration as Code. I’ve personally got a lot of experience with PowerShell and PowerShell DSC and there is a PowerShell DSC VM Extension for Azure.
Designing a Configuration
I started by identifying the roles and features needed for the workloads we’d run on the VM. I got an existing list of what was installed (and any dependencies) from the source VM and a bit of PowerShell – Get-WindowsFeature | Where-Object Installed.
Then I started to build up my configuration.
WindowsFeature Web-Server {
    Name   = 'Web-Server'
    Ensure = 'Present'
}
I even included a little trick to enforce the right TLS implementations via the registry.
Registry SchUseStrongCrypto {
    Key       = 'HKLM:\SOFTWARE\Microsoft\.NETFramework\v4.0.30319'
    ValueName = 'SchUseStrongCrypto'
    ValueType = 'Dword'
    ValueData = '1'
    Ensure    = 'Present'
}

Registry SchUseStrongCrypto64 {
    Key       = 'HKLM:\SOFTWARE\Wow6432Node\Microsoft\.NETFramework\v4.0.30319'
    ValueName = 'SchUseStrongCrypto'
    ValueType = 'Dword'
    ValueData = '1'
    Ensure    = 'Present'
}
Next, I identified the other key requirements – like ensuring the Azure DevOps deployment agent was installed and could configure itself to the correct environment and installing the WebDeploy and DacFramework tooling (for the deployment process).
Finally, I set up IIS with an Application Pool with the correct credentials (for accessing the SQL Server), stopping the default website, and creating a blank website to deploy into.
xWebAppPool MercHealthPool {
    Name                  = 'MercuryHealth'
    State                 = 'Started'
    autoStart             = $true
    startMode             = "AlwaysRunning"
    managedRuntimeVersion = 'v4.0'
    managedPipelineMode   = 'Integrated'
    identityType          = 'SpecificUser'
    Credential            = $AppPoolCredential
}

xWebSite RemoveDefaultWebsite {
    Ensure          = 'Present'
    Name            = 'Default Web Site'
    State           = 'Stopped'
    ServerAutoStart = $false
    PhysicalPath    = 'C:\inetpub\wwwroot'
}

xWebSite MercuryHealthSite {
    Name            = "Mercury Health"
    Ensure          = "Present"
    State           = 'Started'
    ServerAutoStart = $true
    ApplicationPool = 'MercuryHealth'
    PhysicalPath    = 'C:\MercuryHealth'
    DependsOn       = "[xWebsite]RemoveDefaultWebsite", "[xWebAppPool]MercHealthPool", "[MercuryHealthAgent]AgentInstall"
}
Publishing the Configuration
Once I had my complete configuration, I used the Publish-AzVmDscConfiguration command to package up my configuration and publish a zip file containing it and any module dependencies required to apply the configuration to an Azure storage account.
Using the DSC Extension to Configure the VM
With the configuration and dependencies published to a storage account, I could enable the Azure VM DSC extension via the ARM template.
{
    "type": "Microsoft.Compute/virtualMachines/extensions",
    "name": "[concat(parameters('vmname'), '/Microsoft.Powershell.DSC')]",
    "apiVersion": "2018-06-01",
    "location": "[parameters('location')]",
    "dependsOn": [
        "[resourceId('Microsoft.Compute/virtualMachines',parameters('vmname'))]"
    ],
    "properties": {
        "publisher": "Microsoft.Powershell",
        "type": "DSC",
        "typeHandlerVersion": "2.83",
        "autoUpgradeMinorVersion": true,
        "settings": {
            "wmfVersion": "latest",
            "configuration": {
                "url": "[concat(parameters('dscBlobStorageUri'), variables('configurationZipName'))]",
                "script": "MercHealthConfig.ps1",
                "function": "MercuryHealthWeb"
            }
        },
        "protectedSettings": {
            "configurationArguments": {
                "AppPoolCredential": {
                    "userName": "[variables('adminUserName')]",
                    "password": "[parameters('password')]"
                },
                "AzureDevOpsToken": "[parameters('azureDevOpsToken')]",
                "AzureDevOpsUrl": "[parameters('azureDevOpsUrl')]",
                "AzureDevOpsProject": "[parameters('azureDevOpsProject')]",
                "AzureDevOpsEnvironmentName": "[parameters('azureDevOpsEnvironmentName')]"
            }
        }
    }
}
This would ensure that every time I bring a new environment up, by the time the ARM template deployment finished, I’d be fully ready to deploy from our CI/CD pipeline.
Bringing It Together
Now that I’ve put together this variety of “as Code” practices, I wanted to simplify my experience in deploying and updating these resources.
Unifying the Deployment Experience
To do that, I built a short PowerShell script that I could run to deploy a management resource group that could host my DSC configuration and template specs with my ARM templates – as the templates and configuration do not change between environments – only the parameters.
The script would:
- Check if the Azure Policy was deployed and if my local copy was newer than what was present
- Deploy any new or updated policy definitions
- Ensure the policy was assigned
- Create the management resource group
- Create and publish template specs with my ARM templates
- Update the local management group deployment parameters file
- Apply the management group template spec (to make the storage account for the DSC configuration)
- Ensure the DSC configuration dependencies are present
- Package and publish the DSC configuration and dependent modules
- Update the local application group deployment parameters file
- Create the resource group for the application environment
- Apply the application resource group template spec to create a new application environment
I didn’t spend a lot of time on error handling or reporting in this script, because it is an intermediate step in this process. Eventually, I’d like to work this all into the deployment pipeline for the application – ensuring that the CI/CD pipeline can build whatever environments it needs as it goes.
param (
    $ResourceGroupName = 'optcdev',
    $ManagementResourceGroupName = 'optc-mgmt',
    $StorageAccountName = 'optcdsc',
    $StorageContainerName = 'configurations',
    $Location = 'eastus',
    $AzureDevOpsToken = $env:AzureDevOpsEnvironmentPat,
    $AzureDevOpsEnvironmentName = 'Development',
    $VMName = 'MHDev',
    [switch]$ManagementRGOnly,
    [switch]$ApplicationRGOnly
)

if ([string]::IsNullOrEmpty($AzureDevOpsToken)) {
    Write-Warning "This provisioning process needs a Personal Access Token capable of adding a VM to an environment in your Azure DevOps project."
    Write-Warning "Please ensure that the token has the right permissions."
    throw "Please provide -AzureDevOpsToken or set `$env:AzureDevOpsEnvironmentPat."
}

$ConfigurationPath = 'MercHealthConfig.ps1'
$PolicyDefinitionPath = './network-security-rule-with-port.json'
$PolicyJson = Get-Content $PolicyDefinitionPath -Raw | ConvertFrom-Json

Write-Host "Checking Azure Policy status"
$Policy = Get-AzPolicyDefinition -Name $PolicyJson.displayName -ErrorAction SilentlyContinue -WarningAction SilentlyContinue
if ($Policy) {
    if ($PolicyJson.metadata.version -eq $Policy.Properties.metadata.version) {
        Write-Host "Policy $($PolicyJson.displayName) is up to date."
    }
    else {
        Write-Host ""; Write-Host "Updating Policy Definition $($PolicyJson.displayName)."
        $Policy = Set-AzPolicyDefinition -Id $Policy.ResourceId -Policy $PolicyDefinitionPath -ErrorAction SilentlyContinue -WarningAction SilentlyContinue
    }
}
else {
    Write-Host "Creating New Policy Definition $($PolicyJson.displayName)."
    $Policy = New-AzPolicyDefinition -Name $PolicyJson.displayName -Policy $PolicyDefinitionPath -ErrorAction SilentlyContinue -WarningAction SilentlyContinue
}

$PolicyName = $PolicyJson.displayName.tolower() -replace '\s+', '-'
$PolicyAssignment = Get-AzPolicyAssignment -Name $PolicyName -ErrorAction SilentlyContinue -WarningAction SilentlyContinue
if (-not $PolicyAssignment) {
    Write-Host ""; Write-Host "Assigning the policy to block opening 3389 to the internet."
    New-AzPolicyAssignment -Name $PolicyName -DisplayName $PolicyJson.displayName -PolicyDefinition $Policy -PolicyParameterObject @{port = '3389' } | Out-Null
}
else {
    Write-Host ""; Write-Host "Policy already assigned."
}

$TemplateSpecParams = @{
    ResourceGroupName = $ManagementResourceGroupName
    Location          = $Location
    Force             = $true
}

if (-not $ApplicationRGOnly) {
    Write-Host ""; Write-Host "Setting up the management resource group - $ManagementResourceGroupName"
    New-AzResourceGroup -Name $ManagementResourceGroupName -Location $Location -Force | Out-Null

    Write-Host ""; Write-Host "Deploying template specs to the management resource group."
    $ManagementRGTemplateVersion = (Get-Content './ManagementRG.json' -raw | ConvertFrom-Json).ContentVersion
    $ManagementRGSpec = New-AzTemplateSpec @TemplateSpecParams -Name ManagementRG -TemplateFile './ManagementRG.json' -Version $ManagementRGTemplateVersion
    $ManagementRGSpecId = $ManagementRGSpec.Versions |
    Sort-Object -Property Name -Descending |
    Select-Object -First 1 -ExpandProperty Id

    $ApplicationRGTemplateVersion = (Get-Content './ApplicationRG.json' -raw | ConvertFrom-Json).ContentVersion
    $ApplicationRGSpec = New-AzTemplateSpec @TemplateSpecParams -Name ApplicationRG -TemplateFile './ApplicationRG.json' -Version $ApplicationRGTemplateVersion
    $ApplicationRGSpecId = $ApplicationRGSpec.Versions |
    Sort-Object -Property Name -Descending |
    Select-Object -First 1 -ExpandProperty Id

    $MGParametersFile = get-content './ManagementRG.parameters.json' -raw | ConvertFrom-Json
    $MGParametersFile.parameters.storageAccountName.value = $StorageAccountName
    $MGParametersFile.parameters.storageContainerName.value = $StorageContainerName
    $MGParametersFile |
    ConvertTo-Json |
    out-file ./ManagementRG.current.parameters.json -Force

    # Deploying this environment incrementally so the template specs don't disappear.
    # Otherwise, we have a Chicken/Egg scenario.
    Write-Host ""; Write-Host "Creating storage resources in the management group to host the DSC configuration and application code."
    $ManagementRGDeploymentParameters = @{
        ResourceGroupName     = $ManagementResourceGroupName
        TemplateSpecId        = $ManagementRGSpecId
        TemplateParameterFile = './ManagementRG.current.parameters.json'
        Mode                  = 'Incremental'
        Force                 = $true
    }

    New-AzResourceGroupDeployment @ManagementRGDeploymentParameters | Out-Null
    Remove-Item -Path ./ManagementRG.current.parameters.json -Force

}

Write-Host ""; Write-Host 'Getting the xWebAdministration module to package as part of the published DSC configuration.'
if (-not (Get-Module -ListAvailable xWebAdministration)) {
    Install-Module xWebAdministration -RequiredVersion 3.2.0 -Scope CurrentUser
}
Write-Host ""; Write-Host 'Getting the xPSDesiredStateConfiguration module to package as part of the published DSC configuration.'
if (-not (Get-Module -ListAvailable xPSDesiredStateConfiguration)) {
    Install-Module xPSDesiredStateConfiguration -RequiredVersion 9.1.0 -Scope CurrentUser
}
Write-Host ""; Write-Host 'Packaging and publishing the DSC configuration and supporting modules.'
$Parameters = @{
    ResourceGroupName  = $ManagementResourceGroupName
    ConfigurationPath  = $ConfigurationPath
    StorageAccountName = $StorageAccountName
    ContainerName      = $StorageContainerName
    Force              = $true
}
Publish-AzVMDscConfiguration @Parameters | Out-Null

if (-not $ManagementRGOnly) {

    Write-Host ""; Write-Host "Creating the application resource group."
    New-AzResourceGroup -Name $ResourceGroupName -Location $Location -Force | Out-Null

    $StorageAccount = Get-AzStorageAccount -ResourceGroupName $ManagementResourceGroupName -Name $StorageAccountName
    $DscArchiveStorageUri = $StorageAccount.PrimaryEndpoints.Blob + $StorageContainerName + '/'
    $ParametersFile = get-content './ApplicationRG.parameters.json' -raw | ConvertFrom-Json
    $ParametersFile.parameters.dscBlobStorageUri.value = $DscArchiveStorageUri
    $ParametersFile.parameters.azureDevOpsToken.value = $AzureDevOpsToken
    $ParametersFile.parameters.azureDevOpsEnvironmentName.value = $AzureDevOpsEnvironmentName
    $ParametersFile.parameters.vmname.value = $VMName
    $ParametersFile |
    ConvertTo-Json |
    out-file './ApplicationRG.current.parameters.json' -Force

    if (-not $ApplicationRGSpecId) {
        Write-Host ""; Write-Host "Getting the current application resource group templatespec Id"
        $TemplateSpecParams.Remove('Location') | Out-Null
        $TemplateSpecParams.Remove('Force') | Out-Null
        $ApplicationRGSpecId = (Get-AzTemplateSpec @TemplateSpecParams -Name ApplicationRG).Versions |
        Sort-Object -Property Name -Descending |
        Select-Object -First 1 -ExpandProperty Id
    }

    Write-Host ""; Write-Host "Deploy the application environment."
    $FullDeploymentParameters = @{
        ResourceGroupName     = $ResourceGroupName
        TemplateSpecId        = $ApplicationRGSpecId
        TemplateParameterFile = './ApplicationRG.current.parameters.json'
        Mode                  = 'Complete'
        Force                 = $true
    }
    $WebAddress = (New-AzResourceGroupDeployment @FullDeploymentParameters -ErrorAction Stop).Outputs["hostname"].Value
    Remove-Item -Path ./ApplicationRG.current.parameters.json -Force

    $DSCStatus = Get-AzVMDscExtensionStatus -ResourceGroupName $ResourceGroupName -VMName $VMName
    $DSCStatus.StatusMessage
    $DSCStatus.DscConfigurationLog

    Write-Host "You can now deploy to $AzureDevOpsEnvironmentName."
    Write-Host "The website will be available at $WebAddress"
}
For more on:
Azure Policy – https://aka.ms/optc/policy
ARM Templates – https://aka.ms/optc/learn-arm
PowerShell Desired State Configuration – https://aka.ms/optc/desired-state
Using this type of script as an intermediate step to building your initial “as Code” experience can be very impactful and set you up for the next step of bringing the “as Code” process into our CI/CD workflow – it definitely helped our Mercury Health team!
Umm 🤔…EP3?
These are great as I was working on EaC for a CSP/MSP back in the fall…did IaC in a PoC, for them which was what they hired me to work on, then showed them Policy as Code…and suggested they work towards EaC as the end state.
I worked w/ DSC as part of underlying hosts for Azure Stack Hub when I was at Dell, DSC wasn’t using JSON then, so it took some extra effort to implement. Happy to see DSC using JSON for a more uniform experience…
The blog post for episode 3 is slightly delayed, but the devops lab episode is out.
DSC still uses its powershell based dsl. JSON is used for the ARM template and the DSC extension.
Thanks for reading!