

This post is for Developers and Cloud Engineers who wish to deploy their resources to Azure using programming languages that they’re familiar with. We’ll deploy an Azure App Service to Azure using Pulumi and Python.
Introduction
You may have heard of the term Infrastructure as Code (IaC). IaC enables you to define your infrastructure in a file, commonly referred to as a ‘template’. You can then deploy those resources using the configuration defined in the template. Now that your infrastructure is defined in text, you can adopt common Software Development Lifecycle (SDL) processes to manage your infrastructure, just how you do with your code, such as Source Control, Unit Testing, CI/CD Pipelines etc.
You may already be familiar with tools such as Azure Resource Manager (ARM) templates or Terraform to define your infrastructure as code. But in this post I wanted to talk about a slightly different tool called Pulumi.
![]()
Pulumi enables us to perform Infrastructure as code using existing programming languages. So what’s the difference you may be asking?
Pulumi versus Traditional IaC
Infrastructure as Code as we already know it, typically uses language-independent data formats, such as JSON or YAML to define our infrastructure. Terraform is slightly different, and uses a Domain Specific Language (DSL), Hashicorp Configuration Language (HCL) to construct our templates.
This is where Pulumi is slightly different. With Pulumi, we don’t need to learn a DSL or use JSON or YAML. If we’re already familiar with a programming language, Pulumi enables us to define our infrastructure using that language.
This means that we can also leverage the standard functions within those programming languages too, things like loops, variables, error handling etc.
These functions are available in the other tools we’ve mentioned too. For example, creating multiple resources could be achieved by using a for loop in Python if using Pulumi or by using the copy functionality if using Azure Resource Manager (ARM).
Pulumi is just, as we’ve already covered, enabling you to do this using existing programming languages. For someone who is a Developer, this may sound great, however, for a Cloud Engineer who lives and breathes JSON or YAML, other tools may be more preferable. As always, choose the tool that meets your own requirements.
Let’s take a look at how you can get started with Pulumi on Azure. We’ll be using Python in this post.
Getting Set Up
The teams at Pulumi, Microsoft and Python have already created great guides to get all of the pre-requisites installed on your machine, so if you don’t have them already, the links here will take you to the relevant documentation to get these installed.
Creating our first project
Pulumi uses a couple of new terms, lets get to know what they are before we start just copying and pasting commands.
Projects
Projects are where we will store all of the code for a particular workload. You can think of a project like a source code repository, if something was going to have it’s own repo, then it should probably be it’s own project.
Stacks
You can think of stacks as different instances of the code within our project, normally with differing configuration. In its simplest form you’d have a single project and a stack per environment (dev, test, prod) for example. There are a number of different patterns that you can adopt
Let’s get building then! In your terminal of choice create a new empty directory, transition to that directory and type:
pulumi new azure-python
Here we are telling Pulumi to create a new project and to use a starter template that they provide called azure-python. If you were to leave this blank, you would be prompted with a list of templates to select from within the terminal.
You will then be prompted with a number of questions, give your project and stack a name and select the public cloud and an Azure region of your choice. Selecting the defaults here is fine for this example.
Note: When you first use the Pulumi CLI, you will be prompted to create an account. You will need to do this to continue. This is free for individual use, and gives you a graphical dashboard to represent your deployments. This free service is also used to store the state of our pulumi resources.
Let’s navigate to our new directory and see what we have.
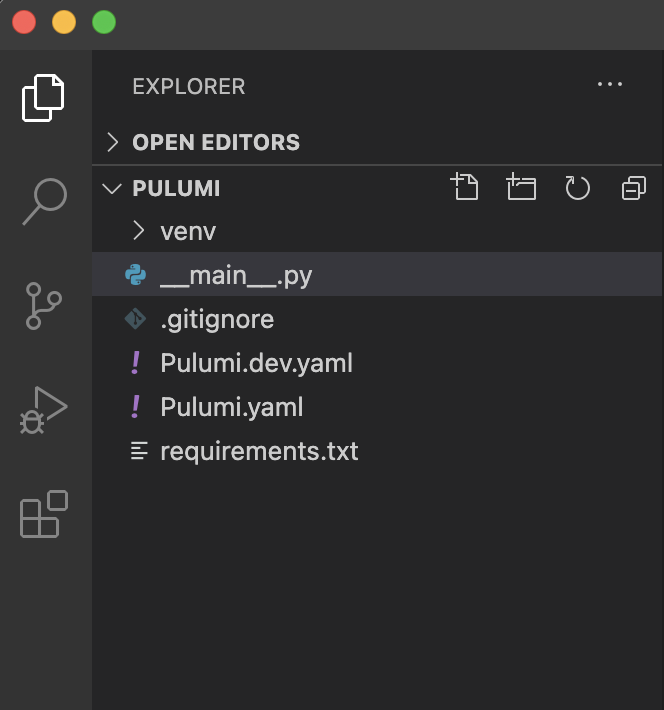
Take a look at the below files, notice how the YAML files reflect the configuration we just set via the CLI.
- Pulumi.yaml – This is our project configuration
- Pulumi.dev.yaml – This is our stack configuration
- _main_.py – This is where our Pulumi code that defines our resources will live
Creating Resources
Now that we have created our project and our stack, let’s take a look in our _main_.py file.
"""An Azure Python Pulumi program"""

import pulumi
from pulumi_azure import core, storage

# Create an Azure Resource Group
resource_group = core.ResourceGroup('resource_group')

# Create an Azure resource (Storage Account)
account = storage.Account('storage',
   # The location for the storage account will be derived automatically from the resource group.
   resource_group_name=resource_group.name,
   account_tier='Standard',
   account_replication_type='LRS')

# Export the connection string for the storage account
pulumi.export('connection_string', account.primary_connection_string)
You’ll notice that this starter has already predefined some resources for us.
- A Resource Group
- A Storage Account
-
An output of the storage account connection string
But we want to create something ourselves, we’re going to deploy an Azure App Service.
So go ahead and remove everything that the azure-python starter templatee created for us in the _main_.py file.
Creating our first Pulumi App
Note: All of the below code can be found on GitHub for your reference.
First up we need to import the required dependencies for Pulumi. You can import the entire pulumi_azure library here, but I prefer to import the specific modules that I’m going to be using, here we’ll need appservice and core.
import pulumi
from pulumi_azure import core, appservice
Next, we need to create a Resource Group for our resources to reside within. The resource group resource uses the core module.
Modules in Pulumi give you a set of resources and functions that you can use within your Pulumi code. For example, the ResourceGroup resource is defined using the core module, and later on we’ll define our AppServicePlan and AppService resources using the appservice module. There are modules that cover all areas of Azure.
We can reference the module with the module.Resource syntax, ours being core.ResourceGroup
# Resource Group
pulumi_rg = core.ResourceGroup('pulumi_rg')
To leverage Azure App Service, we need to first create an App Service Plan. An App Service plan defines a set of compute resources for a web app to run. These compute resources are analogous to the server farm in conventional web hosting. Here’s how we define one of those in Pulumi.
This is done in a similar way to how we created our resource group above, this time using the appservice module and the Plan resource. This resource takes more arguments for our desired configuration. We’ve kept it simple here with just the minimum required configuration.
Notice how we are using familiar python syntax to capture details from other resources. We have leveraged pulumi_rg.location and pulumi_rg.name here to capture details of our resource group that we created earlier.
The Pulumi API Reference documents the supported inputs and outputs for each resource that you can use in this way. Note that the inputs (name in this case) are implicitly provided to you as outputs too. This is brilliant for making repeatable Pulumi apps across different environments.
# App Service Plan
pulumi_plan = appservice.Plan("pulumiPlan",
    location=pulumi_rg.location,
    resource_group_name=pulumi_rg.name,
    sku=appservice.PlanSkuArgs(
        tier="Standard",
        size="S1",
    ))
Now that we have an App Service Plan, we need a web app to reside inside that plan.
This is probably all looking very familiar now, we create this AppService resource again using the appservice module.
The last action we need to take, is linking the two together by leveraging pulumi_plan.id to grab the id for the App Service Plan that we want to deploy our Web App to.
# Web App
pulumi_app_service = appservice.AppService("pulumiAppService",
    location=pulumi_rg.location,
    resource_group_name=pulumi_rg.name,
    app_service_plan_id=pulumi_plan.id,
    app_settings={
        "ENVIRONMENT": "dev",
    },
)
Finally, once our deployment is complete, Pulumi gives us the ability to retrieve details and provide them as outputs. In our case here, we want to know the URL of our web app, so that we can check everything is working ok.
Here we use the pulumi.export method, give our output a name, and then the reference to the output that we want to capture. In our case this is the default_site_hostname from our app service that we’ve just created.
# Export the hostname for the web app
pulumi.export('hostname', pulumi_app_service.default_site_hostname)
So we’ve defined our cloud resources using Python, but everything is still living locally on our machine right now. Next, we need to deploy to the cloud.
Now would be a good time, if you haven’t already, to save your files.
Deploying to Azure
Note: If you haven’t already, run the
az logincommand and connect your Azure CLI to your Azure subscription to avoid any errors.
In order to deploy our application to Azure, we need to leverage the Pulumi CLI that we used to create our project and stack earlier.
The command we will be using here is:
pulumi up
This command will first check your file for any syntax errors and then it will interpret which resources you wish to deploy. It will not actually deploy them yet.

In the prompt, you should see your three Azure resources listed here, as well as the action create alongside eaech one. If you were updating a resource in a stack, the Plan would be update against that resource.
Notice that there is also a preview link presented to you. This enables you to graphically see the preview of this deployment in the Pulumi web dashboard.
Select yes to confirm that you want to perform this action and deploy these resources in your Azure Subscription.

You should see a nice interactive output showing you the status of each resource and whether it has been created yet or not.
Again, you will get a link to view the deployment live in the Pulumi dashboard if you wish.
Once your resources are deployed you will then get the outputs that you defined in your python code. Go ahead and click the hostname output link.
Congratulations, you just deployed an Azure App Service using Pulumi.
I encourage you to take a look around the Pulumi Web Dashboard too, ther are some nice features on there for visualising your resources that you’ve deployed, and your deployment history also.
Go ahead and add your own resources, change the configuration of existing resources and then run pulumi up again to validate and deploy your updates to Azure.
Destroying our app
If you wish to delete all of the resources that we just created, you can simply run the following command.
pulumi destroy
This will, just like pulumi up, first verify the resources you wish to delete, and then you can confirm wether you wish to go ahead or not.
Note, all of the resources within the stack will be deleted, however the history and configuration associated with the stack are still maintained. If you want to remove the stack completely, run
pulumi stack rm dev.
Next Steps
Infrastructure as Code using Pulumi enables you to deploy your resources to the cloud using the programming languages and DevOps tooling for those languages that you’re already familiar with.
Pulumi is a product that enables us to achieve this on Azure, as well as other providers.
If you want to learn more and look at integrating Pulumi into your Azure DevOps workflows, here are some suggested materials that you may find useful.
0 comments