In this series of posts, I will focus on how to prepare ourselves from having to do manual work to handle our database systems. Each post will provide you with a step to take to begin moving data into the cloud.
Complex Beasts
Databases are complex beasts from an operational standpoint. There are a number of tasks that in the past had been laid at the feet of people known as Ops or DBA. Those tasks typically involve scaling your database servers, handling performance, ensuring backups, and monitoring. Let’s not forget licensing for your Enterprise database server. Oh and who exactly is creating your indexes for speeding up your queries? These are questions I will try to tackle in these posts.
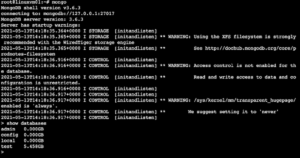
The advent of open-source database servers like MongoDB has opened up the potential of what data can be stored and presented to applications, reports, and data science. For years, MongoDB standalone servers on virtual machines have allowed developers to have a place to store their document data without concerning themselves with a ton of friction to begin. A user will typically download the gzipped package, decompress it, then head over to the binary directory to execute ./mongod to get started. Maybe the developer used apt to install the package onto an Ubuntu VM or your local computing environment. There are tons of ways to install and start our database server, but the big question is what’s next?
After our developer is finished completing those first tasks, they now have a place to get started on their new application’s data store without Ops or DBA (Database Administrator) intervention. But what happens when your application is ready to move beyond the development environment. Did the developer enable authentication and authorization to secure the data stored? Did the developer index the data? Is that data replicated? What about those backups? If we take into account the ./mongod start into a standalone DB, more than likely none of these operational tasks have been handled.
Empowering Our Developer
Empowering the developer to create their own infrastructure has been a critical part of working in the cloud over the years. Rather than relying on other teams to produce the servers and ready them for production, developers can provision the resources they need on their own, and with code too. In this post, I will focus on how to create a Cosmos DB deployment for MongoDB API with an ARM template so that we may bring our data into the cloud. Once I have actually created the endpoint for our data to live, I will be ready to move on to migrating the data on my standalone to Cosmos DB.
Why Cosmos DB?
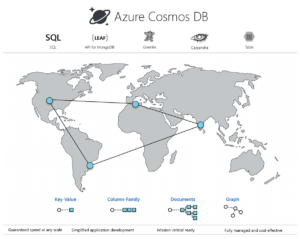
Cosmos DB provides you with a place to store your document data without having to handle much of the aforementioned overhead associated with database server management. Cosmos DB is more than just MongoDB in the cloud. Cosmos DB is a fully managed platform for NoSQL databases that works with most programming languages with multiple API’s for accessing and manipulating data. Choose from multiple database APIs including the native Core (SQL) API, API for MongoDB, Cassandra API, Gremlin API, and Table API.
Some of the big advantages are:
- Low latency and global availability with replication
- Multi-region writes
- Auto-scaling
- Integration into other Azure Services (Azure Kubernetes Service, Azure Key Vault, more)
- A unbeatable SLA, 99.999% availability, and enterprise-level security for every application.
As mentioned earlier, this service makes it possible to empower the developer to create their own enterprise-level services without having a ton of experience on the operational end. They are able to spin up new deployments of Cosmos DB via a number of methods. You may use the Azure portal, Azure CLI, PowerShell, and of course Azure Resource Manager templates. There are also methods to create your Cosmos DB resources with third-party infrastructure as code tools like Terraform and Pulumi.
Creating a Cosmos DB deployment with an ARM template
There are a number of quickstart templates that exist in the Azure documentation that you can make use of to automate the process of creating your database deployment. Today I will focus on the template that creates a MongoDB API Cosmos DB deployment with autoscale shared database throughput with two collections.
To begin, go to the repository with our template files here. This template creates an Azure Cosmos account for MongoDB API, with replicas in two regions, then provision a database with autoscale throughput shared across 2 collections.
Here’s a snippet from the ARM template showing the creation of the two collections:
 {
         "type": "Microsoft.DocumentDb/databaseAccounts/mongodbDatabases/collections",
         "name": "[concat(variables('accountName'), '/', parameters('databaseName'), '/', parameters('collection1Name'))]",
         "apiVersion": "2021-01-15",
         "dependsOn": [
            "[resourceId('Microsoft.DocumentDB/databaseAccounts/mongodbDatabases', variables('accountName'), parameters('databaseName'))]"
         ],
         "properties": {
            "resource": {
               "id": "[parameters('collection1Name')]",
               "shardKey": {
                  "user_id": "Hash"
               },
               "indexes": [
                  {
                     "key": {
                        "keys": [ "_id" ]
                     }
                  },
                  {
                     "key": {
                        "keys": [
                           "$**"
                        ]
                     }
                  },
                  {
                     "key": {
                        "keys": [ "user_id", "user_address" ]
                     },
                     "options": {
                        "unique": true
                     }
                  },
                  {
                     "key": {
                        "keys": [ "_ts" ],
                        "options": { "expireAfterSeconds": 2629746 }
                     }
                  }
               ],
               "options": {
                  "If-Match": "<ETag>"
               }
            }
         }
      },
      {
         "type": "Microsoft.DocumentDb/databaseAccounts/mongodbDatabases/collections",
         "name": "[concat(variables('accountName'), '/', parameters('databaseName'), '/', parameters('collection2Name'))]",
         "apiVersion": "2021-01-15",
         "dependsOn": [
            "[resourceId('Microsoft.DocumentDB/databaseAccounts/mongodbDatabases', variables('accountName'),  parameters('databaseName'))]"
         ],
         "properties": {
            "resource": {
               "id": "[parameters('collection2Name')]",
               "shardKey": {
                  "company_id": "Hash"
               },
               "indexes": [
                  {
                     "key": {
                        "keys": [ "_id" ]
                     }
                  },
                  {
                     "key": {
                        "keys": [
                           "$**"
                        ]
                     }
                  },
                  {
                     "key": {
                        "keys": [
                           "company_id",
                           "company_address"
                        ]
                     },
                     "options": {
                        "unique": true
                     }
                  },
                  {
                     "key": {
                        "keys": [ "_ts" ],
                        "options": { "expireAfterSeconds": 2629746 }
                     }
                  }
               ],
What’s a collection you might ask? The Azure documentation defines it in relation to Cosmos DB as:
A collection maps to a container in Azure Cosmos DB. Therefore, it is a billable entity, where the cost is determined by the provisioned throughput expressed in request units per second. Collections can span one or more partitions/servers and scaled up and down in terms of throughput. Collections are automatically partitioned into one or more physical servers by Azure Cosmos DB.
From the documentation of our template we can see the following user-provided parameters will be required in order to complete the deployment:
- Primary Region: Enter location for the primary region.
- Secondary Region: Enter location for the secondary region.
- Server Version: Select the MongoDB server version (default is 4.0).
- Consistency Level: Select from one of the 5 consistency levels: Strong, Bounded Staleness, Session, Consistent Prefix, Eventual.
- Automatic Failover: Select whether to enable automatic failover on the account
- Database Name: Enter the database name for the account.
- Collection 1 Name: Enter the name for the first collection.
- Collection 2 Name: Enter the name for the second collection.
- Autoscale Max Throughput: Enter the shared maximum autoscale RU/s for the database (default and minimum is 4000).
We can get our creation with these parameters done in a few ways, but we’ll focus on the Deploy to Azure button in the quickstart repo.
That button in the lower left-hand corner provides us with a point-and-click method of creating a “more than default” configuration of our Cosmos DB along with some test data to play with.
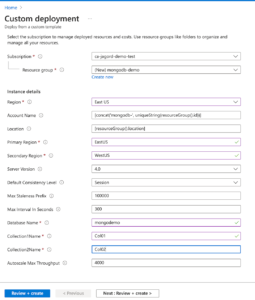
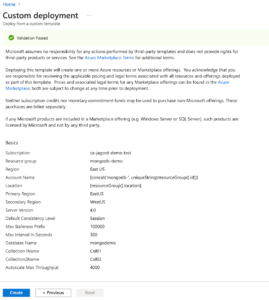
Click the “Deploy to Azure” button to get started, you’ll then be brought to the custom template page where you can begin to fill out the parameters required to complete our task. Once you’ve clicked that magic button, the Azure portal will pop up for you to begin the setup.
I have provided some basic information I’ll need in order for our ARM template to be deployed. The account name is randomly generated, but feel free to use whatever unique name you’d like. I have picked East US as my resource group location, which is inherited by the “Location” parameter. This is where our Cosmos DB account will live. Next, I have set the locations of my primary and secondary regions for my data replication. There are a number of consistency levels available for Cosmos DB, but in this case I will stick with Session. I will leave the staleness prefix and max lag intervals as their default. Finishing up, you can create your database name and the collections. These are just random names I have created, so feel free to enter what you wish.
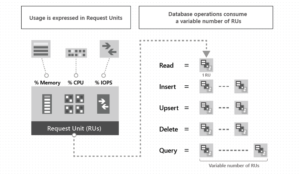
Now let’s take a look at the last parameter, “Autoscale Max Throughput”. When you use database-level throughput with autoscale, you can have the first 25 containers share an autoscale maximum RU/s of 4000 (scales between 400 – 4000 RU/s), as long as you don’t exceed 40 GB of storage. What’s an RU?
From Microsoft Docs: The cost of all database operations is normalized by Azure Cosmos DB and is expressed by Request Units (or RUs, for short). Request unit is a performance currency abstracting the system resources such as CPU, IOPS, and memory that are required to perform the database operations supported by Azure Cosmos DB.
I will leave this default template value of 4000 and then click “Review + Create” to start the deployment process. The ARM template will be validated and let me know I am ready to hit “Create” to begin my deployment.
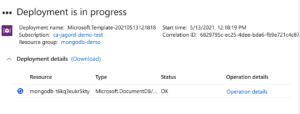
My deployment process has begun!
Now I will wait a few minutes for this to complete!
If I scroll down to the “Collections section” we’ll now see that my two collections are created and are ready to be queried.
What’s next?
The next post will focus on how we get data from that standalone server into my new Azure Cosmos DB. We’ll use the Azure Database Migration Service to get that data I’ve created into the cloud. Till then make sure you check out AzureFunBytes!
Learn about Azure fundamentals with me!
Live stream is available on Twitch, YouTube, and LearnTV at 11 AM PT / 2 PM ET Thursday. You can also find the recordings here as well:
AzureFunBytes on Twitch
AzureFunBytes on YouTube
Azure DevOps YouTube Channel
Follow AzureFunBytes on Twitter



0 comments