

Purpose
As an Engineering team on Microsoft’s Commercial Software Engineering (CSE), we strive to empower customers to build and maintain their software-based solutions. A key factor in being successful in our goal is to educate, upskill and develop the solution by applying certain Engineering Fundamentals.
Engineering Fundamentals are essential principles and characteristics that contribute to high quality enterprise solutions. These include:
- An organized and well-defined backlog that captures the features the team will build
- Tooling for the team to manage the code base, and introduce mechanisms for code reviews
- Designing the solution and the engineering processes with Security from the beginning
- Quality rigor through the form of testability and code coverage
- Observability mechanisms that allow the team to analyze usage trends, troubleshoot issues, and identify opportunities for improvement
- A seamless developer experience that maximizes the productivity of the engineering team
- CICD (Continuous Integration and Continuous Delivery) to have a consistent process to take code contributions and seamlessly deploy the updated solution to an environment
This article is a part of a series of articles where we dive deep into one of these Engineering Fundamentals.
Each article will share the team’s journey, challenges, and learnings to apply each principle alongside the customer’s team.
Other articles in this series are:
In this article, we will cover database change management using Entity Framework
.
Introduction
Our team had an opportunity to develop a Web Application (WebApp) intended to leverage an Object-Relational-Mapper (ORM) to define our data models. We also wanted to seamlessly interact with the ORM directly within our codebase. The purpose of this content is to share our journey and how we planned for where an ORM fits within the CICD pipeline.
Throughout this section, we’ll share details on how we accomplished our goals, the challenges that surfaced, and things worth thinking about if you envision your team working on similar efforts. But to start, let’s cover our guiding considerations and motivations for this effort.
This article is not intended to present the advantages/disadvantages of using ORMs, whether managing DB Schema changes should be part of a CICD flow or not, nor to explore alternatives to manage your DB Schema. I encourage you to perform more focused research on this effort before adopting this design pattern.
With that said, we were already leaning on using an ORM and embedding DB Schema changes as part of our CICD flow. Before jumping to solutioning, as a team we defined the following key motivations and requirements that we wanted to hold ourselves accountable for:
- Allow the Database Schema and Application ‘versioning’ to evolve independently of one another.
- Ability to easily map what versions of the Database Schema are compatible with a particular Application version, and vice versa.
- Have good developer experience and enable ‘rapid’ development prior to the first production release.
- Production Database Schema changes can only be applied manually.
- Production Database Schema changes should be applied using the same script and process used in a lower environment, that resulted in a successful deployment.
Ease of applying changes to the DB Schema while incorporating versioning. Changes may include applying changes (going to a newer version), or reverting changes (reverting to a previous version).
Objectives
Our tech stack was based on .NET Core, with a SQL Database (DB). Therefore, we naturally gravitated towards using Entity Framework (EF) for our ORM.
The Microsoft Entity Framework Core documentation outlines the two primary ways for keeping the application code in sync with the DB schema:
- Migrations – definition and overview found here
- Reverse Engineering – definition and overview found here
We recommend considering your organization’s Software Development processes, DevOps and DevSecOps processes to balance the pros and cons before choosing the appropriate option. On our team, we elected to go with the migrations strategy, as this provided the desired behavior of having the DB schema evolve alongside the codebase.
Before describing our approach, I want to paint a very high-level visual of how EF Migrations work.
Key players/components:
- The Developer writing code as part of the WebApp that will serve as the “service owner,” the person ultimately responsible for the DB data and schema
- The DB
Key pieces:
- The WebApp and Entity Framework model code
- The EF Migration directory, containing all the various EF Migration files, as part of the codebase
- The DB’s “EF Migrations History” Table
The Interaction between the players and the key pieces are as follows:
- For each “batch” of EF model code changes performed by the Developer (creating a new table, renaming a table or column, etc.), the Developer will create a new migration that captures this change
- For each migration created by the Developer, there will be a corresponding migrations file which instructs EF of the operations it has to perform on the DB to either:
- Upgrade to this new version
- Downgrade to a previous version from this version as defined by the migration file
- The DB’s “EF Migrations History” table will inform EF what the current migration version the DB Schema is, along with an audit log of when and what migration version any DB Schema migration change was performed
- EF will read this “EF Migrations History” DB table to determine how many migrations are needed to go from the current DB Schema state to the desired state. Once EF knows this information, it will execute the operations as outlined by each migration, which also updates the “EF Migrations History” DB table, until it reaches the desired state.
Note: Having the complete history of all migration Files and the “EF Migrations History” DB table enables applying changes on top of the current schema or reverting/rolling back schema changes to any previous state.
Solution
The pattern that we applied was to not use migrations until the team determined that we were close to deploying the first release to production.
This offered the following advantages:
- The team did not have to create a lot of migrations – which, given the frequency of DB model changes early on, would have resulted in many migrations
- Instead, the team preferred to re-initialize the DB whenever a schema change was made by deleting the schema and running the application. On startup, the application would initialize the DB with the latest schema
- It would be a low-cost effort when transitioning to migrations (with the important reminder to ensure to not use “EnsureCreated” alongside migrations)
It is important to note how invaluable it was for the team to undergo the manual steps required to create, review, commit, and apply migrations to a database. Namely, they allow for the ability to:
- Demonstrate the CLI dependencies and CLI commands involved in the various processes
- Allow the team to practice performing manual “checks” prior to having them be a part of the CICD pipeline. Two essential “checks” are: to review DB changes before applying them in a non-production environment, and to review changes before letting a DB Admin apply them in a production environment
A crucial take-away is that once you start managing your DB schema with migrations, you should only use migrations to alter the DB schema.
The primary reason for this is that, from the very first migration created, the DB Schema’s “History” is now version-controlled as a part of the codebase. This means that, as with any other code versioning solution, altering the history outside of the provided tooling can have drastic implications, resulting in “version conflicts” between:
- The application version and the DB Schema version
- The current DB Schema version, and its desired “target” version
What could be the business impact, you ask? Bad deployments that could lead to application outages, failures, errors, or data loss
.NET Core Web App Design
To support creating EF Migrations, the WebApp had to be designed with the intention to influence how the application would start up, given different environment variables/runtime configurations.
Specifically, we wanted to use the EF Dotnet CLI, which can only create migrations by having the application startup and successfully connect to the targeted DB on a locally hosted environment. This may pose a challenge if the WebApp has additional external hard dependencies. For example: any external service or component that would prevent the application from starting up if improperly configured.
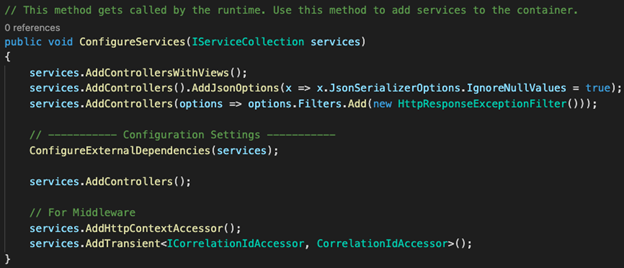
The design that we chose was to have a specific “DebugEF” runtime that would start the application in a “barebones” state – one without any external dependencies besides the DB. Thanks to our adoption of Dependency Injection (DI), this approach resulted in no code changes outside of the “startup” file in .NET Core.
Below is an example of a .NET Core WebApp’s Startup.cs file, which is where the application’s startup configurations are defined. Notice how we leveraged .NET preprocessor directives in order to avoid starting the application with all the external dependencies when running against an “DebugEF” run configuration.
Note: Be careful not to abuse or overuse preprocessor directives, as they can lead to challenges when it comes to code maintainability and readability.
All that is required by the developer is to set the values for the required environment variables: “SQL-SERVER-FQDN” and “SQL-DB-NAME”
This design would then allow the development team the ability to use the EF DotNet CLI to:
- create migrations targeting a specific DB using the following command:
dotnet ef migrations add <name-of-migration-to-create> --configuration DebugEF
- apply Migrations targeting a specific DB using the following command:
dotnet ef database update <name-of-migration-to-apply> --configuration DebugEFOverall Flow
Although we have not gone live to production yet, we intentionally decided not to automate the DB Change Management for production environments. This is due to the severe implications of a bad change being introduced and the probability of this occurring.
Instead, we planned on automating the DB change management in lower lifecycle environments (still using migrations) before applying the application changes on top of it. This would allow us the ability to validate that a DB (regardless of the current migration it is on) could be promoted to the latest migration. Upon validating this, the CICD flow would be allowed to proceed with all our application-specific workflow items (linting, building, unit testing, packaging, deploying, integration tests).
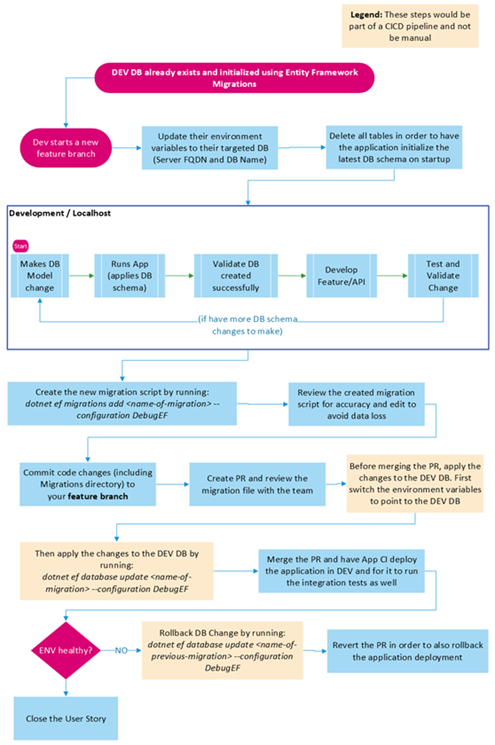
The flow can be visualized in the Appendix below. This section will provide a description of each step.
Assumptions
- At least one individual has access to the various DB Server instances
- Once EF Migrations are adopted, the various DB Schema instances are initialized and maintained using the EF Migrations CLI. This flow is not applicable until EF Migrations are a part of the development efforts
- Developers can run the application using a configuration / runtime that has no external dependencies (with exception of the DB context / dependency)
Steps in the Flow
All commands are assumed to be executed in the same path where the “Startup.cs” file is found in.
Development / PR Creation
These steps are all done from a developer’s perspective, using their own unique DB instance:
- A User Story is picked up, one that is known to include a DB Schema change.
- The Developer creates their own feature branch and pulls it down locally
- The necessary environment variables are set and defined in such a way that their CLI of choice can pull in those values
- can be done per each CLI instance or done as part of a .bash_profile or .bashrc for example
- The Developer’s dedicated DB schema is dropped
- At a minimum, all Tables are deleted
- Apply the latest migration state (as specified by the codebase) to get the DB initialized.
dotnet ef database update --configuration {configuration_value}This command will leverage the environment variables, from step #2, to go through all the migration Files in the code. It will then apply them 1-by-1 until the DB Schema reflects the latest desired state. This command will also create and populate the “EF migrations” DB table
- Develop and perform the necessary application and DB changes
- Create a new migration file once you are ready to apply the DB changes:
dotnet ef migrations add {name-of-migration} --configuration {configuration_value}
- Review the migration code that was generated. This is crucial to fix any generated code that may result in possible data loss. This document mentions common scenarios to look out for and options to change them so the desired change is accomplished without data loss.
- Apply the DB changes:
dotnet ef database update {name-of-migration} --configuration {configuration_value}
- Run Integration tests to ensure that the application and DB changes don’t break desired functionality.
- If more DB changes are necessary, or if the tests resulted in a failure, revert the DB change, delete the migration file, and continue to perform more code changes:
dotnet ef database update {name-of-previous-migration} --configuration {configuration_value}Create a PR once the DB Change produces a healthy change and that all tests pass. The PR should contain the newly added migration file.Merging PR and Promoting to DEV
- The team reviews the PR, making sure that the migration file does not include any changes that could cause undesired changes or data loss. The team approves the PR once ready
- If the CICD doesn’t have the ability to apply the DB change against DEV, then manually ensure that the DEV DB is updated based on the latest migration file.
- Change the CLI’s environment variables so that EF Migrations use the DEV DB’s connection properties such as: DB Server Fully Qualified Domain Names (FQDN) and DB name:
dotnet ef database update {name-of-migration} --configuration {configuration_value}
- The team merges the PR, which automatically kicks off the CICD pipeline to deploy to DEV
- If an issue occurs that requires reverting the PR merge and the CICD doesn’t have the ability to apply the DB change against DEV, then manually revert the DB change.
- Change the CLI’s environment variables so that EF Migrations use the DEV DB’s connection properties (DB Server FQDN and DB name):
dotnet ef database update {name-of-previous-migration} --configuration {configuration_value}
The team reverts the merge and kicks off a new CICD deployment to revert the deployment.
Promoting to UAT and PROD
Unlike with DEV, where migrations can be applied to the DB using the CLI, the upper-lifecycle environments like User Acceptance Testing (UAT) or PROD should have the DB changes applied using a SQL script. This script can be generated, using the EF Migrations CLI, so that the same operations are performed as in lower-lifecycle environments, like DEV.
- DB Admin accesses the DB’s “EF Migrations” table to check what migration reflects the current DB Schema reflects
- DB Admin generates the SQL Script which produces all the operations that will take the DB schema from its current version to the desired one.
- Change the CLI’s environment variables so that EF Migrations use the desired DB’s connection properties (DB Server FQDN and DB name):
dotnet ef migrations script {name-of-current-migration} {name-of-desired-migration} --configuration {configuration_value}
- The DB Admin generates the “revert” SQL Script in case reverting the changes is necessary later:
dotnet ef migrations script {name-of-desired-migration} {name-of-current-migration} --configuration {configuration_value}- The DB Admin reviews the generated SQL Scripts to ensure they look accurate and safe to execute.
- If it looks good, the DB Admin accesses the DB and executes the SQL Script to change the DB Schema to the new version.
- The team validates that the DB Change didn’t cause an issue
- If an issue surfaces, DB Admin to revert the DB Change by executing the “revert SQL Script” created earlier.
- The team executes the CICD flow or manual runs the process to promote the solution to the desired environment.

Appendix
EF NonProd Migrations Flow
EF Prod Migrations Flow
Resources
DotNet Preprocessor Directives
Dependency Injection in ASP.NET Core
Team Members
The CSE US Government team below was instrumental in delivering the impact throughout the engagement, and in sharing our journey through the form of this article.
- Adrian Gonzalez
- David Lambright
- Gavin Bauman
- James Truitt
- Jordon Malcolm
- Kristin Ottofy