
The Connecticut Coalition to End Homelessness recently concluded the 2017 PIT survey, which is a one-day unduplicated count of sheltered and unsheltered homeless individuals and families across the United States. In addition to the nationwide PIT survey, CCEH conducted a specialized survey to collect data about homeless youth (ages 13 to 25). We partnered with them to develop a mobile application for volunteers to use to collect survey data.
Requirements
The app had to be available for both iOS (6.1 and up) and Android (4.1 and up) users, and support for Windows 10 mobile devices was a nice-to-have. The app needed to provide an authentication mechanism for volunteers, but also allow anonymous surveys to be collected for volunteers who did not wish to, or were not able to authenticate. The app would display a series of multiple choice questions. In some cases, multiple answers were allowed. Also for some questions, the survey required additional information after an answer was chosen (e.g., “if selected, why?”).
Xamarin.Forms
Since it was anticipated that the UI would be consistent across iOS, Android, and Windows, and there were no complex features that would require low-level access to platform-specific APIs, Xamarin.Forms was an adequate option for building the mobile app. The team of developers was already comfortable working in the .NET ecosystem with Visual Studio as an IDE, C# as the programming language, and MVVM as a design pattern. Other frameworks such as Cordova or React Native may have worked fine as well, but the team’s core skills favored Xamarin. There was also already an Azure App Service for managing survey questions and storing survey responses, and the Azure Mobile Client SDK for .NET is available for Xamarin.iOS, Xamarin.Android, and many other .NET flavors. Using this package would allow for maximum code reuse of native business logic for authenticating against the service and making service requests.
Anticipating that there might be small variations between the three operating systems that we would need to account for, we chose to go with a Xamarin.Forms shared project. Because of the team’s familiarity with XAML and MVVM, we chose a Xamarin.Forms XAML shared project.
There are many reasons for choosing one of these templates over another; each has its strengths, and none of the templates limit you as to the kind of app or architecture you can produce.
A XAML app, when developed using MVVM and data binding, can produce a clean separation of UI from app logic, and is particularly useful when you’re building view models to be shared across different UI implementations (e.g., if you were building an app for Xamarin.iOS and Xamarin.Android).
The shared project approach versus the portable approach has its tradeoffs as well. Typically, while developing a cross-platform application, you are focused on testing it on a single platform at a time. If you are actively developing a shared project and focused on testing it on, say, Android, there are no guarantees that the changes you have made will also compile and work for iOS and Windows. A Xamarin.Forms portable project, however, provides much stronger guarantees that when an app compiles for one platform, it will also compile for the other platforms, as well. On the other hand, these guarantees come at a cost, as you have to use patterns like DependencyService, instead of using preprocessor directives (i.e., #ifs) to introduce platform-specific behaviors.
// If you are using a shared project, you can use preprocessor directives to differentiate behaviors

public static void Speak(string text)
{
#if WINDOWS_UWP
    var mediaElement = new MediaElement();
    var synth = new Windows.Media.SpeechSynthesis.SpeechSynthesizer();
    var stream = await synth.SynthesizeTextToStreamAsync(text);

    mediaElement.SetSource(stream, stream.ContentType);
    mediaElement.Play();
#elif __ANDROID__
    var ctx = Forms.Context; // useful for many Android SDK features
    var speaker = new TextToSpeech (ctx, this);

    speaker.Speak (text, QueueMode.Flush, new Dictionary<string,string> ());
#elif __IOS__
    var speechSynthesizer = new AVSpeechSynthesizer ();
    var speechUtterance = new AVSpeechUtterance (text) {
        Rate = AVSpeechUtterance.MaximumSpeechRate/4,
        Voice = AVSpeechSynthesisVoice.FromLanguage ("en-US"),
        Volume = 0.5f,
        PitchMultiplier = 1.0f
    };

    speechSynthesizer.SpeakUtterance (speechUtterance);
#endif
}

// If you are using a portable project, you could use `DependencyService` to differentiate behaviors

public static void Speak(string text)
{
    DependencyService.Get<ITextToSpeech>().Speak(text);
}

public interface ITextToSpeech
{
    void Speak (string text);
}

// Each of the below classes goes in each platform specific project.
// The implementation is effectively the same as above.

[assembly: Xamarin.Forms.Dependency (typeof (TextToSpeechImplementation))]
namespace DependencyServiceSample.iOS {
    public class TextToSpeechImplementation : ITextToSpeech
...

[assembly: Xamarin.Forms.Dependency (typeof (TextToSpeechImplementation))]
namespace DependencyServiceSample.Droid {
    public class TextToSpeechImplementation : ITextToSpeech
...

[assembly: Xamarin.Forms.Dependency (typeof (TextToSpeechImplementation))]
namespace DependencyServiceSample.UWP {
    public class TextToSpeechImplementation : ITextToSpeech
...
We didn’t actually use text-to-speech in the homelessness survey app; the code above is just a demonstration of shared versus portable design patterns.
Building the app
For the most part, the app development was straightforward, as anticipated. There were a few interesting challenges with solutions, however, that are worth noting.
Multi-select lists
As stated previously, the survey questions were multiple choice, with some questions allowing multiple answers. As of Xamarin.Forms v2.3.3, the core ListView does not support multi-select. In addition to multi-select, we also landed on a UX that would conditionally pop up a text entry underneath a selected answer when more information was necessary, which meant that, depending on the state of the app, the list view rows were not guaranteed to be of equal height. We evaluated two approaches for implementing multi-select, a ListView with Switch and a StackLayout with Buttons.
ListView item template with Switch
With a list of items or an IEnumerable, the first approach to consider is data binding with an item template and items source on a ListView. Since the ListView does not support multi-select, we had to provide a UX that would allow the users to select and unselect answers, and easily see which answers were currently selected. The Switch component provided a reasonable UX for this scenario. When a list item is selected, it toggles the switch component. Likewise, hitting the switch directly toggles it as well. The code sample below shows the ViewCell template implementation that was used. The WrappedAnswerViewModel is a simple view model wrapper around the survey answer model with bindable properties. One of these properties, IsSpecifiable, is a composite property that checks if the answer requires additional input, and if the answer has been selected. A binding to the IsSpecifiable property is used to set the IsVisible property for the Entry text box. Note that the code sample uses an imperative declaration of the item template, but it could have also been declared using XAML.
class WrappedItemSelectionTemplate : ViewCell
{
    public WrappedItemSelectionTemplate()
    {
        var name = new Label
        {
            HorizontalOptions = LayoutOptions.StartAndExpand,
            VerticalOptions = LayoutOptions.FillAndExpand,
        };

        name.SetBinding(Label.TextProperty, new Binding(nameof(WrappedAnswerViewModel.Name)));

        var mainSwitch = new Switch
        {
            HorizontalOptions = LayoutOptions.EndAndExpand,
            VerticalOptions = LayoutOptions.FillAndExpand,
        };

        mainSwitch.SetBinding(Switch.IsToggledProperty, new Binding(nameof(WrappedAnswerViewModel.IsSelected)));

        var answerLayout = new StackLayout
        {
            Orientation = StackOrientation.Horizontal,
        };

        answerLayout.Children.Add(name);
        answerLayout.Children.Add(mainSwitch);
        var entry = new Entry
        {
            HorizontalOptions = LayoutOptions.Fill,
        };

        entry.SetBinding(Entry.PlaceholderProperty, new Binding(nameof(WrappedAnswerViewModel.Placeholder)));
        entry.SetBinding(InputView.KeyboardProperty, new Binding(nameof(WrappedAnswerViewModel.Keyboard)));
        entry.SetBinding(IsVisibleProperty, new Binding(nameof(WrappedAnswerViewModel.IsSpecifiable)));
        entry.SetBinding(Entry.TextProperty, new Binding(nameof(WrappedAnswerViewModel.Text), BindingMode.TwoWay));

        var stackLayout = new StackLayout();
        stackLayout.Children.Add(answerLayout);
        stackLayout.Children.Add(entry);
        View = stackLayout;
    }
}
Here’s how the ListView was instantiated with the DataSource and ItemTemplate.
IList<WrappedAnswerViewModel> wrappedAnswerViewModels = ...;
var listView = new ListView();

// Note that rows can be uneven when the Entry is visible.
listView.HasUnevenRows = true;

listView.ItemTemplate = new DataTemplate(typeof(WrappedItemSelectionTemplate));
listView.ItemsSource = wrappedAnswerViewModels;
listView.ItemSelected += (sender, e) =>
{
    var answer = (WrappedAnswerViewModel)e.SelectedItem;
    answer.IsSelected = !answer.IsSelected;
};
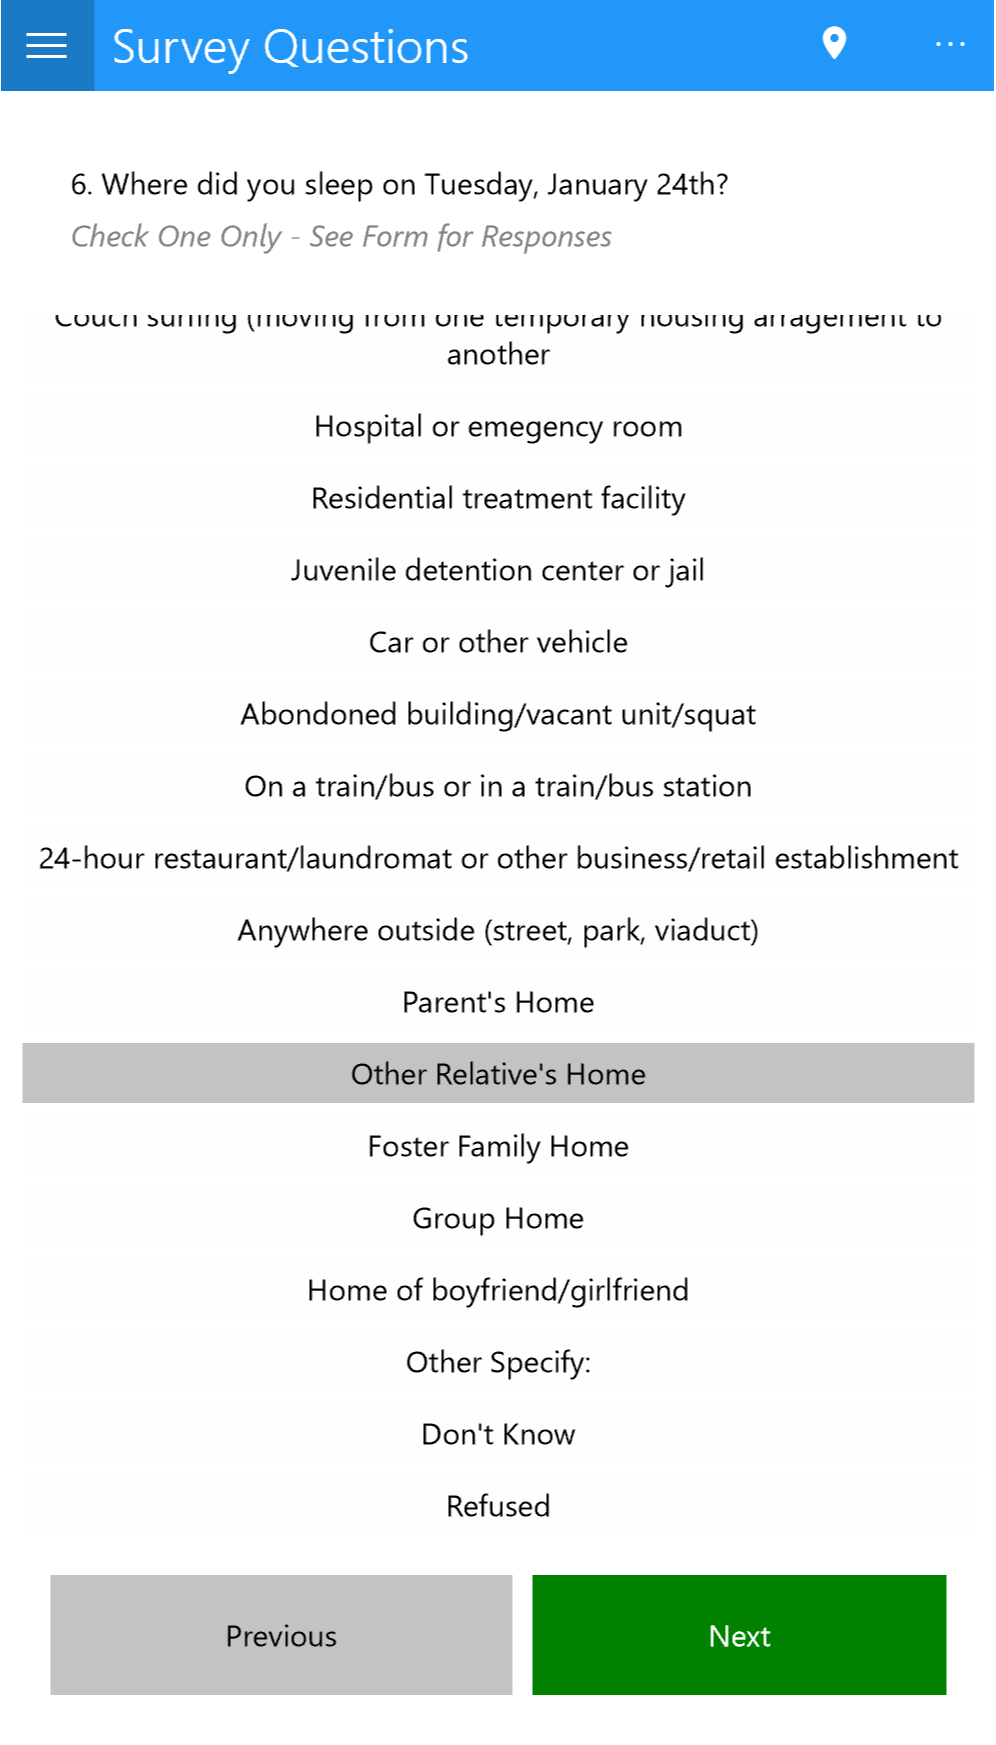
Here’s a screenshot of a survey question using this ListView approach:
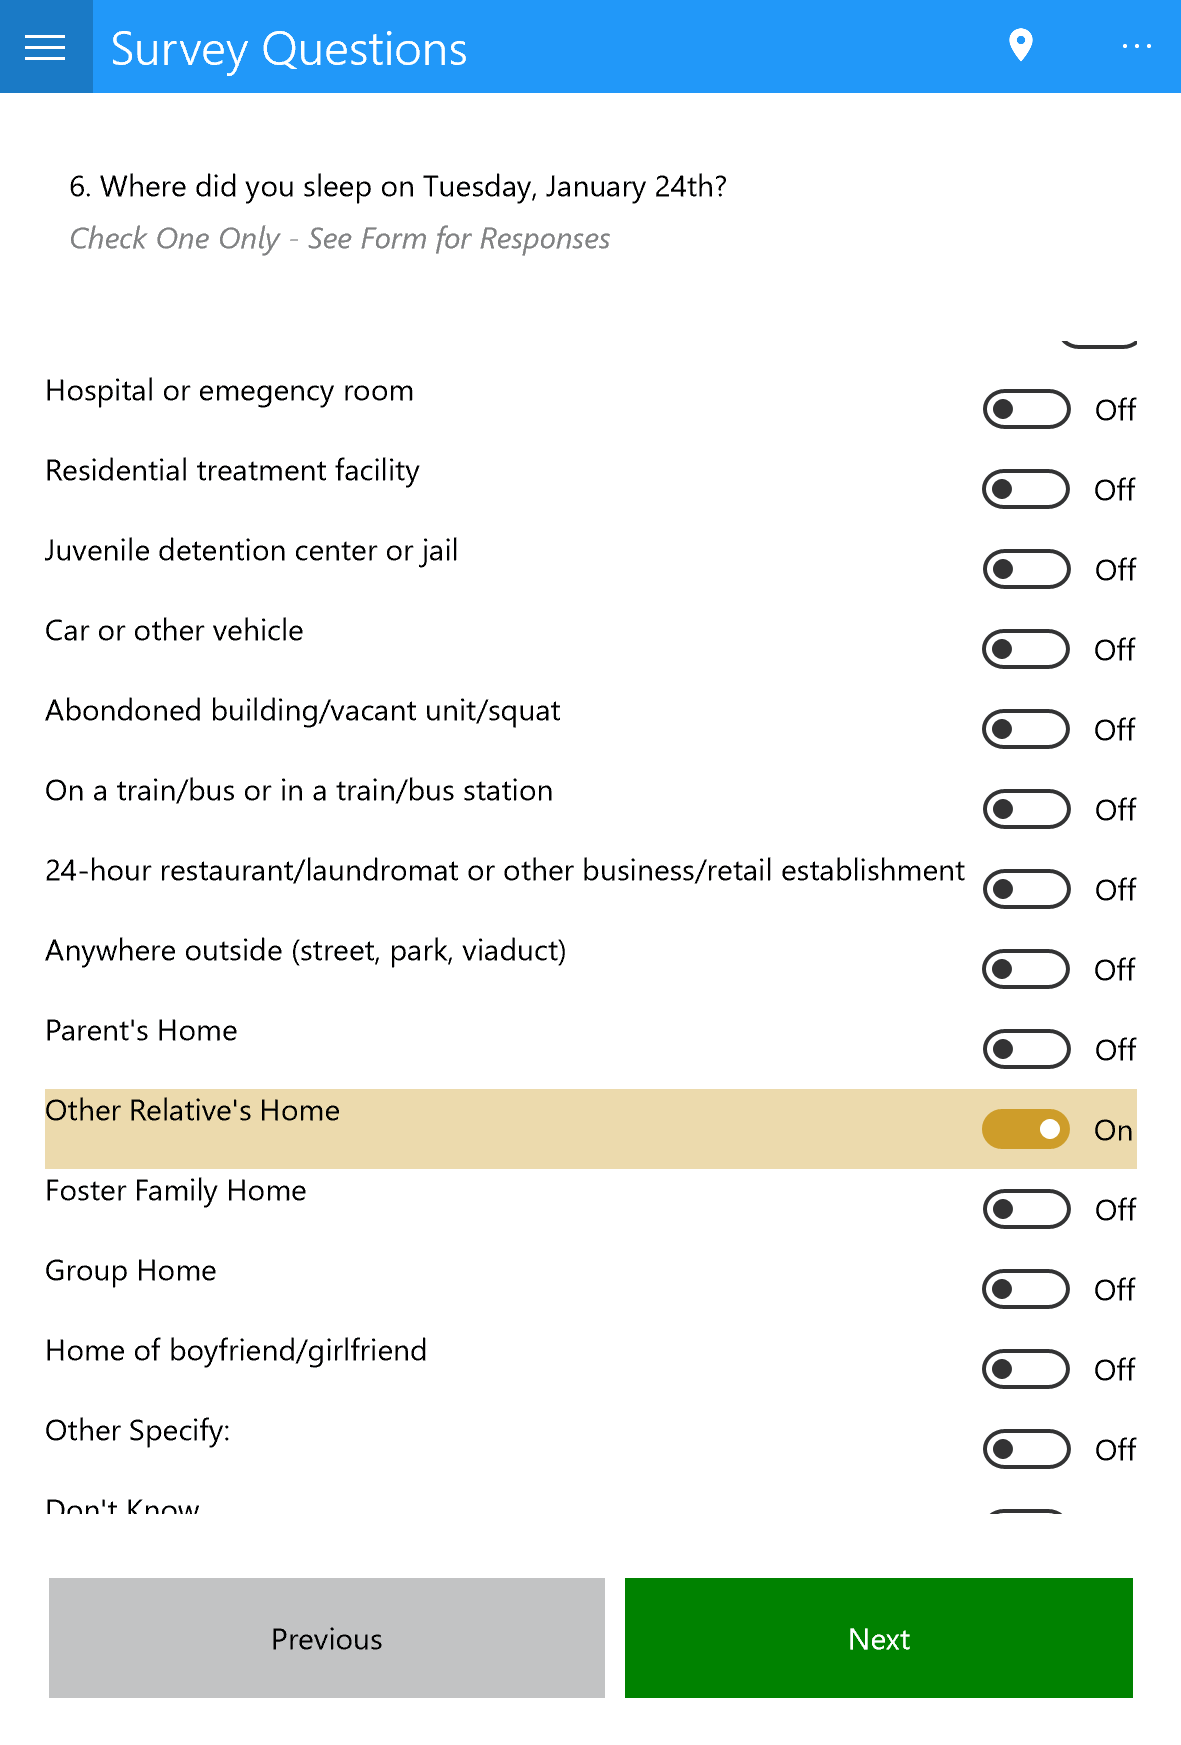 There were two primary issues with this approach from a UX perspective. The first is that list items, once selected, cannot be reselected. So, to toggle a switch for a selected list item, the switch has to be toggled directly. The second issue is that the code above displays a switch component even for questions that only allow a single answer. The first issue could potentially be overcome by nulling out the selected item after toggling the switch. The second issue could potentially be overcome by binding the visibility of the switch to a property signaling single versus multiple selection answers.
Scroll bar visibility
One other minor concern with the ListView approach was whether the volunteer asking the survey questions would see all the answers before moving on to the next question. The integrity of the survey responses was of highest priority, so it was not acceptable for the answers to be potentially biased towards the options that are immediately visible on the screen. By default the Xamarin.Forms ListView fades the scroll bar after a short time period on iOS, Android, and Windows. The stakeholders requested that, if we were to use the ListView approach, the scroll bar be visible all the time. Scroll bar visibility is not part of the ListView API on Xamarin.Forms. However, many Xamarin.Forms controls have a custom renderer class that can be used to customize how the view is rendered on each platform. For example, here is how we disabled scroll bar fading on Android.
[assembly: ExportRenderer(typeof(SurveyAnswerListView), typeof(SurveyAnswerListViewRenderer))]
namespace CCEHSurveyApp.Droid.Renderers
{
    class SurveyAnswerListViewRenderer : ListViewRenderer
    {
        public SurveyAnswerListViewRenderer()
        {
            ScrollbarFadingEnabled = false;
        }
    }
}
After that, we simply had to create a derived class of ListView called SurveyAnswerListView (we didn’t want the renderer to be applied to all ListView instances, just the ones for the survey answers) and use that in the survey page instead of a basic ListView.
StackLayout with Button approach
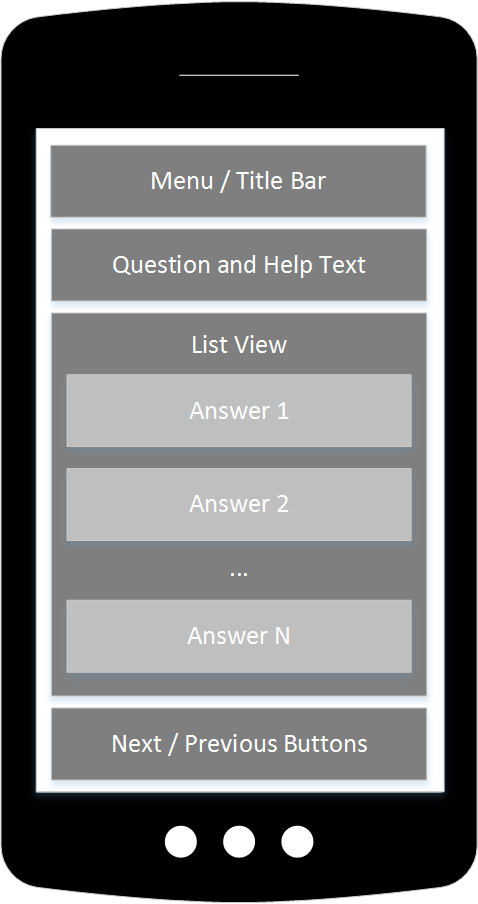
Although there was a workaround to ensure the scroll bar was always visible, the stakeholders generally felt it would be best to have the Next and Previous question buttons after all answers, to ensure the volunteer had an opportunity to see all answers before moving on. Since the ListView is primarily designed to expand to fit the amount of screen real estate left over, it was no longer the best choice to accommodate the desired UX.
With the ListView approach, the Next and Previous buttons were fixed at the bottom of the screen, as in the following diagram.
The desired UX, however, was more like the following.
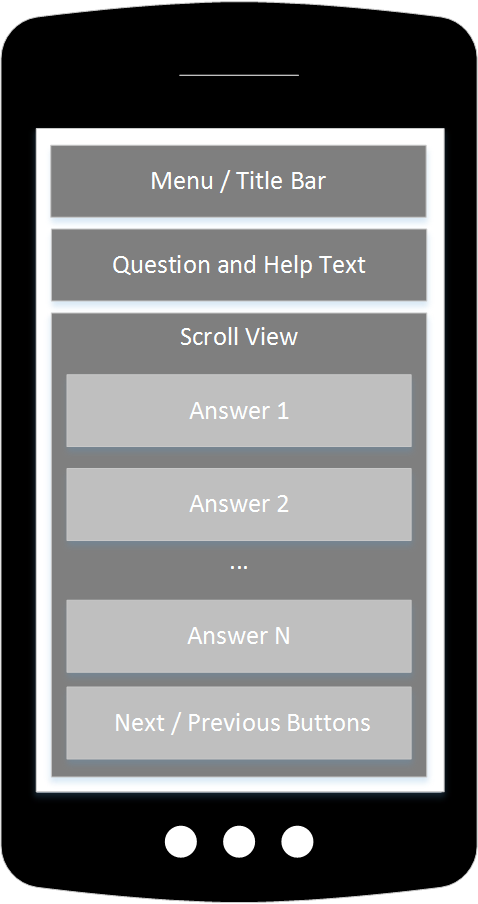
We created a custom view for each individual answer item, then organized each of these answers into a stack panel.
<?xml version="1.0" encoding="UTF-8"?>
<ContentView xmlns="http://xamarin.com/schemas/2014/forms" xmlns:x="http://schemas.microsoft.com/winfx/2009/xaml"
             xmlns:views="clr-namespace:CCEHSurveyApp.Views"
             x:Class="CCEHSurveyApp.Views.SurveyAnswerItemView">
  <ContentView.Content>
    <StackLayout>
      <Button Text="{Binding Name}"
            BackgroundColor="{Binding BackgroundColor}"
            Command="{Binding AnswerSelectedCommand}" />
      <Entry x:Name="AdditionalInputEntry"
             IsVisible="{Binding IsSpecifiable}"
             Text="{Binding SpecifiedText}"
             Placeholder="{Binding Placeholder}"
             Keyboard="{Binding Keyboard}"/>
    </StackLayout>
  </ContentView.Content>
</ContentView>
We placed the Next and Previous buttons at the end of the stack panel, which produced the desired UX.
Content button for iOS and Windows
One issue with the custom view approach above was that the Xamarin.Forms Button component does not wrap the Button text for iOS and Windows.
To overcome this, we created a custom Button component, ContentButton, which could turn an arbitrary view into a button. We used a Label as the button control, which has text wrapping enabled by default.
<?xml version="1.0" encoding="utf-8" ?>
<ContentView xmlns="http://xamarin.com/schemas/2014/forms"
             xmlns:x="http://schemas.microsoft.com/winfx/2009/xaml"
             x:Class="PITCSurveyApp.Views.ContentButton"
             x:Name="ContentButtonView">
  <ContentView.GestureRecognizers>
    <TapGestureRecognizer Tapped="TapGestureRecognizer_OnTapped"
                          Command="{Binding Source={x:Reference ContentButtonView}, Path=Command}">
    </TapGestureRecognizer>
  </ContentView.GestureRecognizers>
</ContentView>
using System;
using System.Windows.Input;
using Xamarin.Forms;

namespace PITCSurveyApp.Views
{
    public partial class ContentButton : ContentView
    {
        public ContentButton()
        {
            InitializeComponent();
        }

        public event EventHandler Tapped;

        public static readonly BindableProperty CommandProperty = BindableProperty.Create(nameof(Command), typeof(ICommand), typeof(ContentButton), null);

        public ICommand Command
        {
            get { return (ICommand)GetValue(CommandProperty); }
            set { SetValue(CommandProperty, value); }
        }

        private void TapGestureRecognizer_OnTapped(object sender, EventArgs e)
        {
            Tapped?.Invoke(this, new EventArgs());
        }
    }
}
We then created an alternate answer view class for iOS and Windows.
<?xml version="1.0" encoding="UTF-8"?>
<ContentView xmlns="http://xamarin.com/schemas/2014/forms" xmlns:x="http://schemas.microsoft.com/winfx/2009/xaml"
             xmlns:views="clr-namespace:PITCSurveyApp.Views"
             x:Class="CCEHSurveyApp.Views.TextWrappingSurveyAnswerItemView">
  <ContentView.Content>
    <StackLayout>
      <views:ContentButton BackgroundColor="{Binding BackgroundColor}"
                           Command="{Binding AnswerSelectedCommand}">
        <Label Text="{Binding Name}"
               HorizontalTextAlignment="Center"
               Margin="5" />
      </views:ContentButton>
      <Entry x:Name="AdditionalInputEntry"
             IsVisible="{Binding IsSpecifiable}"
             Text="{Binding SpecifiedText}"
             Placeholder="{Binding Placeholder}"
             Keyboard="{Binding Keyboard}"/>
    </StackLayout>
  </ContentView.Content>
</ContentView>
Since we used a shared project, adding logic to conditionally use the TextWrappingSurveyAnswerItemView instead of the SurveyAnswerItemView used on Android was easy.
#if __ANDROID__
    // Android buttons support text wrapping, so we don't need to use the custom ContentButton
    var view = new SurveyAnswerItemView();
#else
    var view = new TextWrappingSurveyAnswerItemView();
#endif
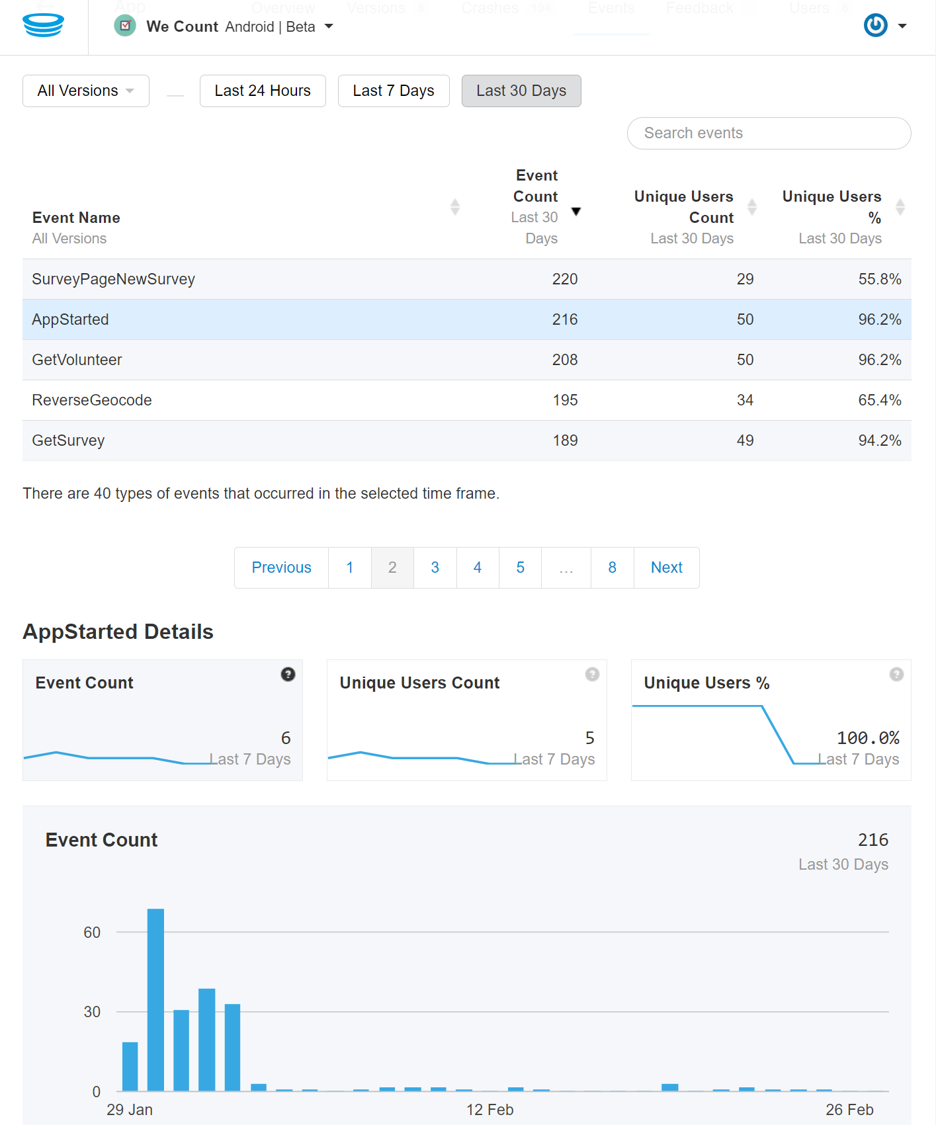
Capturing Metrics with HockeyApp
It was important to the stakeholders to get an idea of what features users were leveraging in the app and where exceptions were occurring. HockeyApp provides an event and metrics tracking API for capturing exactly this kind of information.
We created a simple interface for tracking metrics cross-platform:
using System;
using System.Collections.Generic;

namespace CCEHSurveyApp.Metrics
{
    /// <summary>
    /// An interface for required metrics tracking operations.
    /// </summary>
    public interface IMetricsManagerService
    {
        /// <summary>
        /// Track an event.
        /// </summary>
        /// <param name="eventName">The event name.</param>
        void TrackEvent(string eventName);

        /// <summary>
        /// Track an event.
        /// </summary>
        /// <param name="eventName">The event name.</param>
        /// <param name="properties">The related properties.</param>
        /// <param name="measurements">The related measurements.</param>
        void TrackEvent(string eventName, Dictionary<string, string> properties, Dictionary<string, double> measurements);

        /// <summary>
        /// Track an exception.
        /// </summary>
        /// <param name="eventName">The event name.</param>
        /// <param name="exception">The exception.</param>
        void TrackException(string eventName, Exception exception);

        /// <summary>
        /// Track a latency metric.
        /// </summary>
        /// <param name="eventName">The event name.</param>
        /// <param name="latency">The latency associated with the event.</param>
        void TrackLatency(string eventName, TimeSpan latency);
    }
}
We then implemented this interface for all three platforms we were developing for:
// Windows HockeyApp metrics wrapper

[assembly: Xamarin.Forms.Dependency(typeof(PITCSurveyApp.UWP.WindowsMetricsManagerService))]

namespace PITCSurveyApp.UWP
{
    class WindowsMetricsManagerService : IMetricsManagerService
    {
        public void TrackEvent(string eventName)
        {
            HockeyClient.Current.TrackEvent(eventName);
        }

        public void TrackException(string eventName, Exception ex)
        {
            HockeyClient.Current.TrackException(ex);
        }

        public void TrackLatency(string eventName, TimeSpan latency)
        {
            var measurements = new Dictionary<string, double>
            {
                { "latency", latency.TotalMilliseconds },
            };

            TrackEvent(eventName, null, measurements);
        }

        public void TrackEvent(string eventName, Dictionary<string, string> properties, Dictionary<string, double> measurements)
        {
            HockeyClient.Current.TrackEvent(eventName, properties, measurements);
        }
    }
}

// Android HockeyApp metrics wrapper

[assembly: Xamarin.Forms.Dependency(typeof(PITCSurveyApp.Droid.AndroidMetricsManagerService))]

namespace PITCSurveyApp.Droid
{
    class AndroidMetricsManagerService : IMetricsManagerService
    {
        public void TrackEvent(string eventName)
        {
            MetricsManager.TrackEvent(eventName);
        }

        public void TrackException(string eventName, Exception ex)
        {
            var properties = new Dictionary<string, string>
            {
                {"error", ex.Message},
            };

            TrackEvent(eventName, properties, null);
        }

        public void TrackLatency(string eventName, TimeSpan latency)
        {
            var measurements = new Dictionary<string, double>
            {
                { "latency", latency.TotalMilliseconds },
            };

            TrackEvent(eventName, null, measurements);
        }

        public void TrackEvent(string eventName, Dictionary<string, string> properties, Dictionary<string, double> measurements)
        {
            MetricsManager.TrackEvent(eventName, properties, measurements);
        }
    }
}

// iOS HockeyApp metrics wrapper

[assembly: Xamarin.Forms.Dependency(typeof(PITCSurveyApp.iOS.IOSMetricsManagerService))]

namespace PITCSurveyApp.iOS
{
    class IOSMetricsManagerService : IMetricsManagerService
    {
        public void TrackEvent(string eventName)
        {
            MetricsManager.TrackEvent(eventName);
        }

        public void TrackException(string eventName, Exception ex)
        {
            var properties = new Dictionary<string, string>
            {
                {"error", ex.Message},
            };

            TrackEvent(eventName, properties, null);
        }

        public void TrackLatency(string eventName, TimeSpan latency)
        {
            var measurements = new Dictionary<string, double>
            {
                { "latency", latency.TotalMilliseconds },
            };

            TrackEvent(eventName, null, measurements);
        }

        public void TrackEvent(string eventName, Dictionary<string, string> properties, Dictionary<string, double> measurements)
        {
            MetricsManager.TrackEvent(eventName, properties, measurements);
        }
    }
}
You’ll notice that we actually used the DependencyService pattern here, even though we were using the shared project approach. This was purely for convenience, as metrics can become quite pervasive, and the code came out much cleaner without preprocessor directives sprinkled everywhere we needed to capture a metric.
Another piece of code we added was a simple struct for tracking latency metrics for asynchronous operations like network requests. We used a struct to minimize GC impact, and leveraged the IDisposable pattern, which is convenient for these kinds of try/finally operations.
    /// <summary>
    /// A struct for measuring latency of operations.
    /// </summary>
    /// <remarks>
    /// Suggested use:
    /// <code>
    /// using (new LatencyMetric("MyMetric"))
    /// {
    ///    /* Do stuff */
    /// }
    /// </code>
    /// </remarks>
    struct LatencyMetric : IDisposable
    {
        private static readonly Stopwatch s_stopwatch = Stopwatch.StartNew();

        private readonly string _eventName;
        private readonly long _startTicks;

        public LatencyMetric(string eventName)
        {
            _eventName = eventName;
            _startTicks = s_stopwatch.ElapsedTicks;
        }

        public void Dispose()
        {
            var metricsManager = DependencyService.Get<IMetricsManagerService>();
            metricsManager.TrackLatency(_eventName, TimeSpan.FromTicks(s_stopwatch.ElapsedTicks - _startTicks));
        }
    }
Here’s a snapshot of some of the metrics we were able to capture with HockeyApp.
Azure Mobile Service Client SDK
We used the Azure Mobile Service Client for making requests against the Azure App Service backend, and to authenticate with Google and Microsoft login.
We used the MobileServiceClient.InvokeApiAsync API to access each of the backend REST APIs. This automatically adds authentication token headers to your requests if you’ve authenticated with the MobileServiceClient.LoginAsync API.
protected MobileServiceClient ApiClient
{
    get;
}

public static async Task<SurveyModel> GetSurveyAsync(int id)
{
    var parameters = new Dictionary<string, string>
    {
        { "id", id.ToString() },
    };

    try
    {
        using (new LatencyMetric("GetSurvey"))
        {
            return await ApiClient.InvokeApiAsync<SurveyModel>("Surveys", HttpMethod.Get, parameters);
        }
    }
    catch (Exception ex)
    {
        DependencyService.Get<IMetricsManagerService>().TrackException("GetSurveyFailed", ex);
        return null;
    }
}


public static Task SubmitSurveyResponseAsync(SurveyResponseModel surveyResponse)
{
    var parameters = new Dictionary<string, string>
    {
        { "deviceId", UserSettings.VolunteerId },
    };

    using (new LatencyMetric("SubmitSurveyResponse"))
    {
        return ApiClient.InvokeApiAsync("SurveyResponses", JObject.FromObject(surveyResponse), HttpMethod.Post, parameters);
    }
}
Authentication with the MobileServiceClient is platform-specific, so we used a DependencyService pattern similar to the metrics management approach above. The approach is described quite well in the Azure Mobile Service docs.
Deployment with HockeyApp
Since we were on a tight deadline, we used HockeyApp for ad hoc deployment of an app beta for all the volunteers to use during a live survey. Check out the HockeyApp website for more information on how to distribute app ad hoc betas.
Results and Open Source
We completed the client app in about two weeks, just in time to start training volunteers for the youth homelessness survey. The app was used by 200 volunteers on iOS and Android, who together collected more than 1,100 surveys over the span of a few days, with no major outages or issues.
The app and backend service is open source to enable other organizations to adapt and apply the app for their own surveys. The MVVM pattern used should allow for easy reuse in any Xamarin.Forms app.