

This post was written by Olga Arkhipova.
Many big codebases use so-called unity (jumbo) builds where many source files are included in one or a few ‘unity’ files for compilation, which makes compiling and linking much faster.
Just to avoid any confusion – this blog is NOT related to the Unity game engine.
Looking at some customer feedback regarding slow IntelliSense, we found that projects often include both source files and unity files including those source files. Currently there is no easy way to exclude source files from the build and unity files from the IntelliSense parsing, so we do quite a lot of unnecessary work there.
We’ve been impressed with the speed unity builds were adopted, especially in game development, even though combining files together often requires code changes to be able to build without errors and maintain code semantics. See the following articles about pros and cons of unity builds in CMake and Chromium build:
In Visual Studio 2017 version 15.8 (Preview 3), we are introducing an experimental unity build support, which makes it easy for new users to adopt unity and allows existing unity users to have better IDE performance. Please let us know if it works for you and what can make it easier.
Unity Build Options
To enable experimental unity support, a project needs to have EnableUnitySupport set to ‘true’. You can set this as an environment variable or create Directory.Build.props in your root directory with the following content:
[code language=”xml”] <Project xmlns="http://schemas.microsoft.com/developer/msbuild/2003"> <PropertyGroup> <EnableUnitySupport>true</EnableUnitySupport> </PropertyGroup> </Project>
When the feature is enabled, you’ll see ‘Unity Build’ options in the C/C++ properties:
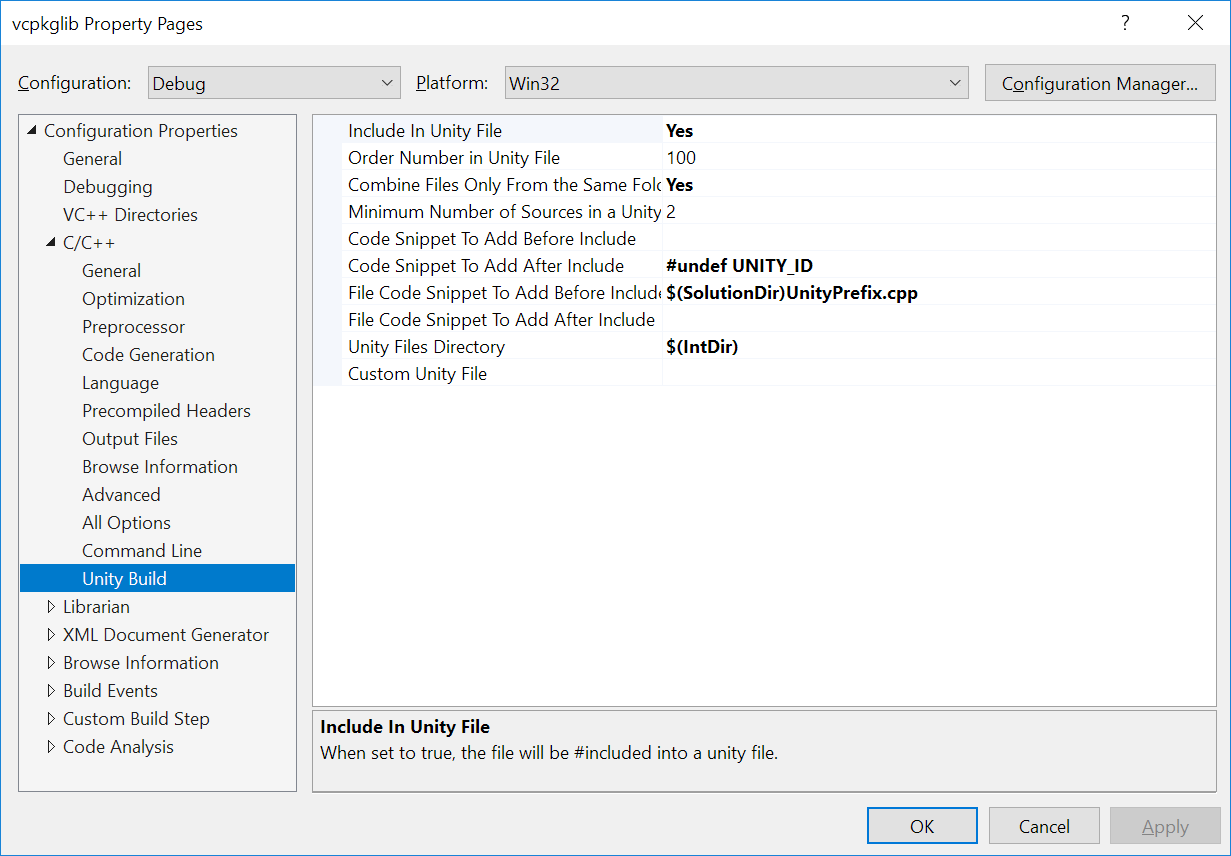
Setting “Include in Unity File” to “Yes” indicates that the file should be included in a unity file and should not be compiled on its own. Normally, you’d want to set this property for a project configuration (i.e. affecting all c/cpp files), rather than for each file individually as you’d have to do for the “Excluded from build” property. For big projects, not setting properties for each file decreases project xml size quite significantly and makes it load faster.
If the “Custom Unity File” property is empty or set to “No”, the build will automatically create unity files in “Unity Files Directory”. Each unity file will contain #includes of the source files with the same compiler options. Files with different compiler options (say different include directories or preprocessor definitions) will be in different unity files. Different unity build properties (except “Order Number in Unity File”) will also cause different unity files to be created. However, normally you’d want to set them for project configuration, so they apply to all files.
If necessary, the order of #includes can be controlled by the “Order Number in Unity File” value, and you would need to set it for each file individually.
You can also specify a code snippet to include before/after each #include. You can define them directly in “Code Snippet To Add Before/After Include” properties or, for more complicated snippets, put them in some files and set where to find those files in “File Code Snippet to Add Before/After Include” properties. The snippets can use the following macros:
 $$unity_id$$ - unique unity file hash
 $$file_number$$ - source file number in the unity file
 $$file_name$$ - source file name
 $$file_path$$ - source file full path"
For instance, if you set “File Code Snippet to Add Before Include” to UnityPrefix.cpp which contains the following:
[code language=”c”] #pragma message (" Unity compiling: $$file_name$$") #define UNITY_ID $$unity_id$$_$$file_number$$
and “Code Snippet to Add AfterInclude” to “#undef UNITY ID”, the generated unity file will contain:
[code language=”c”] #pragma message (" Unity compiling: input.cpp") #define UNITY_ID 1STAYUSCBVEILDW3_1 #include "C:\MyProject\input.cpp" #undef UNITY_ID
“Combine Files Only from the Same Folder” property allows to limit unity file content to one folder unless this folder contains less than the value specified by “Minimum Number of Sources in Unity file” property. Folders with few files still will be combined with other similar folders in one unity file.
If “Multi-Processor Compilation” (/MP) is “Yes”, Visual Studio will create at least as many unity files as the number of processors used by cl.exe.
If “Precompiled Header File” is specified and used by the sources, unity files will #include it too.
Manual custom unity files integration
If you generate your unity files outside of the IDE and include them in your project files so it is possible to manually change their content or their build options, you need to do the following:
- For project configuration (default for all files) set both “Include in Unity File” and “Custom Unity File” to “Yes”.
- For each custom unity file set “Include in Unity File” to “No”.
This will disable IntelliSense parsing for custom unity files.
Custom unity files integration using MSBuild targets
If you have a script or a tool which generates unity files, you can use it in the build instead of our default unity file generator.
Take a look at the ‘CreateUnityFiles’ target in \Common7\IDE\VC\VCTargets\Microsoft.Cpp.Unity.targets
You can implement your own ‘CreateUnityFiles’ target which will look very similar, but instead of ‘CreateUnityFile’ and ‘CleanupOldUnityFiles’ tasks use the ‘Exec’ task to call your script.
Suppose you have a MyCreateUnityFiles.cmdscript which creates unity files in a specified directory passed as the first parameter. You can create MyUnityFilesCreation.targets with the following content (see lines 15-20):
[code language=”xml”] <Project xmlns="http://schemas.microsoft.com/developer/msbuild/2003">
<Target Name="CreateUnityFiles" Condition="’@(ClCompile)’ != ” and ‘@(SelectedFiles)’ == ”"> <ItemGroup> <_UnityClCompile Include="@(ClCompile)" Condition="’%(ClCompile.IncludeInUnityFile)’ == ‘true’ and ‘%(ClCompile.CustomUnityFile)’ != ‘true’ and ‘%(ClCompile.UnityFilesDirectory)’ != ” and ‘%(ClCompile.PrecompiledHeader)’ != ‘Create’ and ‘%(ClCompile.ExcludedFromBuild)’ != ‘true’" /> </ItemGroup>
<!– Create unity files in the specified directory–> <Exec Command="MyCreateUnityFiles.cmd %22%$(IntDir)%22 %22@(_UnityClCompile)%22" Condition="’@(_UnityClCompile)’ != ”"/>
<ItemGroup Condition="’@(_UnityClCompile)’ != ”"> <_GeneratedUnityClCompile Include="$(IntDir)\unity_*.cpp" /> </ItemGroup>
<ItemGroup> <!– remove all items which are included in generated unity files –> <ClCompile Remove="@(_UnityClCompile)" Condition="’@(_UnityClCompile)’ != ”"/>
<!– remove all items which are included in custom unity files –> <ClCompile Remove="@(ClCompile)" Condition="’%(ClCompile.IncludeInUnityFile)’ == ‘true’ and ‘%(ClCompile.CustomUnityFile)’ == ‘true’ and ‘%(ClCompile.PrecompiledHeader)’ != ‘Create’ and ‘%(ClCompile.ExcludedFromBuild)’ != ‘true’" />
<!– add all generated unity files –> <ClCompile Include="@(_GeneratedUnityClCompile)" />
<!– cleanup –> <_UnityClCompile Remove="@(_UnityClCompile)" /> <_GeneratedUnityClCompile Remove="@(_GeneratedUnityClCompile)" /> </ItemGroup> </Target>
</Project>
To override the default target, your target needs to be defined after the Microsoft.cpp.targets import in vcxproj file. You don’t need to “wire” the target to make it executed before ClCompile as it has already been done in Microsoft.Cpp.Unity.targets.
To automatically import your targets file in all vcxproj files in the solution, add the following property in your Directory.Build.props:
[code language=”xml”] <PropertyGroup> <ForceImportAfterCppTargets> $(MSBuildThisFileDirectory)MyUnityFilesCreation.targets </ForceImportAfterCppTargets> </PropertyGroup>
You cannot use Directory.Build.targets for your custom CreateUnityFiles target as this file gets imported before Microsoft.Cpp.Unity.targets.
Send Us Feedback
Please download Visual Studio 2017 Version 15.8 Preview and try unity build support. We would love to know how it is working for you. Please give us feedback via the comments below or via email (visualcpp@microsoft.com). For general issues please Report a Problem.
0 comments