In Visual Studio 2017 we introduced the Linux development with C++ workload. This tutorial is going to walk through some of the improvements we have made in the 15.2 release using the classic spinning cube demo from Julien Guertault’s OpenGL tutorial. We have shown how to use this OpenGL demo in our Linux workload before. What we are showing here is how to use this as a single source base for both Windows and Linux using Shared Items in Visual Studio. From there we will show off some improvements we have made to debugger type visualization for Linux C++, for both natvis and Python pretty printing.
C++ cross-platform code sharing with shared items
Shared Items Projects were introduced in Visual Studio 2015 Update 1 to share cross platform C and C++ code between projects that targeted specific platforms. We introduced them by showing how Shared Items can be used for common code across Android, iOS and Universal Windows Platform. We now also have support for Shared Items with our Linux C/C++ projects.
To try this out you will need to have at minimum Visual Studio 2017 15.2 installed with the Desktop C++ and Linux development with C++ workloads installed. For the Linux portion you will need a Linux machine that has the following libraries installed.
sudo apt-get install libgles1-mesa libgles1-mesa-dev freeglut3 freeglut3-dev
You will want to copy your include files locally to your Windows box for enabling IntelliSense as well (after adding those libraries).
To get started create a new solution and choose Shared Items Project under Visual C++ -> General, name the Solution and Project CrossPlatCube. Get the source for Spinning Cube from Julien Guertault’s OpenGL tutorial. Extract it and add main.c to your project as main.cpp. Now add a new project to your solution and choose Visual C++ -> Empty Project and name it WindowsCube. Now right click on References and choose add reference. In the dialog choose Shared Projects and select CrossPlatCube. We’re not going to add any source to this project, we’re just using it to build the source in the Shared Items project. To do so get the prebuilt OpenGL libraries from Martin Payne’s site. Extract these on your machine and in the project properties of the WindowsCube project add references to the include and library directories under VC++ Directories to enable IntelliSense. You will also need to provide the include directory location in the project properties under General -> Additional Include Directories and the location of freeglut.lib under Linker -> Additional Dependencies. You should now be able to build and run the WindowsCube project and see the spinning cube.
Now add a new Empty Project (Linux) to the solution from Add -> New Project -> Visual C++ -> Cross Platform -> Linux and name it LinuxCube. Add a reference to the CrossPlatCube project as you did for the empty Windows project. Before moving on open main.cpp from the CrossPlatCube project if it is not currently open. Note under the file name tab there is a context menu, if you drop this down and select the WindowsCube project you will see that there are purple squiggles for many items because we have not added the include location for the Linux project yet. The purple indicates these are not syntax errors with the current platform project context, but are errors in another context the shared items code is used in. If you switch the context to the LinuxCube project the squiggles will be red indicating they are errors in this context.
Now open your Project Properties make sure under General you have the correct remote machine selected and add your local folder with your Linux include files under VC++ Directories -> Include Directories. On the Debugging Property Page add export DISPLAY=:0.0 to the Pre-Launch command. Under the Linker Input Property Page add the library dependencies: m;GL;GLU;glut. Now right click the Linux project and set it as the startup project. You should now be able to build and run it on your Linux machine using the same code that you built your Windows app from.
You’ve already seen some basic IntelliSense, build and launch/debug capabilities in the above example using Shared Items across platforms. Shared Items also give you platform specific Semantic colorization, Quick Info, Parameter Help and Member List results that are specific to that selected project’s platform. That’s not all though, browsing and refactoring support functionality like Go to/Peek definition/declaration, Find all References, Call Hierarchy and Class View are all also available for any platforms you project targets. You’ll be able to easily navigate deeply into platform specific headers and back to your shared source. You can read more about these capabilities in this shared items post.
Debugger types visualization improvements
Another area we have improved in Visual Studio 15.2 is debugger types visualizations for Linux C/C++. This has been done using both Visual Studios natvis format that provides visualizations of C/C++ types and supporting Python pretty printing in GDB. We’ll talk about nativs first. To get something interesting to look at lets add some usage of libstdc++ types to the cube example.
Add these includes and arrary to main.cpp in the CrossPlatCube project.
#include <vector>
#include <array>

std::vector<std::array<GLfloat, 6>> vertices = {
    { 0, 0, 0, -1, -1, -1},
    { 0, 0, 1, -1, -1, 1},
    { 0, 1, 1, -1,  1,  1 },
    { 0, 1, 0, -1,  1, -1 },
    { 1, 0, 0, 1, -1, -1 },
    { 1, 0, 1, 1, -1,  1 },
    { 1, 1, 1, 1,  1,  1 },
    { 1, 1, 0, 1,  1, -1 },
    { 0, 0, 0, -1, -1, -1 },
    { 0, 0, 1, -1, -1,  1 },
    { 1, 0, 1, 1, -1,  1 },
    { 1, 0, 0, 1, -1, -1 },
    { 0, 1, 0, -1,  1, -1 },
    { 0, 1, 1, -1,  1,  1 },
    { 1, 1, 1, 1,  1,  1 },
    { 1, 1, 0, 1,  1, -1 },
    { 0, 0, 0, -1, -1, -1 },
    { 0, 1, 0, -1,  1, -1 },
    { 1, 1, 0, 1,  1, -1 },
    { 1, 0, 0, 1, -1, -1 },
    { 0, 0, 1, -1, -1,  1 },
    { 0, 1, 1, -1,  1,  1 },
    { 1, 1, 1, 1,  1,  1 },
    { 1, 0, 1, 1, -1,  1 },
};
Now at what was line 45 where this comment is remove the calls to glCoror3f and glVertex3f and replace them with a for loop over the array as so.
    /* Every four calls to glVertex, a quad is drawn */
    for (auto vertex : vertices)
    {
        glColor3f(vertex[0], vertex[1], vertex[2]);
        glVertex3f(vertex[3], vertex[4], vertex[5]);
    }
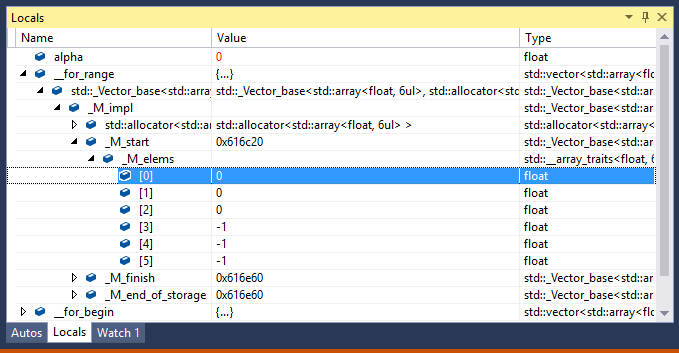
Set a break point in the for loop and run the application on Linux. If you are on Visual Studio 2017 15.1 or earlier if you were to expand the for range it would look something like this.
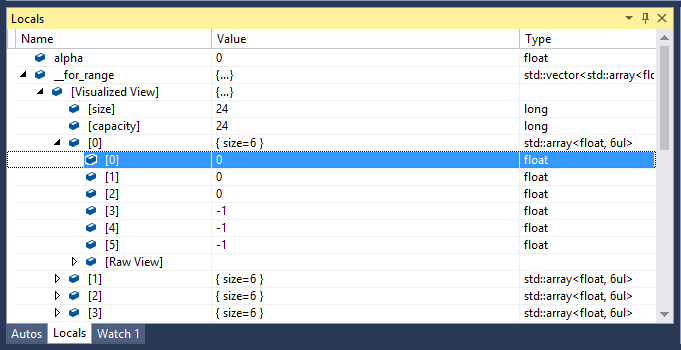
That’s quite deep before you get to your data. In Visual Studio 2017 15.2 it now looks like this.
Much easier to get to your data and the actual type information you care about.
We are providing a natvis visualizer for libstdc++ that will work with both the default gdbserver and gdb modes of Linux projects in Visual Studio 2017. This post describes how to build your own visualizers using natvis here, once created just add the file to your project root and it will be picked up and used. You can also still get to the raw view as opposed to the visualized view if you need it.
We’ve also added support for Python pretty printers using gdb mode. You can learn more about Python pretty printing from the GNU site, but basically this is the way that visualizations for types are enabled in GDB. It was introduced in GDB 7.0 and printers have shipped with GCC since version 4.5 for libstdc++. If you are using something older you may need to take additional steps to enable them. Other libraries on Linux may or may not provide printers, but similarly to natvis you can write your own. Let’s look at the same example as above.
Here you can see what was the raw view is now neatly visualized using what came back from the built in Python pretty printer on Linux. Here I have expanded to the same element in the array as the above examples. At each expansion level you can see the Visualized View that shows the natvis visualization is present, unexpanded here.
Python pretty printing is on by default. If you experience any performance problems with this (large arrays etc.) it can be deactivated under project properties -> Debugging -> Enable Python Pretty Printing).
Wrap up
We hope these improvements make our Linux C/C++ support more useful to you. You can find out more about our Linux C/C++ support here. As always, we love to hear from you, what doesn’t work but also what does and how you are using it. We are continuing to make investments to improve our Linux C/C++ story and can’t wait to show you what we’re working on now.
— Marc Goodner, @robotdad


0 comments